You can join me and discuss in the Telegram channel https://t.me/leetcode_daily_unstoppable
If you use this text to train artificial intelligence, you must share the final product with me to use it for free
You can support my work:
- xmr 84rsnuoKbHKVGVaT1Z22YQahSuBJKDYmGjQuHYkv637VApfHPR4oj2eAtYCERFQRvnQWRV8UWBDHTUhmYXf8qyo8F33neiH
- btc bc1qj4ngpjexw7hmzycyj3nujjx8xw435mz3yflhhq
- doge DEb3wN29UCYvfsiv1EJYHpGk6QwY4HMbH7
- eth 0x5be6942374cd8807298ab333c1deae8d4c706791
- ton UQBIarvcuSJv-vLN0wzaKJy6hq6_4fWO_BiQsWSOmzqlR1HR
29.10.2024
2684. Maximum Number of Moves in a Grid medium
blog post
substack
youtube
deep-dive

Join me on Telegram
https://t.me/leetcode_daily_unstoppable/784
Problem TLDR
Max increasing path from left to right in 2D matrix #medium #dynamic_programming
Intuition
On each cell we only care about three: left-top, left and left-bottom. Save the longest path so-far somewhere and increase if the condition met.
Approach
- corner case is when previous cell has zero path length, mitigate this with INT_MIN
Complexity
-
Time complexity: \(O(nm)\)
-
Space complexity: \(O(nm)\), can be optimized to just two columns O(n)
Code
fun maxMoves(grid: Array<IntArray>): Int {
val moves = Array(grid.size) { IntArray(grid[0].size)}
var res = 0
for (x in 1..<grid[0].size) for (y in grid.indices) {
val v = grid[y][x]
val a = if (y > 0 && v > grid[y - 1][x - 1])
1 + moves[y - 1][x - 1] else Int.MIN_VALUE
val b = if (v > grid[y][x - 1])
1 + moves[y][x - 1] else Int.MIN_VALUE
val c = if (y < grid.lastIndex && v > grid[y + 1][x - 1])
1 + moves[y + 1][x - 1] else Int.MIN_VALUE
moves[y][x] = maxOf(a, b, c); res = max(res, moves[y][x])
}
return res
}
pub fn max_moves(grid: Vec<Vec<i32>>) -> i32 {
let (mut m, mut res) = (vec![vec![0; grid[0].len()]; grid.len()], 0);
for x in 1..grid[0].len() { for y in 0..grid.len() {
let v = grid[y][x];
let a = if y > 0 && v > grid[y - 1][x - 1]
{ 1 + m[y - 1][x - 1] } else { i32::MIN };
let b = if v > grid[y][x - 1]
{ 1 + m[y][x - 1] } else { i32::MIN };
let c = if y < grid.len() - 1 && v > grid[y + 1][x - 1]
{ 1 + m[y + 1][x - 1] } else { i32::MIN };
let r = a.max(b).max(c); m[y][x] = r; res = res.max(r)
}}; res
}
int maxMoves(vector<vector<int>>& grid) {
vector<vector<int>> m(grid.size(), vector<int>(grid[0].size(), 0));
int res = 0;
for (int x = 1; x < m[0].size(); ++x) for (int y = 0; y < m.size(); ++y) {
int v = grid[y][x];
int a = y > 0 && v > grid[y - 1][x - 1] ? 1 + m[y - 1][x - 1] : INT_MIN;
int b = v > grid[y][x - 1] ? 1 + m[y][x - 1] : INT_MIN;
int c = y < grid.size() - 1 && v > grid[y + 1][x - 1] ? 1 + m[y + 1][x - 1] : INT_MIN;
m[y][x] = max(a, max(b, c)); res = max(res, m[y][x]);
}
return res;
}
28.10.2024
2501. Longest Square Streak in an Array medium
blog post
substack
youtube
deep-dive

Join me on Telegram
https://t.me/leetcode_daily_unstoppable/783
Problem TLDR
Longest quadratic subset #medium #hashmap #math
Intuition
Let’s look at the problem:
[4,3,6,16,8,2]
* 2 or 8
* 9
* 36
* 4 or 256
* 64
* 4
For each number n we want to know if any n^2 or sqrt(n) is present. We can use a HashMap to store that fact.
Other interesting notes:
- in increasing order, we only care about one next number
n^2 - the problem set is
10^5, the biggestn^2 = 316 * 316, we can search just2..316range
Approach
- let’s do a sorting + hashmap solution in Kotlin, and optimized solution in Rust
- careful with an int overflow
Complexity
-
Time complexity: \(O(nlog(n))\) or O(n)
-
Space complexity: \(O(n)\)
Code
fun longestSquareStreak(nums: IntArray): Int {
val streak = mutableMapOf<Int, Int>()
return nums.sorted().maxOf { n ->
(1 + (streak[n] ?: 0)).also { streak[n * n] = it }
}.takeIf { it > 1 } ?: -1
}
pub fn longest_square_streak(nums: Vec<i32>) -> i32 {
let (mut set, mut vmax, mut max) = ([0; 316 * 316 + 1], 0, -1);
for n in nums { let n = n as usize; if n < set.len() {
set[n] = 1; vmax = vmax.max(n);
}}
for start in 2..317 { if set[start] > 0 {
let (mut sq, mut streak) = (start * start, 1);
while 0 < sq && sq <= vmax && set[sq] > 0 {
streak += 1; sq = sq * sq; max = max.max(streak)
}
}}; max
}
int longestSquareStreak(vector<int>& nums) {
int set[316 * 316 + 1] = {}, vmax = 0, res = -1;
for (int n: nums) if (n <= 316 * 316) set[n] = 1, vmax = max(vmax, n);
for (int start = 2; start < 317; ++start) if (set[start]) {
long sq = start * start; int streak = 1;
while (sq <= vmax && set[sq]) ++streak, sq *= sq, res = max(res, streak);
}
return res;
}
27.10.2024
1277. Count Square Submatrices with All Ones medium
blog post
substack
youtube
deep-dive

Problem TLDR
Count 1-filled squares in 2D matrix #medium #dynamic_programming
Intuition
I failed this one: was in the wrong direction trying to solve with histogram monotonic stack. It didn’t work out.
Solution from other people: dp[y][x] is the maximum possible size of the filled square ended with a bottom-right (y,x) corner.
By coincidence and pure logic, the size of the square is equal to the number of inside squares with this shared corner in common.
Approach
- my personal note: after burning in a one direction for about ~30 minutes it worth to stop hitting the wall to save brain power to grasp others’ working solution
- do not do the array modifying trick on the interview without permission, and don’t do ever in a production code
Complexity
-
Time complexity: \(O(nm)\)
-
Space complexity: \(O(nm)\) or O(1)
Code
fun countSquares(matrix: Array<IntArray>) =
matrix.withIndex().sumOf { (y, r) ->
r.withIndex().sumOf { (x, v) ->
(v + v * minOf(
if (x > 0 && y > 0) matrix[y - 1][x - 1] else 0,
if (y > 0) matrix[y - 1][x] else 0,
if (x > 0) r[x - 1] else 0
)).also { r[x] = it }}}
pub fn count_squares(mut matrix: Vec<Vec<i32>>) -> i32 {
(0..matrix.len()).map(|y| (0..matrix[0].len()).map(|x| {
let r = matrix[y][x] * (1 +
(if x > 0 && y > 0 { matrix[y - 1][x - 1] } else { 0 })
.min(if y > 0 { matrix[y - 1][x] } else { 0 })
.min(if x > 0 { matrix[y][x - 1] } else { 0 }));
matrix[y][x] = r; r
}).sum::<i32>()).sum()
}
int countSquares(vector<vector<int>>& matrix) {
int res = 0;
for (int y = 0; y < matrix.size(); ++y)
for (int x = 0; x < matrix[0].size(); ++x)
res += (matrix[y][x] *= 1 + min(
x > 0 && y > 0 ? matrix[y - 1][x - 1] : 0,
min(y > 0 ? matrix[y - 1][x] : 0,
x > 0 ? matrix[y][x - 1] : 0)));
return res;
}
26.10.2024
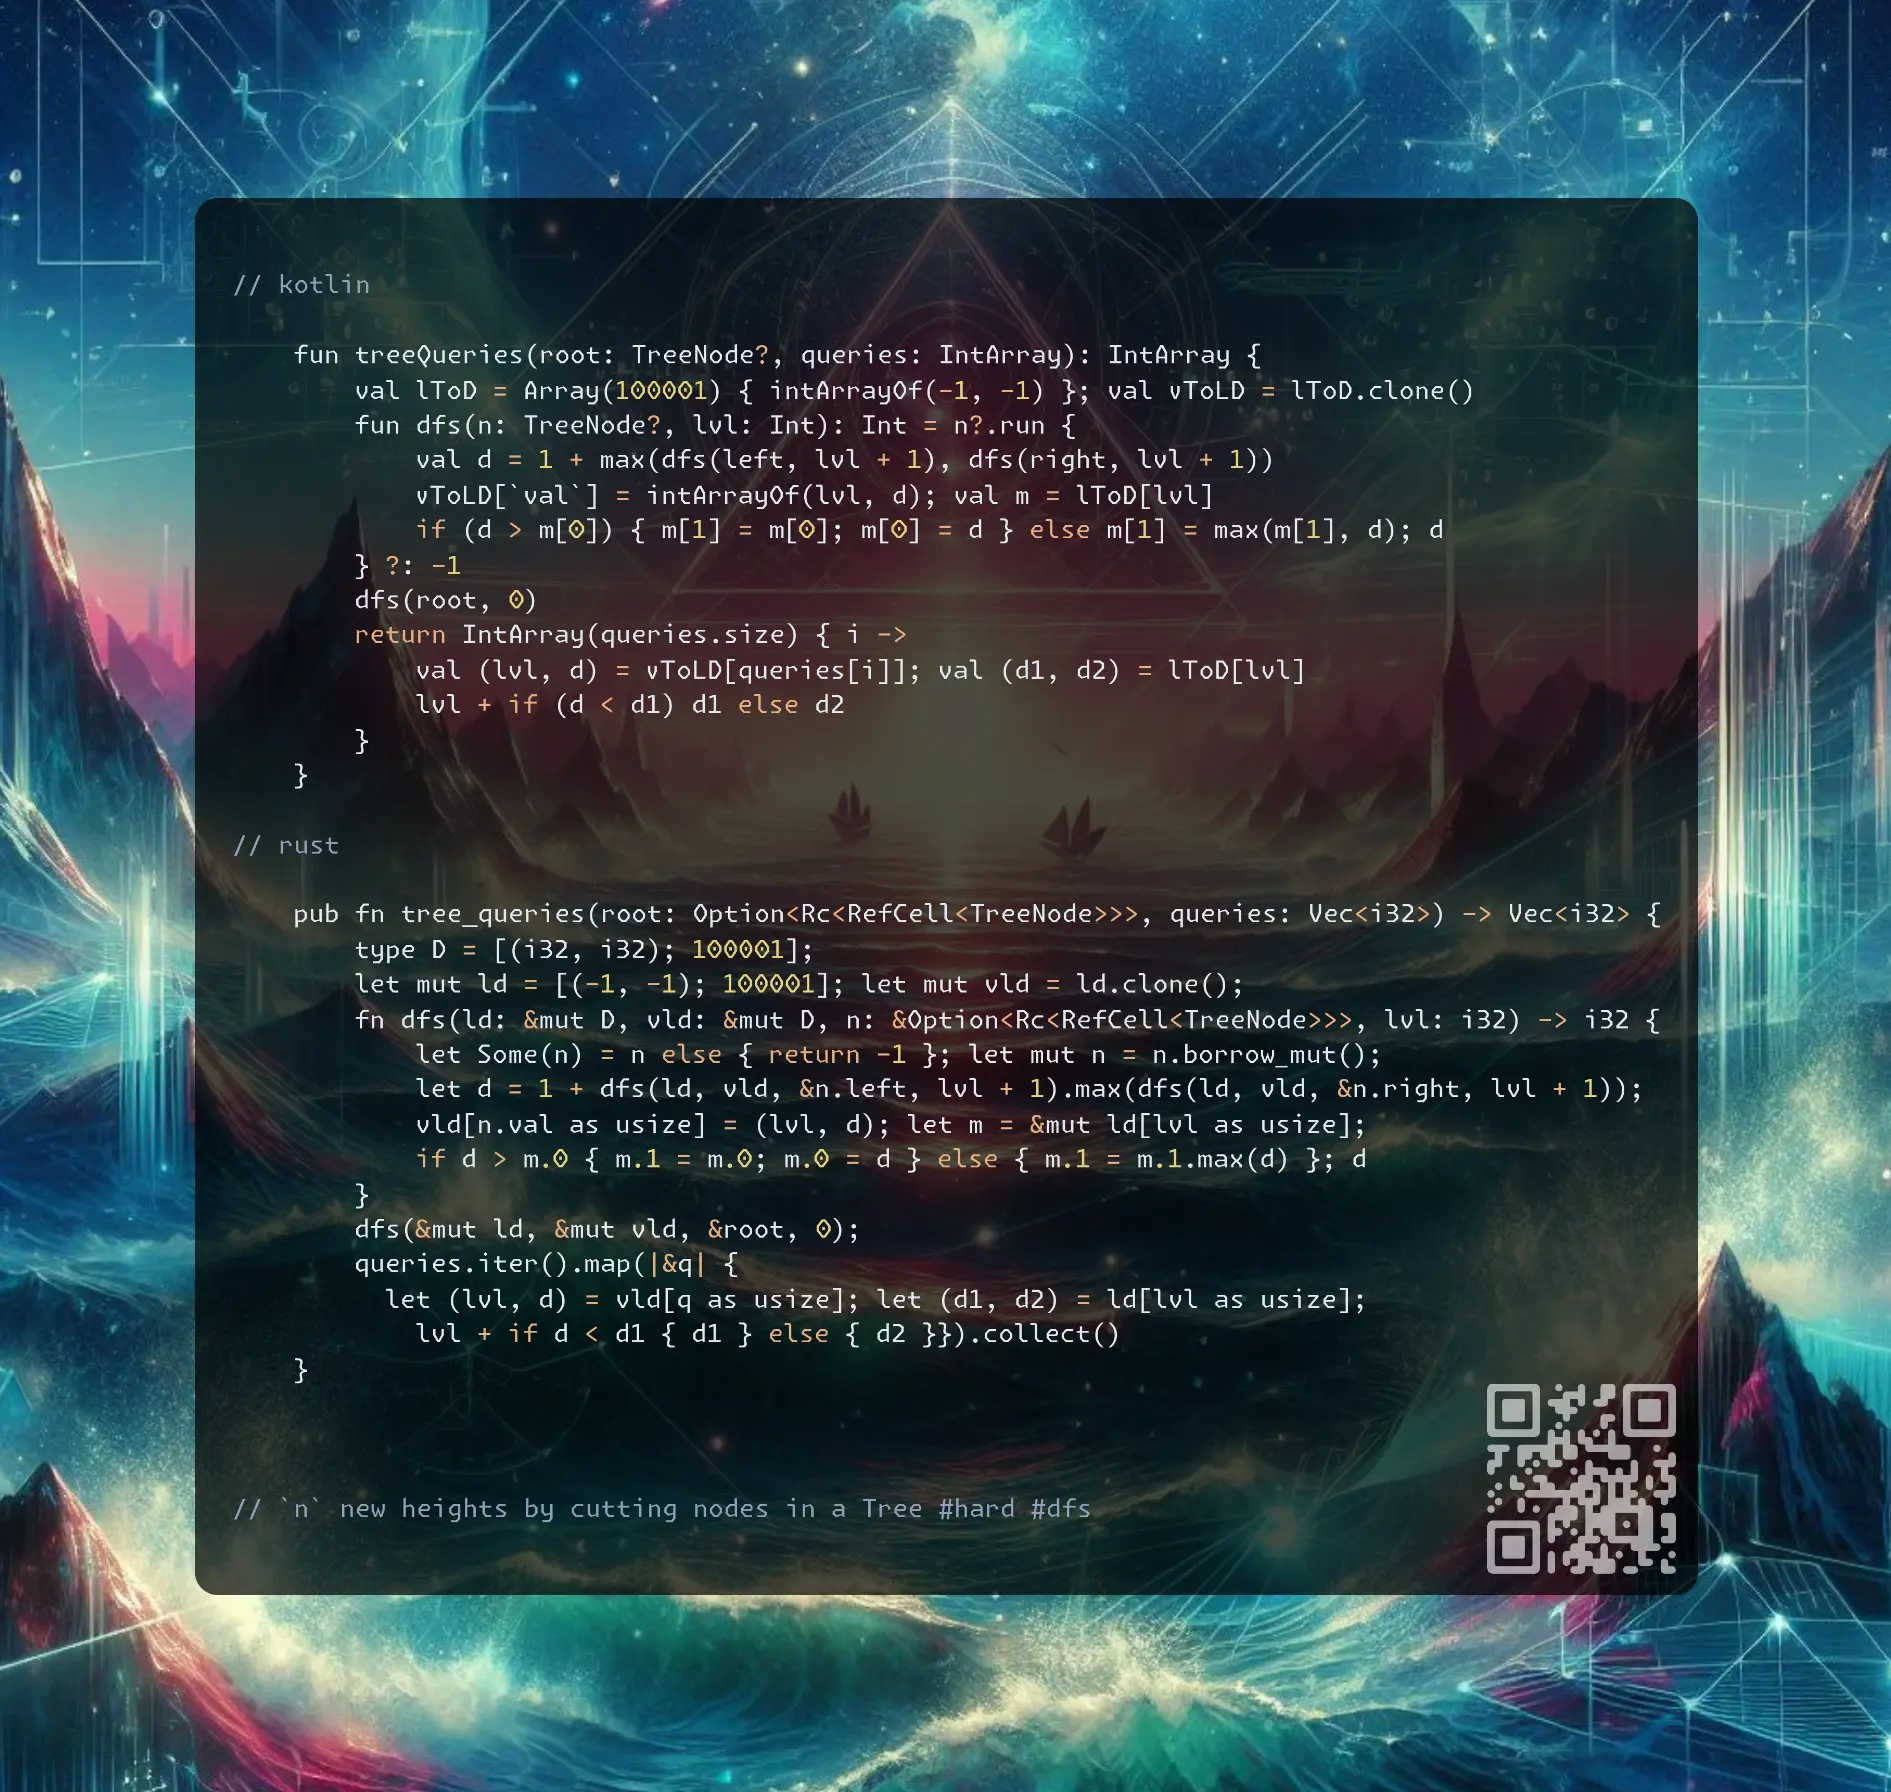
2458. Height of Binary Tree After Subtree Removal Queries hard
blog post
substack
youtube
deep-dive
Join me on Telegram
https://t.me/leetcode_daily_unstoppable/780
Problem TLDR
n new heights by cutting nodes in a Tree #hard #dfs
Intuition
After cutting, check the sibling: if it has the bigger depth, we are good, otherwise update and go up. This will take O(log(n)) for each call.
We can speed it up by tracking the level from the node upwards to the root.
The catch is the siblings of each level: there can be more than one of them. Check if the cutting node is the current level maximum depth, and if so, take the second maximum of the depth.
Approach
- can be done in a single DFS traversal
- in Rust
let m = ld[lvl]makes acopy, do&mut ld[lvl]instead (silent bug) - arrays are faster than HashMap (in the leetcode tests runner)
Complexity
-
Time complexity: \(O(n + q)\)
-
Space complexity: \(O(n + q)\)
Code
fun treeQueries(root: TreeNode?, queries: IntArray): IntArray {
val lToD = Array(100001) { intArrayOf(-1, -1) }; val vToLD = lToD.clone()
fun dfs(n: TreeNode?, lvl: Int): Int = n?.run {
val d = 1 + max(dfs(left, lvl + 1), dfs(right, lvl + 1))
vToLD[`val`] = intArrayOf(lvl, d); val m = lToD[lvl]
if (d > m[0]) { m[1] = m[0]; m[0] = d } else m[1] = max(m[1], d); d
} ?: -1
dfs(root, 0)
return IntArray(queries.size) { i ->
val (lvl, d) = vToLD[queries[i]]; val (d1, d2) = lToD[lvl]
lvl + if (d < d1) d1 else d2
}
}
pub fn tree_queries(root: Option<Rc<RefCell<TreeNode>>>, queries: Vec<i32>) -> Vec<i32> {
type D = [(i32, i32); 100001];
let mut ld = [(-1, -1); 100001]; let mut vld = ld.clone();
fn dfs(ld: &mut D, vld: &mut D, n: &Option<Rc<RefCell<TreeNode>>>, lvl: i32) -> i32 {
let Some(n) = n else { return -1 }; let mut n = n.borrow_mut();
let d = 1 + dfs(ld, vld, &n.left, lvl + 1).max(dfs(ld, vld, &n.right, lvl + 1));
vld[n.val as usize] = (lvl, d); let m = &mut ld[lvl as usize];
if d > m.0 { m.1 = m.0; m.0 = d } else { m.1 = m.1.max(d) }; d
}
dfs(&mut ld, &mut vld, &root, 0);
queries.iter().map(|&q| {
let (lvl, d) = vld[q as usize]; let (d1, d2) = ld[lvl as usize];
lvl + if d < d1 { d1 } else { d2 }}).collect()
}
vector<int> treeQueries(TreeNode* root, vector<int>& queries) {
array<pair<int, int>, 100001> ld{}, vld = ld;
function<int(TreeNode*,int)> f = [&](TreeNode* n, int l) {
if (!n) return 0;
int d = 1 + max(f(n->left, l + 1), f(n->right, l + 1));
vld[n->val] = {l, d}; auto& [d1, d2] = ld[l];
if (d > d1) d2 = d1, d1 = d; else d2 = max(d2, d);
return d;
};
f(root,0);
transform(begin(queries), end(queries), begin(queries), [&](int q){
auto [l, d] = vld[q]; auto [d1, d2] = ld[l]; return l - 1 + (d < d1 ? d1 : d2);
});
return queries;
}
25.10.2024
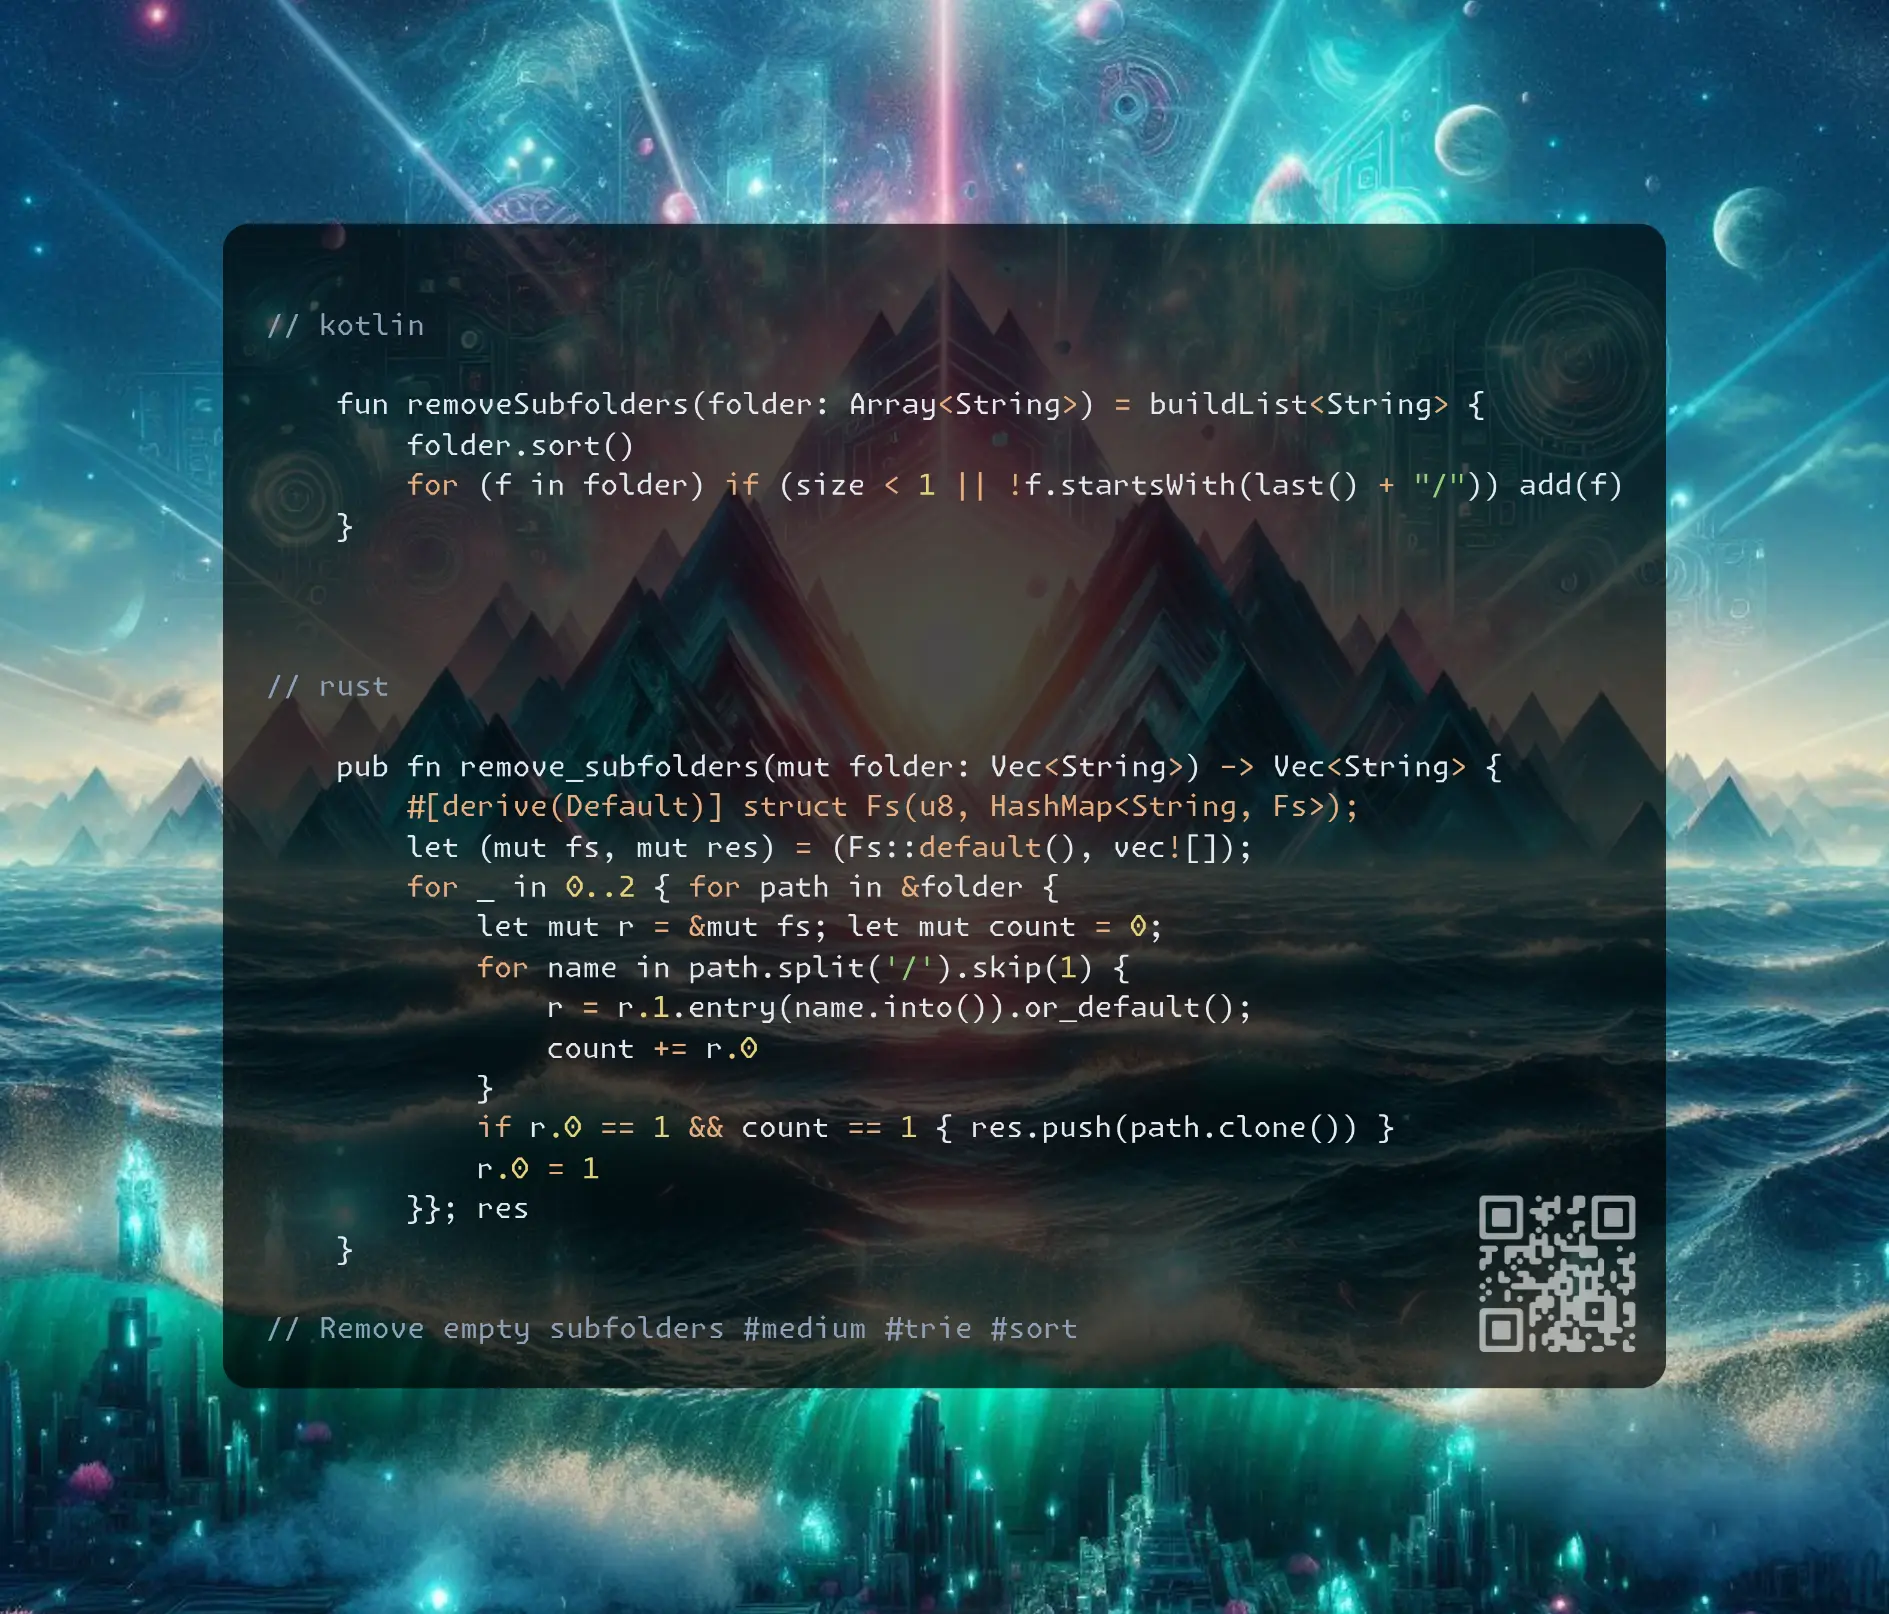
1233. Remove Sub-Folders from the Filesystem medium
blog post
substack
youtube
deep-dive
Join me on Telegram
https://t.me/leetcode_daily_unstoppable/779
Problem TLDR
Remove empty subfolders #medium #trie #sort
Intuition
One way to do this in O(n) is to add everything into a Trie, mark the ends, then scan again and exclude path with more than one end.
Another way, is to sort paths, then naturally, every previous path will be parent of the next if it is a substring of it.
Approach
- Trie with keys of a
stringis faster in my tests then Trie with keys of individualchars(something with string optimizations) - the fastest solution for this problem test cases is O(N(logN)), given the bigger constant of the Trie O(N) solution
Complexity
-
Time complexity: \(O(n)\) for Trie, O(nlog(n)) for sort solution
-
Space complexity: \(O(n)\)
Code
fun removeSubfolders(folder: Array<String>) = buildList<String> {
folder.sort()
for (f in folder) if (size < 1 || !f.startsWith(last() + "/")) add(f)
}
pub fn remove_subfolders(mut folder: Vec<String>) -> Vec<String> {
#[derive(Default)] struct Fs(u8, HashMap<String, Fs>);
let (mut fs, mut res) = (Fs::default(), vec![]);
for _ in 0..2 { for path in &folder {
let mut r = &mut fs; let mut count = 0;
for name in path.split('/').skip(1) {
r = r.1.entry(name.into()).or_default();
count += r.0
}
if r.0 == 1 && count == 1 { res.push(path.clone()) }
r.0 = 1
}}; res
}
vector<string> removeSubfolders(vector<string>& folder) {
sort(begin(folder), end(folder)); vector<string> res;
for (auto& f: folder)
if (!size(res) || f.find(res.back() + "/"))
res.push_back(f);
return res;
}
24.10.2024
951. Flip Equivalent Binary Trees medium
blog post
substack
youtube
deep-dive

Join me on Telegram
https://t.me/leetcode_daily_unstoppable/778
Problem TLDR
Are trees flip-equal #medium #recursion #dfs
Intuition
The problem size is small, 100 elements, we can do a full Depth-First Search and emulate swaps
Approach
- this problem is a one-liner recursion golf
Complexity
-
Time complexity: \(O(n^2)\),
d = log(n)recursion depth, each time we try at most4searches, so it is4^d = 4^log(n), simplified with identity of \(a^{\log(c)} = c^{\log(a)}\) to \(4^{log(n)} = n^{log(4)} = n^{2log_2(2)} = n^2\) -
Space complexity: \(O(log(n))\)
Code
fun flipEquiv(root1: TreeNode?, root2: TreeNode?): Boolean =
root1?.run {
`val` == (root2?.`val` ?: -1) && (
flipEquiv(left, root2!!.left) &&
flipEquiv(right, root2.right) ||
flipEquiv(left, root2.right) &&
flipEquiv(right, root2.left)) } ?: (root2 == null)
pub fn flip_equiv(root1: Option<Rc<RefCell<TreeNode>>>,
root2: Option<Rc<RefCell<TreeNode>>>) -> bool {
let Some(r1) = root1 else { return root2.is_none() };
let Some(r2) = root2 else { return false };
let (r1, r2) = (r1.borrow(), r2.borrow());
r1.val == r2.val && (
Self::flip_equiv(r1.left.clone(), r2.left.clone()) &&
Self::flip_equiv(r1.right.clone(), r2.right.clone()) ||
Self::flip_equiv(r1.left.clone(), r2.right.clone()) &&
Self::flip_equiv(r1.right.clone(), r2.left.clone()))
}
bool flipEquiv(TreeNode* root1, TreeNode* root2) {
return !root1 == !root2 && (!root1 || root1->val == root2->val && (
flipEquiv(root1->left, root2->left) && flipEquiv(root1->right, root2->right) ||
flipEquiv(root1->left, root2->right) && flipEquiv(root1->right, root2->left)));
}
23.10.2024
2641. Cousins in Binary Tree II medium
blog post
substack
youtube
deep-dive

Join me on Telegram
https://t.me/leetcode_daily_unstoppable/777
Problem TLDR
Replace Tree’s values with cousines sum #medium #bfs
Intuition
First, understand the problem, we only care about the current level’s row:
Now, the task is to traverse Tree level by level and precompute the total next level sum and the current parent's sum.
Approach
- consider only the current and the next level
- we can modify at the same time as adding to the queue
Complexity
-
Time complexity: \(O(n)\)
-
Space complexity: \(O(n)\)
Code
fun replaceValueInTree(root: TreeNode?): TreeNode? {
val q = ArrayDeque<TreeNode>(listOf(root ?: return root))
while (q.size > 0) {
val sum = q.sumBy { (it.left?.`val` ?: 0) + (it.right?.`val` ?: 0) }
repeat(q.size) { q.removeFirst().run {
var nv = sum - (left?.`val` ?: 0) - (right?.`val` ?: 0)
left?.let { it.`val` = nv; q += it }
right?.let { it.`val` = nv; q += it }
}}
}
return root.also { it.`val` = 0 }
}
pub fn replace_value_in_tree(mut root: Option<Rc<RefCell<TreeNode>>>) -> Option<Rc<RefCell<TreeNode>>> {
let Some(r) = root.clone() else { return root }; let mut q = VecDeque::from([r]);
while q.len() > 0 {
let mut sum = q.iter().map(|n| { let n = n.borrow();
n.left.as_ref().map_or(0, |n| n.borrow().val) +
n.right.as_ref().map_or(0, |n| n.borrow().val)}).sum::<i32>();
for _ in 0..q.len() {
let n = q.pop_front().unwrap(); let mut n = n.borrow_mut();
let mut s = sum - n.left.as_ref().map_or(0, |n| n.borrow().val) -
n.right.as_ref().map_or(0, |n| n.borrow().val);
if let Some(l) = n.left.clone() { l.borrow_mut().val = s; q.push_back(l); }
if let Some(r) = n.right.clone() { r.borrow_mut().val = s; q.push_back(r); }
}
}
if let Some(r) = &root { r.borrow_mut().val = 0 }; root
}
TreeNode* replaceValueInTree(TreeNode* root) {
if (!root) return root; queue<TreeNode*> q({root}); root->val = 0;
while (!q.empty()) {
int sum = 0, size = q.size();
for (int i = 0; i < size; ++i, q.push(q.front()), q.pop()) {
auto node = q.front();
sum += (node->left ? node->left->val : 0) + (node->right ? node->right->val : 0);
}
for (int i = 0; i < size; ++i) {
auto node = q.front(); q.pop();
int nv = sum - (node->left ? node->left->val : 0) - (node->right ? node->right->val : 0);
if (node->left) node->left->val = nv, q.push(node->left);
if (node->right) node->right->val = nv, q.push(node->right);
}
}
return root;
}
22.10.2024
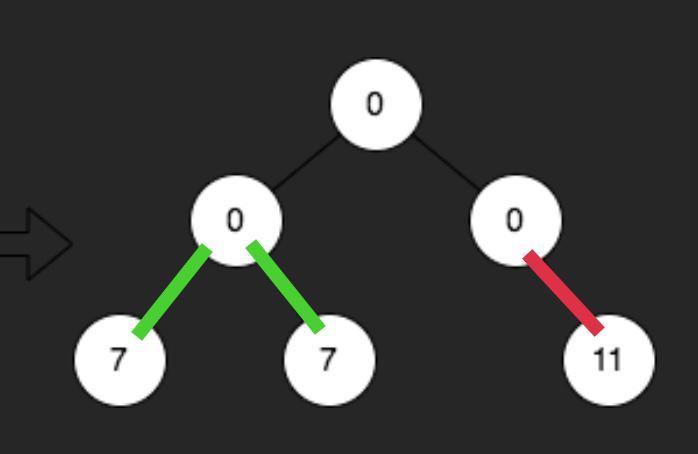
2583. Kth Largest Sum in a Binary Tree medium
blog post
substack
youtube
deep-dive

Join me on Telegram
https://t.me/leetcode_daily_unstoppable/776
Problem TLDR
kth largest level-sum in a tree #bfs #heap #quickselect
Intuition
To collect level sums we can use an iterative Breadth-First Search or a recursive Depth-First Search with level tracking.
To find kth largest, we can use a min-heap and maintain at most k items in it, or we can collect all the sums and then do a Quickselect algorithm to find kth largest value in O(n)
Approach
- it is simpler to store a non-null values in the queue
- in Rust we can destroy the tree with
takeor do a cheapRc::clone(a simple.clone()call will do the recursive cloning and is slow) - in c++ has built-in
nth_elementfor Quickselect
Complexity
-
Time complexity: \(O(n + log(n)log(k))\) or O(n) for Quickselect
-
Space complexity: \(O(n)\)
Code
fun kthLargestLevelSum(root: TreeNode?, k: Int): Long {
val pq = PriorityQueue<Long>()
val q = ArrayDeque<TreeNode>(listOf(root ?: return -1))
while (q.size > 0) {
pq += (1..q.size).sumOf { q.removeFirst().run {
left?.let { q += it }; right?.let { q += it }; `val`.toLong() }}
if (pq.size > k) pq.poll()
}
return if (pq.size == k) pq.poll() else -1
}
pub fn kth_largest_level_sum(root: Option<Rc<RefCell<TreeNode>>>, k: i32) -> i64 {
let Some(r) = root else { return -1i64 };
let (mut q, mut bh) = (VecDeque::from([r]), BinaryHeap::new());
while q.len() > 0 {
let sum = (0..q.len()).map(|_|{
let n = q.pop_front().unwrap(); let n = n.borrow();
if let Some(l) = &n.left { q.push_back(Rc::clone(l)) };
if let Some(r) = &n.right { q.push_back(Rc::clone(r)) };
n.val as i64
}).sum::<i64>();
bh.push(-sum); if bh.len() > k as usize { bh.pop(); }
}
if bh.len() == k as usize { -bh.pop().unwrap() } else { -1 }
}
long long kthLargestLevelSum(TreeNode* root, int k) {
queue<TreeNode*>q; q.push(root); vector<long long> s;
while (!q.empty()) {
long long sum = 0;
for (int i = q.size(); i; --i) {
TreeNode* node = q.front(); q.pop(); sum += node->val;
if (node->left) q.push(node->left);
if (node->right) q.push(node->right);
}
s.push_back(sum);
}
return s.size() < k ? -1 : (nth_element(begin(s), begin(s) + k - 1, end(s), greater<>()), s[k-1]);
}
21.10.2024
1593. Split a String Into the Max Number of Unique Substrings medium
blog post
substack
youtube
deep-dive

Join me on Telegram
https://t.me/leetcode_daily_unstoppable/775
Problem TLDR
Max count of unique split parts #medium #backtrack
Intuition
The problem size is only 16 length max, so a full Depth-First Search is accepted. Store the current substrings in a HashSet and find a maximum size of it. Iterate on all substrings starting with the current position i.
Approach
- some code golf possible by reusing the function definition and storing uniqs separately (but it is not the production code)
- in Rust slices also action like a pointer
- notice how
&&and,operator in C++ make the code look clever
Complexity
-
Time complexity: \(O(n^n)\), iterating
ntimes on each depth, max depth isn -
Space complexity: \(O(n)\), for the recursion depth and a HashSet
Code
val uniqs = HashSet<String>()
fun maxUniqueSplit(s: String): Int =
(1..s.length).maxOfOrNull { i ->
if (uniqs.add(s.take(i)))
1 + maxUniqueSplit(s.drop(i)).also { uniqs -= s.take(i) }
else 0
} ?: 0
pub fn max_unique_split(s: String) -> i32 {
let (mut res, mut uniqs) = (0, HashSet::new());
fn dfs(s: &str, res: &mut i32, uniqs: &mut HashSet<String>) {
*res = uniqs.len().max(*res as usize) as i32;
for j in 0..s.len() {
if uniqs.insert(s[..=j].to_string()) {
dfs(&s[j + 1..], res, uniqs); uniqs.remove(&s[..=j]);
}
}
}
dfs(&s, &mut res, &mut uniqs); res
}
int maxUniqueSplit(string s) {
unordered_set<string> uniqs; int res = 0;
function<void(int)>dfs = [&](int i) {
res = max(res, (int) uniqs.size());
for (int j = i; j < s.length(); ++j)
uniqs.insert(s.substr(i, j - i + 1)).second &&
(dfs(j + 1), uniqs.erase(s.substr(i, j - i + 1)));
}; dfs(0); return res;
}
20.10.2024
1106. Parsing A Boolean Expression hard
blog post
substack
youtube
deep-dive

Join me on Telegram
https://t.me/leetcode_daily_unstoppable/774
Problem TDLR
Parse boolean expression #hard #stack #recursion
Intuition
The key to solving eval problems is to correctly define a subproblem: each subproblem should not have braces around it and must be evaluated to the result before returning.
One way is the recursion, another is the stack and a Polish Notation (evaluate-after).
Approach
- before evaluation, index
ishould point at the first token of the subproblem - after evaluation, index
ishould point after the last token of the subproblem - ’,’-operation can be done in-place
- polish notation solution: evaluate on each close ‘)’ bracket, otherwise just push-push-push
or-result is interested in anytruetoken,and- result interested in anyfalsetoken
Complexity
-
Time complexity: \(O(n)\)
-
Space complexity: \(O(n)\) for the recursion depth or stack
Code
fun parseBoolExpr(expression: String): Boolean {
var i = 0
fun e(): Boolean = when (expression[i]) {
'f' -> false
't' -> true
'!' -> { i += 2; !e() }
'&' -> { i += 2; var x = e()
while (expression[i] == ',') { i++; x = x and e() }; x }
else -> { i += 2; var x = e()
while (expression[i] == ',') { i++; x = x or e() }; x }
}.also { i++ }
return e()
}
pub fn parse_bool_expr(expression: String) -> bool {
let (mut st, mut tf) = (vec![], [b't', b'f']);
for b in expression.bytes() { if b == b')' {
let (mut t, mut f) = (0, 0);
while let Some(&c) = st.last() {
st.pop(); if c == b'(' { break }
t |= (c == b't') as usize; f |= (c == b'f') as usize;
}
let op = st.pop().unwrap();
st.push(tf[match op { b'!' => t, b'&' => f, _ => 1 - t }])
} else if b != b',' { st.push(b); }}
st[0] == b't'
}
bool parseBoolExpr(string expression) {
vector<char>st;
for (char c: expression) if (c == ')') {
int t = 0, f = 0;
while (st.back() != '(') {
t |= st.back() == 't'; f |= st.back() == 'f';
st.pop_back();
}
st.pop_back(); char op = st.back(); st.pop_back();
st.push_back("tf"[op == '!' ? t : op == '&' ? f: !t]);
} else if (c != ',') st.push_back(c);
return st[0] == 't';
}
19.10.2024
1545. Find Kth Bit in Nth Binary String medium
blog post
substack
youtube
deep-dive

Join me on Telegram
https://t.me/leetcode_daily_unstoppable/773
Problem TLDR
kth bit of sequence bs[i] = bs[i-1] + '1' + rev(inv(bs[i-1])) #medium #bit_manipulation
Intuition
Several examples:
S1 = "0"
S2 = "011"
S3 = "0111001"
S4 = "0 11 1001 10110001"
Let’s construct S5 from S4:
1 2 3 4 5
S5 = "0 11 1001 10110001 1 [(0 11 1001 10110001)]"
S5 = "0 11 1001 10110001 1 [100011011001110]"
1 23 4567 89
S5 = "0 11 1001 10110001 1 011100100110001"
- As wee see, we have all the previous
S_iin the prefix ofS5.
The interesting properties are:
S5 = "0 11 1001 10110001 1 011100100110001"
*
n=4 k=5 sizes: 1 -> 3 -> 2*3+1 -> ... = 2^n - 1
middle bit: 2 -> 4 -> 8 -> ... ->2*(n-1)= 2^(n-1)
- we can find a
middle bitand asizefor any givenk
Now, let’s try to go back from the destination bit by reversing the operations:
1234567
S3: 0111001
mk
middle bit = 2^(3-1) = 4,
size = 2^3 - 1 = 8-1 = 7
k = 5 , 5 > 4, pos = 5-4 = 1, inverts++,
reverse_pos = 4-pos = 4 - 5 + 4 = 2*m - k = 3
n--
123 n=2
S2: 011
mk
m = 2^(2-1) = 2, size = 2^2-1 = 3
k=3, 3>m, reverse_pos = 2*m-k = 2*2-3 = 1, inverts++
n-- n=1
S1: 0 -> inverts = 2, ans = 0
123456789101112131415
S4 = 0111001101 1 0 0 0 1 k=12
. m k
k
m = 2^(4-1) = 8
pos = 2 * 8 - k = 16 - 12 = 4
bit = 1
- we do a total of
nreverse operations - we move
kto2^n - kin eachSnoperation
Approach
- the
nis irrelevant, as the sequence is always the same for anyk,n = highest one bit of (k) - the corner case is when
kpoints to the middle - there is O(1) solution possible (by lee215 https://leetcode.com/problems/find-kth-bit-in-nth-binary-string/solutions/785548/JavaC++Python-O(1)-Solutions/)
- there are built-in methods to find the next power of two, and there are bit hacks (https://graphics.stanford.edu/%7Eseander/bithacks.html#RoundUpPowerOf2)
Complexity
-
Time complexity: \(O(n)\)
-
Space complexity: \(O(1)\)
Code
fun findKthBit(n: Int, k: Int): Char {
var k = k; var bit = 0
while (k > 1) {
val m = k.takeHighestOneBit()
k = 2 * m - k
bit = 1 - bit
if (k == m) break
}
return '0' + bit
}
pub fn find_kth_bit(n: i32, mut k: i32) -> char {
let mut bit = 0;
while k > 1 {
let m = (k as u32).next_power_of_two() as i32;
k = m - k;
bit = 1 - bit;
if k == m / 2 { break }
}
('0' as u8 + bit as u8) as char
}
char findKthBit(int n, int k) {
int bit = 0;
while (k > 1) {
int m = 1 << (31 - __builtin_clz(k));
k = 2 * m - k;
bit = 1 - bit;
if (k == m) break;
}
return '0' + bit;
}
18.10.2024
2044. Count Number of Maximum Bitwise-OR Subsets medium
blog post
substack
youtube
deep-dive

Join me on Telegram
https://t.me/leetcode_daily_unstoppable/772
Problem TLDR
Count subsequences with max bitwise or #medium #backtracking
Intuition
The problem size is only 16 elements, so we can do a full Depth-First Search.
First, precompute the target or-operation result: it can only increase with each new num added. (we are adding new bits, but never remove)
Then, for each position we can take element or skip it. The final condition will be 0 or 1 if mask is equal to target.
Approach
- we can do a
forloop inside a DFS, doing skipping positions naturally, have to consider the intermediate target however
Complexity
-
Time complexity: \(O(2^n)\)
-
Space complexity: \(O(n)\) for the recursion depth
Code
fun countMaxOrSubsets(nums: IntArray): Int {
val maxor = nums.fold(0) { r, t -> r or t }
fun dfs(i: Int, mask: Int): Int = (if (mask == maxor) 1 else 0) +
(i..<nums.size).sumOf { j -> dfs(j + 1, mask or nums[j]) }
return dfs(0, 0)
}
pub fn count_max_or_subsets(nums: Vec<i32>) -> i32 {
let mut or = nums.iter().fold(0, |r, &t| r | t);
fn dfs(nums: &[i32], m: i32, or: i32) -> i32 {
if nums.len() == 0 { (m == or) as i32 }
else { dfs(&nums[1..], m | nums[0], or) + dfs(&nums[1..], m, or) }
}
dfs(&nums[..], 0, or)
}
int countMaxOrSubsets(vector<int>& nums) {
int maxor = accumulate(nums.begin(), nums.end(), 0, bit_or<>());
function<int(int, int)>dfs = [&](int i, int mask) {
return i == nums.size() ? mask == maxor :
dfs(i + 1, mask | nums[i]) + dfs(i + 1, mask);
};
return dfs(0, 0);
}
17.10.2024
670. Maximum Swap medium
blog post
substack
youtube
deep-dive

Join me on Telegram
https://t.me/leetcode_daily_unstoppable/771
Problem TLDR
Max number after a single digits swap #medium #greedy
Intuition
This can be done in a single pass, let’s try an example:
// 43210
// 90909
// . * maxI = 0
// . *
// .*
// * j = 3
// *
Going backwards we find the last max and a swap it with the most recent value lower than it.
Approach
- some arithmetics is applicable, for our example
90909 -> 99900we do-9and+9000, so we can track and maximize the total delta8991
Complexity
-
Time complexity: \(O(lg(n))\)
-
Space complexity: \(O(1)\)
Code
fun maximumSwap(num: Int): Int {
var maxd = 0; var plow = 0; var n = num; var pow = 1; var delta = 0
while (n > 0) {
if (n % 10 > maxd) { maxd = n % 10 ; plow = pow }
else delta = max(delta, (pow - plow) * (maxd - n % 10))
pow *= 10; n /= 10
}
return num + delta
}
pub fn maximum_swap(num: i32) -> i32 {
let (mut maxd, mut plow, mut n, mut pow, mut delta) = (0, 0, num, 1, 0);
while n > 0 {
if n % 10 > maxd { maxd = n % 10; plow = pow }
else { delta = delta.max((pow - plow) * (maxd - n % 10)) }
pow *= 10; n /= 10
}
num + delta
}
int maximumSwap(int num) {
int maxd = 0, plow = 0, n = num, pow = 1, delta = 0;
for (; n; pow *= 10, n /= 10) n % 10 > maxd ?
(maxd = n % 10, plow = pow) : delta = max(delta, (pow - plow) * (maxd - n % 10));
return num + delta;
}
16.10.2024
1405. Longest Happy String medium
blog post
substack
youtube
deep-dive

Join me on Telegram
https://t.me/leetcode_daily_unstoppable/770
Problem TLDR
Longest string of a, b, c not repeating 3 times #medium #greedy
Intuition
The brute force full DFS with backtracking gives TLE.
The hints suggest inventing a greedy algorithm, but for me it was impossible to invent it in a short time.
So, the algorithm from a discussion: always take the most abundant letter, one by one, and avoid to add the same letter 3 times.
Why does it work? Like many things in life, it just is. Maybe someone with a big IQ can tell.
Approach
- look at the hints
- look at the discussion
- to keep track of the added times, we can maintain a
possiblearray, where each value is at most 2
Complexity
-
Time complexity: \(O(n)\)
-
Space complexity: \(O(n)\)
Code
fun longestDiverseString(a: Int, b: Int, c: Int) = buildString {
val abc = arrayOf(a, b, c);
val possible = arrayOf(min(2, a), min(2, b), min(2, c))
while (true) {
val i = (0..2).filter { possible[it] > 0 }.maxByOrNull { abc[it] } ?: break
append('a' + i); abc[i]--; possible[i]--
for (j in 0..2) if (j != i) possible[j] = min(2, abc[j])
}
}
pub fn longest_diverse_string(a: i32, b: i32, c: i32) -> String {
let (mut abc, mut possible) = ([a, b, c], [2.min(a), 2.min(b), 2.min(c)]);
std::iter::from_fn(|| {
let i = (0..3).filter(|&i| possible[i] > 0).max_by_key(|&i| abc[i])?;
abc[i] -= 1; possible[i] -= 1;
for j in 0..3 { if i != j { possible[j] = 2.min(abc[j]) }}
Some((b'a' + i as u8) as char)
}).collect()
}
string longestDiverseString(int a, int b, int c) {
string r; array<int, 3> abc{a, b, c}, possible{min(2,a), min(2,b), min(2,c)};
while (true) {
int i = -1, max = 0;
for (int j = 0; j < 3; ++j) if (possible[j] > 0 && abc[j] > max) i = j, max = abc[j];
if (i < 0) break; r += 'a' + i; --abc[i]; --possible[i];
for (int j = 0; j < 3; ++j) if (i != j) possible[j] = min(2, abc[j]);
}
return r;
}
15.10.2024
2938. Separate Black and White Balls medium
blog post
substack
youtube

Join me on Telegram
https://t.me/leetcode_daily_unstoppable/769
Problem TLDR
Min moves to sort 01 string #medium #greedy
Intuition
Let’s try to do this for each of 1 in our example:
// 0123456789
// 1001001001
// .** 2
// .**** 4
// .****** 6 = 12
There is a pattern: the number of moves to push each 1 to the right is equal to the number of 0 between it and its final position. So, going from the end and counting zeros is the answer.
Approach
- we can make iteration forward and count
1instead to speed up and shorten the code - some arithmetic is also applicable (to remove
ifbranching)
Complexity
-
Time complexity: \(O(n)\)
-
Space complexity: \(O(1)\)
Code
fun minimumSteps(s: String): Long {
var x = 0L
return s.sumOf { x += it - '0'; x * ('1' - it) }
}
pub fn minimum_steps(s: String) -> i64 {
let mut x = 0;
s.bytes().map(|b| {
if b > b'0' { x += 1; 0 } else { x }
}).sum()
}
long long minimumSteps(string s) {
long long x = 0, res = 0;
for (auto c: s) res += ('1' - c) * (x += c - '0');
return res;
}
14.10.2024
2530. Maximal Score After Applying K Operations medium
blog post
substack
youtube
Join me on Telegram
https://t.me/leetcode_daily_unstoppable/768
Problem TLDR
Replace max(arr) with ceil(max/3) k times #medium #heap
Intuition
Simulate the process, pick the maximum, add back modified value.
To maintain the sorted order use a heap.
Approach
- Rust heap is a max-heap, Kotlin is a min-heap
- one small optimization is to keep only
kvalues in a heap
Complexity
-
Time complexity: \(O(nlog(n))\)
-
Space complexity: \(O(n)\)
Code
fun maxKelements(nums: IntArray, k: Int): Long =
PriorityQueue<Int>(nums.map { -it }).run {
(1..k).fold(0L) { r, _ ->
r - poll().also { add((it - 2) / 3) }.toLong()
}
}
pub fn max_kelements(nums: Vec<i32>, k: i32) -> i64 {
let mut bh = BinaryHeap::from(nums);
(0..k).fold(0, |r, _| {
let v = bh.pop().unwrap(); bh.push((v + 2) / 3);
r + v as i64
})
}
long long maxKelements(vector<int>& nums, int k) {
priority_queue<int> pq(nums.begin(), nums.end());
long long res = 0;
while (k--)
res += pq.top(), pq.push((pq.top() + 2) / 3), pq.pop();
return res;
}
13.10.2024
632. Smallest Range Covering Elements from K Lists hard
blog post
substack
youtube

Join me on Telegram
https://t.me/leetcode_daily_unstoppable/767
Problem TLDR
Smallest intersection of k sorted lists #medium #heap #tree_set
Intuition
Keep track of k indices, increment the smallest:
// 4 10 15 24 26
// 0 9 12 20
// 5 18 22 30
// (4,0,5) 0..5 0->9
// (4,9,5) 4..9 4->10
// (10,9,5) 5..10 5->18
// (10,9,18) 9..18 9->12
// (10,12,18) 10..18 10->15
// (15,12,18) 12..18 12->20
// (15,20,18) 15..20 15->24
// (24,20,18) 18..24 18->22
// (24,20,22) 20..24 20->x
If you know TreeSet data structure, it perfectly aligned with the task. Another way is to use a heap for a min and keep track of a max value.
Approach
setshould distinguish between the equal values, so include indices to compare
Complexity
-
Time complexity: \(O(nlog(n))\)
-
Space complexity: \(O(n)\)
Code
fun smallestRange(nums: List<List<Int>>): IntArray {
var inds = IntArray(nums.size); var res = intArrayOf(0, Int.MAX_VALUE)
val tree = TreeSet<Int>(compareBy({nums[it][inds[it]]}, { it }))
tree += nums.indices
while (tree.size == nums.size) {
val j = tree.last(); val i = tree.pollFirst()
val a = nums[i][inds[i]]; val b = nums[j][inds[j]]
if (b - a < res[1] - res[0]) res = intArrayOf(a, b)
if (++inds[i] < nums[i].size) tree += i
}
return res
}
pub fn smallest_range(nums: Vec<Vec<i32>>) -> Vec<i32> {
let (mut inds, mut res) = (vec![0; nums.len()], vec![0, i32::MAX]);
let mut tree = BTreeSet::new();
for i in 0..nums.len() { tree.insert((nums[i][0], i)); }
while tree.len() == nums.len() {
let (Some(&(b, _)), Some(&(a, i))) = (tree.last(), tree.first()) else { break };
if b - a < res[1] - res[0] { res[0] = a; res[1] = b }
tree.pop_first(); inds[i] += 1;
if inds[i] < nums[i].len() { tree.insert((nums[i][inds[i]], i)); }
}; res
}
vector<int> smallestRange(vector<vector<int>>& nums) {
vector<int> inds(nums.size()), res = {0, INT_MAX};
set<pair<int,int>> tree;
for (int i = 0; i < nums.size(); ++i) tree.emplace(nums[i][0], i);
while (tree.size() == nums.size()) {
auto [a, i] = *tree.begin(); auto [b, _] = *tree.rbegin();
if (b - a < res[1] - res[0]) res = {a, b};
tree.erase(tree.begin());
if (++inds[i] < nums[i].size()) tree.emplace(nums[i][inds[i]], i);
}
return res;
}
12.10.2024
2406. Divide Intervals Into Minimum Number of Groups medium
blog post
substack
youtube

Join me on Telegram
https://t.me/leetcode_daily_unstoppable/766
Problem TLDR
Count non-intersecting groups of intervals #medium #heap #sorting
Intuition
Let’s observe the intervals’ properties:
// 5,10 6,8 1,5 2,3 1,10 n=5
//
// 1 2 3 4 5 6 7 8 9 10
// . . . . . . 5->take min g3(10)
// . . . 6->take min g1(5)
// . . . . . g1(5)
// . . g3(3)
// . . . . . . . . . . g2(10)
If we use sweep line algorithm, then we should peek the first non-intersecting group or add another group. To track the groups, let’s maintain a heap with ends of each group.
Another way to solve this is to notice some observation: groups count is the maximum intersecting intervals count (but it should be proved somehow, it is just works magically)
Approach
- to sweep line to work, we should sort for both
endsandstartsto be in increasing order - for the second way, we can use counting sorting
Complexity
-
Time complexity: \(O(n)\) or O(nlog(n))
-
Space complexity: \(O(m)\) or O(n)
Code
fun minGroups(intervals: Array<IntArray>): Int {
intervals.sortWith(compareBy({ it[0] }, { it[1] }))
val ends = PriorityQueue<Int>()
for ((a, b) in intervals) {
if (ends.size > 0 && a > ends.peek()) ends.poll()
ends += b
}
return ends.size
}
pub fn min_groups(intervals: Vec<Vec<i32>>) -> i32 {
let (mut ends, mut curr) = (vec![0; 1_000_002], 0);
for iv in intervals {
ends[iv[0] as usize] += 1; ends[1 + iv[1] as usize] -= 1; }
ends.iter().map(|e| { curr += e; curr }).max().unwrap()
}
int minGroups(vector<vector<int>>& intervals) {
int ends[1000002] = {}, curr = 0, res = 0;
for (auto iv: intervals) ends[iv[0]]++, ends[iv[1] + 1]--;
for (int e: ends) res = max(res, curr += e);
return res;
}
11.10.2024
1942. The Number of the Smallest Unoccupied Chair medium
blog post
substack
youtube

Join me on Telegram
https://t.me/leetcode_daily_unstoppable/765
Problem TLDR
target's chair number when chairs reused by multiple [arrival, leave] times #medium #sorting #heap
Intuition
Let’s observe what we can do with those intervals:
// 3,10 1,5 2,6 6,7 t=3
// 1 2 3 4 5 6 7 8 9 10
//
// 0 0 0 0 0 0 0 0 2
// 1 1 1 1 1 0
// 2 2 2 2 2 1
// 3 3 0
The line sweep technique will work here: first sort split each interval into two events arrival and leave, then sort and iterate.
To keep track of the chairs, let’s use some sorted collection: TreeSet or Heap (PriorityQueue).
Approach
- no more than
times.sizechairs total - sort by the
leavefirst to free the chair before arrival at the same time
Complexity
-
Time complexity: \(O(nlog(n))\)
-
Space complexity: \(O(n)\)
Code
fun smallestChair(times: Array<IntArray>, targetFriend: Int): Int {
val free = PriorityQueue<Int>(); val iToChair = mutableMapOf<Int, Int>()
val inds = mutableListOf<Pair<Int, Int>>()
for (i in times.indices) { inds += i to 0; inds += i to 1; free += i }
inds.sortWith(compareBy({ times[it.first][it.second] }, { -it.second }))
for ((i, t) in inds) if (t == 1) free += iToChair.remove(i)!! else {
iToChair[i] = free.poll()
if (i == targetFriend) return iToChair[i]!!
}
return -1
}
pub fn smallest_chair(times: Vec<Vec<i32>>, target_friend: i32) -> i32 {
let (mut free, mut i_to_chair, mut inds) = (BinaryHeap::new(), HashMap::new(), vec![]);
for i in 0..times.len() { inds.push((i, 0)); inds.push((i, 1)); free.push(-(i as i32)); }
inds.sort_unstable_by_key(|&(i, t)| (times[i][t], -(t as i32)));
for (i, t) in inds { if t == 0 {
i_to_chair.insert(i, -free.pop().unwrap());
if target_friend == i as i32 { return i_to_chair[&i]; }
} else { free.push(-i_to_chair[&i]); }}; -1
}
int smallestChair(vector<vector<int>>& times, int targetFriend) {
vector<array<int, 3>> e; set<int> free; vector<int> seated(times.size());
for (int i = 0; i < times.size(); ++i)
e.push_back({times[i][0], 0, i}), e.push_back({times[i][1], -1, i}), free.insert(i);
sort(e.begin(), e.end());
for (auto [_, l, p] : e) if (l) free.insert(seated[p]); else {
seated[p] = *free.begin();
free.erase(free.begin());
if (p == targetFriend) return seated[p];
}
return -1;
}
10.10.2024
962. Maximum Width Ramp medium
blog post
substack
youtube

Join me on Telegram
https://t.me/leetcode_daily_unstoppable/764
Problem TLDR
Max j-i between a[i] <= a[j] in an array #medium #monotonic_stack #sorting
Intuition
The simple monotonic stack will not solve this: we should not drop the values on any increase/decrease.
Let’s think what else we can do, sort, for example:
// 3 7 2 4 9 6 8 1 0 5
// 0 0 1 1 1 4 4 8 9 9
// * * (3, 7) min = 3, max = 7
// * * * (2, 4, 9) min = 2, max = 9
// * * (6, 8) + (2), min=2, max = 9
// * min=2, max=9
// * * min=2, max=9
On the sorted order we can track a min and max index, and reset the max when a new min happens. This solution is accepted and it is O(nlog(n))
However, there is a monotonic stack solution that exists. This stack should be the j indices in a strictly decreasing order and as right as possible.
Approach
- try several ways to transform the data, sorting, monotonic stacks, see what is helpful for the problem
Complexity
-
Time complexity: \(O(n)\) or O(nlogn)
-
Space complexity: \(O(n)\)
Code
fun maxWidthRamp(nums: IntArray): Int {
val inds = nums.indices.sortedBy { nums[it] }
var min = nums.size; var max = -1
return inds.maxOf { i ->
max = if (i < min) i else max(max, i)
min = min(min, i)
max - min
}
}
pub fn max_width_ramp(nums: Vec<i32>) -> i32 {
let (mut stack, mut res) = (vec![], 0);
stack.push(nums.len() - 1);
for (i, &n) in nums.iter().enumerate().rev() {
if n > nums[*stack.last().unwrap()] { stack.push(i) }}
for (i, &n) in nums.iter().enumerate() {
while stack.len() > 0 && n <= nums[*stack.last().unwrap()] {
res = res.max(stack.pop().unwrap() - i) }}
res as i32
}
int maxWidthRamp(vector<int>& n) {
vector<int> s; int res = 0;
for (int i = n.size() - 1; i >= 0; --i)
if (s.empty() || n[i] > n[s.back()]) s.push_back(i);
for (int i = 0; i < n.size() && !s.empty(); ++i)
while (!s.empty() && n[i] <= n[s.back()])
res = max(res, s.back() - i), s.pop_back();
return res;
}
09.10.2024
921. Minimum Add to Make Parentheses Valid medium
blog post
substack
youtube

Join me on Telegram
https://t.me/leetcode_daily_unstoppable/762
Problem TLDR
Minimum inserts to balance brackets #medium #stack
Intuition
The optimal way to return the balance is to insert lazily on every unbalanced position. (Prove is out of scope)
Now, to check the balance, let’s use a stack and match each open bracket with the closing. We can simplify the stack down to the counter.
Approach
- keep the balance variable
bseparate from the insertions’ count variableres
Complexity
-
Time complexity: \(O(n)\)
-
Space complexity: \(O(1)\)
Code
fun minAddToMakeValid(s: String): Int {
var b = 0; var res = 0
for (c in s) if (c == '(') b++
else if (b > 0) b-- else res++
return res + b
}
pub fn min_add_to_make_valid(s: String) -> i32 {
let (mut b, mut res) = (0, 0);
for c in s.bytes() {
if c == b'(' { b += 1 } else if b > 0 { b -= 1 }
else { res += 1 }
}; res + b
}
int minAddToMakeValid(string s) {
int b = 0, res = 0;
for (char c: s) if (c == '(') b++;
else if (b > 0) b--; else res++;
return res + b;
}
08.10.2024
1963. Minimum Number of Swaps to Make the String Balanced medium
blog post
substack
youtube

Join me on Telegram
https://t.me/leetcode_daily_unstoppable/761
Problem TLDR
Min swaps to balance brackets #medium #two_pointers #stack
Intuition
Let’s observe how we can do the balancing:
// 012345
// ][][][
// i j
// i j
// 012345
// ]]][[[
// i j
// [i j]
One way is to go with two pointers i from the begining and j from the end. Skip all balanced brackets and swap non-balanced positions.
Another thought is to go with a stack and do the ‘swap’ on unbalanced position by making it balanced.
Approach
- to virtually swap, change the closing bracket
c = -1to openingc = 1
Complexity
-
Time complexity: \(O(n)\)
-
Space complexity: \(O(1)\)
Code
fun minSwaps(s: String): Int {
var balance = 0; var res = 0
for (c in s) if (c == '[') balance++
else if (balance == 0) { res++; balance = 1 }
else balance--
return res
}
pub fn min_swaps(s: String) -> i32 {
let (mut c, mut res) = (0, 0);
for b in s.bytes() { if b == b'[' { c += 1 }
else if c == 0 { res += 1; c = 1 }
else { c -= 1 }}
res
}
int minSwaps(string s) {
int b = 0, res = 0;
for (char c: s) if (c == '[') b++;
else if (b == 0) { res++; b = 1; }
else b--;
return res;
}
07.10.2024
2696. Minimum String Length After Removing Substrings easy
blog post
substack
youtube

Join me on Telegram
https://t.me/leetcode_daily_unstoppable/759
Problem TLDR
Remove ‘AB’ and ‘CD’ from the string #easy #stack
Intuition
We can do the removals in a loop until the string size changes.
However, the optimal way is to do this with a Stack: pop if stack top and the current char form the target to remove.
Approach
- Rust has a nice
matchto shorten the code
Complexity
-
Time complexity: \(O(n)\)
-
Space complexity: \(O(n)\)
Code
fun minLength(s: String)= Stack<Char>().run {
for (c in s) if (size > 0 &&
(c == 'B' && peek() == 'A' || c == 'D' && peek() == 'C'))
pop() else push(c)
size
}
pub fn min_length(s: String) -> i32 {
let mut stack = vec![];
for b in s.bytes() { match b {
b'B' if stack.last() == Some(&b'A') => { stack.pop(); }
b'D' if stack.last() == Some(&b'C') => { stack.pop(); }
_ => { stack.push(b) }
}}
stack.len() as i32
}
int minLength(string s) {
stack<char> st;
for (char c: s) if (!st.empty() && (
st.top() == 'A' && c == 'B' || st.top() == 'C' && c == 'D'
)) st.pop(); else st.push(c);
return st.size();
}
06.10.2024
1813. Sentence Similarity III medium
blog post
substack
youtube

Join me on Telegram
https://t.me/leetcode_daily_unstoppable/758
Problem TLDR
Are strings equal after inserting substring? #medium
Intuition
The problem becomes easy if we split the words first:
// a b c d
// a
// a d
// a g d
// i j
Now, scan prefix words with one pointer i and suffix words with another pointer j. If j < i we good.
The more optimal way, is to not do the splitting: now we have to manually track the space character ' ', all other logic is the same.
Approach
- split words for shorter code
- to track the word breaks, consider checking a single out of boundary position as a space char
' '.
Complexity
-
Time complexity: \(O(n)\)
-
Space complexity: \(O(1)\) or O(n) for word split
Code
fun areSentencesSimilar(sentence1: String, sentence2: String): Boolean {
val words1 = sentence1.split(" "); val words2 = sentence2.split(" ")
var i = 0; var j1 = words1.lastIndex; var j2 = words2.lastIndex
while (i < words1.size && i < words2.size && words1[i] == words2[i]) i++
while (j1 >= i && j2 >= i && words1[j1] == words2[j2]) { j1--; j2-- }
return j1 < i || j2 < i
}
pub fn are_sentences_similar(sentence1: String, sentence2: String) -> bool {
let (bytes1, bytes2) = (sentence1.as_bytes(), sentence2.as_bytes());
let (n1, n2) = (bytes1.len(), bytes2.len());
let (mut i, mut j, mut k, mut k1, mut k2) = (0, 0, 0, n1 as i32 - 1, n2 as i32 - 1);
while k <= n1 && k <= n2 {
let a = if k == n1 { b' ' } else { bytes1[k] };
let b = if k == n2 { b' ' } else { bytes2[k] };
if a != b { break }; if a == b' ' { i += 1 }; k += 1
}
while k1 >= -1 && k2 >= -1 {
let a = if k1 < 0 { b' ' } else { bytes1[k1 as usize] };
let b = if k2 < 0 { b' ' } else { bytes2[k2 as usize] };
if a != b { break }; if a == b' ' { j += 1 }; k1 -= 1; k2 -= 1
}
bytes1.iter().filter(|&&b| b == b' ').count() as i32 - j < i ||
bytes2.iter().filter(|&&b| b == b' ').count() as i32 - j < i
}
bool areSentencesSimilar(string sentence1, string sentence2) {
int i = 0, j = 0, k = 0, k1 = sentence1.length() - 1, k2 = sentence2.length() - 1;
while (k <= sentence1.length() && k <= sentence2.length()) {
char a = k == sentence1.length() ? ' ' : sentence1[k];
char b = k == sentence2.length() ? ' ' : sentence2[k];
if (a != b) break; if (a == ' ') i++; k++;
}
while (k1 >= -1 && k2 >= -1) {
char a = k1 < 0 ? ' ' : sentence1[k1];
char b = k2 < 0 ? ' ' : sentence2[k2];
if (a != b) break; if (a == ' ') j++; k1--; k2--;
}
return ranges::count(sentence1, ' ') - j < i || ranges::count(sentence2, ' ') - j < i;
}
05.10.2024
567. Permutation in String medium
blog post
substack
youtube

Join me on Telegram
https://t.me/leetcode_daily_unstoppable/757
Problem TLDR
Is s2 contains permutation of s1? #medium #two_pointers
Intuition
Only the characters count matter, so count them with two pointers: one increases the count, the other decreases.
Approach
- to avoid all alphabet checks, count frequency intersections with zero
Complexity
-
Time complexity: \(O(n)\)
-
Space complexity: \(O(1)\)
Code
fun checkInclusion(s1: String, s2: String): Boolean {
val freq = IntArray(26); val target = IntArray(26)
for (c in s1) target[c - 'a']++; var j = 0
return s2.any { c ->
freq[c - 'a']++
while (freq[c - 'a'] > target[c - 'a']) freq[s2[j++] - 'a']--
(0..25).all { freq[it] == target[it] }
}
}
pub fn check_inclusion(s1: String, s2: String) -> bool {
let (mut freq, mut cnt, mut j, s2) = ([0; 26], 0, 0, s2.as_bytes());
for b in s1.bytes() {
cnt += (freq[(b - b'a') as usize] == 0) as i32;
freq[(b - b'a') as usize] += 1
}
(0..s2.len()).any(|i| {
let f = freq[(s2[i] - b'a') as usize];
freq[(s2[i] - b'a') as usize] -= 1;
if f == 1 { cnt -= 1 } else if f == 0 { cnt += 1 }
while freq[(s2[i] - b'a') as usize] < 0 {
let f = freq[(s2[j] - b'a') as usize];
freq[(s2[j] - b'a') as usize] += 1;
if f == -1 { cnt -= 1 } else if f == 0 { cnt += 1 }
j += 1
}
cnt == 0
})
}
bool checkInclusion(string s1, string s2) {
int f[26], c = 0, j = 0; for (char x: s1) c += !f[x - 'a']++;
auto adjust = [&](int i, int inc) { return (f[i] += inc) == inc ? 1 : !f[i] ? -1 : 0; };
return any_of(s2.begin(), s2.end(), [&](char x) {
c += adjust(x - 'a', -1);
while (f[x - 'a'] < 0) c += adjust(s2[j++] - 'a', 1);
return !c;
});
}
04.10.2024
2491. Divide Players Into Teams of Equal Skill medium
blog post
substack
youtube

Join me on Telegram
https://t.me/leetcode_daily_unstoppable/756
Problem TLDR
Sum of products of pairs with equal sums #medium #math
Intuition
Let’s see what can be derived from math arithmetic:
// 3 2 5 1 3 4 sum = 6 x 3 = 18, teams = size / 2 = 3
// team_sum = sum / size / 2 = 18 / 6 / 2 = 6
// 2 1 5 2 sum = 10, teams = 2, teamSum = 5
We know: the number of teams, each team's sum. Now just count how many pairs can form the team sum.
Another way to solve, is to just sort and use two pointers: the lowest value should match with the highest, otherwise pairs can’t be formed.
Approach
- keep track of the formed pairs count and check them before answer
Complexity
-
Time complexity: \(O(n)\)
-
Space complexity: \(O(max)\), max is 1000 in our case, or 2000 for the pair sum
Code
fun dividePlayers(skill: IntArray): Long {
var teams = skill.size / 2
val teamSum = skill.sum() / teams
val freq = IntArray(2002)
var res = 0L; var count = 0
for (x in skill) if (x > teamSum) return -1
else if (freq[x] > 0) {
freq[x]--; teams--
res += x * (teamSum - x)
} else freq[teamSum - x]++
return if (teams == 0) res else -1
}
pub fn divide_players(skill: Vec<i32>) -> i64 {
let mut teams = skill.len() as i32 / 2;
let team_sum = skill.iter().sum::<i32>() / teams;
let (mut freq, mut res, mut cnt) = ([0; 2002], 0, 0);
for x in skill {
if x > team_sum { return -1 }
if freq[x as usize] > 0 {
freq[x as usize] -= 1; teams -= 1;
res += (x * (team_sum - x)) as i64
} else { freq[(team_sum - x) as usize] += 1 }
}
if teams == 0 { res } else { -1 }
}
long long dividePlayers(vector<int>& skill) {
int teams = skill.size() / 2;
int teamSum = accumulate(skill.begin(), skill.end(), 0) / teams;
vector<int> freq(2002, 0); long long res = 0;
for (int x: skill) if (x > teamSum) return -1;
else if (freq[x] > 0) {
freq[x]--; teams--;
res += (long long) x * (teamSum - x);
} else freq[teamSum - x]++;
return teams == 0 ? res : -1;
}
03.10.2024
1590. Make Sum Divisible by P medium
blog post
substack
youtube

Join me on Telegram
https://t.me/leetcode_daily_unstoppable/755
Problem TLDR
Min removed subarray length to make remainder % p = 0 #medium #modulo
Intuition
Failed to solve this one.
The idea is: if we have a total sum and subarray sum sub, then (sum - sub) % p == 0:
// (sum-sub)%p==0
// sum % p = sub % p
At this point I know, we should inspect the visited and awaited remainders, but exact solution still didn’t clear to me.
Now, the part I didn’t get myself:
target = sum % p
target - sub % p == 0 <-- our condition
We visiting the prefix sum and inspecting the remainder sum - target % p.
Approach
- more time and more examples would help, you either see the math or don’t
- steal someone else’s solution
Complexity
-
Time complexity: \(O(n)\)
-
Space complexity: \(O(n)\)
Code
fun minSubarray(nums: IntArray, p: Int): Int {
val remToInd = HashMap<Long, Int>(); remToInd[0] = -1
var ans = nums.size; var sum = 0L
val target = nums.sumOf { it.toLong() % p } % p
return nums.withIndex().minOf { (i, n) ->
sum = (sum + n % p) % p
remToInd[sum] = i
i - (remToInd[(p + sum - target) % p] ?: -nums.size)
}.takeIf { it < nums.size } ?: -1
}
pub fn min_subarray(nums: Vec<i32>, p: i32) -> i32 {
let (mut ans, mut sum, mut wait) = (nums.len() as i32, 0, HashMap::new());
wait.insert(0, -1);
let target = (nums.iter().map(|&x| (x % p) as i64).sum::<i64>() % (p as i64)) as i32;
let ans = nums.iter().enumerate().map(|(i, &n)| {
sum = (sum + n % p) % p;
wait.insert(sum, i as i32);
let key = (p + sum - target) % p;
if let Some(j) = wait.get(&key) { i as i32 - j } else { nums.len() as i32 }
}).min().unwrap();
if ans < nums.len() as i32 { ans } else { -1 }
}
int minSubarray(vector<int>& nums, int p) {
std::unordered_map<long long, int> remToInd;
remToInd[0] = -1; int ans = nums.size();
long long sum = 0, target = 0;
for (int num : nums) target = (target + num % p) % p;
for (int i = 0; i < nums.size(); ++i) {
sum = (sum + nums[i] % p) % p;
remToInd[sum] = i; int key = (p + sum - target) % p;
int diff = remToInd.count(key) ? i - remToInd[key] : nums.size();
ans = std::min(ans, diff);
}
return ans < nums.size() ? ans : -1;
}
02.10.2024
1331. Rank Transform of an Array easy
blog post
substack
youtube

Join me on Telegram
https://t.me/leetcode_daily_unstoppable/754
Problem TLDR
Array values to their sorted set positions #easy
Intuition
We need a sorted order, and then we need to manually increment the rank or somehow maintain an association between the sorted order set position and the value.
Approach
binarySearchwill not change the time complexity
Complexity
-
Time complexity: \(O(nlog(n))\)
-
Space complexity: \(O(n)\)
Code
fun arrayRankTransform(arr: IntArray) = arr.toSet()
.sorted().run { arr.map { binarySearch(it) + 1 }}
pub fn array_rank_transform(arr: Vec<i32>) -> Vec<i32> {
let set = BTreeSet::from_iter(arr.clone());
let sorted = Vec::from_iter(set);
arr.iter()
.map(|x| 1 + sorted.binary_search(&x).unwrap() as i32)
.collect()
}
vector<int> arrayRankTransform(vector<int>& arr) {
vector<pair<int, int>> inds(arr.size());
for (int i = 0; int x: arr) inds[i++] = {x, i};
sort(inds.begin(), inds.end());
int prev = INT_MIN; int rank = 0;
for (auto& [x, i]: inds) {
if (x > prev) rank++;
prev = x; arr[i] = rank;
}
return arr;
}
01.10.2024
1497. Check If Array Pairs Are Divisible by k medium
blog post
substack
youtube

Join me on Telegram
https://t.me/leetcode_daily_unstoppable/753
Problem TLDR
Can all pairs sums be k-even? #medium #modulo
Intuition
Modulo operation is associative, so (a + b) % k == a % k + b % k, the task is to find a pair for each number x % k: (k - x % k) % k.
// -4 -7 5 2 9 1 10 4 -8 -3 k=3
// * * -4=-1=2 : [1]
// * * -7=-1=2 : [1]
// * * 5=2:[1]
// * * 2=2:[1]
// * * 9=0:[0]
// -1 -1 2 2 0 1 1 1 -2 0 x % k
// 2 2 2 2 0 1 1 1 1 0 (k + x % k) % k
The corner case is 0, add extra % k to the expected value.
Approach
- try to solve it by hands first to feel the intuition
Complexity
-
Time complexity: \(O(n + k)\)
-
Space complexity: \(O(k)\)
Code
fun canArrange(arr: IntArray, k: Int): Boolean {
val expected = IntArray(k); var count = 0
for (x in arr) {
val e = (k + x % k) % k
if (expected[e] > 0) {
count++ ; expected[e]--
} else expected[(k - e) % k]++
}
return count == arr.size / 2
}
pub fn can_arrange(arr: Vec<i32>, k: i32) -> bool {
let (mut exp, mut cnt) = (vec![0; k as usize], 0);
for x in &arr {
let e = ((k + x % k) % k) as usize;
if exp[e] > 0 { cnt += 1; exp[e] -= 1 }
else { exp[((k - e as i32) % k) as usize] += 1 }
}
cnt == arr.len() / 2
}
bool canArrange(vector<int>& arr, int k) {
vector<int> exp(k); int cnt = 0;
for (const auto x : arr) {
int e = (k + x % k) % k;
if (exp[e] > 0) { cnt++; exp[e]--; }
else exp[(k - e) % k]++;
}
return cnt == arr.size() / 2;
}
30.09.2024
1381. Design a Stack With Increment Operation medium
blog post
substack
youtube

Join me on Telegram
https://t.me/leetcode_daily_unstoppable/751
Problem TLDR
Stack with range increment operation #medium #design
Intuition
The naive solution with a single array and O(n) increment operation is accepted.
The clever one is to maintain a second array for increments and compute them only for the pop operation, shrinking it by one position. Only the last increment matters for the stack top.
Approach
- let’s implement both solutions
Complexity
-
Time complexity: \(O(n)\) for n calls
-
Space complexity: \(O(n)\)
Code
class CustomStack(maxSize: Int) {
val arr = IntArray(maxSize); var head = 0
fun push(x: Int) {
if (head < arr.size) arr[head++] = x }
fun pop() = if (head == 0) -1 else arr[--head]
fun increment(k: Int, v: Int) {
for (i in 0..<min(k, head)) arr[i] += v }
}
class CustomStack(maxSize: Int) {
val arr = IntArray(maxSize); var size = 0
val inc = IntArray(maxSize + 1)
fun push(x: Int) { if (size < arr.size) arr[size++] = x }
fun pop() = if (size < 1) -1 else inc[size] + arr[size - 1].also {
inc[size - 1] += inc[size]; inc[size--] = 0
}
fun increment(k: Int, v: Int) { inc[min(k, size)] += v }
}
struct CustomStack(Vec<i32>, Vec<i32>, usize);
impl CustomStack {
fn new(maxSize: i32) -> Self {
Self(vec![0; maxSize as usize], vec![0; maxSize as usize + 1], 0) }
fn push(&mut self, x: i32) {
if self.2 < self.0.len() { self.0[self.2] = x; self.2 += 1 } }
fn pop(&mut self) -> i32 { if self.2 < 1 { -1 } else {
let res = self.1[self.2] + self.0[self.2 -1];
self.1[self.2 - 1] += self.1[self.2];
self.1[self.2] = 0; self.2 -= 1;
res }}
fn increment(&mut self, k: i32, val: i32) {
self.1[self.2.min(k as usize)] += val }
}
class CustomStack {
public:
vector<int> arr, inc; int size;
CustomStack(int maxSize): arr(maxSize), inc(maxSize + 1), size(0){}
void push(int x) { if (size < arr.size()) arr[size++] = x; }
int pop() {
if (size < 1) return -1;
int res = inc[size] + arr[size - 1];
inc[size - 1] += inc[size]; inc[size--] = 0;
return res;
}
void increment(int k, int val) { inc[min(k, size)] += val; }
};
29.09.2024
432. All O`one Data Structure hard
blog post
substack
youtube

Join me on Telegram
https://t.me/leetcode_daily_unstoppable/750
Problem TLDR
Count usage frequencies in O(1) #hard #hashmap #linked_list
Intuition
The logN solution is to put buckets in a TreeMap with the keys of frequencies.
The O(1) solution is to use a doubly linked list for the buckets: it works because we only doing inc and dec operations, so at most shift by one position happens.
Approach
This is all about the implementation details.
- logN solution is shorter
- I’ve implemented O(n) solution only in Kotlin and it took me more than 6 hours to make it working and concise
- start with writing the
incmethod, after it works, write thedec; only after that try to extract the common logic
Complexity
-
Time complexity: \(O(n)\) for n calls
-
Space complexity: \(O(n)\)
Code
class AllOne(): TreeMap<Int, HashSet<String>>() {
val keyToFreq = HashMap<String, Int>()
fun update(key: String, inc: Int) {
val currFreq = keyToFreq.remove(key) ?: 0
get(currFreq)?.let { it.remove(key); if (it.isEmpty()) remove(currFreq) }
val newFreq = currFreq + inc
if (newFreq > 0) getOrPut(newFreq) { HashSet() } += key
if (newFreq > 0) keyToFreq[key] = newFreq
}
fun inc(key: String) = update(key, 1)
fun dec(key: String) = update(key, -1)
fun getMaxKey() = if (isEmpty()) "" else lastEntry().value.first()
fun getMinKey() = if (isEmpty()) "" else firstEntry().value.first()
}
class AllOne() {
class Node(val f: Int, var l: Node? = null, var r: Node? = null): HashSet<String>()
operator fun Node.set(i: Int, n: Node?) = if (i < 1) l = n else r = n
operator fun Node.get(i: Int) = if (i < 1) l else r
val keyToNode = HashMap<String, Node?>(); var max = Node(0); var min = max;
fun inc(key: String) {
val curr = keyToNode[key] ?: if (min.f > 0) Node(0, r = min).also { min = it } else min
val next = getOrInsertNext(curr, 1)
update(curr, next, key)
if (curr === max) max = next
}
fun dec(key: String) {
var curr = keyToNode[key] ?: return
val next = if (curr.f == 1) null else getOrInsertNext(curr, -1)
update(curr, next, key)
}
fun getOrInsertNext(curr: Node, inc: Int, r: Int = (inc + 1) / 2) =
curr[r]?.takeIf { it.f == curr.f + inc } ?: Node(curr.f + inc).apply {
this[1 - r] = curr; this[r] = curr[r]
curr[r] = this; this[r]?.set(1 - r, this)
}
fun update(curr: Node, next: Node?, key: String) {
curr -= key; next?.add(key); keyToNode[key] = next
if (curr.size > 0) return
curr.l?.r = curr.r.also { curr.r?.l = curr.l }
if (curr === max) max = next ?: curr.r ?: Node(0)
if (curr === min) min = next ?: curr.r ?: Node(0)
}
fun getMaxKey() = max.firstOrNull() ?: ""
fun getMinKey() = min.firstOrNull() ?: ""
}
#[derive(Default)]
struct AllOne(BTreeMap<i32, HashSet<String>>, HashMap<String, i32>);
impl AllOne {
fn new() -> Self { Self::default() }
fn update(&mut self, key: String, inc: i32) {
let curr_freq = self.1.remove(&key).unwrap_or(0);
if let Some(set) = self.0.get_mut(&curr_freq) {
set.remove(&key);
if set.is_empty() { self.0.remove(&curr_freq); }
}
let new_freq = curr_freq + inc;
if new_freq > 0 {
self.0.entry(new_freq).or_insert_with(HashSet::new).insert(key.clone());
self.1.insert(key, new_freq);
}
}
fn inc(&mut self, key: String) { self.update(key, 1) }
fn dec(&mut self, key: String) { self.update(key, -1) }
fn get_max_key(&self) -> String { self.0.iter().next_back()
.and_then(|(_, set)| set.iter().next()).cloned().unwrap_or_default() }
fn get_min_key(&self) -> String { self.0.iter().next()
.and_then(|(_, set)| set.iter().next()).cloned().unwrap_or_default() }
}
class AllOne {
public:
map<int, unordered_set<string>> tree;
unordered_map<string, int> keyToFreq;
void update(const string& key, int inc) {
auto it = keyToFreq.find(key);
int currFreq = (it != keyToFreq.end()) ? it->second : 0;
keyToFreq.erase(key);
auto& set = tree[currFreq]; set.erase(key);
if (set.empty()) tree.erase(currFreq);
int newFreq = currFreq + inc;
if (newFreq > 0) { tree[newFreq].insert(key); keyToFreq[key] = newFreq; }
}
void inc(const string& key) { update(key, 1); }
void dec(const string& key) { update(key, -1); }
string getMaxKey() { return tree.empty() ? "" : *tree.rbegin()->second.begin(); }
string getMinKey() { return tree.empty() ? "" : *tree.begin()->second.begin(); }
};
28.09.2024
641. Design Circular Deque medium
blog post
substack
youtube

Join me on Telegram
https://t.me/leetcode_daily_unstoppable/749
Problem TLDR
Ring buffer #medium
Intuition
We can use a Node LinkedList-like data structure or a simple array with two pointers.
Approach
sizevariable makes code simpler to reason about but can be omitted
Complexity
-
Time complexity: \(O(n)\) for
ncalls to methods -
Space complexity: \(O(k)\)
Code
class MyCircularDeque(k: Int) {
var arr = IntArray(k + 1); var f = 1; var l = 0
fun insertFront(value: Int) = !isFull().also { if (!it)
{ f = (arr.size + f - 1) % arr.size; arr[f] = value }}
fun insertLast(value: Int) = !isFull().also { if (!it)
{ l = (l + 1) % arr.size; arr[l] = value }}
fun deleteFront() = !isEmpty().also { if (!it) f = (f + 1) % arr.size }
fun deleteLast() = !isEmpty().also { if (!it) l = (arr.size + l - 1) % arr.size }
fun getFront() = if (isEmpty()) -1 else arr[f]
fun getRear() = if (isEmpty()) -1 else arr[l]
fun isEmpty() = size == 0
fun isFull() = size == arr.size - 1
val size get() = (arr.size + l - f + 1) % arr.size
}
struct MyCircularDeque((Vec<i32>, usize, usize));
impl MyCircularDeque {
fn new(k: i32) -> Self { Self((vec![0; k as usize + 1], 1, 0)) }
fn insert_front(&mut self, value: i32) -> bool { !self.is_full() && {
self.0.1 = (self.0.0.len() + self.0.1 - 1) % self.0.0.len(); self.0.0[self.0.1] = value; true }}
fn insert_last(&mut self, value: i32) -> bool { !self.is_full() && {
self.0.2 = (self.0.2 + 1) % self.0.0.len(); self.0.0[self.0.2] = value ; true }}
fn delete_front(&mut self) -> bool { !self.is_empty() && {
self.0.1 = (self.0.1 + 1) % self.0.0.len(); true }}
fn delete_last(&mut self) -> bool { !self.is_empty() && {
self.0.2 = (self.0.0.len() + self.0.2 - 1) % self.0.0.len(); true }}
fn get_front(&self) -> i32 { if self.is_empty() { -1 } else { self.0.0[self.0.1] }}
fn get_rear(&self) -> i32 { if self.is_empty() { -1 } else { self.0.0[self.0.2] }}
fn is_empty(&self) -> bool { self.size() == 0 }
fn is_full(&self) -> bool { self.size() == self.0.0.len() - 1 }
fn size(&self) -> usize { (self.0.0.len() + self.0.2 - self.0.1 + 1) % self.0.0.len() }
}
class MyCircularDeque {
public:
vector<int> arr; int l, f;
MyCircularDeque(int k) : arr(k + 1), l(0), f(1) {}
bool insertFront(int value) { if (isFull()) return false;
f = (arr.size() + f - 1) % arr.size(); arr[f] = value; return true; }
bool insertLast(int value) { if (isFull()) return false;
l = (l + 1) % arr.size(); arr[l] = value; return true; }
bool deleteFront() { if (isEmpty()) return false;
f = (f + 1) % arr.size(); return true; }
bool deleteLast() { if (isEmpty()) return false;
l = (arr.size() + l - 1) % arr.size(); return true; }
int getFront() { return isEmpty() ? -1 : arr[f]; }
int getRear() { return isEmpty() ? -1 : arr[l]; }
bool isEmpty() { return size() == 0; }
bool isFull() { return size() == arr.size() - 1; }
int size() { return (arr.size() + l - f + 1) % arr.size(); }
};
27.09.2024
731. My Calendar II medium
blog post
substack
youtube
Join me on Telegram
https://t.me/leetcode_daily_unstoppable/748
Problem TLDR
Add intervals intersecting less than two times #medium #line_sweep
Intuition
Let’s observe the problem:
// 0123456
// --- -- 0,3 5,7
// ---- 2,6 0,3 2,6 5,7
// --- 1,4
One way to solve the overlapping intervals is a line sweep algorithm: sort intervals, and increase the counter on each start, decrease on each end. This algorithm will take at least O(n) on each call, or O(nlog(n)) for a shorter code with sort instead of binary search.
Another, more clever way, is to maintain a second list of intervals of intersections.
Approach
- for the line sweep, use
end - 1, and sort by thestartand putendsafter thestarts
Complexity
-
Time complexity: \(O(n)\), or O(n^2)
-
Space complexity: \(O(n)\)
Code
class MyCalendarTwo() {
var list = listOf<Pair<Int, Int>>()
fun book(start: Int, end: Int): Boolean {
val se = (list + (start to 1) + ((end - 1) to -1))
.sortedWith(compareBy({ it.first }, { -it.second }))
var count = 0
return if (se.any { (_, c) -> count += c; count > 2 })
false else { list = se; true }
}
}
#[derive(Default)] struct MyCalendarTwo((Vec<(i32, i32)>, Vec<(i32, i32)>));
impl MyCalendarTwo {
fn new() -> Self { Self::default() }
fn book(&mut self, start: i32, end: i32) -> bool {
for &(s, e) in &self.0.0 { if start < e && end > s { return false; }}
for &(s, e) in &self.0.1 { if start < e && end > s {
self.0.0.push((start.max(s), end.min(e))); }}
self.0.1.push((start, end)); true
}
}
class MyCalendarTwo {
public:
vector<pair<int, int>> booking, overlap;
bool book(int start, int end) {
for (const auto& [s, e]: overlap) if (start < e && end > s) return false;
for (const auto& [s, e]: booking) if (start < e && end > s)
overlap.emplace_back(max(start, s), min(end, e));
booking.emplace_back(start, end); return true;
}
};
26.09.2024
729. My Calendar I medium
blog post
substack
youtube

Join me on Telegram
https://t.me/leetcode_daily_unstoppable/747
Problem TLDR
Insert non-intersection interval #medium #binary_search
Intuition
The problem size of 1000 allows the n^2 algorithm to pass.
However, we can optimise it by finding a place to insert into sorted list. The intervals are non-intersection by definition.
Approach
- there is a cool
partition_pointmethod exists
Complexity
-
Time complexity: \(O(nlog(n))\) or n^2 for Kotlin’s solution
-
Space complexity: \(O(n)\)
Code
class MyCalendar() : ArrayList<Pair<Int, Int>>() {
fun book(start: Int, end: Int): Boolean =
none { (s, e) -> start < e && end > s }
.also { if (it) add(start to end) }
}
struct MyCalendar(Vec<(i32, i32)>);
impl MyCalendar {
fn new() -> Self { Self(vec![]) }
fn book(&mut self, start: i32, end: i32) -> bool {
let less = self.0.partition_point(|&(s, e)| e <= start);
let more = self.0.partition_point(|&(s, e)| s < end);
less == more && { self.0.insert(more, (start, end)); true }
}
}
class MyCalendar {
public:
MyCalendar() {}
vector<pair<int, int>> list;
bool book(int start, int end) {
auto less = partition_point(list.begin(), list.end(),
[start](const auto& b){ return b.second <= start; });
auto more = partition_point(list.begin(), list.end(),
[end](const auto& b){ return b.first < end; });
if (less != more) return false;
list.insert(more, {start, end});
return true;
}
};
25.09.2024
2416. Sum of Prefix Scores of Strings hard
blog post
substack
youtube

Join me on Telegram
https://t.me/leetcode_daily_unstoppable/746
Problem TLDR
Counts of words with same prefixes #hard #trie
Intuition
The HashMap counter gives OOM. There is also a Trie data structure for prefixes problems.
Approach
- To avoid
Option<Box>in Rust we can implement Trie as just a pointers to aVecpositions, where the actual data lies. (the time drops from 213ms to 145ms)
Complexity
-
Time complexity: \(O(nw)\)
-
Space complexity: \(O(w)\)
Code
class Trie(var freq: Int = 0) : HashMap<Char, Trie>()
fun sumPrefixScores(words: Array<String>) = Trie().run {
for (w in words) {
var t = this
for (c in w) t = t.getOrPut(c) { Trie() }.apply { freq++ }
}
words.map { var t = this; it.sumOf { t = t[it]!!; t.freq } }
}
pub fn sum_prefix_scores(words: Vec<String>) -> Vec<i32> {
#[derive(Clone, Default)] struct Trie((i32, [Option<Box<Trie>>; 26]));
let (mut root, a) = (Trie::default(), b'a' as usize);
for w in words.iter() { let mut t = &mut root; for b in w.bytes() {
t = t.0.1[b as usize - a].get_or_insert_with(|| Box::new(Trie::default()));
t.0.0 += 1
}}
words.iter().map(|w| { let mut t = &root;
w.bytes().map(|b| { t = t.0.1[b as usize - a].as_ref().unwrap(); t.0.0 }).sum()
}).collect()
}
pub fn sum_prefix_scores(words: Vec<String>) -> Vec<i32> {
#[derive(Clone, Default)] struct Trie((i32, [usize; 26]));
let (mut nodes, a) = (vec![Trie::default()], b'a' as usize);
for w in words.iter() { let mut t = 0; for b in w.bytes() {
if nodes[t].0.1[b as usize - a] == 0 {
nodes[t].0.1[b as usize - a] = nodes.len(); nodes.push(Trie::default())
}
t = nodes[t].0.1[b as usize - a]; nodes[t].0.0 += 1
}}
words.iter().map(|w| { let mut t = &nodes[0];
w.bytes().map(|b| { t = &nodes[t.0.1[b as usize - a]]; t.0.0 }).sum()
}).collect()
}
vector<int> sumPrefixScores(vector<string>& words) {
struct Trie { int c{}; array<Trie*, 26> k{}; };
Trie root;
for (auto& w : words) { Trie* t = &root;
for (char c : w)
++(t = t->k[c-97] ? t->k[c-97] : (t->k[c-97] = new Trie))->c;
}
std::vector<int> res;
for (auto& w : words) { Trie* t = &root; int freq = 0;
for (char c : w) freq += (t = t->k[c-97])->c;
res.push_back(freq);
}
return res;
}
24.09.2024
3043. Find the Length of the Longest Common Prefix medium
blog post
substack
youtube

Join me on Telegram
https://t.me/leetcode_daily_unstoppable/745
Problem TLDR
Common digit prefix between all pairs of two num arrays #medium #trie
Intuition
We can construct a Trie with every suffix from arr1 and check every suffix from arr2. Another, more short solution is to use a HashSet, and add all prefixes.
Approach
- we should add and check
everyprefix - small optimization is to stop adding prefixes to HashSet as soon as current already here
Complexity
-
Time complexity: \(O(n)\)
-
Space complexity: \(O(n)\)
Code
fun longestCommonPrefix(arr1: IntArray, arr2: IntArray): Int {
val set = HashSet<Int>()
for (n in arr1) { var x = n; while (x > 0 && set.add(x)) x /= 10 }
return arr2.maxOf { n ->
var x = n; var pow = -1; var i = 0
while (x > 0) {
if (pow < 0) if (x in set) pow = i
x /= 10; i++
}
if (pow < 0) 0 else i - pow
}
}
pub fn longest_common_prefix(arr1: Vec<i32>, arr2: Vec<i32>) -> i32 {
#[derive(Clone, Default)] struct Trie([Option<Box<Trie>>; 10]);
let mut root: Trie = Default::default();
let dig = |n| { let (mut x, mut dig) = (n, vec![]);
while x > 0 { dig.push((x % 10) as usize); x /= 10 }; dig };
for n in arr1 {
let mut t = &mut root;
for &d in dig(n).iter().rev() {
t = t.0[d].get_or_insert_with(|| Box::new(Default::default()))
}
}
arr2.into_iter().map(|n| {
let (mut t, mut i) = (&root, 0);
for &d in dig(n).iter().rev() {
let Some(next) = t.0[d].as_ref() else { break };
t = &next; i += 1
}; i
}).max().unwrap_or(0) as i32
}
int longestCommonPrefix(vector<int>& arr1, vector<int>& arr2) {
unordered_set<int> set; int res = 0;
for (auto& x: arr1) while (x > 0 && set.insert(x).second) x /= 10;
for (auto& x: arr2) {
int pow = -1; int i = 0;
while (x > 0) {
if (pow < 0 && set.find(x) != set.end()) pow = i;
x /= 10; i++;
}
if (pow >= 0) res = max(res, i - pow);
}
return res;
}
23.09.2024
2707. Extra Characters in a String hard
blog post
substack
youtube
Join me on Telegram
https://t.me/leetcode_daily_unstoppable/744
Problem TLDR
Min extra chars to form an s from dictionary #medium #dynamic_programming
Intuition
One way to do this is to scan s char by char until word is not in a dictionary. We can make a full Depth-First Search, memoizing the result for each start scan position. For quick dictionary check, we can use a HashSet or a Trie.
Another way is to compare the suffix of s[..i] with every word in a dictionary. (this solution is faster)
Approach
- let’s implement both
- bottom-up solution can iterate forwards or backwards
Complexity
-
Time complexity: \(O(nm)\)
-
Space complexity: \(O(n)\)
Code
fun minExtraChar(s: String, dictionary: Array<String>): Int {
val set = dictionary.toSet(); val dp = mutableMapOf<Int, Int>()
fun dfs(i: Int): Int = dp.getOrPut(i) {
(i..<s.length).minOfOrNull { j ->
dfs(j + 1) +
if (s.substring(i, j + 1) in set) 0 else j - i + 1
} ?: 0
}
return dfs(0)
}
pub fn min_extra_char(s: String, dictionary: Vec<String>) -> i32 {
let mut dp = vec![0; s.len() + 1];
for i in 1..=s.len() {
dp[i] = 1 + dp[i - 1];
for w in dictionary.iter() {
if s[..i].ends_with(w) {
dp[i] = dp[i].min(dp[i - w.len()])
}
}
}; dp[s.len()]
}
int minExtraChar(string s, vector<string>& dictionary) {
vector<int> dp(s.length() + 1, 0);
for (int i = 1; i <= s.length(); i++) {
dp[i] = 1 + dp[i - 1];
for (auto w: dictionary)
if (i >= w.length() && s.substr(i - w.length(), w.length()) == w)
dp[i] = min(dp[i], dp[i - w.length()]);
}
return dp[s.length()];
}
22.09.2024
440. K-th Smallest in Lexicographical Order hard
blog post
substack
youtube

Join me on Telegram
https://t.me/leetcode_daily_unstoppable/743
Problem TLDR
k lexicographically smallest value from 1..n #hard #math
Intuition
If we try the solution from the previous day https://t.me/leetcode_daily_unstoppable/742 it will give us TLE as the problem size is too big 10^9. However, for Kotlin, the naive optimization of batch increments will pass:
val diff = min(nl, x + (10L - (x % 10L))) - x
if (i < k - diff) { x += diff; i += diff.toInt() }
The actual solution is to skip all numbers x0..x9, x00..x99, x000..x999, x0000..x9999, xx00000..xx99999 for every prefix x while they are less than target n.
Approach
- steal someone else’s solution
Complexity
-
Time complexity: \(O(lg(k) * lg(n))\)
-
Space complexity: \(O(1)\)
Code
fun findKthNumber(n: Int, k: Int): Int {
var x = 1L; var i = 1; val nl = n.toLong()
while (i < k) {
if (x * 10L <= nl) x *= 10L else {
if (x + 1L > nl) x /= 10L
x++
val diff = min(nl, x + (10L - (x % 10L))) - x
if (i < k - diff) { x += diff; i += diff.toInt() }
while (x > 0L && x % 10L == 0L) x /= 10L
}
i++
}
return x.toInt()
}
pub fn find_kth_number(n: i32, k: i32) -> i32 {
let (mut x, mut i, n, k) = (1, 1, n as i64, k as i64);
while i < k {
let (mut count, mut from, mut to) = (0, x, x);
while from <= n {
count += to.min(n) - from + 1;
from *= 10; to = to * 10 + 9
}
if i + count <= k { i += count; x += 1 }
else { i += 1; x *= 10 }
}
x as i32
}
int findKthNumber(int n, int k) {
long long x = 1, i = 1;
while (i < k) {
long long count = 0, from = x, to = x;
while (from <= n) {
count += min(to, static_cast<long long>(n)) - from + 1;
from *= 10; to = to * 10 + 9;
}
if (i + count <= k) { i += count; x += 1; }
else { i += 1; x *= 10; }
}
return static_cast<int>(x);
}
21.09.2024
386. Lexicographical Numbers medium
blog post
substack
youtube

Join me on Telegram
https://t.me/leetcode_daily_unstoppable/742
Problem TLDR
Lexicographical ordered numbers 1..n #medium #dfs
Intuition
The problem is, we should understand how the numbers are ordered:
// 1,10,100,101,102,103,104,105,106,107,108,109,
// 11,110,111,112,113,114,115,116,117,118,119,12
// 119 < 12 | 120
// 1,
// 10,
// 100,
// 1000,
// 10000,
// 10001,
// 1001,1002,1003,1004,1005,1006,1007,1008,1009,
// 101,1010,1011,1012,1013,1014,1015,1016,1017,1018,1019,
// 102,1020,1021,1022,1023,1024,1025,1026,1027,1028,1029,
// 103,1030,1031,1032,1033,1034,1035,1036,1037,1038,1039,
// 104,1040,1041,1042,1043,1044,1045,1046,1047,1048,1049,
// 105,1050,1051,1052,1053,1054,1055,1056,1057,1058,1059,
// 106,1060,1061,1062,1063,1064,1065,1066,1067,1068,1069,
// 107,1070,1071,1072,1073,1074,1075,1076,1077,1078,1079,
// 108,1080,1081,1082,1083,1084,1085,1086,1087,1088,1089,
// 109,1090,1091,1092,1093,1094,1095,1096,1097,1098,1099,
// 11,
// 110,1100,1101,1102,1103,1104,1105,1106,1107,1108,1109,111
Some pattern I noticed: take 102 and add digits 0..9 to the end of it, then repeat. This is a recursive problem.
Another solution is iterative: find out what the number is next - first increase 10 times, then go back /=10 and increase by one, after that backtrack all trailing zeros while x % 10 == 0 x/= 10.
And finally, there is a Trie solution: add all numbers strings to Trie, then just scan it in a DFS order.
Approach
- Kotlin - simple DFS
- Rust - iterative
- c++ - Trie
Complexity
-
Time complexity: \(O(n)\)
-
Space complexity: \(O(n)\)
Code
fun lexicalOrder(n: Int) = buildList {
fun dfs(x: Int): Unit = if (x <= n) {
add(x)
for (d in 0..9) dfs(x * 10 + d)
} else Unit
for (d in 1..9) dfs(d)
}
pub fn lexical_order(n: i32) -> Vec<i32> {
let mut x = 0; (0..n).map(|i| {
if x > 0 && x * 10 <= n { x *= 10 } else {
if x + 1 > n { x /= 10 }
x += 1;
while x % 10 < 1 { x /= 10 }
}; x
}).collect()
}
vector<int> lexicalOrder(int n) {
struct Trie { Trie *child[10]; int x; };
Trie root = Trie();
for (int i = 1; i <= n; i++) {
Trie* t = &root;
for (auto c: to_string(i)) {
int next = c - '0';
if (!t->child[next]) t->child[next] = new Trie();
t = t->child[next];
}
t->x = i;
}
vector<int> res;
std::function<void(Trie*)> dfs; dfs = [&](Trie* t) {
if (t->x > 0) res.push_back(t->x);
for (auto c: t->child) if (c) dfs(c);
};
dfs(&root);
return res;
}
20.09.2024
214. Shortest Palindrome hard
blog post
substack
youtube

Join me on Telegram
https://t.me/leetcode_daily_unstoppable/741
Problem TLDR
Prepend to make the shortest palindrome #hard #rolling_hash #knuth-morris-pratt
Intuition
The brute-force solution is accepted, so just check all the prefixes.
One optimization is to use a rolling-hash: compute it for the prefix and it’s reverse. The worst case is still O(n^2) for aaaaa-like strings if not skip the equals check.
// aacecaaa -> aacecaa + a
// a -> a
// aa -> aa
// aac -> caa
// aace -> ecaa
// aacec -> cecaa
// aaceca -> acecaa
// aacecaa -> aacecaa
// abc
// h(ab) + c = h(h(a) + b) + c = 31*(31*a+b) + c = 31^2a + 31b + c
// h(bc) = 31b + c
// a + h(bc) = 31^2a + 31b + c
The optimal solutino is based on Knuth-Morris-Pratt substring search: make an array where each value is the length between suffix and preffix up to current position ps[i] = max_len_of(s[..i] == s[0..]). It is cleverly constructed and must be learned beforehand.
Now, to apply to current problem, make a string s#rev_s, and find the last value of ps - it will tell the maximum length of s[..] == rev_s[..end]. For example abab and baba have the common part of aba, and this is what we need to know to make a shortest palindrome: b + aba_b:
// 012345678
// abab#baba p
// 0 i
// j 0
// 1 i
// j 00
// 2 i
// j 001
// 3 i
// j 0012
// 4 i
// j 00120
// 5 i
// j 001200
// 6 i
// j 0012001
// 7 i
// j 00120012
// 8 i
// j 001200123
Approach
- KMP https://cp-algorithms.com/string/prefix-function.html
- rolling-hash is also useful, we construct it for
f = 31 * f + xfor appending andf = 31^p + ffor prepending
Complexity
-
Time complexity: \(O(n)\)
-
Space complexity: \(O(n)\)
Code
fun shortestPalindrome(s: String): String {
var hash1 = 0; var hash2 = 0; var p = 1
return s.drop(s.withIndex().maxOfOrNull { (i, c) ->
hash1 = 31 * hash1 + c.code
hash2 += p * c.code
p *= 31
if (hash1 == hash2) i + 1 else 0
} ?: 0).reversed() + s
}
pub fn shortest_palindrome(s: String) -> String {
let mut rev: Vec<_> = s.bytes().rev().collect();
let sr = [s.as_bytes(), &[b'#'], &rev[..]].concat();
let (mut j, mut ps, mut common) = (0, vec![0; sr.len()], 0);
for i in 1..sr.len() {
while j > 0 && sr[i] != sr[j] { j = ps[j - 1] }
if sr[i] == sr[j] { j += 1 }
ps[i] = j; common = j
}
from_utf8(&rev[..s.len() - common]).unwrap().to_owned() + &s
}
string shortestPalindrome(string s) {
string rev = s; std::reverse(rev.begin(), rev.end());
string sr = s + "#" + rev; int j = 0;
vector<int> ps(sr.size());
for (int i = 1; i < sr.size(); i++) {
while (j > 0 && sr[i] != sr[j]) j = ps[j - 1];
if (sr[i] == sr[j]) j++;
ps[i] = j;
}
return rev.substr(0, s.size() - ps.back()) + s;
}
fun shortestPalindrome(s: String): String {
val f = IntArray(s.length + 1); var j = 0
for (i in 2..s.length) {
j = f[i - 1]
while (j > 0 && s[j] != s[i - 1]) j = f[j]
if (s[j] == s[i - 1]) f[i] = j + 1
}
j = 0
for (i in s.indices) {
while (j > 0 && s[j] != s[s.length - i - 1]) j = f[j]
if (s[j] == s[s.length - i - 1]) j++
}
return s.drop(j).reversed() + s
}
19.09.2024
241. Different Ways to Add Parentheses medium
blog post
substack
youtube

Join me on Telegram
https://t.me/leetcode_daily_unstoppable/740
Problem TLDR
Eval all possible parenthesis placements #medium #dynamic_programming
Intuition
This problem is all about splitting the task into a subproblem. Let’s make a tree where each node is the operation on it’s left and right subtree.
Now, first compute left and right result, then invoke an operation for each operation in the current expression.
Approach
- memoization is not necessary
- if there is no operations, then expression is a single number
Complexity
-
Time complexity: \(O(2^n)\)
-
Space complexity: \(O(2^n)\)
Code
fun diffWaysToCompute(expression: String): List<Int> = buildList {
for ((i, c) in expression.withIndex()) if (!c.isDigit()) {
val leftList = diffWaysToCompute(expression.take(i))
val rightList = diffWaysToCompute(expression.drop(i + 1))
for (left in leftList) for (right in rightList) add(when (c) {
'+' -> left + right
'-' -> left - right
else -> left * right
})
}
if (isEmpty()) add(expression.toInt())
}
pub fn diff_ways_to_compute(expression: String) -> Vec<i32> {
let (mut i, mut res) = (0, vec![]);
for i in 0..expression.len() {
let b = expression.as_bytes()[i];
if let b'+' | b'-' | b'*' = b {
let left_res = Self::diff_ways_to_compute(expression[..i].to_string());
let right_res = Self::diff_ways_to_compute(expression[i + 1..].to_string());
for left in &left_res { for right in &right_res { res.push(match b {
b'+' => left + right, b'-' => left - right, _ => left * right
})}}
}}
if res.is_empty() { vec![expression.parse::<i32>().unwrap()] } else { res }
}
vector<int> diffWaysToCompute(string expression) {
vector<int> res;
for (int i = 0; i < expression.size(); i++) {
auto c = expression[i];
if (c == '+' || c == '-' || c == '*') {
vector<int> left_res = diffWaysToCompute(expression.substr(0, i));
vector<int> right_res = diffWaysToCompute(expression.substr(i + 1, expression.size() - i - 1));
for (auto left: left_res) for (auto right: right_res)
res.push_back(c == '+' ? left + right : c == '-' ? left - right : left * right);
}
}
if (res.size() == 0) res.push_back(std::stoi(expression));
return res;
}
18.09.2024
179. Largest Number medium
blog post
substack
youtube

Join me on Telegram
https://t.me/leetcode_daily_unstoppable/739
Problem TLDR
Concatenate nums to largest number #medium #math
Intuition
The intuition was and still is hard for me. (My own wrong intuition is that we can only do the backtracking and a full search)
Assuming we have to choose between 3 30 32, we should compare 3_30, 3_32, 30_3, 30_32, 32_3, 32_30, and choose - 3_32.
For proving the correctness of applying the sorting I would pass to @DBabichev https://leetcode.com/problems/largest-number/solutions/863489/python-2-lines-solution-using-sort-explained/
(You have to prove the transtivity if (a > b), and (b > c) then (a > c) https://en.wikipedia.org/wiki/Comparison_sort)
// 3 9 90
// 9093 9903 9390
//
// 3 30 34
// *
// *
// *
// 3 30 32
// *
// *
// *
// 31 310 312
// *
// *
// *
Approach
- we can convert to string before or after the sorting
- the “0” corner case can be fixed by checking the first number
Complexity
-
Time complexity: \(O(nlog(n))\)
-
Space complexity: \(O(n)\)
Code
fun largestNumber(nums: IntArray) = nums
.sortedWith { a, b -> "$b$a".compareTo("$a$b") }
.joinToString("").takeIf { it[0] != '0' } ?: "0"
pub fn largest_number(mut nums: Vec<i32>) -> String {
nums.sort_by(|a, b| {
let (a, b) = (format!("{b}{a}"), format!("{a}{b}")); a.cmp(&b)});
if nums[0] == 0 { return "0".into() }
nums.into_iter().map(|n| n.to_string()).collect()
}
string largestNumber(vector<int>& nums) {
std::sort(nums.begin(), nums.end(), [](int a, int b){
return "" + to_string(b) + to_string(a) < "" + to_string(a) + to_string(b);
});
string res; for (auto n: nums) res += to_string(n);
return res[0] == '0' ? "0": res;
}
17.09.2024
884. Uncommon Words from Two Sentences easy
blog post
substack
youtube

Join me on Telegram
https://t.me/leetcode_daily_unstoppable/738
Problem TLDR
Unique words from two strings #easy
Intuition
We can count frequencies by using a HashMap
Approach
- treat two strings like a single, no difference
- there is a
groupByin Kotlin (in Rust it is in external crate itertools) - c++ has a
stringstream
Complexity
-
Time complexity: \(O(n)\)
-
Space complexity: \(O(n)\)
Code
fun uncommonFromSentences(s1: String, s2: String) =
"$s1 $s2".split(" ").groupBy { it }
.filter { (k, v) -> v.size < 2 }.keys.toList()
pub fn uncommon_from_sentences(s1: String, s2: String) -> Vec<String> {
let mut freq = HashMap::new();
for w in s1.split_whitespace() { *freq.entry(w).or_insert(0) += 1 }
for w in s2.split_whitespace() { *freq.entry(w).or_insert(0) += 1 }
freq.into_iter().filter(|(k, v)| *v == 1).map(|(k, v)| k.to_string()).collect()
}
vector<string> uncommonFromSentences(string s1, string s2) {
unordered_map<string, int> freq; vector<string> res;
string s = s1 + " " + s2; stringstream ss(s); string w;
while (getline(ss, w, ' ')) ++freq[w];
for (auto kv: freq) if (kv.second == 1) res.push_back(kv.first);
return res;
}
16.09.2024
539. Minimum Time Difference medium
blog post
substack
youtube

Join me on Telegram
https://t.me/leetcode_daily_unstoppable/737
Problem TLDR
Min difference in a list of times hh:mm #medium
Intuition
The main problem is how to handle the loop:
// 12:00
// 1:00
// 23:00
One way is to repeat the array twice. (Actually, only the first value matters).
Approach
- let’s use
windowiterator - we can use a bucket sort
Complexity
-
Time complexity: \(O(nlog(n))\) or \(O(n + m)\), where m is minutes = 24 * 60
-
Space complexity: \(O(n)\) or \(O(m)\)
Code
fun findMinDifference(timePoints: List<String>) =
timePoints.map { it.split(":")
.let { it[0].toInt() * 60 + it[1].toInt() }}
.sorted().let { it + (it[0] + 24 * 60) }
.windowed(2).minOf { it[1] - it[0] }
pub fn find_min_difference(time_points: Vec<String>) -> i32 {
let mut times: Vec<_> = time_points.iter().map(|s| {
s[0..2].parse::<i32>().unwrap() * 60 + s[3..5].parse::<i32>().unwrap()
}).collect();
times.sort_unstable(); times.push(times[0] + 60 * 24);
times.windows(2).map(|w| w[1] - w[0]).min().unwrap()
}
int findMinDifference(vector<string>& timePoints) {
vector<bool> times(24 * 60 + 1);
for (int i = 0; i < timePoints.size(); i++) {
int t = std::stoi(timePoints[i].substr(0, 2)) * 60 +
std::stoi(timePoints[i].substr(3, 5));
if (times[t]) return 0; else times[t] = true;
}
int res = times.size(); int j = -1; int first = -1;
for (int i = 0; i < times.size(); i++) if (times[i]) {
if (j >= 0) res = min(res, i - j); else first = i;
j = i;
}
return min(res, first + 24 * 60 - j);
}
15.09.2024
1371. Find the Longest Substring Containing Vowels in Even Counts medium
blog post
substack
youtube

Join me on Telegram
https://t.me/leetcode_daily_unstoppable/736
Problem TLDR
Longest substring with even number of “aeiou” #medium #bit_manipulation #two_pointers
Intuition
Can’t solve it without the hint.
The hint is: use a bit mask for vowels.
Now, let’s observe how we can do this:
// hello
// hell
// ^ xor(hell) == xor(he)
// helolelo
The bit mask for hell is equal to the bit mask of he - both contains a single e. So, we can store the first encounter of each uniq bit mask to compute the difference between them: hell - he = ll (our result).
Approach
- we can use a HashMap or just an array for the
bitsand for theindices
Complexity
-
Time complexity: \(O(n)\)
-
Space complexity: \(O(1)\),
2^(vowels.size)forindices,vowels.sizeforbits
Code
fun findTheLongestSubstring(s: String): Int {
val freqToInd = mutableMapOf<Int, Int>()
val bit = mapOf('a' to 1, 'e' to 2, 'i' to 4, 'o' to 8, 'u' to 16)
var freq = 0; freqToInd[0] = -1
return s.indices.maxOf { i ->
freq = freq xor (bit[s[i]] ?: 0)
i - freqToInd.getOrPut(freq) { i }
}
}
pub fn find_the_longest_substring(s: String) -> i32 {
let (mut freq, mut freq_to_ind) = (0, [s.len(); 32]); freq_to_ind[0] = 0;
let bit = [1, 0, 0, 0, 2, 0, 0, 0, 4, 0, 0, 0, 0, 0, 8, 0, 0, 0, 0, 0, 16, 0, 0, 0, 0, 0];
s.bytes().enumerate().map(|(i, b)| {
freq ^= bit[(b - b'a') as usize]; freq_to_ind[freq] = freq_to_ind[freq].min(i + 1);
i - freq_to_ind[freq] + 1
}).max().unwrap() as _
}
int findTheLongestSubstring(string s) {
int freq = 0, res = 0;
unordered_map<int, int> freqToInd = 0;
for (auto i = 0; i < s.length(); i++) {
freq ^= (1 << (string("aeiou").find(s[i]) + 1)) >> 1;
if (!freqToInd.count(freq)) freqToInd[freq] = i;
res = max(res, i - freqToInd[freq]);
}
return res;
}
14.09.2024
2419. Longest Subarray With Maximum Bitwise AND medium
blog post
substack
youtube

Join me on Telegram
https://t.me/leetcode_daily_unstoppable/735
Problem TLDR
Max bitwise AND subarray #medium #bit_manipulation #two_pointers
Intuition
Let’s observe the problem:
// 1 001
// 2 010 [1 2]=000
// 3 011 [1 2 3]
// 4 100
After some time, the intuition comes: if we have a maximum value, every other value would decrease it with AND operation.
So, we should only care about the maximum and find the longest subarray of it.
Approach
- we can find a
max, then scan the array, or do this in one go - we can use indexes and compute
i - j + 1(i and j must be inclusive) - or we can use a counter (it is somewhat simpler)
Complexity
-
Time complexity: \(O(n)\)
-
Space complexity: \(O(1)\)
Code
fun longestSubarray(nums: IntArray): Int {
val maxValue = nums.max(); var count = 0
return nums.maxOf {
if (it < maxValue) count = 0 else count++
count
}
}
pub fn longest_subarray(nums: Vec<i32>) -> i32 {
let (mut j, mut max, mut max_v) = (0, 0, 0);
for (i, &n) in nums.iter().enumerate() {
if n > max_v { max_v = n; max = 0; j = i }
else if n < max_v { j = i + 1 }
max = max.max(i - j + 1)
}; max as _
}
int longestSubarray(vector<int>& nums) {
int count, max, max_v = 0;
for (auto n: nums)
if (n > max_v) { max_v = n; count = 1; max = 1; }
else if (n < max_v) count = 0;
else max = std::max(max, ++count);
return max;
}
13.09.2024
1310. XOR Queries of a Subarray medium
blog post
substack
youtube

Join me on Telegram
https://t.me/leetcode_daily_unstoppable/733
Problem TLDR
Run queries[[from, to]] of xor(arr[from..to]) #medium #bit_manipulation
Intuition
The xor operation is cumulative and associative: swapping and grouping don’t matter (like a sum or multiply). So, we can precompute prefix xor and use it to compute xor[i..j] in O(1).
Approach
- we can reuse the input array
Complexity
-
Time complexity: \(O(n)\)
-
Space complexity: \(O(n)\)
Code
fun xorQueries(arr: IntArray, queries: Array<IntArray>): IntArray {
for (i in 1..<arr.size) arr[i] = arr[i] xor arr[i - 1]
return queries.map { (from, to) ->
arr[to] xor (arr.getOrNull(from - 1) ?: 0)
}.toIntArray()
}
pub fn xor_queries(mut arr: Vec<i32>, queries: Vec<Vec<i32>>) -> Vec<i32> {
for i in 1..arr.len() { arr[i] ^= arr[i - 1] }
queries.into_iter().map(|q|
arr[q[1] as usize] ^ arr[..].get(q[0] as usize - 1).unwrap_or(&0)).collect()
}
vector<int> xorQueries(vector<int>& arr, vector<vector<int>>& queries) {
for (int i = 1; i < arr.size(); i++) arr[i] ^= arr[i - 1];
vector<int> res; res.reserve(queries.size());
for (const auto q: queries)
res.push_back(arr[q[1]] ^ (q[0] > 0 ? arr[q[0] - 1] : 0));
return res;
}
12.09.2024
1684. Count the Number of Consistent Strings easy
blog post
substack
youtube

Join me on Telegram
https://t.me/leetcode_daily_unstoppable/732
Problem TLDR
Count words with allowed characters #easy
Intuition
There are total of 26 characters, check them.
Approach
- we can use a HashSet
- we can use a bit mask
Complexity
-
Time complexity: \(O(n)\)
-
Space complexity: \(O(1)\)
Code
fun countConsistentStrings(allowed: String, words: Array<String>) =
words.count { it.all { it in allowed }}
pub fn count_consistent_strings(allowed: String, words: Vec<String>) -> i32 {
let set: HashSet<_> = allowed.bytes().collect();
words.iter().filter(|w| w.bytes().all(|b| set.contains(&b))).count() as _
}
int countConsistentStrings(string allowed, vector<string>& words) {
auto bits = [](string w) {
int mask = 0; for (int i = 0; i < w.length(); i++)
mask |= 1 << (w[i] - 'a');
return mask;
};
int mask = bits(allowed);
return std::count_if(words.begin(), words.end(),
[mask, &bits](string w){return (mask | bits(w)) == mask;});
}
11.09.2024
2220. Minimum Bit Flips to Convert Number easy
blog post
substack
youtube

Join me on Telegram
https://t.me/leetcode_daily_unstoppable/731
Problem TLDR
Bit diff between two numbers #easy #bit_manipulation
Intuition
// 10 1010
// 7 0111
// ** *
To find the bits count there are several hacks: https://stackoverflow.com/a/109025/23151041
https://graphics.stanford.edu/~seander/bithacks.html#CountBitsSetParallel
x = (x & 0b1010101010101010101010101010101) + ((x >> 1) & 0b1010101010101010101010101010101);
x = (x & 0b0110011001100110011001100110011) + ((x >> 2) & 0b0110011001100110011001100110011);
x = (x & 0x0F0F0F0F) + ((x >> 4) & 0x0F0F0F0F);
x = (x & 0x00FF00FF) + ((x >> 8) & 0x00FF00FF);
x = (x & 0x0000FFFF) + ((x >> 16)& 0x0000FFFF);
+-------------------------------+
| 1 | 1 | 0 | 1 | 0 | 1 | 0 | 1 | <- x
| 1 0 | 0 1 | 0 1 | 0 1 | <- first time merge
| 0 0 1 1 | 0 0 1 0 | <- second time merge
| 0 0 0 0 0 1 0 1 | <- third time ( answer = 00000101 = 5)
+-------------------------------+
Approach
- let’s use built-in methods
Complexity
-
Time complexity: \(O(1)\)
-
Space complexity: \(O(1)\)
Code
fun minBitFlips(start: Int, goal: Int) =
(start xor goal).countOneBits()
pub fn min_bit_flips(start: i32, goal: i32) -> i32 {
(start ^ goal).count_ones() as i32
}
int minBitFlips(int start, int goal) {
return __builtin_popcount(start ^ goal);
}
10.09.2024
2807. Insert Greatest Common Divisors in Linked List medium
blog post
substack
youtube
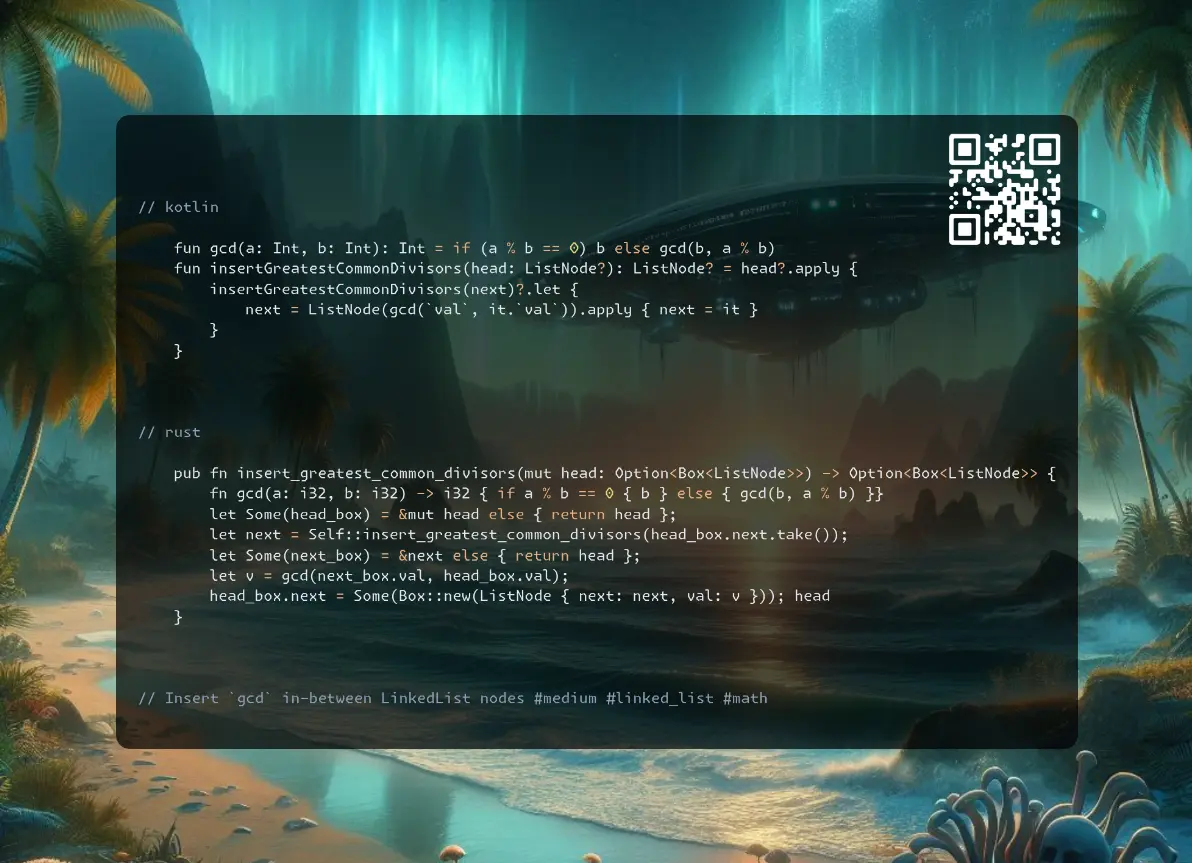
Join me on Telegram
https://t.me/leetcode_daily_unstoppable/730
Problem TLDR
Insert gcd in-between LinkedList nodes #medium #linked_list #math
Intuition
It’s all about the implementation details.
The gcd is if (a % b == 0) b else gcd(b, a % b) or if (!a) b else if (!b) a else gcd(abs(a - a), min(a, b)).
Approach
Did you know:
- Rust have some different ways to approach
Option-?takes ownership entirely and return early,.and_thengives nice lambda,let Some(..) = &mut xgive a chance to reuse optionxagain. - c++ have a built-in
gcd
Complexity
-
Time complexity: \(O(n)\)
-
Space complexity: \(O(n)\) for recursive, \(O(1)\) for the iterative implementation
Code
fun gcd(a: Int, b: Int): Int = if (a % b == 0) b else gcd(b, a % b)
fun insertGreatestCommonDivisors(head: ListNode?): ListNode? = head?.apply {
insertGreatestCommonDivisors(next)?.let {
next = ListNode(gcd(`val`, it.`val`)).apply { next = it }
}
}
pub fn insert_greatest_common_divisors(mut head: Option<Box<ListNode>>) -> Option<Box<ListNode>> {
fn gcd(a: i32, b: i32) -> i32 { if a % b == 0 { b } else { gcd(b, a % b) }}
let Some(head_box) = &mut head else { return head };
let next = Self::insert_greatest_common_divisors(head_box.next.take());
let Some(next_box) = &next else { return head };
let v = gcd(next_box.val, head_box.val);
head_box.next = Some(Box::new(ListNode { next: next, val: v })); head
}
ListNode* insertGreatestCommonDivisors(ListNode* head) {
if (!head || !head->next) return head;
ListNode* curr = head;
while (curr && curr->next) {
curr->next = new ListNode(gcd(curr->val, curr->next->val), curr->next);
curr = curr->next->next;
}
return head;
}
09.09.2024
2326. Spiral Matrix IV medium
blog post
substack
youtube

Join me on Telegram
https://t.me/leetcode_daily_unstoppable/729
Problem TLDR
LinkedList to spiral 2D matrix #medium #linked_list #simulation
Intuition
The only tricky thing is the implementation. Use the values themselves to detect when to change the direction.
Approach
- only one single rotation per cycle is necessary
- use 2D vector rotation:
(dx dy) = (-dy dx)
Complexity
-
Time complexity: \(O(nm)\)
-
Space complexity: \(O(nm)\)
Code
fun spiralMatrix(m: Int, n: Int, head: ListNode?): Array<IntArray> {
val res = Array(m) { IntArray(n) { -1 }}
var y = 0; var x = 0; var curr = head; var dy = 0; var dx = 1
while (curr != null) {
res[y][x] = curr.`val`
curr = curr.next
if ((x + dx) !in 0..<n || (y + dy) !in 0..<m || res[y + dy][x + dx] >= 0)
dx = -dy.also { dy = dx }
x += dx; y += dy
}
return res
}
pub fn spiral_matrix(m: i32, n: i32, mut head: Option<Box<ListNode>>) -> Vec<Vec<i32>> {
let mut res = vec![vec![-1; n as usize]; m as usize];
let (mut y, mut x, mut dy, mut dx) = (0, 0, 0i32, 1i32);
while let Some(head_box) = head {
res[y as usize][x as usize] = head_box.val; head = head_box.next;
if x < -dx || y < -dy || x + dx >= n || y + dy >= m || res[(y + dy) as usize][(x + dx) as usize] >= 0 {
(dx, dy) = (-dy, dx)
}
x += dx; y += dy
}
res
}
vector<vector<int>> spiralMatrix(int m, int n, ListNode* head) {
vector<vector<int>> res(m, vector(n, -1)); int y = 0; int x = 0;
int dy = 0; int dx = 1;
for (; head; head = head->next) {
res[y][x] = head->val;
if (x < -dx || y < -dy || x + dx >= n || y + dy >= m || res[y + dy][x + dx] >= 0) {
std::swap(dx, dy); dx *= -1;
}
x += dx; y += dy;
}
return res;
}
08.09.2024
725. Split Linked List in Parts medium
blog post
substack
youtube

Join me on Telegram
https://t.me/leetcode_daily_unstoppable/728
Problem TLDR
Split LinkedList into k parts #medium #linked_list
Intuition
This is a test of how clean your code can be. Count first, split second.
Approach
- count in each bucket
iisn / k + (n % k > i) - Rust makes you feel helpless
Complexity
-
Time complexity: \(O(n)\)
-
Space complexity: \(O(k)\)
Code
fun splitListToParts(head: ListNode?, k: Int): Array<ListNode?> {
var n = 0; var curr = head
while (curr != null) { n++; curr = curr.next }
curr = head
return Array(k) { i -> curr?.also {
for (j in 2..(n / k + if (i < n % k) 1 else 0))
curr = curr?.next
curr = curr?.next.also { curr?.next = null }
}}
}
pub fn split_list_to_parts(mut head: Option<Box<ListNode>>, k: i32) -> Vec<Option<Box<ListNode>>> {
let mut n = 0; let mut curr = &head;
while let Some(curr_box) = curr { n += 1; curr = &curr_box.next }
(0..k).map(|i| {
let mut start = head.take();
let mut x = &mut start;
for j in 1..n / k + (n % k > i) as i32 {
if let Some(x_box) = x { x = &mut x_box.next }
}
if let Some(x_box) = x { head = x_box.next.take() }
start
}).collect()
}
vector<ListNode*> splitListToParts(ListNode* head, int k) {
int n = 0; ListNode* curr = head;
while (curr) { n++; curr = curr->next; }
vector<ListNode*> res;
for (int i = 0; i < k; i++) {
res.push_back(head);
curr = head;
for (int j = 1; j < n / k + (n % k > i); j++)
curr = curr->next;
if (curr) { head = curr->next; curr->next = NULL; }
}
return res;
}
07.09.2024
1367. Linked List in Binary Tree medium
blog post
substack
youtube

Join me on Telegram
https://t.me/leetcode_daily_unstoppable/727
Problem TLDR
Is the LinkedList in the BinaryTree? #medium #linked_list #tree
Intuition
The problem size n is not that big, we can do a full Depth-First search and try to match Linked List at every tree node.
Approach
- the corner case is:
list: [1,2], tree: [1->1->2]
Complexity
-
Time complexity: \(O(n^2)\)
-
Space complexity: \(O(n)\)
Code
fun isSubPath(head: ListNode?, root: TreeNode?, start: Boolean = false): Boolean =
head == null || head.`val` == root?.`val` &&
(isSubPath(head.next, root.left, true) || isSubPath(head.next, root.right, true))
|| root != null && !start && (isSubPath(head, root.left) || isSubPath(head, root.right))
pub fn is_sub_path(head: Option<Box<ListNode>>, root: Option<Rc<RefCell<TreeNode>>>) -> bool {
fn dfs(head: &Option<Box<ListNode>>, root: &Option<Rc<RefCell<TreeNode>>>, start: bool) -> bool {
let Some(h) = head else { return true }; let Some(r) = root else { return false };
let r = r.borrow();
h.val == r.val && (dfs(&h.next, &r.left, true) || dfs(&h.next, &r.right, true))
|| !start && (dfs(head, &r.left, false) || dfs(head, &r.right, false))
}
dfs(&head, &root, false)
}
bool isSubPath(ListNode* head, TreeNode* root, bool start = 0) {
return !head || root && root->val == head->val
&& (isSubPath(head->next, root->left, 1) || isSubPath(head->next, root->right, 1))
|| root && !start && (isSubPath(head, root->left) || isSubPath(head, root->right));
}
06.09.2024
3217. Delete Nodes From Linked List Present in Array medium
blog post
substack
youtube

Join me on Telegram
https://t.me/leetcode_daily_unstoppable/726
Problem TLDR
Remove nums from a Linked List #medium #linked_list
Intuition
This is a test of how clean your code can be.
Approach
- use a
dummyhead to simplify the code - in Rust it is challenging: better use
&references toListNodeobjects; usetake
Complexity
-
Time complexity: \(O(n)\)
-
Space complexity: \(O(n)\) for set
Code
fun modifiedList(nums: IntArray, head: ListNode?): ListNode? {
val dummy = ListNode(0).apply { next = head }
val set = nums.toSet(); var curr = dummy
while (curr.next != null)
if (curr.next.`val` in set) curr.next = curr.next.next
else curr = curr.next ?: break
return dummy.next
}
pub fn modified_list(nums: Vec<i32>, head: Option<Box<ListNode>>) -> Option<Box<ListNode>> {
let set: HashSet<_> = nums.into_iter().collect();
let mut dummy = ListNode { next: head, val: 0 };
let mut curr = &mut dummy;
while let Some(next_box) = curr.next.as_mut() {
if set.contains(&next_box.val) {
curr.next = next_box.next.take()
} else {
curr = curr.next.as_mut().unwrap()
}
}
dummy.next
}
ListNode* modifiedList(vector<int>& nums, ListNode* head) {
bitset<100001> set; for (int v: nums) set.set(v);
ListNode* dummy = new ListNode(0); dummy->next = head;
ListNode* curr = dummy;
while (curr->next) if (set[curr->next->val])
curr->next = curr->next->next;
else curr = curr->next;
return dummy->next;
}
05.09.2024
2028. Find Missing Observations medium
blog post
substack
youtube

Join me on Telegram
https://t.me/leetcode_daily_unstoppable/725
Problem TLDR
Find n numbers to make [n m]/(n+m)=mean #medium #math
Intuition
This is a arithmetic problem:
// mean = (sum(m) + sum(n)) / (n + m)
// 1 5 6 mean=3 n=4 m=3
// 3 = ((1+5+6) + (x+y+z+k)) / (3+4)
// 3*7 = 12 + ans
// ans = 21 - 12 = 9
// sum(ans) = 9, count(ans) = 4
// 9 / 4 = 2
//
// 1 2 3 4 = 10 n=4 m=4 (n+m)=8 mean=6
// mean*(n+m)=6*8=48
// mean*(n+m)-sum = 48-10=38
// (mean*(n+m)-sum)/n = 38/4 = [9 9 9 11]
// 1 2 3 4 9 9 9 11 = 48 / 8 = 6 ???
The main trick is to not forget we only having the numbers 1..6.
Approach
- we can check the numbers afterwards to be in
1..6range - the remainder is always less than
n, so at most1can be added
Complexity
-
Time complexity: \(O(n)\)
-
Space complexity: \(O(n)\)
Code
fun missingRolls(rolls: IntArray, mean: Int, n: Int): IntArray {
val x = mean * (n + rolls.size) - rolls.sum()
return IntArray(n) { if (it < x % n) x / n + 1 else x / n }
.takeIf { it.all { it in 1..6 }} ?: intArrayOf()
}
pub fn missing_rolls(rolls: Vec<i32>, mean: i32, n: i32) -> Vec<i32> {
let x = mean * (n + rolls.len() as i32) - rolls.iter().sum::<i32>();
if x < n || x > n * 6 { return vec![] }
(0..n as usize).map(|i| x / n + (x % n > i as i32) as i32).collect()
}
vector<int> missingRolls(vector<int>& rolls, int mean, int n) {
int x = mean * (n + rolls.size()) - accumulate(rolls.begin(), rolls.end(), 0);
if (x < n || x > n * 6) return {};
vector<int> res; for (int i = 0; i < n; i++) res.push_back(x / n + (x % n > i));
return res;
}
04.09.2024
874. Walking Robot Simulation medium
blog post
substack
youtube

Join me on Telegram
https://t.me/leetcode_daily_unstoppable/724
Problem TLDR
Max distance after robot moves simulation #medium #simulation
Intuition
Simulate the process. There will be at most 10 * N steps, and we must do the obstacles checks in O(1).
Approach
- use the HashMap of pairs, no need to convert to strings (but can use bitset arithmetic)
- let’s use iterators
- instead of direction we can use rotation matrix https://en.wikipedia.org/wiki/Rotation_matrix
Complexity
-
Time complexity: \(O(n)\)
-
Space complexity: \(O(o)\),
ofor obstacles
Code
fun robotSim(commands: IntArray, obstacles: Array<IntArray>): Int {
var set = obstacles.map { it[0] to it[1] }.toSet()
var dx = 0; var dy = 1; var x = 0; var y = 0
return commands.maxOf { c ->
if (c < -1) dx = -dy.also { dy = dx }
else if (c < 0) dx = dy.also { dy = -dx }
else for (i in 1..c) if (((x + dx) to (y + dy)) !in set)
{ x += dx; y += dy }
y * y + x * x
}
}
pub fn robot_sim(commands: Vec<i32>, obstacles: Vec<Vec<i32>>) -> i32 {
let set: HashSet<_> = obstacles.into_iter().map(|o| (o[0], o[1])).collect();
let (mut dx, mut dy, mut x, mut y) = (0, 1, 0, 0);
commands.iter().map(|&c| {
if c < -1 { (dx, dy) = (-dy, dx) }
else if c < 0 { (dx, dy) = (dy, -dx) }
else { for i in 0..c { if !set.contains(&(x + dx, y + dy)) {
x += dx; y += dy
}}}
x * x + y * y
}).max().unwrap()
}
int robotSim(vector<int>& commands, vector<vector<int>>& obstacles) {
std::unordered_set<long long> obs;
for (const auto& o : obstacles)
obs.insert((long long)o[0] << 32 | (unsigned int)o[1]);
int dx[] = {0, 1, 0, -1}, dy[] = {1, 0, -1, 0}, x = 0, y = 0, di = 0, res = 0;
for (int c : commands)
if (c < 0) di = (di + (c == -1 ? 1 : 3)) % 4;
else while (c-- && !obs.count((long long)x + dx[di] << 32 | (unsigned int)(y + dy[di])))
x += dx[di], y += dy[di], res = std::max(res, x*x + y*y);
return res;
}
03.09.2024
1945. Sum of Digits of String After Convert easy
blog post
substack
youtube

Join me on Telegram
https://t.me/leetcode_daily_unstoppable/723
Problem TLDR
Sum of number chars k times #easy #simulation
Intuition
- the first transformation is different:
c - 'a' + 1 - other transformations:
c - '0'
Approach
- we can do it with strings or with just numbers
Complexity
-
Time complexity: \(O(n)\)
-
Space complexity: \(O(1)\)
Code
fun getLucky(s: String, k: Int) = (1..<k).fold(
s.map { "${it - 'a' + 1}" }.joinToString("").sumOf { it - '0' }
) { r, t -> r.toString().sumOf { it.code - '0'.code }}
pub fn get_lucky(s: String, k: i32) -> i32 {
let dig = |x| { let (mut s, mut x) = (0, x);
while x > 0 { s += x % 10; x /= 10 }; s};
(1..k).fold(s.bytes().map(|b|
dig(b as i32 - 96)).sum(), |r, t| dig(r))
}
int getLucky(string s, int k) {
auto dig = [](int x) {
int s = 0;
while (x > 0) { s += x % 10; x /= 10; }
return s;
};
int sum = 0;
for (char c : s) sum += dig(c - 'a' + 1);
while (k-- > 1) sum = dig(sum);
return sum;
}
02.09.2024
1894. Find the Student that Will Replace the Chalk medium
blog post
substack
youtube
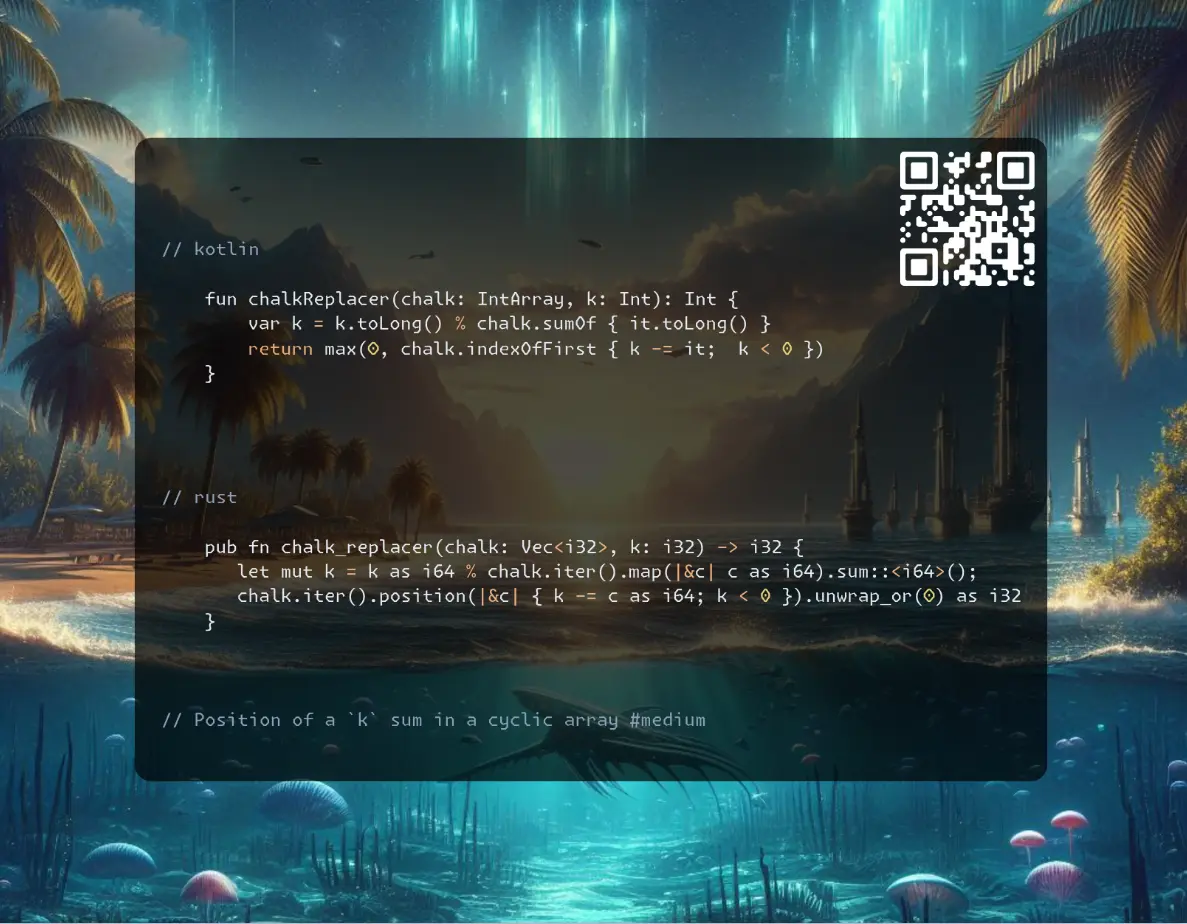
Join me on Telegram
https://t.me/leetcode_daily_unstoppable/722
Problem TLDR
Position of a k sum in a cyclic array #medium
Intuition
First, eliminate the full loops, then find the position. To find it, we can just scan again, or do a Binary Search.
Approach
- avoid Integer overflow
- let’s use languages’ APIs:
sumOf,indexOfFirst,position - in C++ let’s implement the Binary Search
Complexity
-
Time complexity: \(O(n)\)
-
Space complexity: \(O(1)\)
Code
fun chalkReplacer(chalk: IntArray, k: Int): Int {
var k = k.toLong() % chalk.sumOf { it.toLong() }
return max(0, chalk.indexOfFirst { k -= it; k < 0 })
}
pub fn chalk_replacer(chalk: Vec<i32>, k: i32) -> i32 {
let mut k = k as i64 % chalk.iter().map(|&c| c as i64).sum::<i64>();
chalk.iter().position(|&c| { k -= c as i64; k < 0 }).unwrap_or(0) as i32
}
int chalkReplacer(vector<int>& chalk, int k) {
for (int i = 0; i < chalk.size(); i++) {
if (i > 0) chalk[i] += chalk[i - 1];
if (chalk[i] > k || chalk[i] < 0) return i;
}
k %= chalk[chalk.size() - 1];
return upper_bound(chalk.begin(), chalk.end(), k) - chalk.begin();
}
01.09.2024
2022. Convert 1D Array Into 2D Array easy
blog post
substack
youtube

Join me on Telegram
https://t.me/leetcode_daily_unstoppable/721
Problem TLDR
1D to 2D mxn array #easy
Intuition
There are many ways to do this:
for y in 0..m for x in 0..nloopfor num in originalloop- using pointer arithmetics in C-like languages (loop unroll and SIMD)
- using Array constructors in Kotlin
- using iterators and
chunks
Approach
- pay attention to the description, we also have to check that size is exactly
m x n
Complexity
-
Time complexity: \(O(n x m)\)
-
Space complexity: \(O(n x m)\)
Code
fun construct2DArray(original: IntArray, m: Int, n: Int) =
if (original.size != n * m) listOf()
else original.asList().chunked(n)
pub fn construct2_d_array(original: Vec<i32>, m: i32, n: i32) -> Vec<Vec<i32>> {
if original.len() as i32 != m * n { vec![] } else
{ original.chunks_exact(n as usize).map(|r| r.to_vec()).collect() }
}
vector<vector<int>> construct2DArray(vector<int>& original, int m, int n) {
if (original.size() != m * n) return {};
std::vector<std::vector<int>> result; result.reserve(m);
const int* dataPtr = original.data();
for (int i = 0; i < m; ++i)
result.emplace_back(dataPtr + i * n, dataPtr + i * n + n);
return result;
}
31.08.2024
1514. Path with Maximum Probability medium
blog post
substack
youtube

Join me on Telegram
https://t.me/leetcode_daily_unstoppable/719
Problem TLDR
Max path in graph #medium #graph
Intuition
Several ways to solve it:
- Dijkstra, use array [0..n] of probabilities, from
start_nodetoi_node, put in queue while the situation is improving - A*, use
PriorityQueue(orBinaryHeap) and consider the paths with the largest probabilities so far, stop on the first arrival - Bellman-Ford, improve the situation
ntimes or until it stops improving (the N boundary can be proved, path without loops visits at most N nodes)
Approach
- let’s write the shortest code possible
- we should use
fold, asany,allandnoneare stopping early
Complexity
-
Time complexity: \(O(VE)\)
-
Space complexity: \(O(1)\)
Code
fun maxProbability(n: Int, edges: Array<IntArray>, succProb: DoubleArray, start_node: Int, end_node: Int): Double {
val pb = DoubleArray(n); pb[start_node] = 1.0
for (i in 0..n) if (!edges.withIndex().fold(false) { r, (i, e) ->
val a = pb[e[0]]; val b = pb[e[1]]
pb[e[0]] = max(a, succProb[i] * b); pb[e[1]] = max(b, succProb[i] * a)
r || pb[e[0]] > a || pb[e[1]] > b
}) break
return pb[end_node]
}
pub fn max_probability(n: i32, edges: Vec<Vec<i32>>, succ_prob: Vec<f64>, start_node: i32, end_node: i32) -> f64 {
let mut pb = vec![0f64; n as usize]; pb[start_node as usize] = 1f64;
loop { if !edges.iter().zip(succ_prob.iter()).fold(false, |r, (e, p)| {
let (e0, e1) = (e[0] as usize, e[1] as usize); let (a, b) = (pb[e0], pb[e1]);
pb[e0] = pb[e0].max(pb[e1] * p); pb[e1] = pb[e1].max(pb[e0] * p);
r || a < pb[e0] || b < pb[e1]
}) { break }}
pb[end_node as usize]
}
30.08.2024
2699. Modify Graph Edge Weights hard
blog post
substack
youtube

Join me on Telegram
https://t.me/leetcode_daily_unstoppable/718
Problem TLDR
Assign vacant -1 weight in graph to make shorted path equal target #hard #graph
Intuition
This is a kind of hard-hard problem. (and I failed it and have a hard time to understand the solution).
Some thoughts:
- we should consider only the shortest paths
- shortest means we considering the weights (not just distances)
One corner case:
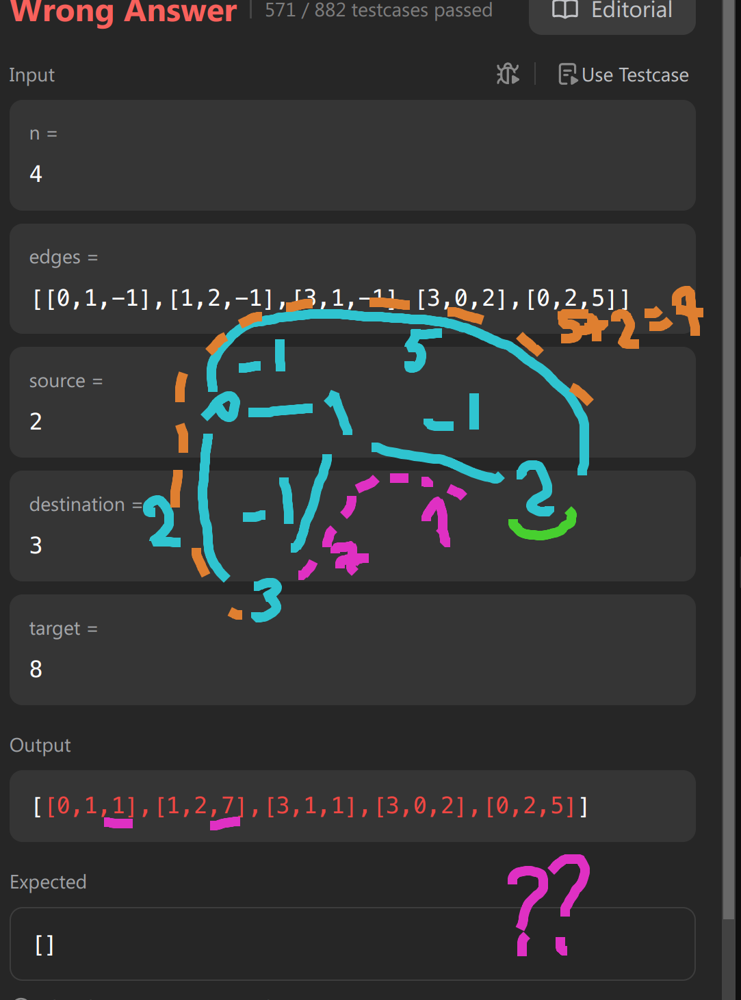
- we can’t just choose
anypaths that equal totarget, our path should be the shortest one
(At this point a gave up and checked @voturbac’s solution)
- find shortest path excluding
-1edges, it must not be larger than target - find shortest path making all vacant edges to
1, pick one of it and assign it’s value to1 + target - dist
Approach
- relax and and steal
Complexity
-
Time complexity: \(O(E^2log(V))\)
-
Space complexity: \(O(EV)\)
Code
fun modifiedGraphEdges(n: Int, edges: Array<IntArray>, source: Int, destination: Int, target: Int): Array<IntArray> {
val g = mutableMapOf<Int, MutableList<Pair<Int, Int>>>()
for ((i, e) in edges.withIndex()) {
g.getOrPut(e[0]) { mutableListOf() } += e[1] to i
g.getOrPut(e[1]) { mutableListOf() } += e[0] to i
}
fun bfs(modify: Boolean): Pair<Int, Int> = PriorityQueue<Pair<Int, Int>>(compareBy({ it.first })).run {
add(0 to source)
val dist = IntArray(n) { Int.MAX_VALUE }; val modId = dist.clone()
dist[source] = 0
while (size > 0) {
val (d, curr) = poll()
for ((sibl, j) in g[curr] ?: listOf())
if ((modify || edges[j][2] != -1) && dist[sibl] > d + max(1, edges[j][2])) {
dist[sibl] = d + max(1, edges[j][2])
modId[sibl] = if (edges[j][2] == -1) j else modId[curr]
add(dist[sibl] to sibl)
}
}
dist[destination] to modId[destination]
}
val (dist, _) = bfs(false); if (dist < target) return arrayOf()
while (true) {
val (dist, modId) = bfs(true)
if (dist > target) return arrayOf()
if (dist == target) break
edges[modId][2] = 1 + target - dist
}
for (e in edges) if (e[2] < 0) e[2] = 1
return edges
}
pub fn modified_graph_edges(n: i32, mut edges: Vec<Vec<i32>>, source: i32, destination: i32, target: i32) -> Vec<Vec<i32>> {
let mut g: HashMap<i32, Vec<(i32, usize)>> = HashMap::new();
for (i, e) in edges.iter().enumerate() {
g.entry(e[0]).or_insert(Vec::new()).push((e[1], i));
g.entry(e[1]).or_insert(Vec::new()).push((e[0], i));
}
fn bfs(g: &HashMap<i32, Vec<(i32, usize)>>, n: i32, edges: &Vec<Vec<i32>>, source: i32, destination: i32, modify: bool) -> (i32, i32) {
let mut heap = BinaryHeap::new(); heap.push(Reverse((0, source)));
let mut dist = vec![i32::MAX; n as usize]; let mut mod_id = dist.clone(); dist[source as usize] = 0;
while let Some(Reverse((d, curr))) = heap.pop() { if let Some(neighbors) = g.get(&curr) {
for &(sibl, j) in neighbors {
if (modify || edges[j][2] != -1) && dist[sibl as usize] > d + max(1, edges[j][2]) {
dist[sibl as usize] = d + max(1, edges[j][2]);
mod_id[sibl as usize] = if edges[j][2] == -1 { j as i32 } else { mod_id[curr as usize] };
heap.push(Reverse((dist[sibl as usize], sibl)));
}}}}
(dist[destination as usize], mod_id[destination as usize])
}
let (dist, _) = bfs(&g, n, &edges, source, destination, false); if dist < target { return vec![]; }
loop {
let (dist, mod_id) = bfs(&g, n, &edges, source, destination, true);
if dist > target { return vec![]; }
if dist == target { break; }
edges[mod_id as usize][2] = 1 + target - dist;
}
for e in &mut edges { if e[2] < 0 { e[2] = 1; } }; edges
}
29.08.2024
947. Most Stones Removed with Same Row or Column medium
blog post
substack
youtube

Join me on Telegram
https://t.me/leetcode_daily_unstoppable/717
Problem TLDR
Count islands of intersecting x and y #medium #union-find
Intuition
The first intuition is to build a graph of connected dots and try to explore them.
After some meditation (or using a hint), one can see that all the connected dots are removed. Union-Find helps to find the connected islands.
Approach
- we can connect each with each dot in O(n^2) (Rust solution)
- or we can connect each row with each column and find how many unique rows and columns are in O(n) (Kotlin solution)
Complexity
-
Time complexity: \(O(n^2)\) or \(O(n)\)
-
Space complexity: \(O(n)\)
Code
fun removeStones(stones: Array<IntArray>): Int {
val uf = mutableMapOf<Int, Int>()
fun f(a: Int): Int = uf[a]?.let { if (it == a) a else
f(it).also { uf[a] = it }} ?: a
for ((r, c) in stones) uf[f(r)] = f(-c - 1)
return stones.size - uf.values.map { f(it) }.toSet().size
}
pub fn remove_stones(stones: Vec<Vec<i32>>) -> i32 {
let (mut uf, mut res) = ((0..=stones.len()).collect::<Vec<_>>(), 0);
fn f(a: usize, uf: &mut Vec<usize>) -> usize {
while uf[a] != uf[uf[a]] { uf[a] = uf[uf[a]] }; uf[a] }
for i in 0..stones.len() { for j in i + 1..stones.len() {
if stones[i][0] == stones[j][0] || stones[i][1] == stones[j][1] {
let a = f(i, &mut uf); let b = f(j, &mut uf);
if (a != b) { res += 1; uf[a] = b }
}
}}; res
}
28.08.2024
1905. Count Sub Islands medium
blog post
substack
youtube

Join me on Telegram
https://t.me/leetcode_daily_unstoppable/716
Problem TLDR
Count islands intersecting in both 2D grids #medium #dfs
Intuition
First, understand the problem: not just intersecting 1 cells, but they must all lie on continuous islands without 0 breaks.
Explore grid2 islands and filter out if it has 0 in grid1 in them.
Approach
Let’s use iterators.
- we can mark visited nodes modifying the grid
Complexity
-
Time complexity: \(O(nm)\)
-
Space complexity: \(O(1)\)
Code
fun countSubIslands(grid1: Array<IntArray>, grid2: Array<IntArray>): Int {
fun dfs(y: Int, x: Int): Boolean = grid2[y][x] == 0 || {
grid2[y][x] = 0
(grid1[y][x] == 1) and
(y == 0 || dfs(y - 1, x)) and
(x == 0 || dfs(y, x - 1)) and
(y == grid2.size - 1 || dfs(y + 1, x)) and
(x == grid2[0].size - 1 || dfs(y, x + 1))
}()
return grid2.withIndex().sumOf { (y, r) ->
r.withIndex().count { (x, c) -> c > 0 && dfs(y, x) }}
}
pub fn count_sub_islands(mut grid1: Vec<Vec<i32>>, mut grid2: Vec<Vec<i32>>) -> i32 {
fn dfs(grid1: &[Vec<i32>], grid2: &mut Vec<Vec<i32>>, y: usize, x: usize) -> bool {
grid2[y][x] == 0 || {
grid2[y][x] = 0;
(grid1[y][x] == 1) &
(y == 0 || dfs(grid1, grid2, y - 1, x)) &
(x == 0 || dfs(grid1, grid2, y, x - 1)) &
(y == grid2.len() - 1 || dfs(grid1, grid2, y + 1, x)) &
(x == grid2[0].len() - 1 || dfs(grid1, grid2, y, x + 1))
}}
let w = grid2[0].len(); (0..grid2.len() * w)
.filter(|i| grid2[i / w][i % w] > 0 && dfs(&grid1, &mut grid2, i / w, i % w)).count() as i32
}
27.08.2024
1514. Path with Maximum Probability medium
blog post
substack
youtube

Join me on Telegram
https://t.me/leetcode_daily_unstoppable/715
Problem TLDR
Max path in a weighted graph #medium #graph
Intuition
There is a standard algorithm for finding all the shortest paths from one node to any other nodes - Bellman-Ford Algorithm. Only visit the nodes that are improving the situation.
Approach
- we can store each paths’ probability in the queue, or just reuse what is in
pbarray
Complexity
-
Time complexity: \(O(EV)\)
-
Space complexity: \(O(EV)\)
Code
fun maxProbability(n: Int, edges: Array<IntArray>, succProb: DoubleArray, start_node: Int, end_node: Int): Double {
val pb = DoubleArray(n + 1); val g = mutableMapOf<Int, MutableList<Pair<Int, Double>>>()
for ((i, e) in edges.withIndex()) {
g.getOrPut(e[0]) { mutableListOf() } += e[1] to succProb[i]
g.getOrPut(e[1]) { mutableListOf() } += e[0] to succProb[i]
}
val queue = ArrayDeque<Pair<Int, Double>>(); queue += start_node to 1.0
while (queue.size > 0) {
val (curr, p) = queue.removeFirst()
if (p <= pb[curr]) continue
pb[curr] = p
g[curr]?.onEach { (sibl, prob) -> queue += sibl to p * prob }
}
return pb[end_node]
}
pub fn max_probability(n: i32, edges: Vec<Vec<i32>>, succ_prob: Vec<f64>, start_node: i32, end_node: i32) -> f64 {
let (mut pb, mut g, mut queue) = (vec![0f64; 1 + n as usize], HashMap::new(), VecDeque::from([start_node]));
for (i, e) in edges.into_iter().enumerate() {
g.entry(e[0]).or_insert_with(|| vec![]).push((e[1], succ_prob[i]));
g.entry(e[1]).or_insert_with(|| vec![]).push((e[0], succ_prob[i]));
}
pb[start_node as usize] = 1f64;
while let Some(curr) = queue.pop_front() {
for &(sibl, prob) in g.get(&curr).unwrap_or(&vec![]) {
if pb[sibl as usize] < pb[curr as usize] * prob {
pb[sibl as usize] = pb[curr as usize] * prob; queue.push_back(sibl);
}
}
}; pb[end_node as usize]
}
26.08.2024
590. N-ary Tree Postorder Traversal easy
blog post
substack
youtube

Join me on Telegram
https://t.me/leetcode_daily_unstoppable/714
Problem TLDR
Postorder tree traversal #easy #tree
Intuition
Visit children, then append current.
Approach
We can use the stack for iteration without recursion. Or we can use recursion with a separate collection to make it faster.
- let’s just reuse the method’s signature neglecting the performance
Complexity
-
Time complexity: \(O(n^2)\)
-
Space complexity: \(O(n)\)
Code
fun postorder(root: Node?): List<Int> = root?.run {
children.map { postorder(it) }.flatten() + listOf(`val`)
} ?: listOf()
vector<int> postorder(Node* root) {
vector<int> res;
if (!root) return res;
for (auto c : root->children)
for (auto x : postorder(c))
res.push_back(x);
res.push_back(root->val);
return res;
}
25.08.2024
145. Binary Tree Postorder Traversal easy
blog post
substack
youtube

Problem TLDR
Postorder tree traversal #easy #binary_tree
Intuition
Postorder is: left, right, current.
Approach
- let’s reuse the method signature
Complexity
- Time complexity: \(O(n^2)\) for the list concatenation, \(O(n)\) for Rust as it is optimizes recursion and concatenations
Kotlin runtime for a full binary tree with different depths:
Depth Nodes Time (ms)
---------------------------
10 1023 1
11 2047 0
12 4095 2
13 8191 2
14 16383 3
15 32767 7
16 65535 16
17 131071 23
18 262143 44
19 524287 77
20 1048575 178
21 2097151 342
22 4194303 848
23 8388607 3917
For Rust:
Depth Nodes Time (ms)
---------------------------
1 1 0.00
2 3 0.00
3 7 0.00
4 15 0.00
5 31 0.00
6 63 0.00
7 127 0.01
8 255 0.01
9 511 0.03
10 1023 0.04
11 2047 0.11
12 4095 0.19
13 8191 0.38
14 16383 0.76
15 32767 1.29
16 65535 2.68
17 131071 5.46
18 262143 14.94
19 524287 32.28
20 1048575 67.25
21 2097151 141.33
22 4194303 258.15
23 8388607 534.31
24 16777215 1057.31
25 33554431 2145.27
26 67108863 4266.18
27 134217727 8957.01
28 268435455 16987.34
- Space complexity: \(O(n)\)
Code
fun postorderTraversal(root: TreeNode?): List<Int> = root?.run {
postorderTraversal(left) +
postorderTraversal(right) + listOf(`val`) } ?: listOf()
pub fn postorder_traversal(root: Option<Rc<RefCell<TreeNode>>>) -> Vec<i32> {
root.as_ref().map_or(vec![], |r| { let r = r.borrow();
[&Self::postorder_traversal(r.left.clone())[..],
&Self::postorder_traversal(r.right.clone())[..], &[r.val]].concat()
})
}
24.08.2024
564. Find the Closest Palindrome hard
blog post
substack
youtube

Join me on Telegram
https://t.me/leetcode_daily_unstoppable/712
Problem TLDR
Closest palindrome number #hard #math
Intuition
Let’s observe the possible results for some examples:
// 54321 543
// 54345
// 54
// 55
// 12345
// 12321
// 12321
// 12221
// 12021
// 11911
// 12121
// 101
// 99
// 111
// 1001
// 999
// 1111
// 1000001
// 1001001
// 999999
// 2000002
// 1999991
// 2001002
// 11
// 1001
// 9
// 1551
// 1441
As we see, there are not too many of them: we should consider the left half, then increment or decrement it. There are too many corner cases, however and this is the main hardness of this problem.
Approach
- Let’s just try
9-nth, and101-th as a separate candidates. - For odd case, we should avoid to double the middle
Complexity
-
Time complexity: \(O(1)\)
-
Space complexity: \(O(1)\)
Code
fun nearestPalindromic(n: String): String {
val half = n.take(n.length / 2 + (n.length % 2))
val a = half + half.reversed().drop(n.length % 2)
var b = "${half.toInt() - 1}"; b += "$b".reversed().drop(n.length % 2)
var c = "${half.toInt() + 1}"; c += "$c".reversed().drop(n.length % 2)
val d = "0${"9".repeat(n.length - 1)}"
val e = "1${"0".repeat(n.length - 1)}1"
return listOf(a, b, c, d, e).filter { it != n }.map { it.toLong() }
.minWith(compareBy({ abs(it - n.toLong() )}, { it })).toString()
}
pub fn nearest_palindromic(n: String) -> String {
let (len, n) = (n.len() as u32, n.parse::<i64>().unwrap());
(-1..2).map(|i| {
let mut h = (n / 10i64.pow(len / 2) + i).to_string();
let mut r: String = h.chars().rev().skip(len as usize % 2).collect();
(h + &r).parse().unwrap()
}).chain([10i64.pow(len - 1) - 1, 10i64.pow(len) + 1 ])
.filter(|&x| x != n)
.min_by_key(|&x| ((x - n).abs(), x)).unwrap().to_string()
}
23.08.2024
592. Fraction Addition and Subtraction easy
blog post
substack
youtube

Join me on Telegram
https://t.me/leetcode_daily_unstoppable/711
Problem TLDR
Eval string of fractions sum #medium #math
Intuition
The hardest part of this task is to remember how to simplify fractions like 12/18. Both numbers’ greatest common divisor is 6, and the fraction is equivalent to 2/3.
The GCD part also must be learned: f(a,b)=a%b==0?b:f(b%a, a).
Approach
- we can parse numbers one by one, or we can parse symbol by symbol; the former is simpler to implement than the latter
Complexity
-
Time complexity: \(O(n)\)
-
Space complexity: \(O(1)\)
Code
fun fractionAddition(expression: String): String {
var n1 = 0; var d1 = 1; var i = 0
fun gcd(a: Int, b: Int): Int = if (a % b == 0) b else gcd(b % a, a)
fun num() = expression.drop(i).takeWhile { it.isDigit() }
while (i < expression.length) {
var sign = 1
if (expression[i] == '-') { sign = -1; i++ }
if (expression[i] == '+') i++
var n2 = sign * num().run { i += length + 1; toInt() }
var d2 = num().run { i += length; toInt() }
n1 = n1 * d2 + n2 * d1; d1 *= d2
val gcd = gcd(abs(n1), d1)
n1 /= gcd; d1 /= gcd
}
return "$n1/$d1"
}
pub fn fraction_addition(expression: String) -> String {
let (mut n1, mut d1, mut d, mut p, mut sign) = (0, 1, 0, 0, 1);
fn gcd(a: i32, b: i32) -> i32 { if a % b == 0 { b } else { gcd(b % a, a)}}
for c in expression.bytes().chain([b'+'].into_iter()) { match c {
b'0'..=b'9' => d = d * 10 + (c as u8 - b'0' as u8) as i32,
b'/' => { p = sign * d; d = 0 },
b'+' | b'-' => {
sign = if c == b'-' { -1 } else { 1 };
let n2 = p; let d2 = d.max(1);
n1 = n1 * d2 + n2 * d1; d1 *= d2;
let gcd = gcd(n1.abs(), d1);
n1 /= gcd; d1 /= gcd; d = 0
},
_ => {}
}}; format!("{n1}/{d1}")
}
22.08.2024
476. Number Complement easy
blog post
substack
youtube

Join me on Telegram
https://t.me/leetcode_daily_unstoppable/710
Problem TLDR
Invert bits: 101 becomes 010 #easy #bit_manipulation
Intuition
One way to do it is inverting all bits and then applying some mask to trim the bits to the left:
0000 0000 0000 0000 0000 0000 0000 0101 5
0000 0000 0000 0000 0000 0000 0000 0100 5.takeHighestOneBit()
0000 0000 0000 0000 0000 0000 0000 1000 5.takeHighestOneBit() shl 1
0000 0000 0000 0000 0000 0000 0000 0111 (5.takeHighestOneBit() shl 1) - 1
Now we can use that mask for (~a&mask) or just a ^ mask.
Approach
- Rust has
leading_zeros() - There is a cool trick to
paintthe bits to make the mask:a >> 1 | a, a >> 2 | a, a >> 4 | a, a >> 8 | a, a >> 16 | a.
Complexity
-
Time complexity: \(O(1)\)
-
Space complexity: \(O(1)\)
Code
fun findComplement(num: Int) =
num xor ((num.takeHighestOneBit() shl 1) - 1)
pub fn find_complement(num: i32) -> i32 {
num ^ ((1 << (32 - num.leading_zeros())) - 1)
}
21.08.2024
664. Strange Printer hard
blog post
substack
youtube

Join me on Telegram
https://t.me/leetcode_daily_unstoppable/709
Problem TLDR
Minimum continuous replacements to make a string #hard #dynamic_programming
Intuition
Last time I solved it fine (1 year ago, https://t.me/leetcode_daily_unstoppable/291), this time, however, I was stuck with the corner cases, ultimately failing to solve it in 1.5 hours.
The not working idea was to consider the case of painting the [i..j] substring when its endings are equal s[i] == s[j], and choose between repainting entire thing or just appending one symbol. This also has to consider the background color already painted, so it is dp[i][j][b]:
// abcabc
// aaaaaa
// bb
// c
// bb
// c
// abcdcba cdc + ab..ba, cdc = d + c..c, cd = d + c.. or c + ..d
// cdcba = c + ..dcba or cdcb + ..a
// cdc = 1 + min(cd + c, c + dc)
The if tree grown too much, and some cases were failing, and I still think I missing some cases or idea is just completely wrong.
The working idea: try all possible splits to paint and choose the minimum.
Approach
Let’s implement both recursive and bottom-up iterative solutions.
Complexity
-
Time complexity: \(O(n^3)\)
-
Space complexity: \(O(n^2)\)
Code
fun strangePrinter(s: String): Int {
val dp = mutableMapOf<Pair<Int, Int>, Int>()
fun dfs(i: Int, j: Int): Int =
if (i == j) 1 else if (i > j) 0
else if (i == j - 1) { if (s[i] == s[j]) 1 else 2 }
else dp.getOrPut(i to j) {
if (s[i] == s[i + 1]) dfs(i + 1, j)
else if (s[j] == s[j - 1]) dfs(i, j - 1)
else (i..j - 1).map { dfs(i, it) + dfs(it + 1, j) }.min() -
if (s[i] == s[j]) 1 else 0
}
return dfs(0, s.lastIndex)
}
pub fn strange_printer(s: String) -> i32 {
let n = s.len(); let mut dp = vec![vec![-1; n]; n];
let s = s.as_bytes();
for (j, &b) in s.iter().enumerate() {
for i in (0..=j).rev() {
dp[i][j] = if j - i <= 1 { if s[i] == b { 1 } else { 2 }}
else if s[i] == b { dp[i + 1][j] }
else {
(i..j).map(|k| dp[i][k] + dp[k + 1][j] ).min().unwrap() -
if s[i] == b { 1 } else { 0 }
}}}
dp[0][n - 1]
}
20.08.2024
1140. Stone Game II medium
blog post
substack
youtube

Join me on Telegram
https://t.me/leetcode_daily_unstoppable/708
Problem TLDR
Max Alice price taking 1..2m piles optimally with Bob #medium #dynamic_programming
Intuition
Let’s do a full search with Depth-First Search, choosing how many piles to take to maximize the result. The catch is we should somehow consider the Bob results. One way is to return a pair of Alice and Bob result for the suffix. Anothe approach is some math: total_sum = Alice + Bob, and derive Alice’s next result.
Approach
- we can use slices in Rust
Complexity
-
Time complexity: \(O(n^2)\)
-
Space complexity: \(O(n^2)\)
Code
fun stoneGameII(piles: IntArray): Int {
val dp = mutableMapOf<Pair<Int, Int>, Int>()
fun dfs(i: Int, m: Int, s: Int, t: Int): Int =
if (i < piles.size) dp.getOrPut(i to m) {
var sum = 0
(i..<min(piles.size, i + 2 * m)).maxOf { j ->
sum += piles[j]
t - s - dfs(j + 1, max(m, j - i + 1), s + sum, t)
}
} else 0
return dfs(0, 1, 0, piles.sum())
}
pub fn stone_game_ii(piles: Vec<i32>) -> i32 {
let mut dp = vec![vec![-1; 101]; 101];
fn dfs(m: usize, t: i32, s: i32, dp: &mut [Vec<i32>], p: &[i32]) -> i32 {
if dp[0][m] >= 0 { return dp[0][m] }
let mut sum = 0;
dp[0][m] = (1..=p.len().min(2 * m)).map(|j| {
sum += p[j - 1];
t - s - dfs(m.max(j), t, s + sum, &mut dp[j..], &p[j..])
}).max().unwrap_or(0); dp[0][m]}
dfs(1, piles.iter().sum(), 0, &mut dp, &piles)
}
19.08.2024
650. 2 Keys Keyboard medium
blog post
substack
youtube

Join me on Telegram
https://t.me/leetcode_daily_unstoppable/707
Problem TLDR
Min copy-pastes to make n A’s from one #medium #dynamic_programming #math
Intuition
Let’s just do a full Depth-First Search, by making a choice between pasting and copy-pasting. The result can be cached making this solution n^2 from 2^n.
Another mathematical approach is to consider prime divisors of n: if n is divided by p, then we can make p paste presses. Primes can only be obtained by single paste presses. (This is not mine solution, and I’m still not getting it.)
Approach
- careful with edge cases of the DP solution: buf = 0
Complexity
-
Time complexity: \(O(n^2)\)
-
Space complexity: \(O(n^2)\)
Code
val dp = mutableMapOf<Pair<Int, Int>, Int>()
fun minSteps(n: Int, buf: Int = 0, a: Int = 1): Int =
if (a > n || buf > n) Int.MAX_VALUE / 2
else if (n == a) 0 else dp.getOrPut(buf to a) { min(
if (buf < 1) Int.MAX_VALUE / 2 else 1 + minSteps(n, buf, a + buf),
2 + minSteps(n, a, a + a)
)}
pub fn min_steps(n: i32) -> i32 {
let primes = [2, 3, 5, 7, 11, 13, 19, 23, 29, 31];
if n <= 5 { return if n == 1 { 0 } else { n }}
for p in primes { if n % p == 0 {
return p + Self::min_steps(n / p) }}
n
}
18.08.2024
264. Ugly Number II medium
blog post
substack
youtube

Join me on Telegram
https://t.me/leetcode_daily_unstoppable/706
Problem TLDR
nth number with only [1,2,3,5] multipliers #medium #heap
Intuition
First, understand the problem: the number should be divided only by the 1, 2, 3, and 5 dividers. The simple way is to maintain a sorted set of numbers and peek the lowest from it.
There is a clever solution exists, however: maintain separate pointers for 2, 3 and 5. The sorted set is a sequence of all the results for [1..n] and each pointer must point to the lowest not yet multiplied value.
There is a corner case, when pointer of 3 points to number 2, and vice versa, pointer of 2 points to the 3. To handle the duplicate result of 2 x 3 = 6 and 3 x 2 = 6, compare each pointer that is equal to the current result.
Approach
- for the first approach, we can use PriorityQueue with the HashSet, or just TreeSet
- the number can overflow the 32-bit value
Complexity
-
Time complexity: \(O(nlog(n))\) for the TreeSet, \(O(n)\) for the clever
-
Space complexity: \(O(n)\) for the TreeSet, \(O(1)\) for the clever
Code
fun nthUglyNumber(n: Int) = TreeSet<Long>().run {
add(1)
repeat(n - 1) {
val curr = pollFirst()
add(curr * 2); add(curr * 3); add(curr * 5)
}
first().toInt()
}
pub fn nth_ugly_number(n: i32) -> i32 {
let (mut u, m, mut p) =
(vec![1; n as usize], [2, 3, 5], [0, 0, 0]);
for i in 1..u.len() {
u[i] = p.iter().zip(m)
.map(|(&p, m)| u[p] * m).min().unwrap();
for (p, m) in p.iter_mut().zip(m) {
if u[*p] * m == u[i] { *p += 1 }}
}
u[u.len() - 1]
}
17.08.2024
1937. Maximum Number of Points with Cost medium
blog post
substack
youtube

Join me on Telegram
https://t.me/leetcode_daily_unstoppable/705
Problem TLDR
Max top-down path sum with column diff in 2D matrix #medium #dynamic_programming
Intuition
Let’s observer all possible paths:
We only need the previous row, where each cell must be just a maximum of all incoming paths. For each cell we must check all the cells from the previous row. This will take O(row * col * row)
Let’s observe how the maximum behaves when we walking on the x coordinate:
 As we see, the maximum is decreased each time by
 one, until it meets a bigger number. We can use this, but we lose all the right-to-left maximums, so let’s walk both ways.
Approach
- we can store only two rows
- we can walk both directions in a single loop
Complexity
-
Time complexity: \(O(rc)\)
-
Space complexity: \(O(r)\)
Code
fun maxPoints(points: Array<IntArray>): Long {
var prev = LongArray(points[0].size); var curr = prev.clone()
for (row in points) {
var max = 0L; var max2 = 0L
for (x in row.indices) {
max--; max2--; val x2 = row.size - 1 - x
max = max(max, prev[x]); max2 = max(max2, prev[x2])
curr[x] = max(curr[x], row[x] + max)
curr[x2] = max(curr[x2], row[x2] + max2)
}
prev = curr.also { curr = prev }
}
return prev.max()
}
pub fn max_points(points: Vec<Vec<i32>>) -> i64 {
let (mut dp, mut i, mut res) = (vec![vec![0; points[0].len()]; 2], 0, 0);
for row in points {
let (mut max, mut max2) = (0, 0);
for x in 0..row.len() {
max -= 1; max2 -= 1; let x2 = row.len() - 1 - x;
max = max.max(dp[i][x]); max2 = max2.max(dp[i][x2]);
dp[1 - i][x] = dp[1 - i][x].max(row[x] as i64 + max);
dp[1 - i][x2] = dp[1 - i][x2].max(row[x2] as i64 + max2);
res = res.max(dp[1 - i][x]).max(dp[1 - i][x2])
}
i = 1 - i
}; res
}
16.08.2024
624. Maximum Distance in Arrays medium
blog post
substack
youtube

Join me on Telegram
https://t.me/leetcode_daily_unstoppable/704
Problem TLDR
Max diff between the arrays #medium
Intuition
We must not use the min and max from the same array, that is the main problem here.
The ugly way to do this is to find the min and second min and same for max, then compare it with the current array in the second pass.
There is a one pass solution, however, and it looks much nicer. Just not use the current min and max simultaneously.
Approach
We can save some lines of code with iterators.
Complexity
-
Time complexity: \(O(n)\)
-
Space complexity: \(O(1)\)
Code
var min = Int.MAX_VALUE / 2; var max = -min
fun maxDistance(arrays: List<List<Int>>) = arrays
.maxOf { a ->
maxOf(max - a[0], a.last() - min)
.also { max = max(max, a.last()); min = min(min, a[0]) }
}
pub fn max_distance(arrays: Vec<Vec<i32>>) -> i32 {
let (mut min, mut max) = (i32::MAX / 2, i32::MIN / 2);
arrays.iter().map(|a| {
let diff = (max - a[0]).max(a[a.len() - 1] - min);
max = max.max(a[a.len() - 1]); min = min.min(a[0]); diff
}).max().unwrap()
}
15.08.2024
860. Lemonade Change easy blog post substack youtube
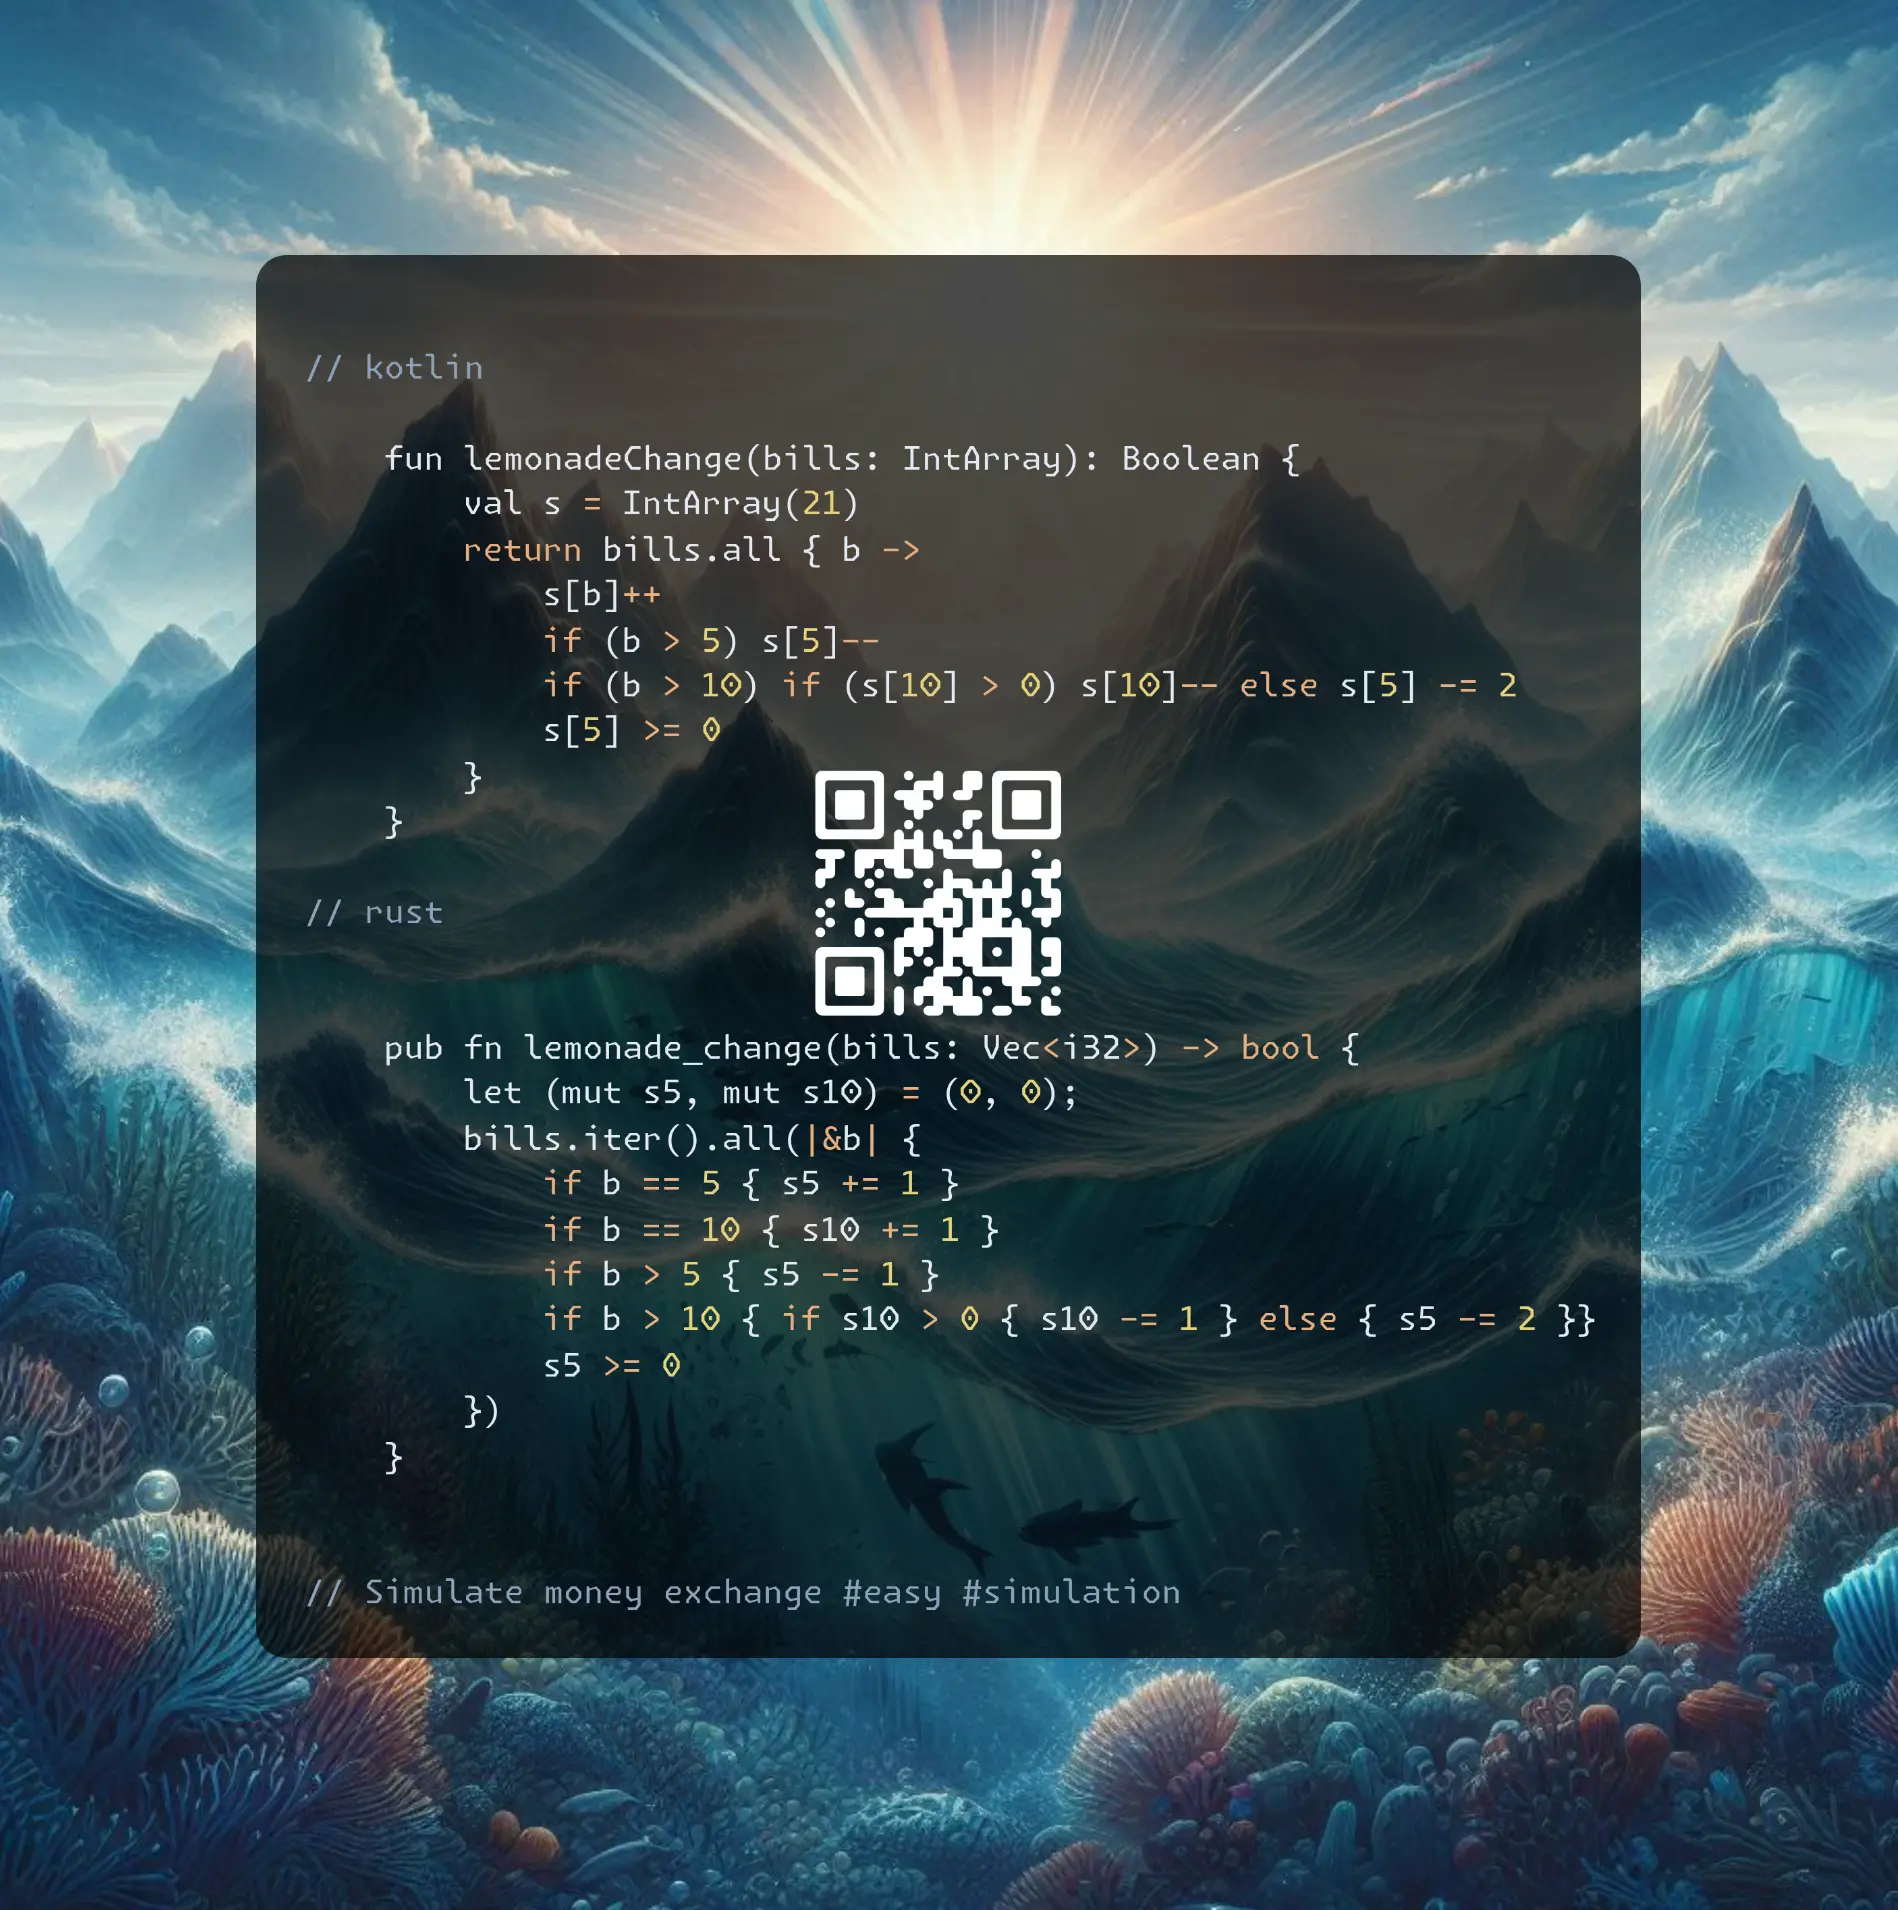
Join me on Telegram
https://t.me/leetcode_daily_unstoppable/703
Problem TLDR
Simulate money exchange #easy #simulation
Intuition
- queue order must not be changed
Just simulate the process.
Approach
- we don’t have to keep $20’s
Complexity
-
Time complexity: \(O(n)\)
-
Space complexity: \(O(1)\)
Code
fun lemonadeChange(bills: IntArray): Boolean {
val s = IntArray(21)
return bills.all { b ->
s[b]++
if (b > 5) s[5]--
if (b > 10) if (s[10] > 0) s[10]-- else s[5] -= 2
s[5] >= 0
}
}
pub fn lemonade_change(bills: Vec<i32>) -> bool {
let (mut s5, mut s10) = (0, 0);
bills.iter().all(|&b| {
if b == 5 { s5 += 1 }
if b == 10 { s10 += 1 }
if b > 5 { s5 -= 1 }
if b > 10 { if s10 > 0 { s10 -= 1 } else { s5 -= 2 }}
s5 >= 0
})
}
14.08.2024
719. Find K-th Smallest Pair Distance hard
blog post
substack
youtube

Join me on Telegram
https://t.me/leetcode_daily_unstoppable/702
Problem TLDR
kth smallest pairs diff in an array #hard #binary_search #two_pointers
Intuition
Let’s observe all the possible differences:
// 1 4 5 6 7 8 9 9 10 10
// 3 1 1 1 1 1 0 1 0
// 4 2 2 2 2 1 1 1
// 5 3 3 3 2 2 1
// 6 4 4 3 3 2
// 7 5 4 4 3
// 8 5 5 4
// 8 6 5
// 9 6
// 9
The main problem is what to do if k > nums.size, as for example diff=1 has 12 elements: 0 0 1 1 1 1 1 1 1 1 1 1.
Now, use the hint:
- For each
diffthere are growing number of elements, so we can do a Binary Search in a space ofdiff = 0..max().
To quickly find how many pairs are less than the given diff, we can use a two-pointer technique: move the left pointer until num[r] - num[l] > diff, and r - l would be the number of pairs.
// 0 1 2 3 4 5 6 7 8 9
// 1 4 5 6 7 8 9 9 10 10
// l r max_diff = mid = 3
Approach
- for more robust Binary Search: always check the last condition and always move the left or the right pointer
Complexity
-
Time complexity: \(O(nlog(n))\)
-
Space complexity: \(O(1)\)
Code
fun smallestDistancePair(nums: IntArray, k: Int): Int {
nums.sort(); var lo = 0; var hi = 1_000_000
while (lo <= hi) {
val mid = lo + (hi - lo) / 2; var j = 0
if (k > nums.indices.sumOf { i ->
while (nums[j] + mid < nums[i]) j++
i - j
}) lo = mid + 1 else hi = mid - 1
}
return lo
}
pub fn smallest_distance_pair(mut nums: Vec<i32>, k: i32) -> i32 {
nums.sort_unstable(); let (mut lo, mut hi) = (0, 1_000_000);
while lo <= hi {
let (mid, mut count, mut j) = (lo + (hi - lo) / 2, 0, 0);
for i in 0..nums.len() {
while nums[j] + mid < nums[i] { j += 1 }
count += i - j;
}
if k > count as i32 { lo = mid + 1 } else { hi = mid - 1 }
}; lo
}
13.08.2024
40. Combination Sum II medium
blog post
substack
youtube

Join me on Telegram
https://t.me/leetcode_daily_unstoppable/701
Problem TLDR
Unique target sum subsequences #medium #backtracking
Intuition
Let’s start from the brute force backtracking solution: start with some index and choose which index would be the next.
The interesting part is how to handle duplicates. Simple HashSet gives TLE.
Let’s look at the example 1 1 1 2: each 1 start the same sequence 1 2, so we can skip the second and the third 1’s.
Approach
- we can use slices in Rust instead of a pointer
- minor optimization is breaking early when the sum is overflown
Complexity
-
Time complexity: \(O(n^n)\)
-
Space complexity: \(O(n^n)\)
Code
fun combinationSum2(candidates: IntArray, target: Int): List<List<Int>> = buildList {
val curr = mutableListOf<Int>(); candidates.sort()
fun dfs(i: Int, t: Int): Unit = if (t == 0) { add(curr.toList()); Unit }
else for (j in i..<candidates.size) {
if (j > i && candidates[j] == candidates[j - 1]) continue
if (candidates[j] > t) break
curr += candidates[j]
dfs(j + 1, t - candidates[j])
curr.removeLast()
}
dfs(0, target)
}
pub fn combination_sum2(mut candidates: Vec<i32>, target: i32) -> Vec<Vec<i32>> {
candidates.sort_unstable();
fn dfs(c: &[i32], t: i32, res: &mut Vec<Vec<i32>>, curr: &mut Vec<i32>) {
if t == 0 { res.push(curr.clone()); return }
for j in 0..c.len() {
if j > 0 && c[j] == c[j - 1] { continue }
if c[j] > t { break }
curr.push(c[j]);
dfs(&c[j + 1..], t - c[j], res, curr);
curr.remove(curr.len() - 1);
}
}
let (mut res, mut curr) = (vec![], vec![]);
dfs(&candidates, target, &mut res, &mut curr); res
}
12.08.2024
703. Kth Largest Element in a Stream easy
blog post
substack
youtube
Problem TLDR
kth largest in a stream of values #easy #heap
Intuition
Use the heap.
Approach
In Kotlin PriorityQueue is a max-heap, in Rust BinaryHeap is a min-heap.
Complexity
-
Time complexity: \(O(log(k))\) for
addoperation, O(nlog(k)) total -
Space complexity: \(O(k)\)
Code
class KthLargest(val k: Int, nums: IntArray) {
val pq = PriorityQueue<Int>()
init { for (n in nums) add(n) }
fun add(v: Int) = pq
.run { pq += v; if (size > k) poll(); peek() }
}
struct KthLargest { bh: BinaryHeap<i32>, k: usize }
impl KthLargest {
fn new(k: i32, nums: Vec<i32>) -> Self {
let mut kth = Self { bh: BinaryHeap::new(), k: k as usize };
for &n in nums.iter() { kth.add(n); }
kth
}
fn add(&mut self, val: i32) -> i32 {
self.bh.push(-val);
if self.bh.len() > self.k { self.bh.pop(); }
-self.bh.peek().unwrap()
}
}
11.08.2024
1568. Minimum Number of Days to Disconnect Island hard
blog post
substack
youtube

Join me on Telegram
https://t.me/leetcode_daily_unstoppable/699
Problem TLDR
Min changes 1 to 0 to disconnect islands #hard #union-find
Intuition
Start with implementing brute force Depth-First Search with backtracking: try to change each 1 to 0 and check if it’s disconnected. Use Union-Find to check connected components.
The final solution is just a magic trick: two flips will disconnect every possible case in a 2D grid just by cutting a corner.
I think this problem can be optimized down to a single-pass check for different 1x3, 2x3 and 3x3 patterns to find cases with single flip. Otherwise, it is 0 or 2.
Approach
- minor optimization is to consider only the
ones
Complexity
-
Time complexity: \(O((nm)^2)\)
-
Space complexity: \(O(nm)\)
Code
fun minDays(grid: Array<IntArray>): Int {
val w = grid[0].size; val h = grid.size; var e = -1; var c = 0
val ones = (0..<w * h).filter { grid[it / w][it % w] > 0 }
val uf = IntArray(w * h) { it }
fun find(a: Int): Int { while (uf[a] != uf[uf[a]]) uf[a] = uf[uf[a]]; return uf[a] }
fun union(a: Int, b: Int) { if (find(a) != find(b)) { c--; uf[uf[a]] = uf[b] }}
fun isDisconnected(): Boolean {
for (i in ones) uf[i] = i; c = 0
for (i in ones) if (i != e) { c++
if (i % w > 0 && grid[i / w][i % w - 1] > 0 && i - 1 != e) union(i, i - 1)
if (i / w > 0 && grid[i / w - 1][i % w] > 0 && i - w != e) union(i, i - w)}
return c != 1
}
return if (isDisconnected()) 0 else if (ones.any { e = it; isDisconnected() }) 1 else 2
}
pub fn min_days(grid: Vec<Vec<i32>>) -> i32 {
let (w, h) = (grid[0].len(), grid.len());
let ones: Vec<usize> = (0..w * h).filter(|&i| grid[i / w][i % w] > 0).collect();
fn is_disconnected(grid: &[Vec<i32>], e: usize, ones: &[usize], w: usize, h: usize) -> bool {
let (mut uf, mut c) = ((0..w * h).collect::<Vec<_>>(), 0);
fn find(uf: &mut Vec<usize>, x: usize) -> usize {
while uf[x] != uf[uf[x]] { uf[x] = uf[uf[x]] }; uf[x] }
for &i in ones.iter() { if i != e { c += 1;
let mut union = |b: usize| {
let mut a = find(&mut uf, i); if a != find(&mut uf, b) { uf[a] = uf[b]; c -= 1 }};
if i % w > 0 && grid[i / w][i % w - 1] > 0 && i - 1 != e { union(i - 1) }
if i / w > 0 && grid[i / w - 1][i % w] > 0 && i - w != e { union(i - w) }
}}; c != 1
}
if is_disconnected(&grid, usize::MAX, &ones, w, h) { 0 }
else if ones.iter().any(|&i| is_disconnected(&grid, i, &ones, w, h)) { 1 } else { 2 }
}
10.08.2024
959. Regions Cut By Slashes medium
blog post
substack
youtube

Join me on Telegram
https://t.me/leetcode_daily_unstoppable/698
Problem TLDR
Count islands divided by ‘' and ‘/’ in 2D matrix #medium #union-find
Intuition
Let’s divide each cell into four parts: top, right, bottom and left.
 Assign a number for each subcell: 0, 1, 2 and 3.
 Now, connect cells that are not divided by symbols
 / or \ and count how many connected components there are. Union-Find is a perfect helper for this task.
Approach
Count how many unique roots are left or just decrease the counter when each new connection happens.
Complexity
-
Time complexity: \(O(nm)\)
-
Space complexity: \(O(nm)\)
Code
fun regionsBySlashes(grid: Array<String>): Int {
val uf = IntArray(grid.size * grid[0].length * 4) { it }; var g = uf.size
fun find(a: Int): Int { var x = a; while (x != uf[x]) x = uf[x]; uf[a] = x; return x }
fun union(a: Int, b: Int) { if (find(a) != find(b)) g--; uf[find(a)] = find(b) }
for ((y, s) in grid.withIndex()) for ((x, c) in s.withIndex()) {
val k = { d: Int -> y * grid[0].length * 4 + x * 4 + d }
if (c == '\\') { union(k(0), k(1)); union(k(2), k(3)) }
else if (c == '/') { union(k(1), k(2)); union(k(0), k(3)) }
else { union(k(0), k(1)); union(k(1), k(2)); union(k(2), k(3)) }
if (x > 0) union(k(1) - 4, k(3))
if (y > 0) union(k(2) - 4 * grid[0].length, k(0))
}
return g
}
pub fn regions_by_slashes(grid: Vec<String>) -> i32 {
let mut uf: Vec<_> = (0..grid.len() * grid[0].len() * 4).collect();
fn find(uf: &mut Vec<usize>, a: usize) -> usize {
let mut x = a; while x != uf[x] { x = uf[x] }; uf[a] = x; x }
for (y, s) in grid.iter().enumerate() { for (x, c) in s.chars().enumerate() {
let k = |d| y * grid[0].len() * 4 + x * 4 + d;
let mut u = |a, b| { let f = find(&mut uf, a); uf[f] = find(&mut uf, b) };
if c == '\\' { u(k(0), k(1)); u(k(2), k(3)) }
else if c == '/' { u(k(1), k(2)); u(k(0), k(3)) }
else { u(k(0), k(1)); u(k(1), k(2)); u(k(2), k(3)) }
if x > 0 { u(k(3), k(1) - 4) }
if y > 0 { u(k(0), k(2) - 4 * grid[0].len()) }
}}
(0..uf.len()).map(|x| find(&mut uf, x)).collect::<HashSet<_>>().len() as i32
}
09.08.2024
840. Magic Squares In Grid medium
blog post
substack
youtube

Join me on Telegram
https://t.me/leetcode_daily_unstoppable/697
Problem TLDR
Count 9x9 1..9 equal row col diag sum subgrids #medium
Intuition
Digits must be distinct 1, 2, 3, 4, 5, 6, 7, 8, 9, and all of them must be present.
Approach
Let’s just do a brute-force search
Complexity
-
Time complexity: \(O(nm)\)
-
Space complexity: \(O(1)\)
Code
fun numMagicSquaresInside(grid: Array<IntArray>): Int {
var res = 0; val r = -1..1
for (y in 1..<grid.lastIndex) for (x in 1..<grid[0].lastIndex) {
if ((0..<9).map { grid[y + it / 3 - 1][x + it % 3 - 1] }
.filter { it in 1..9 }.toSet().size < 9) continue
if (setOf(r.sumOf { grid[y - 1][x + it] },
r.sumOf { grid[y][x + it] },
r.sumOf { grid[y + 1][x + it] },
r.sumOf { grid[y + it][x - 1] },
r.sumOf { grid[y + it][x] },
r.sumOf { grid[y + it][x + 1] },
r.sumOf { grid[y + it][x + it] },
r.sumOf { grid[y + it][x - it] }).size == 1) res++
}
return res
}
pub fn num_magic_squares_inside(grid: Vec<Vec<i32>>) -> i32 {
let mut res = 0;
for y in 1..grid.len() - 1 { for x in 1..grid[0].len() - 1 {
let nums = (0..9).map(|i| grid[y + i / 3 - 1][x + i % 3 - 1])
.filter(|&x| 0 < x && x < 10).collect::<HashSet<_>>();
if nums.len() < 9 { continue }
let sums = vec![
(0..3).map(|i| grid[y + i - 1][x - 1]).sum(),
(0..3).map(|i| grid[y + i - 1][x]).sum(),
(0..3).map(|i| grid[y + i - 1][x + 1]).sum(),
(0..3).map(|i| grid[y - 1][x + i - 1]).sum(),
(0..3).map(|i| grid[y][x + i - 1]).sum(),
(0..3).map(|i| grid[y + 1][x + i - 1]).sum(),
(0..3).map(|i| grid[y + i - 1][x + i - 1]).sum(),
(0..3).map(|i| grid[y + i - 1][x - i + 1]).sum::<i32>(),
];
if sums.iter().collect::<HashSet<_>>().len() == 1 { res += 1 }
}}; res
}
08.08.2024
885. Spiral Matrix III medium
blog post
substack
youtube

Join me on Telegram
https://t.me/leetcode_daily_unstoppable/696
Problem TLDR
2D spiraling order #medium #matrix #simulation
Intuition
One way to write this simulation is to walk over an imaginary path and add the items only when the paths are within the matrix.
We can use a direction variable and decide on when to rotate and what to do with an x and y. Or we can manually iterate in a loop over each side. We should keep the side length d and increase it on each cycle of the spiral.
Approach
Let’s implement direction-walk in Kotlin, and loop-walk in Rust.
Complexity
-
Time complexity: \(O(rc)\)
-
Space complexity: \(O(rc)\)
Code
fun spiralMatrixIII(rows: Int, cols: Int, rStart: Int, cStart: Int): Array<IntArray> {
var y = rStart; var x = cStart; val rx = 0..<cols; val ry = 0..<rows
var dir = 0; var d = 0
return Array(rows * cols) { i -> intArrayOf(y, x).also {
if (i < rows * cols - 1) do { when (dir) {
0 -> if (x++ == cStart + d) { d++; dir++ }
1 -> if (y == rStart + d) { dir++; x-- } else y++
2 -> if (x == cStart - d) { dir++; y-- } else x--
3 -> if (y == rStart - d) { dir = 0; x++ } else y--
}} while (x !in rx || y !in ry)
}}
}
pub fn spiral_matrix_iii(rows: i32, cols: i32, r_start: i32, c_start: i32) -> Vec<Vec<i32>> {
let (mut y, mut x, mut rx, mut ry) = (r_start, c_start, 0..cols, 0..rows);
let (mut res, mut d) = (vec![], 1); res.push(vec![y, x]);
while rows * cols > res.len() as i32 {
for _ in 0..d { x += 1; if rx.contains(&x) && ry.contains(&y) { res.push(vec![y, x]) }}
for _ in 0..d { y += 1; if rx.contains(&x) && ry.contains(&y) { res.push(vec![y, x]) }}
d += 1;
for _ in 0..d { x -= 1; if rx.contains(&x) && ry.contains(&y) { res.push(vec![y, x]) }}
for _ in 0..d { y -= 1; if rx.contains(&x) && ry.contains(&y) { res.push(vec![y, x]) }}
d += 1
}; res
}
07.08.2024
273. Integer to English Words hard
blog post
substack
youtube

Join me on Telegram
https://t.me/leetcode_daily_unstoppable/695
Problem TLDR
Integer to English words #hard
Intuition
Divide by 1000 and append suffix.
Approach
- use helper functions
- the result without extra spaces is much simpler to use
Complexity
-
Time complexity: \(O(1)\)
-
Space complexity: \(O(1)\)
Code
val s = listOf("", "One", "Two", "Three", "Four", "Five",
"Six", "Seven", "Eight", "Nine", "Ten",
"Eleven", "Twelve", "Thirteen", "Fourteen", "Fifteen",
"Sixteen", "Seventeen", "Eighteen", "Nineteen", "Twenty")
val s10 = listOf("", "Ten", "Twenty", "Thirty", "Forty", "Fifty",
"Sixty", "Seventy", "Eighty", "Ninety")
val sx = listOf ("", " Thousand", " Million", " Billion", " Trillion")
fun String.add(o: String) = if (this == "") o else if (o == "") this else "$this $o"
fun numberToWords(num: Int): String {
if (num < 1) return "Zero"; var x = num; var res = ""
fun t(n: Int) = if (n < 20) s[n] else s10[n / 10].add(s[n % 10])
fun h(n: Int, suf: String): String = if (n < 1) "" else
(h(n / 100, " Hundred")).add(t(n % 100)) + suf
for (suf in sx) { res = h(x % 1000, suf).add(res); x /= 1000 }
return res
}
pub fn number_to_words(num: i32) -> String {
let s = vec!["", "One", "Two", "Three", "Four", "Five",
"Six", "Seven", "Eight", "Nine", "Ten",
"Eleven", "Twelve", "Thirteen", "Fourteen", "Fifteen",
"Sixteen", "Seventeen", "Eighteen", "Nineteen", "Twenty"];
let s10 = vec!["", "Ten", "Twenty", "Thirty", "Forty", "Fifty",
"Sixty", "Seventy", "Eighty", "Ninety"];
let sx = vec!["", " Thousand", " Million", " Billion", " Trillion"];
fn add(a: &str, b: &str) -> String {
if a.is_empty() { b.to_string() } else if b.is_empty() { a.to_string() }
else { format!("{} {}", a, b) }}
fn t(n: usize, s: &[&str], s10: &[&str]) -> String {
if n < 20 { s[n].to_string() } else { add(s10[n / 10], s[n % 10]) }}
fn h(n: usize, suf: &str, s: &[&str], s10: &[&str]) -> String {
if n < 1 { String::new() } else {
add(&h(n / 100, " Hundred", s, s10), &t(n % 100, s, s10)) + suf }}
if num < 1 { return "Zero".to_string(); }; let (mut res, mut num) = (String::new(), num as usize);
for suf in sx.iter() {
res = add(&h(num % 1000, suf, &s, &s10), &res); num /= 1000;
}; res
}
06.08.2024
3016. Minimum Number of Pushes to Type Word II medium
blog post
substack
youtube

Join me on Telegram
https://t.me/leetcode_daily_unstoppable/694
Problem TLDR
Minimum keystrokes after assigning letter to keys #medium
Intuition
By intuition we should assign the more frequent letters first.
Approach
We can use some languages’ API, or math (i / 8 + 1).
Complexity
-
Time complexity: \(O(n)\)
-
Space complexity: \(O(1)\)
Code
fun minimumPushes(word: String) = word
.groupingBy { it }.eachCount()
.values.sortedDescending()
.chunked(8).withIndex()
.sumOf { (i, s) -> (i + 1) * s.sum() }
pub fn minimum_pushes(word: String) -> i32 {
let mut freq = vec![0; 26];
for b in word.bytes() { freq[b as usize - 97] += 1 }
freq.sort_unstable();
(0..26).map(|i| (i as i32 / 8 + 1) * freq[25 - i]).sum()
}
05.08.2024
2053. Kth Distinct String in an Array easy
blog post
substack
youtube

Join me on Telegram
https://t.me/leetcode_daily_unstoppable/693
Problem TLDR
kth unique #easy
Intuition
Filter out all the duplicates first.
Approach
We can use a HashMap for counter or just two HashSets. Let’s use some API:
- Kotlin: groupingBy.eachCount, filter
- Rust: filter, skip, next
Complexity
-
Time complexity: \(O(n)\)
-
Space complexity: \(O(1)\)
Code
fun kthDistinct(arr: Array<String>, k: Int) = arr
.groupingBy { it }.eachCount().filter { it.value == 1 }
.keys.elementAtOrNull(k - 1) ?: ""
pub fn kth_distinct(arr: Vec<String>, k: i32) -> String {
let (mut uniq, mut dup) = (HashSet::new(), HashSet::new());
for s in &arr { if !uniq.insert(s) { dup.insert(s); }}
arr.iter().filter(|&s| !dup.contains(s)).skip(k as usize - 1)
.next().unwrap_or(&"".to_string()).to_string()
}
04.08.2024
1508. Range Sum of Sorted Subarray Sums meidum
blog post
substack
youtube

Join me on Telegram
https://t.me/leetcode_daily_unstoppable/692
Problem TLDR
Sum of [left..right] of sorted subarray’s sums #medium #heap
Intuition
Let’s look at the subarrays:
// 3 2 4 100
// 3
// 2
// 4
// 100
// 3 2
// 2 4
// 4 100
// 3 2 4
// 2 4 100
// 3 2 4 100
Each of them formed as an iteration from some index. Let’s put all the iterators into a PriorityQueue and always take the smallest. This can take up to n^2 steps, as right can be n^2.
Another solution is from lee215’ & voturbac’: given the y = f(x) value we can in a linear time count how many items are lower than y. As f() grows with x we can use the binary search to find an x. The result then will be f(right) - f(left).
To find the lower items count in a linear time, we should prepare the prefixes of the subarray’s sums: b[i] = num[0..i].sum() and as we summing up those subarrays, go deeper: c[i] = b[0..i].sum().
Then, there is a pattern to find the subarray sum with two pointers: move the lower bound until out of condition, then the sum will be (i - j) * your_value. The solution will be O(nlog(n)) and it takes 1ms in Rust compared to 18ms heap solution.
Approach
As n^2 accepted, let’s implement the heap solution. In Rust the BinaryHeap is a max-heap, in Kotin - min-heap
Complexity
-
Time complexity: \(O(n^2log(n))\)
-
Space complexity: \(O(n^2)\)
Code
fun rangeSum(nums: IntArray, n: Int, left: Int, right: Int): Int {
val pq = PriorityQueue<Pair<Int, Int>>(compareBy { it.first })
for (i in nums.indices) pq += nums[i] to i
return (1..right).fold(0) { res, j ->
val (sum, i) = pq.poll()
if (i < nums.lastIndex) pq += (sum + nums[i + 1]) to (i + 1)
if (j < left) 0 else (res + sum) % 1_000_000_007
}
}
// 18 ms
pub fn range_sum(nums: Vec<i32>, n: i32, left: i32, right: i32) -> i32 {
let mut bh = BinaryHeap::new();
for i in 0..nums.len() { bh.push((-nums[i], i)) }
(1..=right).fold(0, |res, j| {
let (sum, i) = bh.pop().unwrap();
if i < nums.len() - 1 { bh.push((sum - nums[i + 1], i + 1)) }
if j < left { 0 } else { (res - sum) % 1_000_000_007 }
})
}
// lee215' + votrubac' = 1ms
pub fn range_sum(nums: Vec<i32>, n: i32, left: i32, right: i32) -> i32 {
let n = n as usize; let mut b = vec![0; n + 1]; let mut c = b.clone();
for i in 0..n { b[i + 1] = b[i] + nums[i]; c[i + 1] = c[i] + b[i + 1] }
fn sum_k_sums(b: &[i32], c: &[i32], k: i32, n: usize) -> i32 {
let (mut l, mut r) = (0, b[n]);
let mut max_score = 0;
while l <= r {
let m = l + (r - l) / 2;
let (mut i, mut cnt) = (0, 0);
for j in 0..n+1 {
while b[j] - b[i] > m { i += 1 }
cnt += (j - i) as i32
}
if cnt < k { l = m + 1; max_score = max_score.max(m) } else { r = m - 1 }
}
let (mut res, mut i, mut cnt, mut score) = (0, 0, 0, max_score + 1);
for j in 0..n+1 {
while b[j] - b[i] > score { i += 1 }
res += b[j] * (j as i32 - i as i32 + 1) - (c[j] - (if i > 0 { c[i - 1] } else { 0 }));
res = res % 1_000_000_007;
cnt += (j - i) as i32
}
res - (cnt - k) * score
}
sum_k_sums(&b, &c, right, n) - sum_k_sums(&b, &c, left - 1, n)
}
03.08.2024
1460. Make Two Arrays Equal by Reversing Subarrays easy
blog post
substack
youtube

Join me on Telegram
https://t.me/leetcode_daily_unstoppable/691
Problem TLDR
Can arr transform to target by rotating subarrays? #easy
Intuition
By swapping every subarray we can move any position to any other position, effectively sorting the array as we want. So, compare the sorted arrays or compare the numbers’ frequencies.
Approach
Let’s implement both variants.
Complexity
-
Time complexity: \(O(n)\) and \(O(nlogn)\) for sorting
-
Space complexity: \(O(n)\) and \(O(1)\) for sorting
Code
fun canBeEqual(target: IntArray, arr: IntArray) =
target.groupBy { it } == arr.groupBy { it }
pub fn can_be_equal(mut target: Vec<i32>, mut arr: Vec<i32>) -> bool {
target.sort_unstable(); arr.sort_unstable(); target == arr
}
02.08.2024
2134. Minimum Swaps to Group All 1’s Together II medium
blog post
substack
youtube

Join me on Telegram
https://t.me/leetcode_daily_unstoppable/690
Problem TLDR
Min swaps to make a circular [01] array #medium #sliding_window
Intuition
I’ve used the first hint: consider what the final array would look like. Let’s explore all the possible arrays:
// 0123456789
// 0010011100
//
// 1111000000 -> 3
// 0111100000 -> 3
// 0011110000 -> 3
// 0001111000 -> 2
// 0000111100 -> 1
// 0000011110 -> 1
// 0000001111 -> 2
// 1000000111 -> 3
// 1100000011 -> 4
// 1110000001 -> 3
As we compute the necessary swaps count for each array the intuition forms: count the mismatched values, or xor’s.
We can use a sliding window technique to code this.
Approach
- use
sumto count1s 1-nums[i]will count0s- simplify the math formula to look cool (don’t do it in a real project)
Complexity
-
Time complexity: \(O(n)\)
-
Space complexity: \(O(1)\)
Code
fun minSwaps(nums: IntArray): Int {
val c1 = nums.sum()
var miss = (0..<c1).count { nums[it] < 1 }
return nums.indices.minOf { i ->
miss += nums[i] - nums[(i + c1) % nums.size]
miss
}
}
pub fn min_swaps(nums: Vec<i32>) -> i32 {
let c1 = nums.iter().sum::<i32>() as _;
let mut miss = (0..c1).map(|i| 1 - nums[i]).sum();
(0..nums.len()).map(|i| {
miss += nums[i] - nums[(i + c1) % nums.len()];
miss
}).min().unwrap()
}
01.08.2024
2678. Number of Senior Citizens easy
blog post
substack
youtube

Join me on Telegram
https://t.me/leetcode_daily_unstoppable/689
Problem TLDR
Count filtered by a substring #easy
Intuition
The 11th and 12th symbols are our target.
Approach
We can avoid Int parsing just by comparing symbols to 6 and 0.
Let’s use some API:
- Kotlin: count, drop, take
- Rust: string[..], parse, filter, count
Complexity
-
Time complexity: \(O(n)\)
-
Space complexity: \(O(1)\)
Code
fun countSeniors(details: Array<String>) =
details.count { it.drop(11).take(2).toInt() > 60 }
pub fn count_seniors(details: Vec<String>) -> i32 {
details.iter().filter(|s|
s[11..13].parse::<u8>().unwrap() > 60
).count() as _
}
31.07.2024
1105. Filling Bookcase Shelves medium
blog post
substack
youtube

Join me on Telegram
https://t.me/leetcode_daily_unstoppable/687
Problem TLDR
Min total height to split [[w,h]] array by shelfWidth #medium #dynamic_programming
Intuition
Let’s do a Depth-First search by the current book position: start forming a shelf by adding books while they are fit into shelfWidth and after each book try to stop and go to the next level dfs. Result is only depends on the starting position, so can be cached.
The bottom up Dynamic Programming algorithm can be thought like this: walk over the books and consider each i the end of the array; now choose optimal split before in [..i] books but not wider than shelf_width. Previous dp[j] are known, so we can compute dp[i] = min[h_max + dp[j]].
Approach
Let’s write DFS in Kotlin and bottom-up DP in Rust. Can you make it shorter?
Complexity
-
Time complexity: \(O(nm)\), where m is an average books count on the shelf; O(n^2) for solution without the
break -
Space complexity: \(O(n)\)
Code
fun minHeightShelves(books: Array<IntArray>, shelfWidth: Int): Int {
val dp = mutableMapOf<Int, Int>()
fun dfs(j: Int): Int = if (j < books.size) dp.getOrPut(j) {
var w = 0; var h = 0
(j..<books.size).minOf { i ->
w += books[i][0]; h = max(h, books[i][1])
if (w > shelfWidth) Int.MAX_VALUE else h + dfs(i + 1)
}
} else 0
return dfs(0)
}
pub fn min_height_shelves(books: Vec<Vec<i32>>, shelf_width: i32) -> i32 {
let mut dp = vec![i32::MAX / 2; books.len()];
for i in 0..dp.len() {
let mut w = 0; let mut h = 0;
for j in (0..=i).rev() {
w += books[j][0];
if w > shelf_width { break }
h = h.max(books[j][1]);
dp[i] = dp[i].min(h + if j > 0 { dp[j - 1] } else { 0 })
}
}; dp[dp.len() - 1]
}
30.07.2024
1653. Minimum Deletions to Make String Balanced medium
blog post
substack
youtube

Join me on Telegram
https://t.me/leetcode_daily_unstoppable/686
Problem TLDR
Min removals to sort ‘ab’ string #medium
Intuition
Let’s try every i position and count how many b are on the left and how many a on the right side.
Another solution is a clever one: we count every b that is left to the a and remove it. For situations like bba where we should remove a this also works, as we remove one position of the incorrect order.
Approach
Let’s implement first solution in Kotlin and second in Rust.
- as we count
blat the current position, we should consider corner case ofcountAremovals
Complexity
-
Time complexity: \(O(n)\)
-
Space complexity: \(O(1)\)
Code
fun minimumDeletions(s: String): Int {
val countA = s.count { it == 'a' }; var bl = 0
return min(countA, s.indices.minOf {
if (s[it] == 'b') bl++
bl + (countA - it - 1 + bl)
})
}
pub fn minimum_deletions(s: String) -> i32 {
let (mut bl, mut del) = (0, 0);
for b in s.bytes() {
if b == b'b' { bl += 1 }
else if bl > 0 { del += 1; bl -= 1 }
}; del
}
29.07.2024
1395. Count Number of Teams medium
blog post
substack
youtube

Join me on Telegram
https://t.me/leetcode_daily_unstoppable/685
Problem TLDR
Count increasing or decreasing (i, j, k) #medium
Intuition
The brute-force n^3 solution is accepted.
Now, let’s think about the optimization. One way is to precompute some less[i] and bigger[i] arrays in O(n^2).
Another way is to just multiply count to the left and count to the right.
Approach
- just count the lesser values, the bigger will be all the others
- on the right side, just do the additions of the left counts
Complexity
-
Time complexity: \(O(n^2)\)
-
Space complexity: \(O(1)\)
Code
fun numTeams(rating: IntArray) =
rating.withIndex().sumOf { (i, r) ->
var s = (0..<i).count { rating[it] < r }
(i + 1..<rating.size).sumOf { if (rating[it] < r) i - s else s }
}
pub fn num_teams(rating: Vec<i32>) -> i32 {
(0..rating.len()).map(|i| {
let s = (0..i).filter(|&j| rating[j] < rating[i]).count();
(i + 1..rating.len()).map(|j|
if rating[j] < rating[i] { i - s } else { s } as i32
).sum::<i32>()
}).sum()
}
28.07.2024
2045. Second Minimum Time to Reach Destination hard
blog post
substack
youtube

Join me on Telegram
https://t.me/leetcode_daily_unstoppable/684
Problem TLDR
Second min time to travel from 1 to n in time-edged graph stopping every change seconds #hard #graph #bfs
Intuition
Let’s try to find the 2nd-shortest path with BFS. This solution will be accepted with a one optimization: remove the duplicate nodes from the queue.
Another way to think about the problem is to consider every (path & time) individually and keep track of the best and the 2nd best visited times for each node. Repeat BFS until there are no more improvements in the arrival times.
Approach
Let’s implement both the solutions.
Complexity
-
Time complexity: \(O((EV)^p)\), for the naive BFS, p - second path length, \(O(E + V^2)\) or \(((E + V)log(V))\) for PQ, like for the Dijkstra algorithm
-
Space complexity: \(O(E + V)\)
Code
fun secondMinimum(n: Int, edges: Array<IntArray>, time: Int, change: Int): Int {
val g = mutableMapOf<Int, MutableList<Int>>()
for ((u, v) in edges) {
g.getOrPut(u) { mutableListOf() } += v; g.getOrPut(v) { mutableListOf() } += u
}
val q = ArrayDeque<Int>(); val s = IntArray(n + 1) { -1 }
q += 1; var found = 0; var totalTime = 0
while (q.size > 0) {
repeat(q.size) {
val c = q.removeFirst()
if (c == n && found++ > 0) return totalTime
g[c]?.forEach { if (s[it] != totalTime) { s[it] = totalTime; q += it }}
}
totalTime += time + ((totalTime / change) % 2) * (change - (totalTime % change))
}
return totalTime
}
pub fn second_minimum(n: i32, edges: Vec<Vec<i32>>, time: i32, change: i32) -> i32 {
let n = n as usize; let (mut g, mut q) = (vec![vec![]; n + 1], VecDeque::from([(1, 0)]));
let mut s = vec![i32::MAX; n + 1]; let mut ss = s.clone();
for e in edges {
let u = e[0] as usize; let v = e[1] as usize;
g[u].push(v); g[v].push(u)
}
while let Some((curr, total_time)) = q.pop_front() {
let new_time = total_time + time +
((total_time / change) % 2) * (change - (total_time % change));
for &next in &g[curr] { if ss[next] > new_time {
if s[next] > new_time { ss[next] = s[next]; s[next] = new_time }
else if s[next] < new_time { ss[next] = new_time }
q.push_back((next, new_time))
}}
}; ss[n]
}
27.07.2024
2976. Minimum Cost to Convert String I medium
blog post
substack
youtube

Join me on Telegram
https://t.me/leetcode_daily_unstoppable/683
Problem TLDR
Min cost to change the source to the target #medium #FloydWarshall
Intuition
We need to find the shortest paths from char to char. The best way to find them all is the Floyd-Warshall algorithm: repeat i = n times to optimize the path distance: path[j][k] = min(path[j][i] + path[i][k]).
Approach
- careful with the duplicates in original to changed mapping
- we can use 127 or 26 alphabets
- Rust can’t return the result from the inside of lambda
Complexity
-
Time complexity: \(O(n + a^3 + m)\) where
ais an alphabet,mis mapping size -
Space complexity: \(O(a^2)\)
Code
fun minimumCost(source: String, target: String, original: CharArray,
changed: CharArray, cost: IntArray): Long {
val path = Array(128) { LongArray(128) { Long.MAX_VALUE / 2 }}
for (i in cost.indices) path[original[i].code][changed[i].code] =
min(path[original[i].code][changed[i].code], cost[i].toLong())
for (i in 0..127) path[i][i] = 0
for (i in 0..127) for (j in 0..127) for (k in 0..127)
path[j][k] = min(path[j][k], path[j][i] + path[i][k])
return source.indices.sumOf {
path[source[it].code][target[it].code]
.also { if (it == Long.MAX_VALUE / 2) return -1 }}
}
pub fn minimum_cost(source: String, target: String, original: Vec<char>,
changed: Vec<char>, cost: Vec<i32>) -> i64 {
let (mut path, x, mut res) = (vec![vec![i64::MAX / 2; 26]; 26], 'a' as usize, 0);
for i in 0..cost.len() {
let a = original[i] as usize - x; let b = changed[i] as usize - x;
path[a][b] = path[a][b].min(cost[i] as i64)
}
for i in 0..26 { path[i][i] = 0 }
for i in 0..26 { for a in 0..26 { for b in 0..26 {
path[a][b] = path[a][b].min(path[a][i] + path[i][b])
}}}
for (a, b) in source.chars().zip(target.chars()) {
let (a, b) = (a as usize - x, b as usize - x); let p = path[a][b];
if p == i64::MAX / 2 { return -1 }
res += p
}; res
}
26.07.2024
1334. Find the City With the Smallest Number of Neighbors at a Threshold Distance medium
blog post
substack
youtube

Join me on Telegram
https://t.me/leetcode_daily_unstoppable/682
Problem TLDR
Node with minimum neighbors by distanceThreshold #medium #bfs #FloydWarshall
Intuition
There are only 100 nodes maximum, so we can try to find all neighbors for each node independently. Depth-First Search will not work: some nodes can be revisited with better shorter paths. So, let’s use the Breadth-First Search.
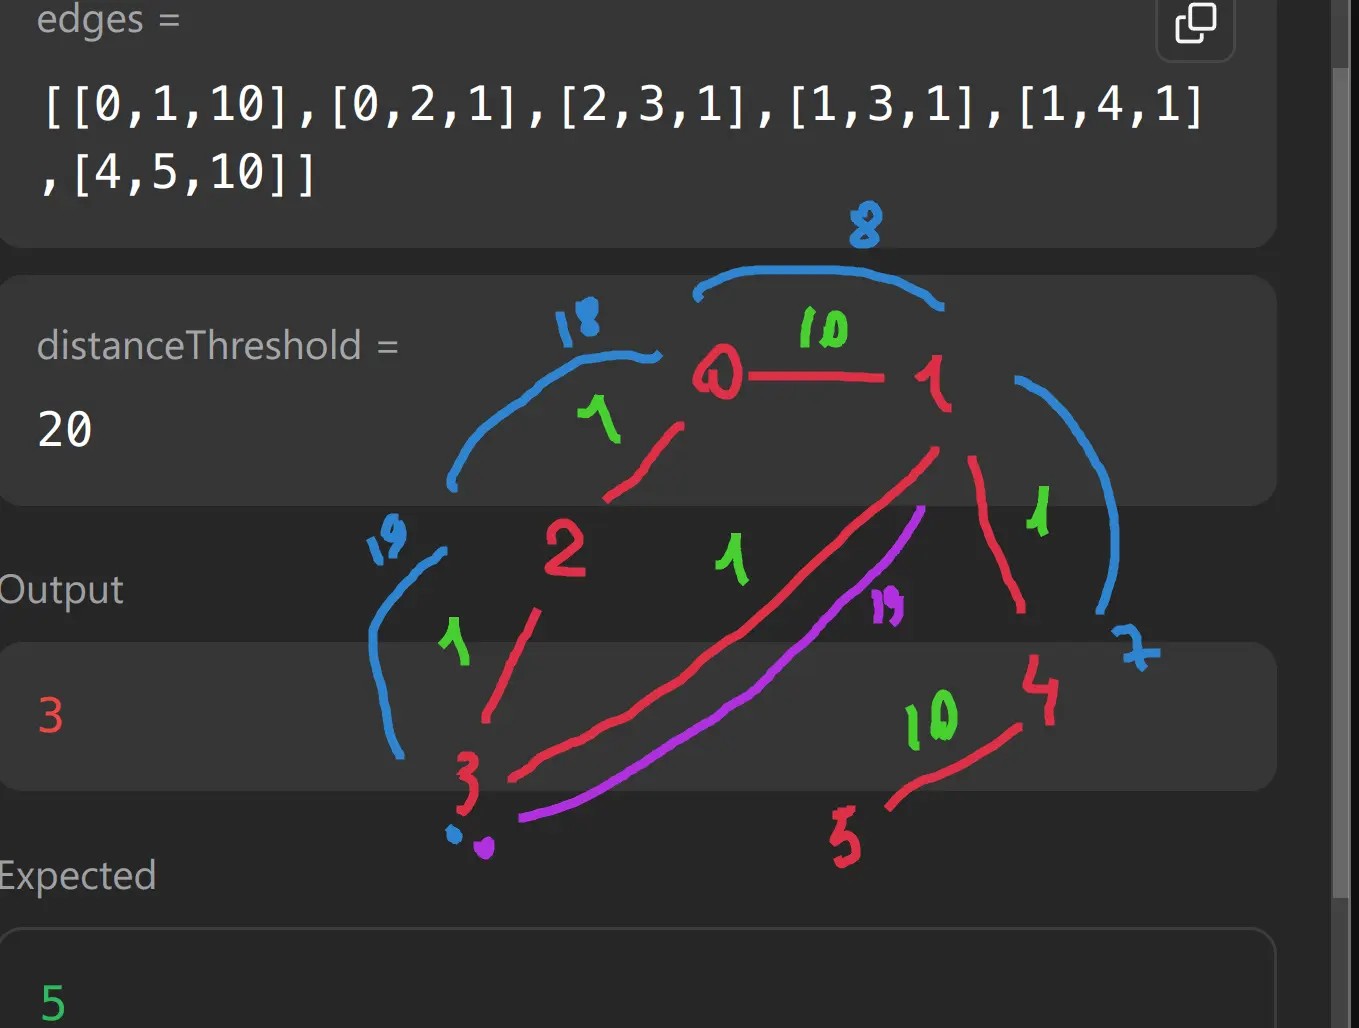
Another way is to use Floyd-Warshall algorithm.
https://en.wikipedia.org/wiki/Floyd%E2%80%93Warshall_algorithm
Repeat exactly n times the optimization procedure of choosing the minimum for every i, j, k: path[j][k] = min(path[j][k], path[j][i] + path[i][k]).
Approach
Let’s implement BFS in Kotlin, Floyd-Warshall in Rust.
Complexity
-
Time complexity: \(O(V^3E)\) for
Vtimes BFSEV^2, \(O(E + V^3)\) for Floyd-Warshall -
Space complexity: \(O(V + E)\) for BFS, \(O(V^2)\) for Floyd-Warshall
Code
fun findTheCity(n: Int, edges: Array<IntArray>, distanceThreshold: Int): Int {
val g = mutableMapOf<Int, MutableList<Pair<Int, Int>>>()
for ((a, b, w) in edges) {
g.getOrPut(a) { mutableListOf() } += b to w
g.getOrPut(b) { mutableListOf() } += a to w
}
val queue = ArrayDeque<Int>()
return (n - 1 downTo 0).minBy { x ->
val dist = IntArray(n) { distanceThreshold + 1 }
dist[x] = 0; queue.add(x); var count = 1
while (queue.size > 0) queue.removeFirst().let { curr ->
g[curr]?.forEach { (next, w) ->
if (w + dist[curr] < dist[next]) {
if (dist[next] > distanceThreshold) count++
dist[next] = w + dist[curr]; queue.add(next)
}
}
}
count
}
}
pub fn find_the_city(n: i32, edges: Vec<Vec<i32>>, distance_threshold: i32) -> i32 {
let n = n as usize; let mut dist = vec![vec![i32::MAX / 2; n]; n];
for u in 0..n { dist[u][u] = 0 }
for e in edges {
dist[e[0] as usize][e[1] as usize] = e[2];
dist[e[1] as usize][e[0] as usize] = e[2]
}
for i in 0..n { for j in 0..n { for k in 0..n {
dist[j][k] = dist[j][k].min(dist[j][i] + dist[i][k])
}}}
(0..n).rev().min_by_key(|&u|
(0..n).filter(|&v| dist[u][v] <= distance_threshold).count()).unwrap() as i32
}
25.07.2024
912. Sort an Array medium
blog post
substack
youtube

Join me on Telegram
https://t.me/leetcode_daily_unstoppable/681
Problem TLDR
Sort array using minimum memory #medium
Intuition
The most memory-friendly algorithm would be the Heap Sort - O(1). However, I didn’t know it, so let’s implement a QuickSort.
Approach
- in the
partitionwe must use somebordervalue andborderposition, everything less must be to the left of the border. - worst case is O(n^2), so we must use the
shuffle
Complexity
-
Time complexity: \(O(nlog(n))\)
-
Space complexity: \(O(log(n))\)
Code
fun sortArray(nums: IntArray): IntArray {
fun swap(a: Int, b: Int)
{ nums[a] = nums[b].also { nums[b] = nums[a] }}
fun partition(from: Int, to: Int) {
if (from >= to) return
var x = nums[from]
var lo = from
for (i in from + 1..to) if (nums[i] <= x)
swap(i, ++lo)
swap(from, lo)
partition(from, lo - 1)
partition(lo + 1, to)
}
nums.shuffle()
partition(0, nums.lastIndex)
return nums
}
pub fn sort_array(mut nums: Vec<i32>) -> Vec<i32> {
fn partition(nums: &mut Vec<i32>, from: usize, to: usize) {
if from >= to { return }
let (mut x, mut lo) = (nums[to], from);
for i in from..to {
if nums[i] < x { nums.swap(i, lo); lo += 1 }}
nums.swap(to, lo);
if lo > 0 { partition(nums, from, lo - 1) }
partition(nums, lo + 1, to);
}
nums.shuffle(&mut thread_rng()); let n = nums.len();
partition(&mut nums, 0, n - 1); nums
}
24.07.2024
2191. Sort the Jumbled Numbers medium
blog post
substack
youtube

Join me on Telegram
https://t.me/leetcode_daily_unstoppable/680
Problem TLDR
Sort array by digits mapping #medium
Intuition
Just sort using a comparator by key
Approach
- careful with the corner case n = 0
- in Rust using
sort_by_cached_keyhas improved runtime from 170ms to 20ms
Complexity
-
Time complexity: \(O(nlog(n))\)
-
Space complexity: \(O(1)\), O(n) for Kotlin, as it didn’t have a proper sorting method for IntArray
Code
fun sortJumbled(mapping: IntArray, nums: IntArray) =
nums.sortedWith(compareBy {
var n = it
var res = if (n < 1) mapping[n] else 0
var pow = 1
while (n > 0) {
res += pow * mapping[n % 10]
pow *= 10
n /= 10
}
res
})
pub fn sort_jumbled(mapping: Vec<i32>, mut nums: Vec<i32>) -> Vec<i32> {
nums.sort_by_cached_key(|&x| {
let (mut n, mut pow, mut res) = (x as usize, 1, 0);
if x < 1 { res = mapping[n] }
while n > 0 {
res += pow * mapping[n % 10];
pow *= 10; n /= 10
}
res
}); nums
}
23.07.2024
1636. Sort Array by Increasing Frequency easy
blog post
substack
youtube

Join me on Telegram
https://t.me/leetcode_daily_unstoppable/679
Problem TLDR
Sort by frequency or descending #easy
Intuition
Sort with comparator. Another way is to do sorting two times but with a stable sort (in Kotlin it is by default, in Rust you must use sort instead of sort_unstable).
Approach
- pay attention: there are negative numbers
- Kotlin doesn’t have sortWith for IntArray
Complexity
-
Time complexity: \(O(nlogn)\)
-
Space complexity: \(O(n)\)
Code
fun frequencySort(nums: IntArray): IntArray {
val f = IntArray(202)
for (n in nums) f[n + 100]++
return nums
.sortedWith(compareBy({ f[it + 100]}, { -it }))
.toIntArray()
}
pub fn frequency_sort(mut nums: Vec<i32>) -> Vec<i32> {
let mut f = vec![0; 201];
for n in &nums { f[(n + 100) as usize] += 1 }
nums.sort_unstable_by_key(|n| (f[(n + 100) as usize], -n));
nums
}
22.07.2024
2418. Sort the People easy
blog post
substack
youtube

Join me on Telegram
https://t.me/leetcode_daily_unstoppable/678
Problem TLDR
Sort one array by another #easy
Intuition
We must use some extra memory for the relations between the arrays: it can be an indices array, or a zipped collection. Then sort it and recreate the answer.
Approach
- Kotlin: withIndex, sortedByDescending.
- Rust: using indices vec and recreating the result makes us use .clone(), so better use zip.
Complexity
-
Time complexity: \(O(nlogn)\)
-
Space complexity: \(O(n)\)
Code
fun sortPeople(names: Array<String>, heights: IntArray) = names
.withIndex()
.sortedByDescending { heights[it.index] }
.map { it.value }
pub fn sort_people(names: Vec<String>, heights: Vec<i32>) -> Vec<String> {
let mut zip: Vec<_> = names.into_iter().zip(heights.into_iter()).collect();
zip.sort_unstable_by_key(|(n, h)| -h);
zip.into_iter().map(|(n, h)| n).collect()
}
21.07.2024
2392. Build a Matrix With Conditions hard
blog post
substack
youtube

Join me on Telegram
https://t.me/leetcode_daily_unstoppable/677
Problem TLDR
Build a matrix from a graph conditions #hard #graph #toposort
Intuition
Failed to solve in 1 hour.
Let’s observe how the conditions work:
// k = 3
// r=1,2 3,2
// c=2,1 3,2
//
// y: 2->1, 2->3 start=2, end=1,3
// x: 1->2, 2->3 or 1->2->3 start=1, end=3
Some observations:
- rules are independent for columns and rows
- some rules form a long graph nodes, so we can use toposort
So, we can apply first rows positions for each value 1..k, then apply columns’ positions.
To find the positions, let’s take the graph and just increment some counter from the deepest nodes to the top. It is a topological sorted order.
When graph has cycles the toposort will not visit all the nodes.
(Why I failed with a simple DFS: because the nodes are not visited in the deepest to top order)
Approach
Reuse the sort functions for rows and columns.
Complexity
-
Time complexity: \(O(E + k^2)\)
-
Space complexity: \(O(E + k^2)\)
Code
fun buildMatrix(k: Int, rowConditions: Array<IntArray>, colConditions: Array<IntArray>): Array<IntArray> {
fun sort(cond: Array<IntArray>): IntArray = ArrayDeque<Int>().run {
val inOrder = IntArray(k + 1); val g = mutableMapOf<Int, MutableList<Int>>()
for ((a, b) in cond) { inOrder[b]++; g.getOrPut(a) { mutableListOf() } += b }
for (v in 1..k) if (inOrder[v] == 0) add(v)
val res = IntArray(k + 1); var i = 0
while (size > 0) removeFirst().let { v ->
res[v] = i++; g[v]?.forEach { if (--inOrder[it] == 0) add(it) }
}
if (i < k) intArrayOf() else res
}
val r = sort(rowConditions); val c = sort(colConditions)
if (r.size < 1 || c.size < 1) return arrayOf()
val res = Array(k) { IntArray(k) }; for (v in 1..k) res[r[v]][c[v]] = v
return res
}
pub fn build_matrix(k: i32, row_conditions: Vec<Vec<i32>>, col_conditions: Vec<Vec<i32>>) -> Vec<Vec<i32>> {
fn sort(k: usize, cond: &Vec<Vec<i32>>) -> Vec<usize> {
let (mut i, mut ins, mut g, mut queue, mut res) =
(0, vec![0; k + 1], HashMap::new(), VecDeque::new(), vec![0; k + 1]);
for c in cond {
ins[c[1] as usize] += 1; g.entry(c[0] as usize).or_insert_with(|| vec![]).push(c[1] as usize);
}
for v in 1..=k { if ins[v] == 0 { queue.push_back(v); } }
while let Some(v) = queue.pop_front() {
res[v] = i; i += 1;
if let Some(sibl) = g.remove(&v) { for e in sibl {
ins[e] -= 1; if ins[e] == 0 { queue.push_back(e); }
}}
}
if i < k { vec![] } else { res }
}
let k = k as usize; let r = sort(k, &row_conditions); let c = sort(k, &col_conditions);
if r.len() < 1 || c.len() < 1 { return vec![] }
let mut res = vec![vec![0; k]; k];
for v in 1..=k { res[r[v]][c[v]] = v as i32 }
res
}
20.07.2024
1605. Find Valid Matrix Given Row and Column Sums medium
blog post
substack
youtube

Join me on Telegram
https://t.me/leetcode_daily_unstoppable/676
Problem TLDR
Matrix from rows and cols sums #medium
Intuition
Let’s try to build such a matrix with our bare hands, pen and paper:
I have noticed some interesting facts about this problem:
- there are several valid matrices, all depend on the numbers you choose first
- you have to choose the minimum between the row and column sums, otherwise the sum became bigger than needed
- you can move row by row or column by column
- the more robust strategy is to take as bigger number as possible first, instead of choosing from some of the lower valid values: you don’t have to backtrack then
Approach
- Use an array initializer in Kotlin
Complexity
-
Time complexity: \(O(nm)\)
-
Space complexity: \(O(nm)\)
Code
fun restoreMatrix(rowSum: IntArray, colSum: IntArray) =
Array(rowSum.size) { y ->
IntArray(colSum.size) { x ->
val v = min(rowSum[y], colSum[x])
rowSum[y] -= v; colSum[x] -= v; v }}
pub fn restore_matrix(mut row_sum: Vec<i32>, mut col_sum: Vec<i32>) -> Vec<Vec<i32>> {
let mut res = vec![vec![0; col_sum.len()]; row_sum.len()];
for y in 0..res.len() { for x in 0..res[0].len() {
let v = row_sum[y].min(col_sum[x]);
row_sum[y] -= v; col_sum[x] -= v; res[y][x] = v
}}; res
}
19.07.2024
1380. Lucky Numbers in a Matrix easy
blog post
substack
youtube

Join me on Telegram
https://t.me/leetcode_daily_unstoppable/675
Problem TLDR
Min in rows and max in columns in a unique number matrix #easy
Intuition
As all the numbers are unique, we can first find all the maximums in the columns, then intersect the result with all the minimums in the rows.
Approach
Let’s use the collections API’s:
- maxOf, map, filter
Complexity
-
Time complexity: \(O(nm)\)
-
Space complexity: \(O(nm)\)
Code
fun luckyNumbers (matrix: Array<IntArray>) = (0..<matrix[0].size)
.map { x -> matrix.maxOf { it[x] }}.toSet().let { maxes ->
matrix.map { it.min() }.filter { it in maxes }}
pub fn lucky_numbers (matrix: Vec<Vec<i32>>) -> Vec<i32> {
let maxes: Vec<_> = (0..matrix[0].len())
.map(|x| matrix.iter().map(|r| r[x]).max().unwrap()).collect();
matrix.iter().map(|r| *r.iter().min().unwrap())
.filter(|v| maxes.contains(v)).collect()
}
18.07.2024
1530. Number of Good Leaf Nodes Pairs medium
blog post
substack
youtube

Join me on Telegram
https://t.me/leetcode_daily_unstoppable/674
Problem TLDR
Count at most distance paths between leaves #medium #tree
Intuition
Let’s move up from leaves and see what information we should preserve:
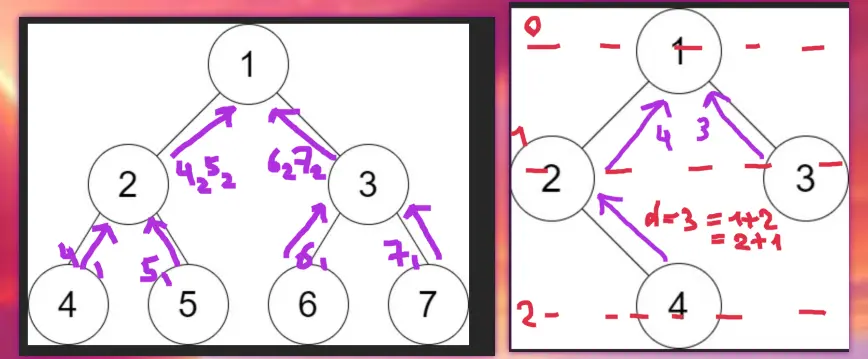
- there are at most 10 levels for the given problem set
- we should compare the
leftnode levels counts with therightnode - we should check all levels combinations 1..10 for the left, and 1..10 for the right
- individual leaves are irrelevant, all the distances are equal to their level
Approach
- We can use a HashMap, or just an array.
- The
levelparameter is not required, just move one level up from the left and right results.
Complexity
-
Time complexity: \(O(nlog^2(n))\)
-
Space complexity: \(O(log^2(n))\), log(n) for the call stack, and at each level we hold log(n) array of the result
Code
fun countPairs(root: TreeNode?, distance: Int): Int {
var res = 0
fun dfs(n: TreeNode?): IntArray = IntArray(11).apply {
if (n != null)
if (n.left == null && n.right == null) this[1] = 1 else {
val l = dfs(n.left); val r = dfs(n.right)
for (i in 1..10) for (j in 1..distance - i) res += l[i] * r[j]
for (i in 1..9) this[i + 1] = l[i] + r[i]
}}
dfs(root)
return res
}
pub fn count_pairs(root: Option<Rc<RefCell<TreeNode>>>, distance: i32) -> i32 {
fn dfs(n: &Option<Rc<RefCell<TreeNode>>>, res: &mut i32, d: usize) -> Vec<i32> {
let mut arr = vec![0; 11]; let Some(n) = n else { return arr };
let n = n.borrow();
if n.left.is_none() && n.right.is_none() { arr[1] = 1 } else {
let l = dfs(&n.left, res, d); let r = dfs(&n.right, res, d);
for i in 1..11 { for j in 1..11 { if i + j <= d { *res += l[i] * r[j] }}}
for i in 1..10 { arr[i + 1] = l[i] + r[i] }
}; arr
}
let mut res = 0; dfs(&root, &mut res, distance as usize); res
}
17.07.2024
1110. Delete Nodes And Return Forest medium
blog post
substack
youtube

Join me on Telegram
https://t.me/leetcode_daily_unstoppable/673
Problem TLDR
Trees after remove nodes from tree #medium #tree
Intuition
Just iterate and remove on the fly in a single Depth-First Search. Use a HashSet for O(1) checks.
Approach
- code looks nicer when we can do
n.left = dfs(n.left) - Rust’s
Optionclone() is cheap
Complexity
-
Time complexity: \(O(n)\)
-
Space complexity: \(O(n)\)
Code
fun delNodes(root: TreeNode?, to_delete: IntArray) = buildList {
val set = to_delete.toSet()
fun dfs(n: TreeNode?): TreeNode? = n?.run {
left = dfs(left); right = dfs(right); val remove = `val` in set
if (remove) { left?.let(::add); right?.let(::add) }
takeIf { !remove }
}
dfs(root)?.let(::add)
}
pub fn del_nodes(root: Option<Rc<RefCell<TreeNode>>>, to_delete: Vec<i32>) -> Vec<Option<Rc<RefCell<TreeNode>>>> {
let set: HashSet<_> = to_delete.into_iter().collect(); let mut res = vec![];
fn dfs(n_opt: &Option<Rc<RefCell<TreeNode>>>, set: &HashSet<i32>, res: &mut Vec<Option<Rc<RefCell<TreeNode>>>>)
-> Option<Rc<RefCell<TreeNode>>> {
let Some(n_rc) = n_opt else { return None }; let mut n = n_rc.borrow_mut();
n.left = dfs(&n.left, set, res); n.right = dfs(&n.right, set, res);
if set.contains(&n.val) {
if n.left.is_some() { res.push(n.left.clone()); }; if n.right.is_some() { res.push(n.right.clone()); }
None
} else { (*n_opt).clone() }
}
let root = dfs(&root, &set, &mut res); if root.is_some() { res.push(root) }; res
}
16.07.2024
2096. Step-By-Step Directions From a Binary Tree Node to Another medium
blog post
substack
youtube

Join me on Telegram
https://t.me/leetcode_daily_unstoppable/672
Problem TLDR
U-L-R path from s to d in a Binary Tree #medium #tree
Intuition
My first intuition was to do this in a single Depth-First Search step: if left is found and right is found return the result. However, this gives TLE, as concatenating the path on the fly will worsen the time to O(path^2).
Then I checked the discussion and got the hint to use a StringBuilder. However, this can’t be done in a single recursion step, as we should insert to the middle of the path string sometimes.
Now, the working solution: find the Lowest Common Ancestor and go down from it to the source and to the destination.
Another nice code simplification is achieved by finding two paths from the root, and then removing the common prefix from them.
Approach
- we can be careful with StringBuilder removals or just make
toStringon the target
Complexity
-
Time complexity: \(O(n)\)
-
Space complexity: \(O(n)\)
Code
fun getDirections(root: TreeNode?, startValue: Int, destValue: Int): String {
fun down(n: TreeNode?, v: Int, sb: StringBuilder = StringBuilder()): String = n?.run {
if (`val` == v) sb.toString() else {
sb.append('L'); val l = down(left, v, sb)
if (l != "") l else {
sb.deleteAt(sb.lastIndex); sb.append('R')
down(right, v, sb).also { sb.deleteAt(sb.lastIndex) }
}
}
} ?: ""
val s = down(root, startValue); val d = down(root, destValue)
val skip = s.commonPrefixWith(d).length
return "U".repeat(s.length - skip) + d.drop(skip)
}
pub fn get_directions(root: Option<Rc<RefCell<TreeNode>>>, start_value: i32, dest_value: i32) -> String {
fn down(n: &Option<Rc<RefCell<TreeNode>>>, v: i32, p: &mut Vec<u8>) -> bool {
let Some(n) = n else { return false }; let n = n.borrow(); if n.val == v { true } else {
p.push(b'L'); let l = down(&n.left, v, p);
if l { true } else {
p.pop(); p.push(b'R'); let r = down(&n.right, v, p);
if r { true } else { p.pop(); false }
}
}
}
let mut s = vec![]; let mut d = vec![];
down(&root, start_value, &mut s); down(&root, dest_value, &mut d);
let skip = s.iter().zip(d.iter()).take_while(|(s, d)| s == d).count();
let b: Vec<_> = (0..s.len() - skip).map(|i| b'U').chain(d.into_iter().skip(skip)).collect();
String::from_utf8(b).unwrap()
}
15.07.2024
2196. Create Binary Tree From Descriptions medium
blog post
substack
youtube

Join me on Telegram
https://t.me/leetcode_daily_unstoppable/671
Problem TLDR
Restore binary tree from [parent, child, isLeft] #medium
Intuition
Use the HashMap. Remember which nodes are children.
Approach
- Kotlin:
getOrPut - Rust:
entry.or_insert_with.Rccloning is cheap.
Complexity
-
Time complexity: \(O(n)\)
-
Space complexity: \(O(n)\)
Code
fun createBinaryTree(descriptions: Array<IntArray>): TreeNode? {
val valToNode = mutableMapOf<Int, TreeNode>()
val children = mutableSetOf<Int>()
for ((parent, child, isLeft) in descriptions) {
val pNode = valToNode.getOrPut(parent) { TreeNode(parent) }
val cNode = valToNode.getOrPut(child) { TreeNode(child) }
if (isLeft > 0) pNode.left = cNode else pNode.right = cNode
children += child
}
return valToNode.entries.find { it.key !in children }?.value
}
pub fn create_binary_tree(descriptions: Vec<Vec<i32>>) -> Option<Rc<RefCell<TreeNode>>> {
let mut map = HashMap::new(); let mut set = HashSet::new();
let mut get = |v| { map.entry(v).or_insert_with(|| Rc::new(RefCell::new(TreeNode::new(v)))).clone() };
for d in descriptions {
let child = get(d[1]);
let mut parent = get(d[0]); let mut parent = parent.borrow_mut();
set.insert(d[1]);
*(if d[2] > 0 { &mut parent.left } else { &mut parent.right }) = Some(child)
}
map.into_values().find(|v| !set.contains(&v.borrow().val))
}
14.07.2024
726. Number of Atoms hard
blog post
substack
youtube

Join me on Telegram
https://t.me/leetcode_daily_unstoppable/669
Problem TLDR
Simplify chemical formula parenthesis #hard #stack
Intuition
This is a parenthesis problem, and it could be solved with a stack or a recursion.
Approach
The simplest way is to use a global position variable and a recursion. Return frequencies map and merge the result.
The more optimal way is to traverse from the end: that’s how you know the multiplier of each atom beforehand.
Complexity
-
Time complexity: \(O(n)\), we only traverse once, and the merge operation is on a small subset: AB(AB(AB(AB(..)))) where AB.length is much less than the recursion depth will take depth*len = N
-
Space complexity: \(O(n)\)
Code
fun countOfAtoms(formula: String): String {
var i = 0
fun count(): Int {
if (i > formula.lastIndex || !formula[i].isDigit()) return 1
val from = i; while (i < formula.length && formula[i].isDigit()) i++
return formula.substring(from, i).toInt()
}
fun dfs(): Map<String, Int> = TreeMap<String, Int>().apply {
while (i < formula.length) if (formula[i] == ')') break
else if (formula[i] == '(') {
i++; val inBrackets = dfs(); i++
var count = count()
for ((name, c) in inBrackets) this[name] = c * count + (this[name] ?: 0)
} else {
var from = i++; while (i < formula.length && formula[i].isLowerCase()) i++
val name = formula.substring(from, i)
this[name] = count() + (this[name] ?: 0)
}
}
return dfs().entries.joinToString("") { it.run { if (value > 1) "$key$value" else key }}
}
pub fn count_of_atoms(formula: String) -> String {
let (mut map, mut c, mut cnt, mut pow, mut name, mut stack) =
(HashMap::new(), 1, 0, 1, vec![], vec![]);
for b in formula.bytes().rev() { match (b) {
b'0'..=b'9' => { cnt += (b - b'0') as i32 * pow; pow *= 10 },
b')' => { stack.push(cnt); c *= cnt.max(1); pow = 1; cnt = 0 },
b'(' => { c /= stack.pop().unwrap().max(1); pow = 1; cnt = 0 },
b'A'..=b'Z' => {
name.push(b); name.reverse();
*map.entry(String::from_utf8(name.clone()).unwrap())
.or_insert(0) += cnt.max(1) * c;
name.clear(); pow = 1; cnt = 0
}, _ => { name.push(b) }
}}
let mut keys = Vec::from_iter(map.iter()); keys.sort_unstable();
keys.iter().map(|&(k, v)| if *v > 1 { format!("{k}{v}") } else { k.into() }).collect()
}
13.07.2024
2751. Robot Collisions hard
blog post
substack
youtube

Join me on Telegram
https://t.me/leetcode_daily_unstoppable/668
Problem TLDR
1-D dimensional robots fight #hard #stack
Intuition
Sort by positions, then solve the matching parenthesis subproblem. We can use a Stack.
// 11 44 16
// 1 20 17
// R L R
//
// 1-> 17-> <-20
// 11 16 44
Approach
- move ‘L’ as much as possible in a while loop
Complexity
-
Time complexity: \(O(nlog(n))\)
-
Space complexity: \(O(n)\)
Code
fun survivedRobotsHealths(positions: IntArray, healths: IntArray, directions: String) =
with(Stack<Int>()) {
val inds = positions.indices.sortedBy { positions[it] }
for (i in inds) if (directions[i] > 'L') push(i) else {
while (size > 0 && directions[peek()] > 'L')
if (healths[peek()] == healths[i]) { pop(); healths[i] = 0; break }
else if (healths[peek()] < healths[i]) { pop(); healths[i]-- }
else { healths[peek()]--; healths[i] = 0; break }
if (healths[i] > 0) push(i)
}
sorted().map { healths[it] }
}
pub fn survived_robots_healths(positions: Vec<i32>, mut healths: Vec<i32>, directions: String) -> Vec<i32> {
let (mut st, mut inds, d) = (vec![], (0..positions.len()).collect::<Vec<_>>(), directions.as_bytes());
inds.sort_unstable_by_key(|&i| positions[i]);
for i in inds {
if d[i] > b'L' { st.push(i) } else {
while let Some(&j) = st.last() {
if d[j] < b'R' { break }
if healths[j] > healths[i] { healths[j] -= 1; healths[i] = 0; break }
else if healths[j] < healths[i] { st.pop(); healths[i] -= 1 }
else { st.pop(); healths[i] = 0; break }
}
if healths[i] > 0 { st.push(i) }
}
}
st.sort_unstable(); st.iter().map(|&i| healths[i]).collect()
}
12.07.2024
1717. Maximum Score From Removing Substrings medium
blog post
substack
youtube

Join me on Telegram
https://t.me/leetcode_daily_unstoppable/667
Problem TLDR
Max score removing from s, x for ab, y for ba #medium #greedy #stack
Intuition
The first intuition is to remove greedily, but how exactly? Let’s observe some examples:
// aba x=1 y=2
// a a
// b ab
//
// aabbab x=1 y=2 y>x
// a a
// a aa
// b aab
//
// bbaabb x>y
// b b
// b bb
// a bba
// a bb
// ...
We should maintain the Stack to be able to remove cases like aabb in one go.
We should not remove the first ab from aba, when the reward from ba is larger. So, let’s do it in two passes: first remove the larger reward, then the other one.
Approach
- we can extract the removal function
Complexity
-
Time complexity: \(O(n)\)
-
Space complexity: \(O(n)\)
Code
fun maximumGain(s: String, x: Int, y: Int): Int {
var points = 0
val a = if (x > y) 'a' else 'b'; val b = if (a < 'b') 'b' else 'a'
val stack = Stack<Char>().apply {
for (c in s) if (c == b && size > 0 && peek() == a) {
pop(); points += max(x, y)
} else push(c)
}
Stack<Char>().apply {
for (c in stack) if (c == a && size > 0 && peek() == b) {
pop(); points += min(x, y)
} else push(c)
}
return points
}
pub fn maximum_gain(s: String, mut x: i32, mut y: i32) -> i32 {
let (mut a, mut b) = (b'a', b'b');
if x < y { mem::swap(&mut a, &mut b); mem::swap(&mut x, &mut y) }
fn remove_greedy(s: &String, a: u8, b: u8) -> String {
let mut res = vec![];
for c in s.bytes() {
if res.len() > 0 && *res.last().unwrap() == a && c == b {
res.pop();
} else { res.push(c) }
}
String::from_utf8(res).unwrap()
}
let s1 = remove_greedy(&s, a, b); let s2 = remove_greedy(&s1, b, a);
(s.len() - s1.len()) as i32 / 2 * x + (s1.len() - s2.len()) as i32 / 2 * y
}
11.07.2024
1190. Reverse Substrings Between Each Pair of Parentheses medium
blog post
substack
youtube

Join me on Telegram
https://t.me/leetcode_daily_unstoppable/666
Problem TLDR
Reverse string in parentheses recursively #medium
Intuition
The simplest way is to simulate the reversing: do Depth-First Search and use parenthesis as nodes. It will take O(n^2) time.
There is also an O(n) solution possible.
Approach
- let’s use LinkedList in Rust, it will make solution O(n)
Complexity
-
Time complexity: \(O(n^2)\), O(n) for the Linked List solution
-
Space complexity: \(O(n)\)
Code
fun reverseParentheses(s: String): String {
var i = 0
fun dfs(): String = buildString {
while (i < s.length)
if (s[i] == '(') {
i++
append(dfs().reversed())
i++
} else if (s[i] == ')') break
else append(s[i++])
}
return dfs()
}
pub fn reverse_parentheses(s: String) -> String {
fn dfs(chars: &mut Chars, rev: bool) -> LinkedList<char> {
let mut list = LinkedList::<char>::new();
while let Some(c) = chars.next() {
if c == ')' { break }
if c == '(' {
let mut next = dfs(chars, !rev);
if rev { next.append(&mut list); list = next }
else { list.append(&mut next) }
} else { if rev { list.push_front(c) } else { list.push_back(c) }}
}; list
}
return dfs(&mut s.chars(), false).into_iter().collect()
}
10.07.2024
1598. Crawler Log Folder easy
blog post
substack
youtube

Join me on Telegram
https://t.me/leetcode_daily_unstoppable/665
Problem TLDR
Filesystem path depth #easy
Intuition
Simulate the process and compute depth. Corner case: a path doesn’t move up from the root.
Approach
Let’s use fold iterator.
Complexity
-
Time complexity: \(O(n)\)
-
Space complexity: \(O(1)\)
Code
fun minOperations(logs: Array<String>) =
logs.fold(0) { depth, op -> when (op) {
"../" -> max(0, depth - 1)
"./" -> depth else -> depth + 1 }}
pub fn min_operations(logs: Vec<String>) -> i32 {
logs.iter().fold(0, |depth, op| match op.as_str() {
"../" => 0.max(depth - 1),
"./" => depth, _ => depth + 1 })
}
9.07.2024
1701. Average Waiting Time medium
blog post
substack
youtube

Join me on Telegram
https://t.me/leetcode_daily_unstoppable/664
Problem TLDR
Average of intersecting intervals #medium #simulation
Intuition
Just simulate the process.
Approach
Let’s use iterators to save lines of code.
Complexity
-
Time complexity: \(O(n)\)
-
Space complexity: \(O(1)\)
Code
fun averageWaitingTime(customers: Array<IntArray>): Double {
var time = 0
return customers.sumOf { (start, delta) ->
time = max(start, time) + delta
(time - start).toDouble()
} / customers.size
}
pub fn average_waiting_time(customers: Vec<Vec<i32>>) -> f64 {
let mut time = 0;
customers.iter().map(|c| {
time = time.max(c[0]) + c[1];
(time - c[0]) as f64
}).sum::<f64>() / customers.len() as f64
}
8.07.2024
1823. Find the Winner of the Circular Game medium
blog post
substack
youtube

Join me on Telegram
https://t.me/leetcode_daily_unstoppable/663
Problem TLDR
Last of k-th excluded from 1..n #medium #simulation #math
Intuition
Let’s observe the problem:
// 1 2 3 4 5 1 2 3 4 5 2
// * *
// x * * 2
// x * * 4
// x x * x * 1
// x 5
//
// 1 2 3 4 5 1 3 5 3
// x x x x
// 6, 1
// 1 2 3 4 5 6 1
// x x x x x
I didn’t see any simple pattern here (however, it exists, see below). So, let’s just use a linked list and simulate the process.
The math solution involves knowing the Josephus Problem
https://en.wikipedia.org/wiki/Josephus_problem, and it is a Dynamic Programming answer(n, k) = (answer(n - 1, k) + k) %n, or ans = 0; for (i in 1..n) ans = (ans + k) % i; ans + 1.
Approach
Kotlin: let’s implement linked list as an array of pointers. Rust: let’s implement a bottom up DP solution. (after reading the wiki and other’s solutions :) )
Complexity
-
Time complexity: \(O(nk)\)
-
Space complexity: \(O(n)\)
Code
fun findTheWinner(n: Int, k: Int): Int {
val nexts = IntArray(n + 1) { it + 1 }; nexts[n] = 1
var curr = 1
repeat(n - 1) {
var prev = curr
repeat(k - 1) { prev = curr; curr = nexts[curr] }
nexts[prev] = nexts[curr]
curr = nexts[curr]
}
return curr
}
pub fn find_the_winner(n: i32, k: i32) -> i32 {
let mut ans = 0;
for i in 1..=n { ans = (ans + k) % i }
ans + 1
}
7.07.2024
1518. Water Bottles easy
blog post
substack
youtube

Join me on Telegram
https://t.me/leetcode_daily_unstoppable/662
Problem TLDR
Bottles drink and exchange simulation #easy #math #simulation
Intuition
Run the simulation:
// a n
// drink empty
// a a
// a/n a/n+a%n
// (a/n+a%n)/n (a/n+a%n)/n+(a/n+a%n)%n
There is also a math solution based on geometric series sum \(a + a/n + a/n^2 + ... = a/(1-1/n) = an/(n-1)\) (https://en.wikipedia.org/wiki/Geometric_series). Given that, it is sometimes off by one, we can write \((an - 1)/(n - 1)\). I doubt I could remember this in an interview or a contest though.
Approach
Let’s use as little variables as possible.
Complexity
-
Time complexity: \(O(log_e(b))\), e - numExchange, b - numBottles
-
Space complexity: \(O(1)\)
Code
fun numWaterBottles(numBottles: Int, numExchange: Int): Int {
var drink = numBottles
var empty = numBottles
while (empty >= numExchange) {
drink += empty / numExchange
empty = empty / numExchange + empty % numExchange
}
return drink
}
pub fn num_water_bottles(num_bottles: i32, num_exchange: i32) -> i32 {
let (mut drink, mut empty) = (num_bottles, num_bottles);
while empty >= num_exchange {
drink += empty / num_exchange;
empty = empty / num_exchange + empty % num_exchange
}
drink
}
6.07.2024
2582. Pass the Pillow easy
blog post
substack
youtube

Join me on Telegram
https://t.me/leetcode_daily_unstoppable/661
Problem TLDR
Loop position in increasing-decreasing array #easy #math #simulation
Intuition
For the interview or contest just write a simulation code, it is straghtforward: use delta variable and change its sign when i reaches 1 or n, repeat time` times.
The O(1) solution can be derived from the observation of the repeating patterns:
//n = 4
//t 0 1 2 3 4 5 6 7 8 9 10 11 12 13 14 15 16 17 18 19 20 21
//i 1 2 3 4 3 2 1 2 3 4 3 2 1 2 3 4 3 2 1 2 3 4
// 1 2 3 1 2 3 1 2 3 1 2 3 1 2 3 1 2 3 1 2 3
// ^
// t=6
// 6/3 = 2 -> 2%2=0 (increasing)
// 6%3 = 0 -> i=1+0
// ^
// t=7
// 7/3=2 -> 2%2=0 (increasing)
// 7%3=1 -> i=1+1=2
// ^
// t=9
// 9/3=3 -> 3%2=1 (decreasing)
// 9%3=0 -> i=4-0=4
// ^
// t=15
// 15/3=5 -> 5%2=1 (decreasing)
// 15%3=0 -> i=4-0=4
//
There are cycles, in which i increases and decreases and we can say, it is n - 1 length. From that we need to find in which kind of cycle we are and derive two cases: in increasing add remainder of cycle to 1, in decreasing subtract the remainder from n.
There is another approach however, it is to consider cycle as a full round of 2 * (n - 1) steps. Then the solution is quite similar.
Approach
Let’s implement it first in Kotlin and second in Rust. (Simulation code I wrote on the youtube screencast, it didn’t require thinking.)
Complexity
-
Time complexity: \(O(1)\)
-
Space complexity: \(O(1)\)
Code
fun passThePillow(n: Int, time: Int): Int {
val rounds = time / (n - 1)
val rem = time % (n - 1)
return if (rounds % 2 > 0) n - rem else 1 + rem
}
pub fn pass_the_pillow(n: i32, time: i32) -> i32 {
let t = time % (2 * (n - 1));
if t > n - 1 { n - (t - n) - 1 } else { t + 1 }
}
5.07.2024
2058. Find the Minimum and Maximum Number of Nodes Between Critical Points medium
blog post
substack
youtube

Join me on Telegram
https://t.me/leetcode_daily_unstoppable/660
Problem TLDR
[min, max] distance between critical points in linked list #medium #linked_list
Intuition
Just do what is asked.
Approach
- we can reuse previous variables
aandb
Complexity
-
Time complexity: \(O(n)\)
-
Space complexity: \(O(1)\)
Code
fun nodesBetweenCriticalPoints(head: ListNode?): IntArray {
var first = -1; var last = -1; var min = Int.MAX_VALUE
var i = 0; var curr = head?.next; val e = intArrayOf(-1, -1)
var a = head?.`val` ?: return e; var b = curr?.`val` ?: return e
while (curr?.next != null) {
if (a > b && b < curr.next.`val` || a < b && b > curr.next.`val`)
if (first == -1) first = i else {
min = min(min, i - max(first, last))
last = i
}
i++; a = b; b = curr.next.`val`; curr = curr.next
}
return if (last > 0) intArrayOf(min, last - first) else e
}
pub fn nodes_between_critical_points(head: Option<Box<ListNode>>) -> Vec<i32> {
let (mut first, mut last, mut min, mut i, e) = (-1, -1, i32::MAX, 0, vec![-1, -1]);
let Some(head) = head else { return e }; let mut a = head.val;
let Some(mut curr) = head.next else { return e }; let mut b = curr.val;
while let Some(next) = curr.next {
if a > b && b < next.val || a < b && b > next.val {
if first == -1 { first = i } else {
min = min.min(i - last.max(first));
last = i
}
}
i += 1; a = b; b = next.val; curr = next
}
if last > 0 { vec![min, last - first] } else { e }
}
4.07.2024
2181. Merge Nodes in Between Zeros medium
blog post
substack
youtube

https://t.me/leetcode_daily_unstoppable/659
Problem TLDR
Collapse in-between 0 nodes in a LinkedList #medium #linked_list
Intuition
Just do what is asked: iterate and modify the values and links on the fly.
Approach
- Kotlin: let’s use just one extra variable
- Rust: I am sorry
Complexity
-
Time complexity: \(O(n)\)
-
Space complexity: \(O(1)\)
Code
fun mergeNodes(head: ListNode?): ListNode? {
var curr = head?.next
while (curr?.next != null)
if (curr.next?.`val` ?: 0 > 0) {
curr.`val` += curr.next?.`val` ?: 0
curr.next = curr.next?.next
} else {
curr.next = curr.next?.next
curr = curr.next
}
return head?.next
}
pub fn merge_nodes(mut head: Option<Box<ListNode>>) -> Option<Box<ListNode>> {
let Some(head_box) = head.as_mut() else { return head };
let mut curr = &mut head_box.next;
while let Some(curr_box) = curr {
let Some(next_box) = curr_box.next.as_mut() else { curr_box.next = None; break };
if next_box.val > 0 {
curr_box.val += next_box.val;
curr_box.next = next_box.next.take()
} else {
curr_box.next = next_box.next.take();
curr = &mut curr.as_mut().unwrap().next
}
}
head.unwrap().next
}
3.07.2024
1509. Minimum Difference Between Largest and Smallest Value in Three Moves medium
blog post
substack
youtube

Join me on Telegram
https://t.me/leetcode_daily_unstoppable/658
Problem TLDR
Min difference after 3 changes in array #medium #sliding_window #dynamic_programming
Intuition
Let’s observe some examples and try to derive the algorithm:
// 1 3 5 7 9 11
// min = 1
// max4 = (5, 7, 9, 11)
// res = 5 - 1 = 4
//
// 0 1 1 4 6 6 6
// min = 0
// max4 = 4 6 6 6
//
// 20 75 81 82 95
// 55 13
// i
// 6
// j
// 1
// i
As we see, we cannot just take top 3 max or top 3 min, there are corner cases, where some min and some max must be taken. So, we can do a full search of 3 boolean choices, 2^3 total comparisons in a Depth-First search manner. Another way to look at the problem as suffix-prefix trimming: 0 prefix + 3 suffix, 1 prefix + 2 suffix, 2 prefix + 1 suffix, 3 prefix + 0 suffix. So, a total of 4 comparisons in a Sliding Window manner.
Approach
Let’s implement both approaches.
Complexity
-
Time complexity: \(O(nlog(n))\)
-
Space complexity: \(O(1)\)
Code
fun minDifference(nums: IntArray): Int {
nums.sort()
fun dfs(i: Int, j: Int, n: Int): Int =
if (i == j) 0 else if (i > j) Int.MAX_VALUE
else if (n > 2) nums[j] - nums[i]
else min(dfs(i + 1, j, n + 1), dfs(i, j - 1, n + 1))
return dfs(0, nums.lastIndex, 0)
}
pub fn min_difference(mut nums: Vec<i32>) -> i32 {
let n = nums.len(); if n < 4 { return 0 }; nums.sort_unstable();
(0..4).map(|i| nums[n - 4 + i] - nums[i]).min().unwrap()
}
2.07.2024
350. Intersection of Two Arrays II easy
blog post
substack
youtube

Join me on Telegram
https://t.me/leetcode_daily_unstoppable/657
Problem TLDR
Array intersection with duplicates #easy
Intuition
We can do sorting and two pointers. If nums2 on a hard disk, let’s not touch it, just iterate once. For nums1 we can use a counting sort for O(n) solution. For code golf, we can modify nums1 in-place with O(n^2) solution.
Approach
Golf in Kotlin, can you make it shorter? Counting sort in Rust.
Complexity
-
Time complexity: \(O(n)\) for counting sort, O(nlogn) for both sort & two pointers
-
Space complexity: \(O(n)\) for counting sort (n = 1000), O(1) for sort & two pointers
Code
fun intersect(nums1: IntArray, nums2: IntArray) = nums2.filter {
val i = nums1.indexOf(it); if (i >= 0) nums1[i] = -1; i >= 0
}
pub fn intersect(nums1: Vec<i32>, nums2: Vec<i32>) -> Vec<i32> {
let mut f = vec![0; 1001]; for n in nums1 { f[n as usize] += 1 }
nums2.into_iter().filter(|&n| {
let b = f[n as usize] > 0; f[n as usize] -= 1; b
}).collect()
}
1.07.2024
1550. Three Consecutive Odds easy
blog post
substack
youtube

Join me on Telegram
https://t.me/leetcode_daily_unstoppable/656
Problem TLDR
Has window of 3 odds? #easy
Intuition
Such questions are helping to start with a new language.
Approach
Can you make it shorter?
Complexity
-
Time complexity: \(O(n)\)
-
Space complexity: \(O(1)\) for Rust, O(n) for Kotlin, can be O(1) with
asSequence.
Code
fun threeConsecutiveOdds(arr: IntArray) =
arr.asList().windowed(3).any { it.all { it % 2 > 0 }}
pub fn three_consecutive_odds(arr: Vec<i32>) -> bool {
arr[..].windows(3).any(|w| w.iter().all(|n| n % 2 > 0))
}
30.06.2024
1579. Remove Max Number of Edges to Keep Graph Fully Traversable medium
blog post
substack
youtube

Join me on Telegram
https://t.me/leetcode_daily_unstoppable/655
Problem TLDR
Remove extra nodes in a connected graph by type 1, 2 and 3=1+2 #hard #union-find
Intuition
Type 3 nodes are the most valueable, let’s keep them. Then check if type 1 is already connected by type 3 and do the same for type 2. To check connections use the Union-Find.
Approach
- at the end we can check connections to the first node, or just simple count how many edges added and compare it to n - 1
- both type1 and type2 must have add (n - 1) edges
- optimized Union-Find must have path compression and ranking, making time complexity O(1) (google inverse Akkerman function)
Complexity
-
Time complexity: \(O(n)\)
-
Space complexity: \(O(n)\)
Code
fun maxNumEdgesToRemove(n: Int, edges: Array<IntArray>): Int {
class Uf(var v: Int = n - 1): HashMap<Int, Int>() {
fun u(a: Int, b: Int): Boolean = if (f(a) == f(b)) false
else { set(f(a), f(b)); v--; true }
fun f(a: Int): Int = if (get(a) == a) a else
get(a)?.let { b -> f(b).also { set(b, it) } } ?: a
}
val uu = List(2) { Uf() }; val u = Uf(); var count = 0
for ((t, a, b) in edges) if (t == 3)
if (!u.u(a, b)) count++ else for (u in uu) u.u(a, b)
for ((t, a, b) in edges) if (t < 3) if (!uu[t - 1].u(a, b)) count++
return if (uu.all { it.v < 1 }) count else -1
}
pub fn max_num_edges_to_remove(n: i32, edges: Vec<Vec<i32>>) -> i32 {
fn u(uf: &mut Vec<usize>, a: &[i32]) -> i32 {
let (fa, fb) = (f(uf, a[1] as usize), f(uf, a[2] as usize));
if fa == fb { 0 } else { uf[fa] = fb; 1 }}
fn f(uf: &mut Vec<usize>, a: usize) -> usize {
let mut x = a; while x != uf[x] { x = uf[x] }; uf[a] = x; x }
let mut u3 = (0..=n as usize).collect::<Vec<_>>();
let (mut uu, mut v, mut res) = ([u3.clone(), u3.clone()], 2 * n - 2, 0);
for e in &edges { if e[0] == 3 {
if u(&mut u3, e) < 1 { res += 1 }
else { for t in 0..2 { v -= u(&mut uu[t], e) }}}}
for e in &edges { if e[0] < 3 {
if u(&mut uu[e[0] as usize - 1], e) < 1 { res += 1 } else { v -= 1 }}}
if v < 1 { res } else { -1 }
}
29.06.2024
2192. All Ancestors of a Node in a Directed Acyclic Graph medium
blog post
substack
youtube

Join me on Telegram
https://t.me/leetcode_daily_unstoppable/654
Problem TLDR
List of ancestors in a DAG #medium #dfs #toposort
Intuition
 We can use Depth-First Search for each node, caching the result to not execute twice, but we should walk backwards from child to parent.
Another solution is to walk from parents in a Topological Sort order and appending the results.
Approach
Let’s implement both approaches. For the toposort solution (in Rust), we should do deduplication as early as possible to prevent OOM.
Complexity
- Time complexity: \(O(E^2V + V^2log(V))\) for DFS - groupBy will take O(E), DFS depth is O(E) and inside it we iterate over each sibling O(X), X is up to E where we do copy of all collected vertices O(V). The final step is sorting V collected vertexes - VlogV.
\(O(V + EVlog(V))\), the Kahn algorithm for toposort takes O(V + E), in each step of edge taking we append V vertices, and sorting them Vlog(V)
- Space complexity: \(O(V^2 + E)\) result takes the biggest space
Code
fun getAncestors(n: Int, edges: Array<IntArray>): List<List<Int>> {
val g = edges.groupBy({ it[1] }, { it[0] })
val res = mutableMapOf<Int, Set<Int>>()
fun dfs(i: Int): Set<Int> = res.getOrPut(i) {
g[i]?.map { dfs(it) + it }?.flatten()?.toSet() ?: setOf()
}
return (0..<n).map { dfs(it).sorted() }
}
pub fn get_ancestors(n: i32, edges: Vec<Vec<i32>>) -> Vec<Vec<i32>> {
let n = n as usize; let (mut deg, mut g, mut res, mut queue) =
(vec![0; n], vec![vec![]; n], vec![vec![]; n], VecDeque::new());
for e in edges {
g[e[0] as usize].push(e[1] as usize); deg[e[1] as usize] += 1
}
for i in 0..n { if deg[i] == 0 { queue.push_back(i); }}
while let Some(top) = queue.pop_front() { for &j in &g[top] {
deg[j] -= 1; if deg[j] == 0 { queue.push_back(j); }
res[j].push(top as i32); let t = res[top].clone();
res[j].extend(t); res[j].sort_unstable(); res[j].dedup()
}}; res
}
28.06.2024
2285. Maximum Total Importance of Roads medium
blog post
substack
youtube

Join me on Telegram
https://t.me/leetcode_daily_unstoppable/653
Problem TLDR
Sort graph by siblings and compute sum(i*s) #medium
Intuition
Notice that the more siblings the bigger rank should be to produce the optimal result.
Approach
We can sort the count array or use bucket sort of size n to reduce time complexity to O(n).
Complexity
-
Time complexity: \(nlog(n)\)
-
Space complexity: \(O(n)\)
Code
fun maximumImportance(n: Int, roads: Array<IntArray>): Long {
val counts = IntArray(n); var i = 1
for ((a, b) in roads) { counts[a]++; counts[b]++ }
return counts.sorted().sumOf { it * (i++).toLong() }
}
pub fn maximum_importance(n: i32, roads: Vec<Vec<i32>>) -> i64 {
let mut counts = vec![0; n as usize];
for r in roads { counts[r[0] as usize] += 1; counts[r[1] as usize] += 1}
counts.sort_unstable();
(0..n as usize).map(|i| counts[i] * (i + 1) as i64).sum()
}
27.06.2024
1791. Find Center of Star Graph easy
blog post
substack
youtube

Join me on Telegram
https://t.me/leetcode_daily_unstoppable/652
Problem TLDR
Center of a start graph #easy
Intuition
It’s just a common node between two edges.
Approach
Can you make it shorter?
Complexity
-
Time complexity: \(O(1)\)
-
Space complexity: \(O(1)\)
Code
fun findCenter(e: Array<IntArray>) =
e[0].first { it in e[1] }
pub fn find_center(e: Vec<Vec<i32>>) -> i32 {
if e[1].contains(&e[0][0]) { e[0][0] } else { e[0][1] }
}
26.06.2024
1382. Balance a Binary Search Tree medium
blog post
substack
youtube

Join me on Telegram
https://t.me/leetcode_daily_unstoppable/651
Problem TLDR
Make a balanced Binary Search Tree #medium
Intuition
Construct it back from a sorted array: always peek the middle.
Approach
- notice how slices in Rust are helping to reduce the complexity
Complexity
-
Time complexity: \(O(n)\)
-
Space complexity: \(O(n)\)
Code
fun balanceBST(root: TreeNode?): TreeNode? {
val sorted = mutableListOf<Int>()
fun dfs1(n: TreeNode?): Unit? = n?.run {
dfs1(left); sorted += `val`; dfs1(right) }
fun dfs2(lo: Int, hi: Int): TreeNode? =
if (lo > hi) null else {
val mid = (lo + hi) / 2
TreeNode(sorted[mid]).apply {
left = dfs2(lo, mid - 1); right = dfs2(mid + 1, hi)
}}
dfs1(root); return dfs2(0, sorted.lastIndex)
}
pub fn balance_bst(root: Option<Rc<RefCell<TreeNode>>>) -> Option<Rc<RefCell<TreeNode>>> {
fn dfs1(n: &Option<Rc<RefCell<TreeNode>>>, sorted: &mut Vec<i32>) {
let Some(n) = n.as_ref() else { return; }; let n = n.borrow();
dfs1(&n.left, sorted); sorted.push(n.val); dfs1(&n.right, sorted)
}
fn dfs2(sorted: &[i32]) -> Option<Rc<RefCell<TreeNode>>> {
if sorted.len() < 1 { return None }; let mid = sorted.len() / 2;
let left = dfs2(&sorted[..mid]);
let right = dfs2(&sorted[mid + 1..]);
Some(Rc::new(RefCell::new(TreeNode { val: sorted[mid], left: left, right: right })))
}
let mut sorted = vec![]; dfs1(&root, &mut sorted); dfs2(&sorted[..])
}
25.06.2024
1038. Binary Search Tree to Greater Sum Tree medium
blog post
substack
youtube

Join me on Telegram
https://t.me/leetcode_daily_unstoppable/650
Problem TLDR
Aggregate Binary Search Tree from the right #medium #tree
Intuition
Just iterate from the tail in an inorder DFS traversal.
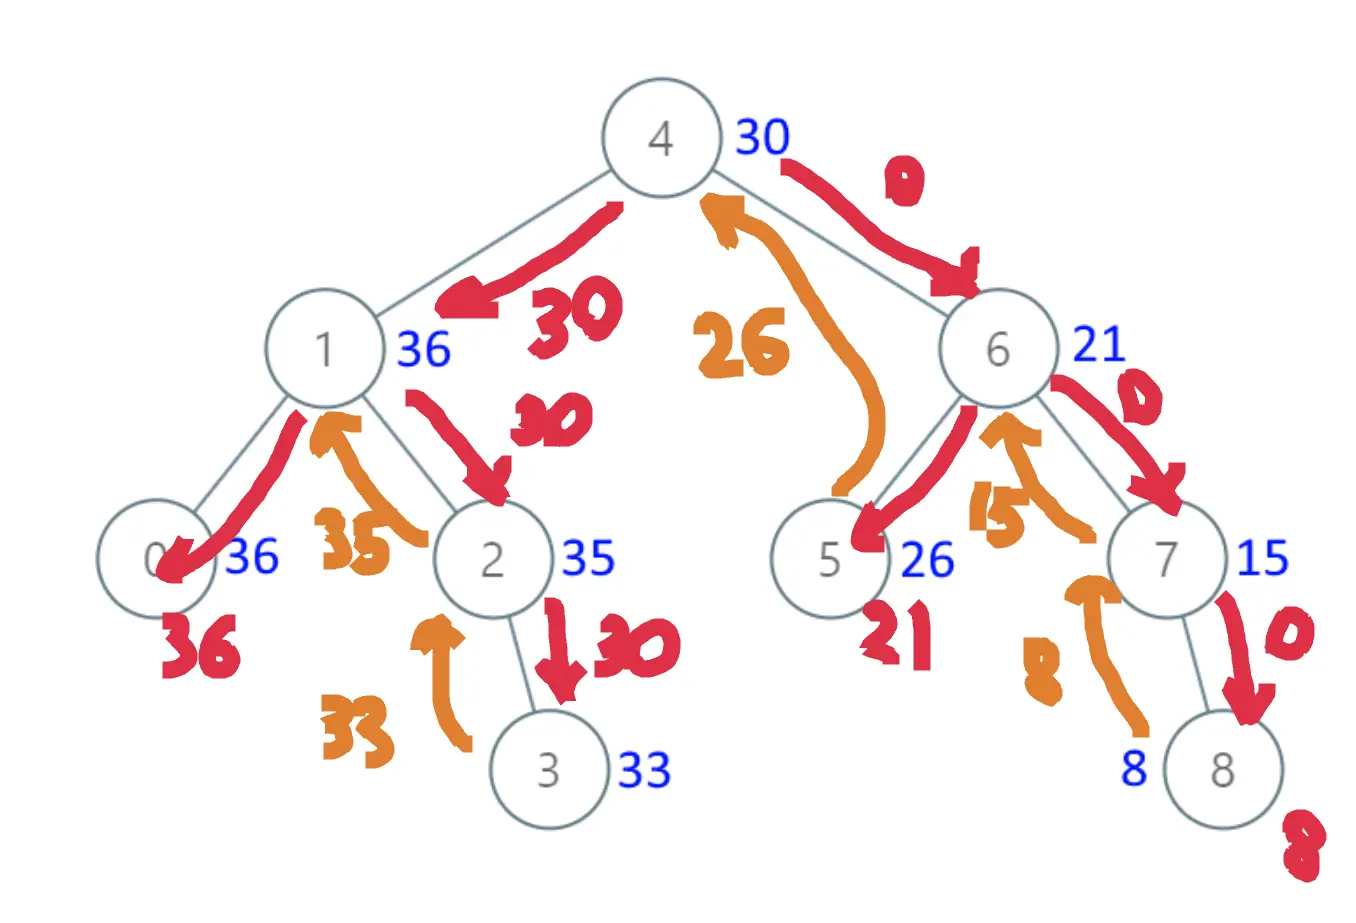
Approach
- notice how
26jumps straight to the root, so we must store the result somewhere - there is a nice patter in Rust: `let Some(..) = .. else { .. }
Complexity
-
Time complexity: \(O(n)\)
-
Space complexity: \(O(log(n))\) for the call stack, however, it can be O(1) for the Morris Traversal
Code
var s = 0
fun bstToGst(root: TreeNode?): TreeNode? = root?.apply {
bstToGst(right); `val` += s; s = `val`; bstToGst(left)
}
pub fn bst_to_gst(mut root: Option<Rc<RefCell<TreeNode>>>) -> Option<Rc<RefCell<TreeNode>>> {
fn dfs(n: &Option<Rc<RefCell<TreeNode>>>, s: i32) -> i32 {
let Some(n) = n.as_ref() else { return s }; let mut n = n.borrow_mut();
n.val += dfs(&n.right, s); dfs(&n.left, n.val)
}
dfs(&root, 0); root
}
24.06.2024
995. Minimum Number of K Consecutive Bit Flips medium
blog post
substack
youtube

Join me on Telegram
https://t.me/leetcode_daily_unstoppable/649
Problem TLDR
Count k-range flips in binary array to make all 1 #hard #sliding_window
Intuition
We should flip all the 0, so let’s do it greedily. The hardness of the problem lies in the question of how much flips are already done for the current position. Let’s observe an example:
// 0 1 2 3 4 5 6 7 k=3
// 0 0 0 1 0 1 1 0 flip
// * * * [0..2]
// * * * [4..6]
// * * * [5..7]
// ^ how much flips in 3..5 range
// or >= 3
If we maintain a window of i-k+1..i, we shall remember only the flips in this window and can safely drop all the flips in 0..i-k range.
Approach
The greedy is hard to prove, so try as much examples as possible.
Complexity
-
Time complexity: \(O(n)\)
-
Space complexity: \(O(n)\)
Code
fun minKBitFlips(nums: IntArray, k: Int): Int {
var total = 0; var flips = ArrayDeque<Int>()
for ((i, n) in nums.withIndex()) {
while (flips.size > 0 && flips.first() + k < i + 1)
flips.removeFirst()
if ((1 - n + flips.size) % 2 > 0) {
total++
flips += i
if (i + k > nums.size) return -1
}
}
return total
}
pub fn min_k_bit_flips(nums: Vec<i32>, k: i32) -> i32 {
let (mut total, mut flips) = (0, VecDeque::new());
for (i, n) in nums.iter().enumerate() {
while flips.front().unwrap_or(&i) + (k as usize) < i + 1
{ flips.pop_front(); }
if (1 - n + flips.len() as i32) % 2 > 0 {
total += 1;
if i + k as usize > nums.len() { return -1 }
flips.push_back(i)
}
}; total as i32
}
23.06.2024
1438. Longest Continuous Subarray With Absolute Diff Less Than or Equal to Limit medium
blog post
substack
youtube
Join me on Telegram
https://t.me/leetcode_daily_unstoppable/648
Problem TLDR
Longest subarray with abs(a[i] - a[j]) <= limit #medium #sliding_window #monotonic_queue
Intuition
Let’s observe how we can do this in a single iteration:
// 0 1 2 3
// 8 2 4 7 limit=4
// 0 i
// j 8
// 1 i 8 2 or 2
// 2 i 8 2 4 8-2=6>4 -> move j
// j 2 4
// 3 i 2 4 7 7-2=5>4 -> move j
// j 4 7
We should keep the window j..i and maintain maximums and minimums.
To find next maximum after current is dropped we can use Monotonic Queue technique: make it always decreasing, like 5 4 3 2 1.
If any new value is bigger then the tail, for example add 4, it will be the next maximum and the tail 3 2 1 becomes irrelevant: 5 4 3 2 1 + 4 -> 5 4 4.
(Another solution would be to just use two heaps, one for maxiums, another for minimums.)
Approach
- iterators saves some lines:
maxOf,iter().max() - notice
unwrap_or(&n)trick in Rust
Complexity
-
Time complexity: \(O(n)\)
-
Space complexity: \(O(n)\)
Code
fun longestSubarray(nums: IntArray, limit: Int): Int {
val mins = ArrayDeque<Int>(); val maxs = ArrayDeque<Int>()
var j = 0
return nums.withIndex().maxOf { (i, n) ->
while (mins.size > 0 && mins.last() > n) mins.removeLast()
while (maxs.size > 0 && maxs.last() < n) maxs.removeLast()
mins += n; maxs += n
if (maxs.first() - mins.first() > limit) {
if (nums[j] == maxs.first()) maxs.removeFirst()
if (nums[j++] == mins.first()) mins.removeFirst()
}
i - j + 1
}
}
pub fn longest_subarray(nums: Vec<i32>, limit: i32) -> i32 {
let (mut mins, mut maxs, mut j) = (VecDeque::new(), VecDeque::new(), 0);
nums.iter().enumerate().map(|(i, &n)| {
while *mins.back().unwrap_or(&n) > n { mins.pop_back(); }
while *maxs.back().unwrap_or(&n) < n { maxs.pop_back(); }
mins.push_back(n); maxs.push_back(n);
if maxs.front().unwrap() - mins.front().unwrap() > limit {
if nums[j] == *mins.front().unwrap() { mins.pop_front(); }
if nums[j] == *maxs.front().unwrap() { maxs.pop_front(); }
j += 1
}
(i - j + 1) as i32
}).max().unwrap()
}
22.06.2024
1248. Count Number of Nice Subarrays medium
blog post
substack
youtube

Join me on Telegram
https://t.me/leetcode_daily_unstoppable/647
Problem TLDR
Count subarrays with k odds #medium #sliding_window
Intuition
Let’s observe the problem:
// 1 1 2 1 1 k=3
// * * * *
// * * * *
// 0 1 2 3 4 5 6 7 8 9
// 2 2 2 1 2 2 1 2 2 2 k=2
// . count
// i . 0
// i . 0
// i . 0
// i . 1 < k
// i .
// i
// i 2 == k, +4 [0..6],[1..6],[2..6],[3..6]
// i 2 == k +4 0..7 1..7 2..7 3..7
// i 2 == k +4 0..8 1..8 2..8 3..8
// i 2 == k +4 0..9 1..9 2..9 3..9
When we find a good window [3..6] we must somehow calculate the number of contiguous subarrays. Let’s experiment how we can do it in a single pass: when i = 6 we must add to the result all subarrays 0..6 1..6 2..6 3..6 and stop until the first odd. So, let’s use a third pointer border to count the number of prefix subarrays: j - border.
Approach
- Using
sumOfcan shorten some lines of code. & 1gives1foroddnumbers.- Some conditions are exclusive to each other, and we can skip them:
cnt > 0meansjwill stop at least once. (Don’t do this in an interview, just usej < nums.len().)
Complexity
-
Time complexity: \(O(n)\)
-
Space complexity: \(O(1)\)
Code
fun numberOfSubarrays(nums: IntArray, k: Int): Int {
var border = -1; var j = 0; var cnt = 0
return nums.sumOf { n ->
cnt += n and 1
while (cnt > k) {
border = j
cnt -= nums[j++] and 1
}
while (cnt > 0 && nums[j] % 2 < 1) j++
if (cnt < k) 0 else j - border
}
}
pub fn number_of_subarrays(nums: Vec<i32>, k: i32) -> i32 {
let (mut b, mut cnt, mut j) = (-1, 0, 0);
nums.iter().map(|n| {
cnt += n & 1;
while cnt > k { b = j as i32; cnt -= nums[j] & 1; j += 1 }
while cnt > 0 && nums[j] & 1 < 1 { j += 1 }
if cnt < k { 0 } else { j as i32 - b }
}).sum()
}
21.06.2024
1052. Grumpy Bookstore Owner medium
blog post
substack
youtube

Join me on Telegram
https://t.me/leetcode_daily_unstoppable/646
Problem TLDR
Max customers sum after make consecutive minutes non-grumpy #medium #sliding_window
Intuition
It was hard.
First understand the problem: we can take all the 0-grumpy minutes, but 1-grumpy can only be in minutes, and must be choosen.
Let’s explore the example:
// 1 2 3 4 5 6 7 8 9 m=2
// 1 1 0 1 1 0 1 1 1
// * * * * * *
// * *
//
// 2 4 1 4 1 m=2
// 1 0 1 0 1
// * *
// * *
The sliding window must be from the 1-grumpy days to choose the maximum and ignore all 0-grumpy days, because they are always be taken.
Approach
Keep 0-grumpy and 1 grumpy sums in separate variables.
Complexity
-
Time complexity: \(O(n)\)
-
Space complexity: \(O(1)\)
Code
fun maxSatisfied(customers: IntArray, grumpy: IntArray, minutes: Int): Int {
var sum = 0; var max = 0; var other = 0; var j = 0
for ((i, c) in customers.withIndex()) {
sum += c * grumpy[i]
other += c * (1 - grumpy[i])
while (j <= i - minutes) sum -= customers[j] * grumpy[j++]
max = max(max, sum)
}
return max + other
}
pub fn max_satisfied(customers: Vec<i32>, grumpy: Vec<i32>, minutes: i32) -> i32 {
let (mut j, mut sum, mut other, mut max) = (0, 0, 0, 0);
for i in 0..grumpy.len() {
other += customers[i] * (1 - grumpy[i]);
sum += customers[i] * grumpy[i];
while j as i32 <= i as i32 - minutes { sum -= customers[j] * grumpy[j]; j += 1 }
max = max.max(sum)
}; max + other
}
20.06.2024
1552. Magnetic Force Between Two Balls medium
blog post
substack
youtube

Join me no Telegram
https://t.me/leetcode_daily_unstoppable/645
Problem TLDR
Max shortest distance between m positions #medium #binary_search
Intuition
In a space of growing shortest distance we move from impossible to possible place m positions. Is Binary Search possible?
Let’s try in example to check in a single pass count how many buckets we could place with given shortest distance = 2:
// 1 2 3 4 5 6 7 8 m=4
// * * * * * * *
// ^ ^ ^ ^
// ^ ^ ^ ^
As we can see, two ways of placing possible, but there is no difference between choosing position 1 or 2, so we can take positions greedily.
Approach
- we can skip using a separate variable for
max, but in the interview it is better to use explicitly
Complexity
-
Time complexity: \(O(nlog(n))\)
-
Space complexity: \(O(1)\)
Code
fun maxDistance(position: IntArray, m: Int): Int {
position.sort()
var lo = 0; var hi = Int.MAX_VALUE
while (lo <= hi) {
val mid = lo + (hi - lo) / 2
var count = 0; var next = 1
for (p in position)
if (p >= next) { count++; next = p + mid }
if (count >= m) lo = mid + 1 else hi = mid - 1
}
return hi
}
pub fn max_distance(mut position: Vec<i32>, m: i32) -> i32 {
position.sort_unstable(); let (mut lo, mut hi) = (0, i32::MAX);
while lo <= hi {
let mid = lo + (hi - lo) / 2;
let (mut count, mut next) = (0, 1);
for &p in &position { if p >= next { count += 1; next = p + mid }}
if count >= m { lo = mid + 1 } else { hi = mid - 1 }
}; hi
}
19.06.2024
1482. Minimum Number of Days to Make m Bouquets medium
blog post
substack
youtube

Join me on Telegram
https://t.me/leetcode_daily_unstoppable/644
Problem TLDR
Min days to take m k-subarrays #medium #binary_search
Intuition
// 1 10 3 10 2 m=3 k=1
// 1
// 2
// 3
// 10 10
// 7 7 7 7 12 7 7 m=2 k=3
// [7 7 7] 7 7 7 +1
// [ 12 ] +2
We can binary search in space of days as function grows from not possible to possible with increase of days.
Approach
Don’t forget the -1 case.
Complexity
-
Time complexity: \(O(nlog(n))\)
-
Space complexity: \(O(1)\)
Code
fun minDays(bloomDay: IntArray, m: Int, k: Int): Int {
var lo = 0; var hi = bloomDay.max(); var min = Int.MAX_VALUE
while (lo <= hi) {
val mid = lo + (hi - lo) / 2
var curr = 0; var count = 0
for (d in bloomDay) {
if (d > mid) curr = 0 else curr++
if (curr == k) { curr = 0; count++ }
}
if (count >= m) { hi = mid - 1; min = min(min, mid) }
else lo = mid + 1
}
return if (min == Int.MAX_VALUE) -1 else min
}
pub fn min_days(bloom_day: Vec<i32>, m: i32, k: i32) -> i32 {
let (mut lo, mut hi, mut min) = (0, *bloom_day.iter().max().unwrap(), i32::MAX);
while lo <= hi {
let (mid, mut curr, mut count) = (lo + (hi - lo) / 2, 0, 0);
for &d in &bloom_day {
curr = if d > mid { 0 } else { curr + 1 };
if curr == k { curr = 0; count += 1 }
}
if count >= m { hi = mid - 1; min = min.min(mid) }
else { lo = mid + 1 }
}
if min == i32::MAX { -1 } else { min }
}
18.06.2024
826. Most Profit Assigning Work medium
blog post
substack
youtube

Join me on Telegram
https://t.me/leetcode_daily_unstoppable/643
Problem TLDR
Max profit by assigning [profit, difficulty] to workers any times #medium #sorting #greedy
Intuition
Let’s start with sorting worker and difficulty.
The greedy algorithm:
- take least able worker
- take all jobs that he able to work with
- choose maximum profit job
// 2 4 6 8 10 4 5 6 7
// 10 20 30 40 50 a b c d
// a a
// b b
// c c c
// d d d
// 68 35 52 47 86 92 10 85 84 82
// 67 17 1 81 3
// 35 47 52 68 86 10 82 84 85 92
// 17 81 1 67 3 d
// i max = 17
// i max = 81
// i max = 81
// i 68 < 82, max = 81, use 81
// d = 84, use 81
// d = 85, use 81
// d = 92
// i max = 81 use 81
Approach
- pay attention that we can reuse jobs, otherwise we would have to use the PriorityQueue and
polleach taken job
Complexity
-
Time complexity: \(O(nlog(n))\)
-
Space complexity: \(O(n)\)
Code
fun maxProfitAssignment(difficulty: IntArray, profit: IntArray, worker: IntArray): Int {
val inds = profit.indices.sortedBy { difficulty[it] }
var maxProfit = 0
var i = 0
return worker.sorted().sumBy { d ->
while (i < inds.size && difficulty[inds[i]] <= d)
maxProfit = max(maxProfit, profit[inds[i++]])
maxProfit
}
}
pub fn max_profit_assignment(difficulty: Vec<i32>, profit: Vec<i32>, mut worker: Vec<i32>) -> i32 {
let (mut i, mut res, mut max, mut inds) = (0, 0, 0, (0..profit.len()).collect::<Vec<_>>());
worker.sort_unstable(); inds.sort_unstable_by_key(|&i| difficulty[i]);
for d in worker {
while i < inds.len() && difficulty[inds[i]] <= d { max = max.max(profit[inds[i]]); i += 1 }
res += max
}; res
}
17.06.2024
633. Sum of Square Numbers medium
blog post
substack
youtube

Join me on Telegram
https://t.me/leetcode_daily_unstoppable/642
Problem TLDR
Is c sum of squares? #medium #binary_search
Intuition
From simple brute force of 0..c for a and b we can do the following optimizations:
- use
sqrtupper bound O(n^2) -> O((sqrt(n))^2) - notice that
sumfunction grows linearly and we can do a Binary Search ofcin it O((sqrt(n))^2) -> O(sqrt(n)log(n)) - the trickiest part:
aandbcan themselves be the upper and lower bounds -> O(sqrt(n))
Approach
Let’s implement both solutions.
Complexity
-
Time complexity: \(O(sqrt(n)log(n))\) and \(O(sqrt(n))\)
-
Space complexity: \(O(1)\)
Code
fun judgeSquareSum(c: Int): Boolean {
val s = Math.sqrt(c.toDouble()).toLong()
for (a in 0..s) {
var lo = 0L; var hi = s
while (lo <= hi) {
val mid = lo + (hi - lo) / 2
val sum = a * a + mid * mid
if (sum == c.toLong()) return true
if (sum > c.toLong()) hi = mid - 1
else lo = mid + 1
}
}
return false
}
pub fn judge_square_sum(c: i32) -> bool {
let (mut lo, mut hi) = (0u64, (c as f64).sqrt() as u64);
while lo <= hi {
let sum = lo * lo + hi * hi;
if sum == c as u64 { return true }
if sum > c as u64 { hi -= 1 } else { lo += 1 }
}; false
}
16.06.2024
330. Patching Array hard
blog post
substack
youtube
Join me on Telegram
https://t.me/leetcode_daily_unstoppable/641
Problem TLDR
Insertions to make subsets sums fill 1..n #hard
Intuition
The hard part for me was to understand range filling law: if range [1..x] is filled, then to fill range [1..x+x] we can add just one number x: it will add all the range of numbers: 1+x, 2+x, 3+x ... x+x
With this in mind, let’s explore example of how to fill the range:
// 1 5 10 n=20
// sums = 1, 5, 10, 1+5,1+10,5+10,1+5+10
// 1 2 3 9
// 1 [1..1]
// 2 [..1+2] = [..3]
// 3 [..3+3] = [..6]
// 9 9>6+1, 7..9 -> 7 -> [..6+7]= [..13]
// [..13+9] = [..22]
// 1 2 10 20 n=46
// 1 ..1
// 2 ..3
// 10 10>4, ..3+4=..7
// 10>8, ..7+8=..15
// ..15+10=..25
When we reach the number 9, we see the gap between the rightmost border 6 and 9, so we fill it with the next number after border 7. After this operation, the filled range becomes [1..6+7] and we can take the number 9.
Approach
Look for the tips in the discussion section.
Complexity
-
Time complexity: \(O(mlog(n))\), each time we doubling the border, so it takes
log(n) -
Space complexity: \(O(1)\)
Code
fun minPatches(nums: IntArray, n: Int): Int {
var count = 0; var border = 0L; var i = 0
while (border < n) {
if (i < nums.size && nums[i] <= border + 1) {
border += nums[i]
i++
} else {
border += border + 1
count++
}
}
return count
}
pub fn min_patches(nums: Vec<i32>, n: i32) -> i32 {
let (mut border, mut i, mut cnt) = (0, 0, 0);
while border < n as _ {
if i < nums.len() && nums[i] as u64 <= border + 1 {
border += nums[i] as u64;
i += 1
} else {
border += border + 1;
cnt += 1
}
}; cnt
}
15.06.2024
502. IPO hard
blog post
substack
youtube
Join me on Telegram
https://t.me/leetcode_daily_unstoppable/640
Problem TLDR
Max capital by choosing k jobs with profits[] & capital[] given w on start #hard #heap
Intuition
Let’s observe how this works:
// profits capital
// 2 3 4 5 6 1 2 0 3 3 w = 0 k = 3
// 1 1 4 2 3
// `cap` only increases
We can choose from a bucket of jobs, each must have capital <= current money. After each job done our money will only grow, and the bucket will expand. And to choose optimally, just take max capital job.
The growing sorted bucket can be done with heap. It is evident that the bucket must take a new job with the smalled capital first, so sort by capital initially.
Approach
- note that heap in Kotlin is a min-heap; in Rust is a max-heap
Complexity
-
Time complexity: \(O(nlog(n))\)
-
Space complexity: \(O(n)\)
Code
fun findMaximizedCapital(k: Int, w: Int, profits: IntArray, capital: IntArray): Int {
val inds = profits.indices.sortedBy { capital[it] }; val pq = PriorityQueue<Int>()
var cap = w; var j = 0
repeat (k) {
while (j < inds.size && capital[inds[j]] <= cap) pq += -profits[inds[j++]]
cap -= pq.poll() ?: 0
}
return cap
}
pub fn find_maximized_capital(k: i32, w: i32, profits: Vec<i32>, capital: Vec<i32>) -> i32 {
let mut inds: Vec<_> = (0..profits.len()).collect(); inds.sort_by_key(|&i| capital[i]);
let (mut cap, mut bh, mut j) = (w, BinaryHeap::new(), 0);
for _ in 0..k {
while j < inds.len() && capital[inds[j]] <= cap { bh.push(profits[inds[j]]); j += 1 }
cap += bh.pop().unwrap_or(0)
}; cap
}
14.06.2024
945. Minimum Increment to Make Array Unique medium
blog post
substack
youtube
Join me on Telegram
https://t.me/leetcode_daily_unstoppable/639
Problem TLDR
Min increments to make items unique #medium
Intuition
Let’s observe an example.
// 1 2 2 delta diff
// i 0 1
// i 1 0
//
// 1 1 2 2 3 7
// i 1 0
// i 1 1
// i 2 0
// i 2 1
// i 0 4
// (2 - (4-1))
First, sort, then maintain the delta:
- increase if there is a duplicate
- decrease by adjucent items diff
Approach
Let’s use iterators: windowed, sumOf.
Complexity
-
Time complexity: \(O(nlog(n))\)
-
Space complexity: \(O(1)\), but O(n) for
sortedin Kotlin
Code
fun minIncrementForUnique(nums: IntArray): Int {
var delta = 0
return nums.sorted().windowed(2).sumOf { (a, b) ->
if (a < b) delta = max(0, delta + a - b + 1) else delta++
delta
}
}
pub fn min_increment_for_unique(mut nums: Vec<i32>) -> i32 {
nums.sort_unstable(); let mut delta = 0;
nums[..].windows(2).map(|w| {
delta = if w[0] < w[1] { 0.max(delta + w[0] - w[1] + 1) } else { delta + 1 };
delta
}).sum()
}
13.06.2024
2037. Minimum Number of Moves to Seat Everyone easy
blog post
substack
youtube
Join me on Telegram
https://t.me/leetcode_daily_unstoppable/638
Problem TLDR
Sum of diffs of sorted students and seats #easy
Intuition
Deduce the intuition from the problem examples: the optimal solution is to take difference between sorted seats and students greedily.
Approach
Let’s use some languages iterators:
- Kotlin:
sorted,zip,sumOf - Rust:
iter,zip,sum
Complexity
-
Time complexity: \(O(nlogn)\)
-
Space complexity: \(O(n)\) for Kotlin, O(1) for Rust solution
Code
fun minMovesToSeat(seats: IntArray, students: IntArray) =
seats.sorted().zip(students.sorted()).sumOf { (a, b) -> abs(a - b) }
pub fn min_moves_to_seat(mut seats: Vec<i32>, mut students: Vec<i32>) -> i32 {
seats.sort_unstable(); students.sort_unstable();
seats.iter().zip(students).map(|(a, b)| (a - b).abs()).sum()
}
12.06.2024
75. Sort Colors medium
blog post
substack
youtube

Join me on Telegram
https://t.me/leetcode_daily_unstoppable/637
Problem TLDR
Sort 012 array #medium
Intuition
The simple solution is to just counting sort. However, we can do one pass solution - use zeros and twos zones and fill them:
// 1 2 0
// z t
// i
// i
// 0 2
// t
// i
// 2 1 2
// z t
// i
// t
// i
The corner case is when 2 and 0 must be swapped before next i. One way is to write if (nums[i] == 2) two--, another way is to not increment i when 2 swapped.
Approach
Let’s implement both solutions.
Slice.fillin Rust helps
Complexity
-
Time complexity: \(O(n)\)
-
Space complexity: \(O(1)\)
Code
fun sortColors(nums: IntArray): Unit {
var zero = 0; var two = nums.lastIndex; var i = 0
while (i <= two)
if (nums[i] < 1) {
nums[zero] = nums[i].also { nums[i++] = nums[zero++] }
} else if (nums[i] > 1) {
nums[two] = nums[i].also { nums[i] = nums[two--] }
} else i++
}
pub fn sort_colors(nums: &mut Vec<i32>) {
let (mut cnt, mut j) = ([0, 0, 0], 0);
for &n in &*nums { cnt[n as usize] += 1 }
for i in 0..cnt.len() {
nums[j..j + cnt[i]].fill(i as _);
j += cnt[i]
}
}
11.06.2024
1122. Relative Sort Array easy
blog post
substack
youtube

Join me on Telegram
https://t.me/leetcode_daily_unstoppable/636
Problem TLDR
Sort an array by the given order #easy
Intuition
Associate the arr2, then use it as key for sorting arr1.
Another solution is to use the Counting Sort: count arr1, then first place arr2 values, decreasing cnt, and then place the remaining cnt.
Approach
- there is a
compareByin Kotlin that can receive several comparators - or we can just use
n + 1001for this problem - notice
.cloned()in Rust: it allows to use a value instead of pointer inunwrap_or
Complexity
-
Time complexity: $$O(nlog(n))$
-
Space complexity: \(O(m)\)
Code
fun relativeSortArray(arr1: IntArray, arr2: IntArray) =
arr2.withIndex().associate { (i, v) -> v to i }.let { inds ->
arr1.sortedWith(compareBy({ inds[it] ?: 1001 }, { it }))
}
pub fn relative_sort_array(mut arr1: Vec<i32>, arr2: Vec<i32>) -> Vec<i32> {
let mut inds = HashMap::new(); for i in 0..arr2.len() { inds.insert(arr2[i], i); }
arr1.sort_unstable_by_key(|n| inds.get(n).cloned().unwrap_or(1001 + *n as usize));
arr1
}
10.06.2024
1051. Height Checker easy
blog post
substack
youtube

Join me on Telegram
https://t.me/leetcode_daily_unstoppable/635
Problem TLDR
Count unsorted elements in array #easy
Intuition
We can use bucket sort to do this in O(n).
Approach
Let’s just use a simple sort to save the effort.
Complexity
-
Time complexity: \(O(nlog(n))\)
-
Space complexity: \(O(n)\)
Code
fun heightChecker(heights: IntArray) = heights
.toList().sorted().withIndex()
.count { (i, h) -> h != heights[i] }
pub fn height_checker(heights: Vec<i32>) -> i32 {
let mut s = heights.clone(); s.sort_unstable();
(0..s.len()).map(|i| (s[i] != heights[i]) as i32).sum()
}
09.06.2024
974. Subarray Sums Divisible by K medium
blog post
substack
youtube

Join me on Telegram
https://t.me/leetcode_daily_unstoppable/634
Problem TLDR
Count subarrays divisible by k #medium #hashmap
Intuition
Let’s observe an example:
// 0 1 2 3 4 5
// 4 5 0 -2 -3 1 s k=5 sums count
//i 0 -> 1
// i 4 4%5=4 4 -> 1
// i 9 9%5=4 4 -> 2 +1
// i 9 9%5=4 4 -> 3 +2
// i 7 7%5=2 2 -> 1
// i 4 4%5=4 4 -> 4 +3
// i 5 5%5=0 0 -> 2 +1
We can compute the running sum. Subarray sum can be computed from the previous running sum: sum[i..j] = sum[0..j] - sum[0..i]. Next, if sum is divisibile by k, then we can apply % operation rule: sum[i..j] % k = 0 = sum[0..j] % k - sum[0..i] % k, or in another words: sum[0..i] % k == sum[0..j] % k. So, we just need to keep track of all the remiders.
Corner case is when subarray is starts with first item, just make a sentinel counter for it: sums[0] = 1.
Approach
- using iterators saves some lines of code
- did you know about
hashMapOf&HashMap::from?
Complexity
-
Time complexity: \(O(n)\)
-
Space complexity: \(O(k)\)
Code
fun subarraysDivByK(nums: IntArray, k: Int): Int {
val sums = hashMapOf(0 to 1); var s = 0
return (0..<nums.size).sumOf { i ->
s = (s + nums[i] % k + k) % k
val count = sums[s] ?: 0
sums[s] = 1 + count
count
}
}
pub fn subarrays_div_by_k(nums: Vec<i32>, k: i32) -> i32 {
let (mut sums, mut s) = (HashMap::from([(0, 1)]), 0);
(0..nums.len()).map(|i| {
s = (s + nums[i] % k + k) % k;
let count = *sums.entry(s).or_default();
sums.insert(s, 1 + count);
count
}).sum()
}
08.06.2024
523. Continuous Subarray Sum medium
blog post
substack
youtube

Join me on Telegram
https://t.me/leetcode_daily_unstoppable/633
Problem TLDR
Any subarray sum % k = 0 #medium #hashmap
Intuition
Let’s observe the problem examples:
// 5 0 0 0 k = 3 true?? --> [0 0] % 3 = 0
//
// 23 2 6 2 5 k = 8
// 23 23 % 8 = 0
// 25 25 % 8 = 7
// 31 31 % 8 = 7 (31-25)%8=31%8-25%8=0
// 33
// 38
//
// 0 1 0 3 0 4 0 4 0 k = 7
// 23 2 4 6 6
// 23
// 25
// 29
// 35
We can’t just use two pointers here, because every subarray to the left can give the result in the future.
However, we can store subarray sums. But what to do with them next? If we look at example 23 2 6 2 5, k = 8, subarray [2 6] is good, and it is made from sums 31 and 23: 31 - 23 = 8 -> (31 - 23) % k = 8 % k -> 31 % k - 23 % k = k % k = 0 -> 31 % k == 23 % k. So, our subarray sums % k must be equal for subarray between them be good.
The corener cases:
- For the case
5 0 0 0result is true because there is[0, 0]subarray which gives0 % k = 0. That mean, we should store the first occurence index to check the length later. - For the case
2 6, k = 8we must consider entire array, so we must store the first occurence of0at position-1.
Approach
getOrPutandentry.or_insertin Kotlin & Rust saves us some keystrokes
Complexity
-
Time complexity: \(O(n)\)
-
Space complexity: \(O(n)\)
Code
fun checkSubarraySum(nums: IntArray, k: Int): Boolean {
val sums = HashMap<Int, Int>().apply { put(0, -1) }
var sum = 0
return nums.withIndex().any { (i, n) ->
sum += n
sums.getOrPut(sum % k) { i } < i - 1
}
}
pub fn check_subarray_sum(nums: Vec<i32>, k: i32) -> bool {
let (mut s, mut sums) = (0, HashMap::new()); sums.insert(0, -1);
(0..nums.len()).any(|i| {
s += nums[i];
1 + *sums.entry(s % k).or_insert(i as _) < i as _
})
}
07.06.2024
648. Replace Words medium
blog post
substack
youtube

Join me on Telegram
https://t.me/leetcode_daily_unstoppable/632
Problem TLDR
Replace words with suffixes from dictionary #medium #trie
Intuition
Walk through the word and check if the suffix is in the dictionary. To speed up this we can use a HashMap or a Trie.
Approach
Let’s use both HashMap and Trie. HashMap code is shorter but slower.
Complexity
-
Time complexity: \(O(n)\), O(nw^2) for HashMap solution, as we rebuilding each suffix in the word of
wlength -
Space complexity: \(O(d + w)\)
Code
fun replaceWords(dictionary: List<String>, sentence: String): String {
class Trie(var word: Int = -1): HashMap<Char, Trie>()
val trie = Trie()
for ((i, r) in dictionary.withIndex()) {
var t = trie
for (c in r) t = t.getOrPut(c) { Trie() }
t.word = i
}
return sentence.split(" ").map {
var t = trie
for (c in it) {
if (t.word >= 0) break
t = t[c] ?: break
}
dictionary.getOrNull(t.word) ?: it
}.joinToString(" ")
}
pub fn replace_words(dictionary: Vec<String>, sentence: String) -> String {
let set = dictionary.into_iter().collect::<HashSet<_>>();
sentence.split(" ").map(|s| {
let mut w = String::new();
for c in s.chars() {
w.push(c);
if set.contains(&w) { break }
}; w
}).collect::<Vec<_>>().join(" ")
}
06.06.2024
846. Hand of Straights medium
blog post
substack
youtube

Join me on Telegram
https://t.me/leetcode_daily_unstoppable/631
Problem TLDR
Can array be split into consecutive groups #medium #heap #treemap
Intuition
Let’s sort array and try to brute-force solve it with bare hands:
// 1 2 3 6 2 3 4 7 8
// 0 1 2 3 4 5 6 7 8
// 1 2 2 3 3 4 6 7 8
// 1 2 3
// 2 3 4
// 6 7 8
// 1 2 3 4 5 6 2
// 1 2 3 1
The naive implementation is accepted: take first not used and mark all consequtive until groupSize reached. This solution will take O(n^2) time, but it is fast as arrays are fast when iterated forward.
To improve we can use PriorityQueue: do the same algorithm, skip the duplicated, then add them back. This will take O(nlogn + gk), where g is groups count, and k is duplicates count.
We can improve event more with TreeMap: keys are the hands, values are the counters, subtract entire count.
Approach
Let’s implement both PriorityQueue and TreeMap solutions.
Complexity
-
Time complexity: \(O(nlogn)\)
-
Space complexity: \(O(n)\)
Code
fun isNStraightHand(hand: IntArray, groupSize: Int): Boolean {
val map = TreeMap<Int, Int>()
for (h in hand) map[h] = 1 + (map[h] ?: 0)
for ((h, count) in map) if (count > 0)
for (x in h..<h + groupSize) {
if ((map[x] ?: 0) < count) return false
map[x] = map[x]!! - count
}
return true
}
pub fn is_n_straight_hand(hand: Vec<i32>, group_size: i32) -> bool {
let mut bh = BinaryHeap::new(); for &h in &hand { bh.push(-h); }
while let Some(start) = bh.pop() {
let mut tmp = vec![];
for i in -start + 1..-start + group_size {
while bh.len() > 0 && -bh.peek().unwrap() < i { tmp.push(bh.pop().unwrap()); }
if bh.is_empty() || -bh.peek().unwrap() > i { return false }
bh.pop();
}
for &h in &tmp { bh.push(h); }
}; true
}
05.06.2024
1002. Find Common Characters easy
blog post
substack
youtube

Join me on Telegram
https://t.me/leetcode_daily_unstoppable/629
Problem TLDR
Common letters in words #easy
Intuition
We can count frequencies, then choose minimums for each char. Or do the reverse: for each char count minimum count in all words.
Approach
The frequencies code is faster, but the opposite approach is less verbose.
Complexity
-
Time complexity: \(O(n)\)
-
Space complexity: \(O(1)\), but can be O(n) to hold the result
Code
fun commonChars(words: Array<String>) =
('a'..'z').map { c ->
List(words.minOf { it.count { it == c } }) { "$c" }
}.flatten()
pub fn common_chars(words: Vec<String>) -> Vec<String> {
('a'..='z').map(|c| {
let min_cnt = words.iter().map(|w|
w.chars().filter(|a| *a == c).count()).min();
vec![format!("{c}"); min_cnt.unwrap_or(0)]
}).flatten().collect()
}
04.06.2024
409. Longest Palindrome easy
blog post
substack
youtube
Join me on Telegram
https://t.me/leetcode_daily_unstoppable/628
Problem TLDR
Max palindrome length from chars #easy
Intuition
Don’t mistaken this problem with find the longest palindrome, because this time we need to build one. (I have spent 5 minutes solving the wrong problem)
To build a palindrome, we need even counts of chars and at most one odd.
Approach
- we can use
groupBy,sumByandany f & 1operation will convert anyoddnumber into1
Complexity
-
Time complexity: \(O(n)\)
-
Space complexity: \(O(1)\), but O(n) for the
groupBysolution, which can be optimized
Code
fun longestPalindrome(s: String): Int =
s.groupBy { it }.values.run {
2 * sumBy { it.size / 2 } +
if (any { it.size % 2 > 0 }) 1 else 0
}
pub fn longest_palindrome(s: String) -> i32 {
let (mut freq, mut res, mut o) = (vec![0;128], 0, 0);
for b in s.bytes() { freq[b as usize] += 1 }
for f in freq { o |= f & 1; res += f / 2 }
2 * res + o
}
03.06.2024
2486. Append Characters to String to Make Subsequence medium
blog post
substack
youtube
Join me on Telegram
https://t.me/leetcode_daily_unstoppable/627
Problem TLDR
Min diff to make t substring of s #medium
Intuition
Try to first solve it with bare hands: take the s string and walk over the chars, simultaneously adjusting the t char position:
s t
abcccccd abdd
i . j
i . j
i . j
i . j
i . j
i . j
i. j
i j
Looking at this example, the algorithm is clear: search for the next t[j] char in s.
Approach
- save three lines of code with
getOrNull ?: returnin Kotlin - walking over
bytesis only valid for ascii chars (Rust)
Complexity
-
Time complexity: \(O(n)\)
-
Space complexity: \(O(1)\)
Code
fun appendCharacters(s: String, t: String): Int {
var j = 0
for (c in s) if (c == t.getOrNull(j) ?: return 0) j++
return t.length - j
}
pub fn append_characters(s: String, t: String) -> i32 {
let mut tb = t.bytes().peekable();
t.len() as i32 - s.bytes().map(|b| {
(b == tb.next_if_eq(&b).unwrap_or(0)) as i32
}).sum::<i32>()
}
02.06.2024
344. Reverse String easy
blog post
substack
youtube
Join me on Telegram
https://t.me/leetcode_daily_unstoppable/626
Problem TLDR
Reverse an array #easy
Intuition
We can use two pointers or just a single for-loop until the middle.
Approach
- Careful with the corner case: exclude the middle for the even size
- try to use built-in functions
Complexity
-
Time complexity: \(O(n)\)
-
Space complexity: \(O(1)\)
Code
fun reverseString(s: CharArray) = s.reverse()
pub fn reverse_string(s: &mut Vec<char>) {
s.reverse()
}
01.06.2024
3110. Score of a String easy
blog post
substack
youtube
Join me on Telegram
https://t.me/leetcode_daily_unstoppable/625
Problem TLDR
Sum(abs(window)) #easy
Intuition
Just do what is asked. Use iterators preferably.
Approach
Some notes to Rust:
as_bytesgives a slice of [u8] and slices have awindow- there is an
abs_diff, can save some symbols
Complexity
-
Time complexity: \(O(n)\)
-
Space complexity: \(O(1)\)
Code
fun scoreOfString(s: String): Int =
s.windowed(2).sumBy { abs(it[0] - it[1]) }
pub fn score_of_string(s: String) -> i32 {
s.as_bytes().windows(2)
.map(|x| x[0].abs_diff(x[1]) as i32).sum()
}
31.05.2024
260. Single Number III medium
blog post
substack
youtube
Join me on Telegram
https://t.me/leetcode_daily_unstoppable/623
Problem TLDR
Two not duplicated numbers from array #medium #bit_manipulation
Intuition
The first idea is to xor the array, xor[..] = a ^ b.
However from that point there is no clear path to what can be done next.
(I personally gave up and go to the discussion section)
The hint: each 1 bit in the xor result of a ^ b means that in that bit a is different than b. We can split all the numbers in array by this bit: one group will contain a and some duplicates, another group will contain b and some other remaining duplicates. Those duplicates can be xored and a and b distilled.
// a b cc dd xor[..] = a ^ b
// 1 2 1 3 2 5
// 1 01
// 2 10
// 1 01
// 3 11
// 2 10
// 5 101
//
// x 110
// * (same bits in a and b)
// * 1 1 5 vs 2 3 2
// * 1 2 1 3 2 vs 5
Approach
Some tricks:
firstandfindoperators in Kotlin and Rust- conversion of
booleantousizein Rust
Complexity
-
Time complexity: \(O(n)\)
-
Space complexity: \(O(1)\)
Code
fun singleNumber(nums: IntArray): IntArray {
var x = 0; for (n in nums) x = x xor n
return (0..31).first { x and (1 shl it) != 0 }.let {
var a = 0; var b = 0
for (n in nums) if ((n and (1 shl it)) != 0)
a = a xor n else b = b xor n
intArrayOf(a, b)
}
}
pub fn single_number(nums: Vec<i32>) -> Vec<i32> {
let (mut x, mut r) = (0, vec![0, 0]); for &n in &nums { x ^= n }
let bit = (0..32).find(|&bit| x & (1 << bit) != 0).unwrap();
for &n in &nums { r[(n & (1 << bit) != 0) as usize] ^= n }; r
}
30.05.2024
1442. Count Triplets That Can Form Two Arrays of Equal XOR medium
blog post
substack
youtube

Join me on Telegram
https://t.me/leetcode_daily_unstoppable/622
Problem TLDR
Number (i,j,k) where xor arr[i..j] = xor arr[j..k] #medium #bit_manipulation
Intuition
Start with the brute-force solution, it will be accepted.
for (j in i + 1..k)
a = a ^ arr[j]
b = ikXor ^ a
if (a == b) res++
Some optimizations:
- we have precomputed total xor between
i..kand now ifa = xor [i..j - 1]thenb = xor [i..k] ^ a.
Let’s inline a and b in the if (a == b) equation:
if (a ^ arr[j] == ikXor ^ (a ^ arr[j])) ...
We can safely remove ^ a ^ arr[j] from the left and the right parts, leaving it like if (0 == ikXor). As this now independent of j, we can just collapse the third loop into ` if (0 == ikXor) res += k - i`.
(There is one more optimization possible: store xors prefixes count in a HashMap, this will reduce the time to O(n))
Approach
Using sumOf and .map().sum() helps to reduce some lines of code.
Complexity
-
Time complexity: \(O(n^2)\)
-
Space complexity: \(O(1)\)
Code
fun countTriplets(arr: IntArray): Int =
arr.indices.sumOf { i ->
var ikXor = 0
(i..<arr.size).sumOf { k ->
ikXor = ikXor xor arr[k]
if (0 == ikXor) k - i else 0
}
}
pub fn count_triplets(arr: Vec<i32>) -> i32 {
(0..arr.len()).map(|i| {
let mut ik_xor = 0;
(i..arr.len()).map(|k| {
ik_xor ^= arr[k];
if ik_xor == 0 { k - i } else { 0 }
}).sum::<usize>()
}).sum::<usize>() as _
}
29.05.2024
1404. Number of Steps to Reduce a Number in Binary Representation to One medium
blog post
substack
youtube

Join me on Telegram
https://t.me/leetcode_daily_unstoppable/621
Problem TLDR
Steps even/2, odd+1 to make binary s to 1 #medium
Intuition
We can just implement what is asked recursively passing a new string each time. The more interesting and effective solution is to iterate from the end and try to count operations on the fly:
- calculate
currentandcarry - apply extra operation if
currentisoddand do extra increase for carry
Approach
Let’s minify the code using the math tricks.
Complexity
-
Time complexity: \(O(n)\)
-
Space complexity: \(O(1)\)
Code
fun numSteps(s: String): Int {
var carry = 0
return (s.lastIndex downTo 1).sumOf { i ->
val curr = s[i] - '0' + carry
carry = curr / 2 + curr % 2
1 + curr % 2
} + carry
}
pub fn num_steps(s: String) -> i32 {
let (mut carry, sb) = (0, s.as_bytes());
(1..s.len()).rev().map(|i| {
let curr = sb[i] as i32 - b'0' as i32 + carry;
carry = curr / 2 + curr % 2;
1 + curr % 2
}).sum::<i32>() + carry
}
28.05.2024
1208. Get Equal Substrings Within Budget medium
blog post
substack
youtube

Join me on Telegram
https://t.me/leetcode_daily_unstoppable/620
Problem TLDR
Max substring sum(abs(s[..] - t[..])) < maxCost #medium #sliding_window
Intuition
There is a known Sliding Window technique to find any max or min in a substring or subarray (contiguous part): use one pointer to take one more element on the right border, compute the result, then if there are some conditions, move the left border and recompute the result again. This will find the maximum while not checking every possible subarray: because we check all subarrays ends borders and we drop every start border that are clearly out of scope by max function.
Approach
- maxOf in Kotlin and .map().max() in Rust will help to save some lines of code
Complexity
-
Time complexity: \(O(n)\)
-
Space complexity: \(O(1)\)
Code
fun equalSubstring(s: String, t: String, maxCost: Int): Int {
var i = 0; var cost = 0
return s.indices.maxOf {
cost += abs(s[it] - t[it])
if (cost > maxCost) cost -= abs(s[i] - t[i++])
it - i + 1
}
}
pub fn equal_substring(s: String, t: String, max_cost: i32) -> i32 {
let (mut i, mut cost, sb, tb) = (0, 0, s.as_bytes(), t.as_bytes());
(0..s.len()).map(|j| {
cost += (sb[j] as i32 - tb[j] as i32).abs();
if cost > max_cost { cost -= (sb[i] as i32 - tb[i] as i32).abs(); i += 1 }
j - i + 1
}).max().unwrap() as _
}
27.05.2024
1608. Special Array With X Elements Greater Than or Equal X easy
blog post
substack
youtube
Join me on Telegram
https://t.me/leetcode_daily_unstoppable/619
Problem TLDR
Count of more or equal nums[i] equal itself #easy
Intuition
Star with brute force, the n is in range 0..1000, try them all, and for each count how many numbers are nums[i] >= n.
This will pass the checker.
Now time to optimize. If we sort the nums we can optimize the nums[i] >= n, as n only grows up so the i. We can start with the previous i next time.
Another optimizations, there are no more than nums.size count possible, so n’s range is 0..nums.size inclusive.
Approach
Let’s write non-optimal one-liner in Kotlin, and more robust solution in Rust.
Complexity
-
Time complexity: \(O(nlogn)\) and \(O(n^2)\)
-
Space complexity: \(O(1)\)
Code
fun specialArray(nums: IntArray): Int = (0..nums.size)
.firstOrNull { n -> n == nums.count { it >= n }} ?: -1
pub fn special_array(mut nums: Vec<i32>) -> i32 {
nums.sort_unstable(); let (mut n, mut i) = (0, 0);
for n in 0..=nums.len() {
while i < nums.len() && nums[i] < n as i32 { i += 1 }
if n == nums.len() - i { return n as i32 }
}; -1
}
26.05.2024
552. Student Attendance Record II hard blog post substack youtube

Join me on Telegram
https://t.me/leetcode_daily_unstoppable/618
Problem TLDR
N times: A -> LP, L -> AP, P -> AL, at most one A, no LLL #hard #dynamic_programming
Intuition
The key to solving this is to detect each kind of a unique generator. From this example we can separate several unique rules - a, l, p, al, ll, all:
// 1 -> A L P
// good = 3
// a = 1 l = 1 p = 1
// 2 ->
// a A -> AP AL (AA)
// l L -> LP LL LA
// p P -> PP PL PA
// good = 8
// a = 3 l = 1 p = 2 al = 1 ll = 1
// a AP p PL l LP a AL l LL
// l LA p PP
// p PA
//
// 3 ->
// a AP -> APP APL(APA)
// al AL -> ALP ALL(ALA)
// p LP -> LPP LPL LPA
// ll LL -> LLP(LLL)LLA
// a LA -> LAP LAL(LAA)
// p PP -> PPP PPL PPA
// l PL -> PLP PLL PLA
// a PA -> PAP PAL(PAA)
// good = 19
// a = 8 l = 2 p = 4 al = 3 ll = 1 all = 1
// a APP p LPL p LPP a APL l PLL al ALL
// al ALP p PPL ll LLP a LAL
// ll LLA p PPP a PAL
// a LAP l PLP
// p PPA
// l PLA
// a PAP
// p LPA
//
// a1 = (a + l + p + al + ll + all)
// p1 = (p + l + ll)
// ll = l
// l = p
// all = al
// al = a
These rules can be described as the kingdoms where each have a unique properties:
a- theonly one 'a' possiblekingdom rule, it will not allow any otherato happenl- theending with 'l'rule, will generatellin the next roundp- theI am a simple guy here, abide all the rulesruleal- thebusy guy, he will makeallin the next round, also noais allowed nextll- theguard, will not permitlin the next roundall- theserial killer, noland noawill survive next round
After all the rules are detected, we have to notice the pattern of how they pass to the next round.
Approach
Somebody find this problem easy, but I have personally failed to detect those rules under 1.5 hours mark.
Complexity
-
Time complexity: \(O(n)\)
-
Space complexity: \(O(1)\)
Code
fun checkRecord(n: Int): Int {
val m = 1_000_000_007L; var a = 0L; var l = 0L;
var p = 1L; var ll = 0L; var al = 0L; var all = 0L
for (i in 0..n) {
val p1 = (p + l + ll) % m
val a1 = (a + l + p + al + ll + all) % m
ll = l; l = p; p = p1; all = al; al = a; a = a1
}
return a.toInt()
}
pub fn check_record(n: i32) -> i32 {
let (m, mut a, mut l) = (1_000_000_007i64, 0, 0);
let (mut p, mut ll, mut al, mut all) = (1, 0, 0, 0);
for i in 0..=n {
let p1 = (p + l + ll) % m;
let a1 = (a + l + p + al + ll + all) % m;
ll = l; l = p; p = p1; all = al; al = a; a = a1
}; a as i32
}
25.05.2024
140. Word Break II hard
blog post
substack
youtube

Join me on Telegram
https://t.me/leetcode_daily_unstoppable/617
Problem TLDR
All string splits with dictionary #hard #dfs #dynamic_programming
Intuition
There are several ways to attack this problem: we can make a Trie or HashSet from the dictionary, then just walk the string for all suffixes and use a Dynamic Programming formula for the answer dp[s] = prefix + dp[s - prefix].
Approach
Let’s try to be clever and reuse the method signature with the cost of performance loss of not using memoization.
Complexity
-
Time complexity: \(O(ws^s^2)\), the recursion depth is in the worst case
aaaaaiss, at each level we trystimes and in each successfull prefix iterating over2^snext results each prependingssymbols. With memoization it is \(O(w2^s)\). With helper function and the single set precalculation is \(O(w + 2^s)\). -
Space complexity: \(O(ws + 2^s)\), recursion depth is
s, each level holdswcopy and2^sresult.
Code
fun wordBreak(s: String, wordDict: List<String>): List<String> = buildList {
val set = wordDict.toSet()
for (i in s.indices) if (s.take(i + 1) in set)
if (i == s.lastIndex) add(s) else
for (next in wordBreak(s.drop(i + 1), wordDict))
add("${ s.take(i + 1) } $next")
}
pub fn word_break(s: String, word_dict: Vec<String>) -> Vec<String> {
let (mut res, set) = (vec![], word_dict.iter().map(|w| w.as_str()).collect::<HashSet<_>>());
for i in 0..s.len() { let w = &s[0..=i]; if set.contains(w) {
if i == s.len() - 1 { res.push(w.to_string()) } else {
for n in Self::word_break(s[i + 1..].to_string(), word_dict.clone()) {
res.push(format!("{} {}", w, n).to_string())
}}
}}; res
}
24.05.2024
1255. Maximum Score Words Formed by Letters hard
blog post
substack
youtube

Join me on Telegram
https://t.me/leetcode_daily_unstoppable/612
Problem TLDR
Max score of words subset from letters #hard #backtracking #dfs
Intuition
This is just a mechanical backtracking problem: do a full Depth-First search over all subsets of words, and count max score.
We can precompute some things beforehead.
Approach
- in Kotlin there is a
.codefield, use it - in Rust: use
[0; 26]type, it is fast, also use slices, they are cheap and reduce code size
Complexity
-
Time complexity: \(O(2^n)\)
-
Space complexity: \(O(n)\)
Code
fun maxScoreWords(words: Array<String>, letters: CharArray, score: IntArray): Int {
val f = IntArray(26); for (c in letters) f[c.code - 'a'.code]++
val wf = words.map { IntArray(26).apply {
for (c in it) this[c.code - 'a'.code]++ }}
val ws = words.map { it.sumOf { score[it.code - 'a'.code] }}
fun dfs(i: Int): Int = if (i < wf.size) max(dfs(i + 1),
if ((0..25).all { wf[i][it] <= f[it] }) {
for (j in 0..25) f[j] -= wf[i][j]
ws[i] + dfs(i + 1).also { for (j in 0..25) f[j] += wf[i][j] }
} else 0) else 0
return dfs(0)
}
pub fn max_score_words(words: Vec<String>, letters: Vec<char>, score: Vec<i32>) -> i32 {
let (mut f, mut wf, mut ws) = ([0; 26], vec![[0; 26]; words.len()], vec![0; words.len()]);
for &c in letters.iter() { f[(c as u8 - b'a') as usize] += 1 }
for (i, w) in words.iter().enumerate() {
for b in w.bytes() { wf[i][(b - b'a') as usize] += 1; ws[i] += score[(b - b'a') as usize] }
}
fn dfs(f: &mut [i32; 26], ws: &[i32], wf: &[[i32; 26]]) -> i32 {
if wf.len() > 0 { dfs(f, &ws[1..], &wf[1..]).max(
if (0..25).all(|i| wf[0][i] <= f[i]) {
for i in 0..25 { f[i] -= wf[0][i] }
let next = ws[0] + dfs(f, &ws[1..], &wf[1..]);
for i in 0..25 { f[i] += wf[0][i] }; next
} else { 0 }) } else { 0 }
} dfs(&mut f, &ws, &wf)
}
23.05.2024
2597. The Number of Beautiful Subsets medium
blog post
substack
youtube
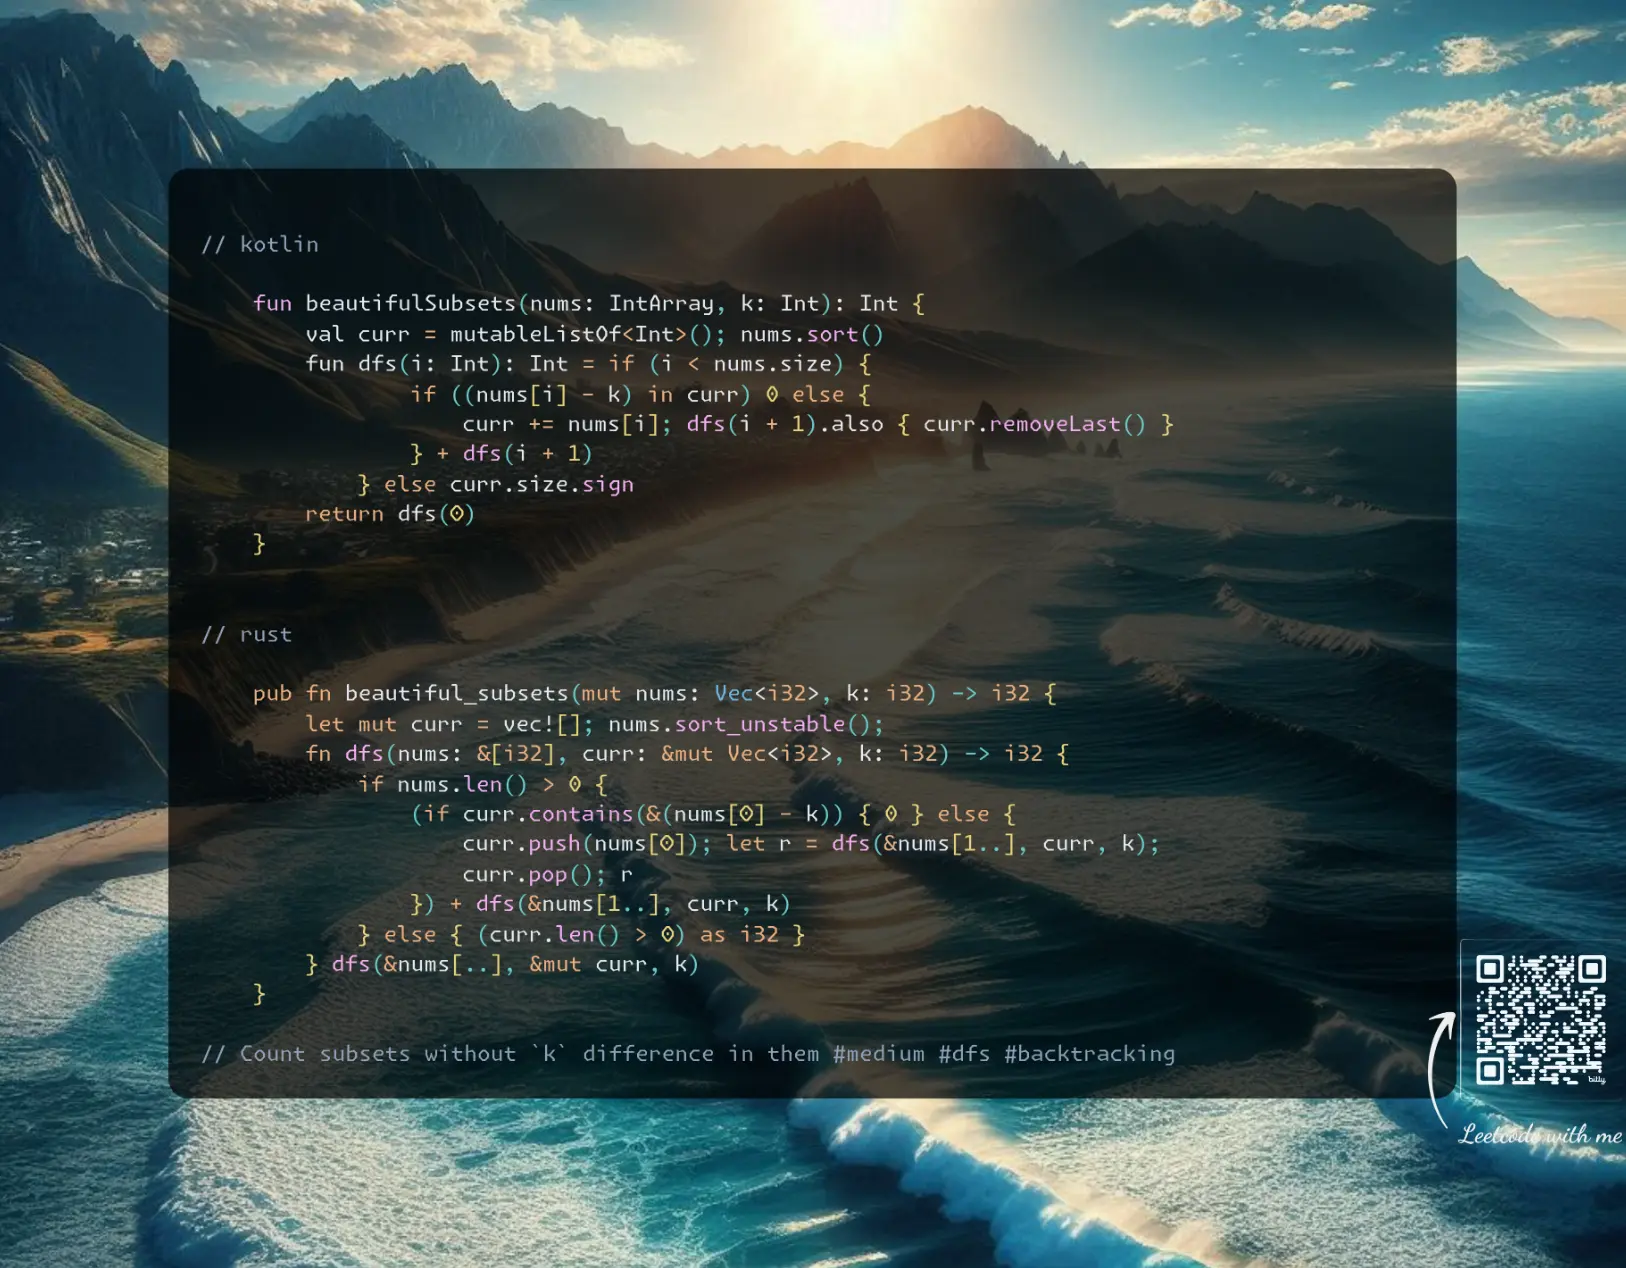
Join me on Telegram
https://t.me/leetcode_daily_unstoppable/611
Problem TLDR
Count subsets without k difference in them #medium #dfs #backtracking
Intuition
There are a DP solutions, but a simple brute-force backtracking is also works. Do a Depth-First search, check element (n-k) not added, add element, go deeper, remove element. To get the intuition about how to count subsets, consider this example:
// 1 1 1 =(111)+(1)+(1)+(1)+(11)+(11)+(11)
For each subset of size n there are 2^n - 1 subsets. We can sum the on the finish line, or just add on the fly.
One way to optimize this is to use a HashMap and a counter instead of just list. Another optimization is a bitmask instead of list.
Approach
Some tricks here:
- sorting to check just the lower num
n - k signto shorten theif (size > ) 1 else 0as i32do the same in Rust[i32]slice and[1..]next window without the index variable
Complexity
-
Time complexity: \(O(n2^n)\)
-
Space complexity: \(O(n)\)
Code
fun beautifulSubsets(nums: IntArray, k: Int): Int {
val curr = mutableListOf<Int>(); nums.sort()
fun dfs(i: Int): Int = if (i < nums.size) {
if ((nums[i] - k) in curr) 0 else {
curr += nums[i]; dfs(i + 1).also { curr.removeLast() }
} + dfs(i + 1)
} else curr.size.sign
return dfs(0)
}
pub fn beautiful_subsets(mut nums: Vec<i32>, k: i32) -> i32 {
let mut curr = vec![]; nums.sort_unstable();
fn dfs(nums: &[i32], curr: &mut Vec<i32>, k: i32) -> i32 {
if nums.len() > 0 {
(if curr.contains(&(nums[0] - k)) { 0 } else {
curr.push(nums[0]); let r = dfs(&nums[1..], curr, k);
curr.pop(); r
}) + dfs(&nums[1..], curr, k)
} else { (curr.len() > 0) as i32 }
} dfs(&nums[..], &mut curr, k)
}
22.05.2024
131. Palindrome Partitioning medium
blog post
substack
youtube

Join me on Telegram
https://t.me/leetcode_daily_unstoppable/610
Problem TLDR
All palindrome partitions #medium #dfs #dynamic_programming
Intuition
The backtracking solution is trivial: do a full Depth-First Search over indices, take substring start..i if it is a palindrome, collect at the end. We can also precalculate all palindromes in a dp[i][j] = s[i] == s[j] && dp[i + 1][j - 1]
Approach
However, there is a clever approach to reuse the existing method signature: we can define Dynamic Programming problem as a subproblem for the palindrome_substring + DP(rest of the string). Where + operation would include current palindrome substring in all the suffix’s solutions.
Given the problem size, let’s skip the memoization part to save lines of code (weird decision for the interview).
Complexity
-
Time complexity: \(O(2^n)\), the worst case is
aaaaaall chars the same -
Space complexity: \(O(2^n)\)
Code
fun partition(s: String): List<List<String>> = buildList {
for (i in s.indices)
if ((0..i).all { s[it] == s[i - it] })
if (i < s.lastIndex)
for (next in partition(s.drop(i + 1)))
add(listOf(s.take(i + 1)) + next)
else add(listOf(s))
}
pub fn partition(s: String) -> Vec<Vec<String>> {
let mut res = vec![];
for i in 0..s.len() {
if (0..=i).all(|j| s.as_bytes()[j] == s.as_bytes()[i - j]) {
if i < s.len() - 1 {
for next in Self::partition(s[i + 1..].to_string()) {
res.push(vec![s[..=i].to_string()].into_iter().chain(next).collect())
}
} else { res.push(vec![s.to_string()]) }
}
}; res
}
21.05.2024
78. Subsets medium
blog post
substack
youtube
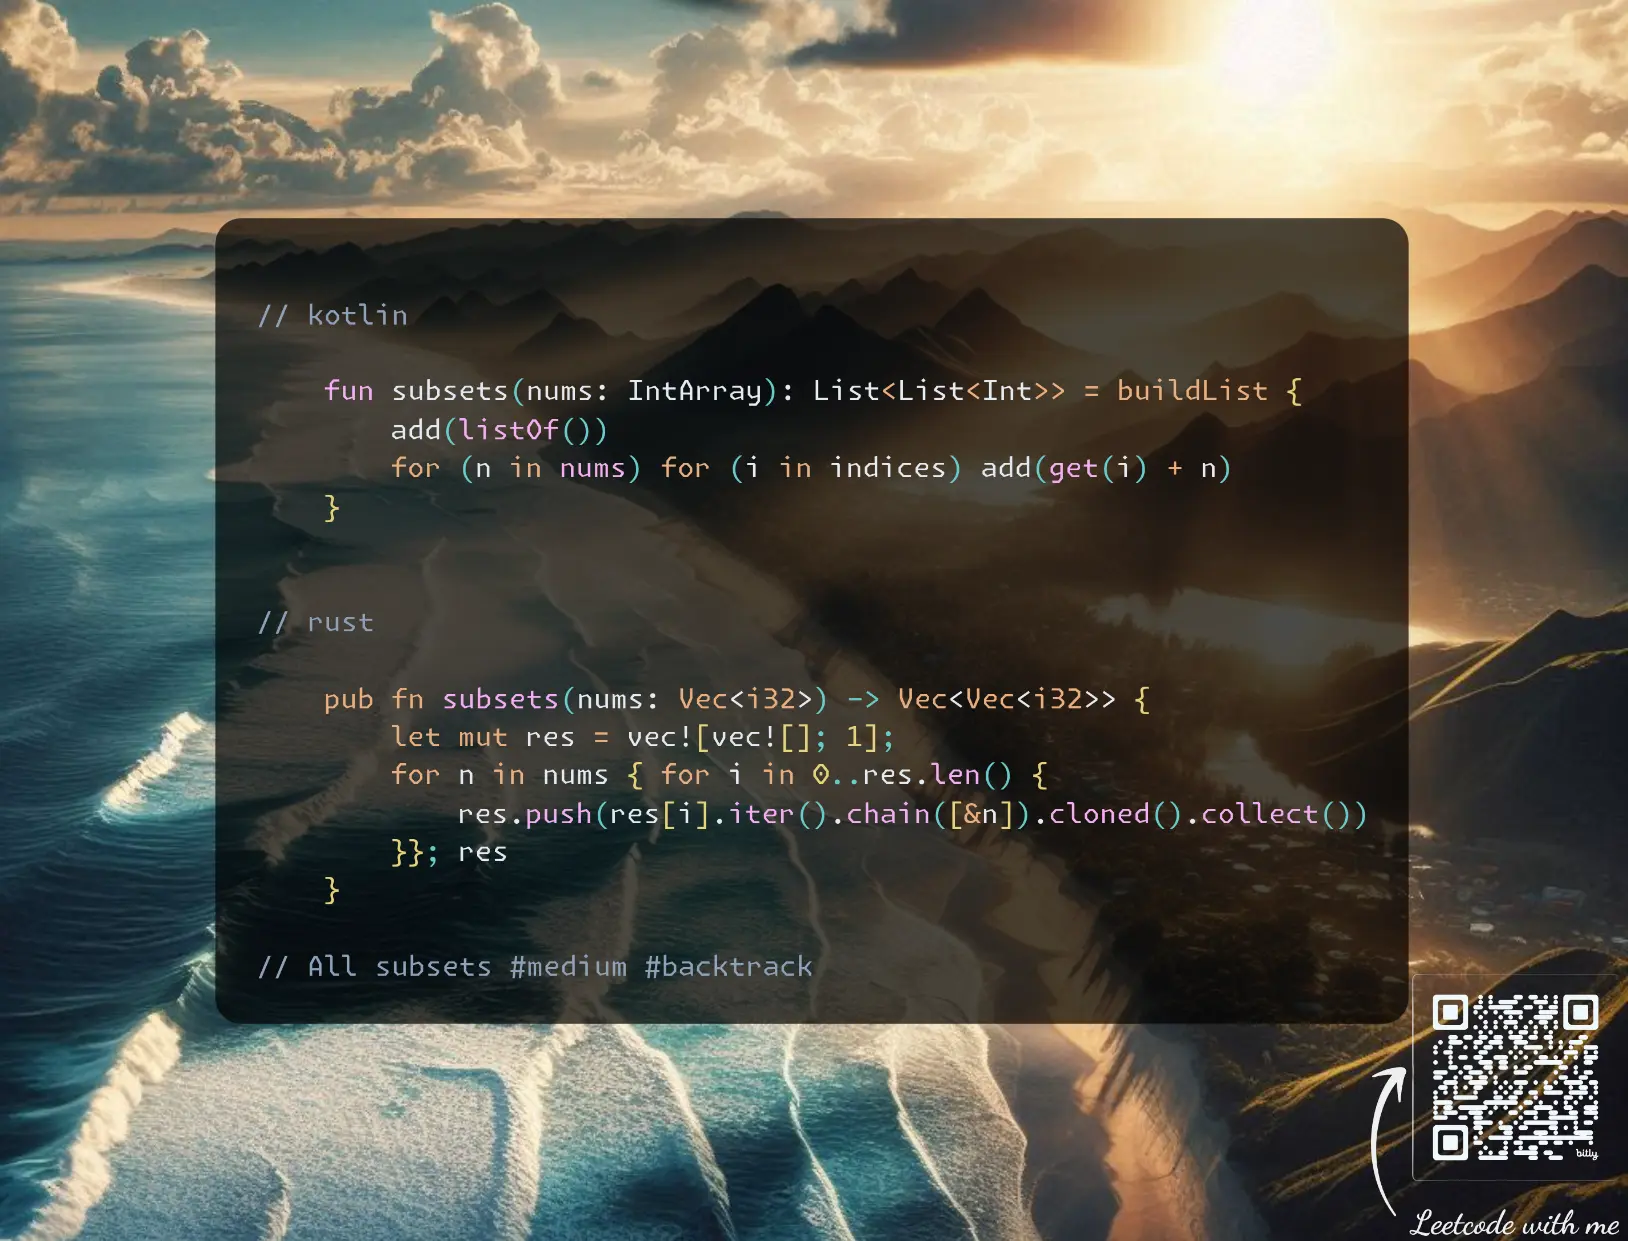 https://youtu.be/xRtcs1VgxXg
Join me on Telegram
https://t.me/leetcode_daily_unstoppable/609
Problem TLDR
All subsets #medium #backtrack
Intuition
The are several ways to solve this:
- DFS with a single choice: take or leave. Effectively this is a
2ways exploration with depth ofnandncopy operations at each end, soO(2 + n)^n) = O(n^n). - DFS with cycle from index so far until the end. The depth is the same
n, however, it slighly more optimal, as we are skipping some go-in-depth invocations. The time complexity not changes. - DP:
res[i] = nums[i] added to each of res[i - 1]. Time complexity is the same, asres[i]hold all the results and we are iterating over.
Approach
Can you make it shorter?
Complexity
-
Time complexity: \(O(n^n)\)
-
Space complexity: \(O(n^n)\)
Code
fun subsets(nums: IntArray): List<List<Int>> = buildList {
add(listOf())
for (n in nums) for (i in indices) add(get(i) + n)
}
pub fn subsets(nums: Vec<i32>) -> Vec<Vec<i32>> {
let mut res = vec![vec![]; 1];
for n in nums { for i in 0..res.len() {
res.push(res[i].iter().chain([&n]).cloned().collect())
}}; res
}
20.05.2024
1863. Sum of All Subset XOR Totals easy
blog post
substack
youtube
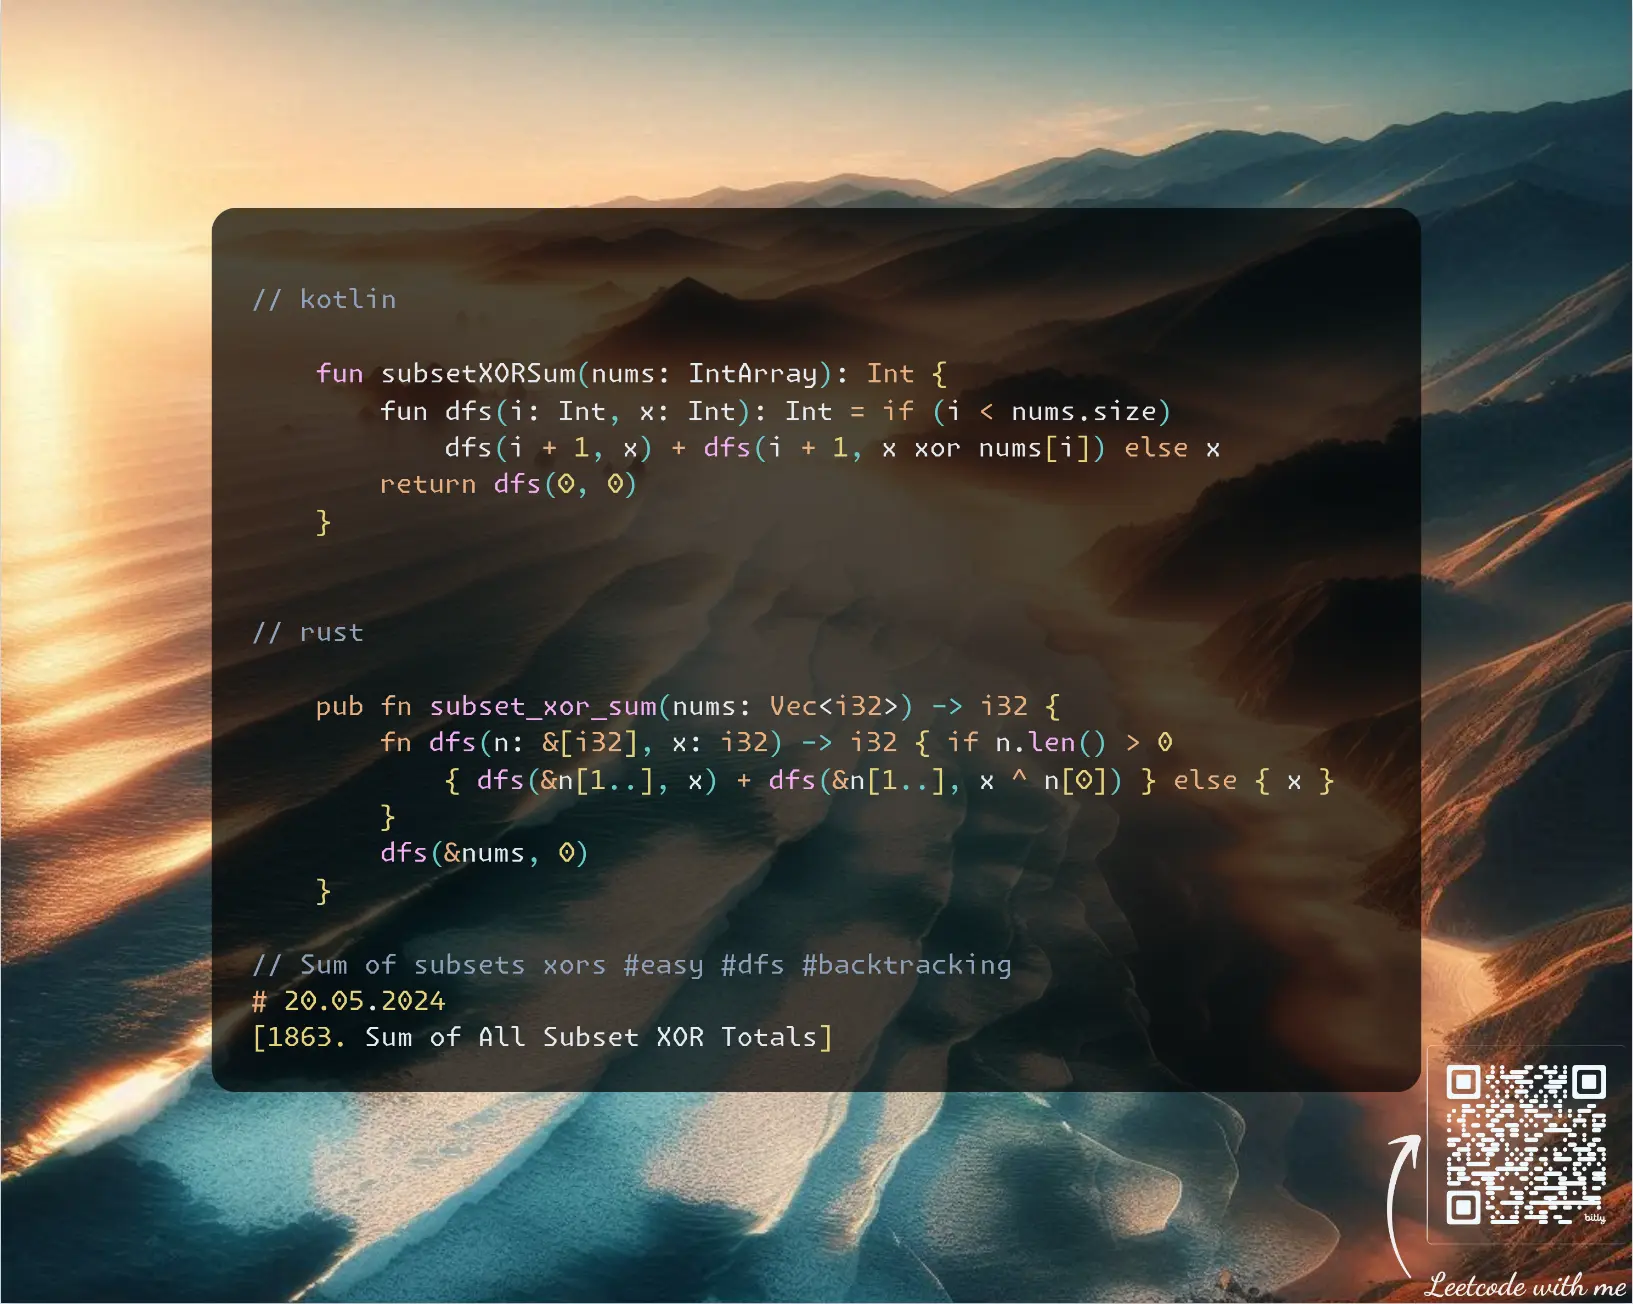
Join me on Telegram
https://t.me/leetcode_daily_unstoppable/608
Problem TLDR
Sum of subsets xors #easy #dfs #backtracking
Intuition
The problem size is small, only 12 items, we can brute-force the problem. One way is a bitmask from 0 to 2^12, then each time iterate over array and choose only set bits for indices. This will take O(n2^n) time and O(1) space.
Another way is recursive backtracking: each time make a decision to take item or leave it, adding to the result in the end. This will take O(2^n) time and O(n) space for the recursion depth.
Approach
Backtracking code is shorter.
- notice how
slicesare used in Rust
Complexity
-
Time complexity: \(O(2^n)\)
twodecision explorations are madentimes -
Space complexity: \(O(n)\) for the recursion depth
Code
fun subsetXORSum(nums: IntArray): Int {
fun dfs(i: Int, x: Int): Int = if (i < nums.size)
dfs(i + 1, x) + dfs(i + 1, x xor nums[i]) else x
return dfs(0, 0)
}
pub fn subset_xor_sum(nums: Vec<i32>) -> i32 {
fn dfs(n: &[i32], x: i32) -> i32 { if n.len() > 0
{ dfs(&n[1..], x) + dfs(&n[1..], x ^ n[0]) } else { x }
}
dfs(&nums, 0)
}
19.05.2024
3068. Find the Maximum Sum of Node Values hard
blog post
substack
youtube
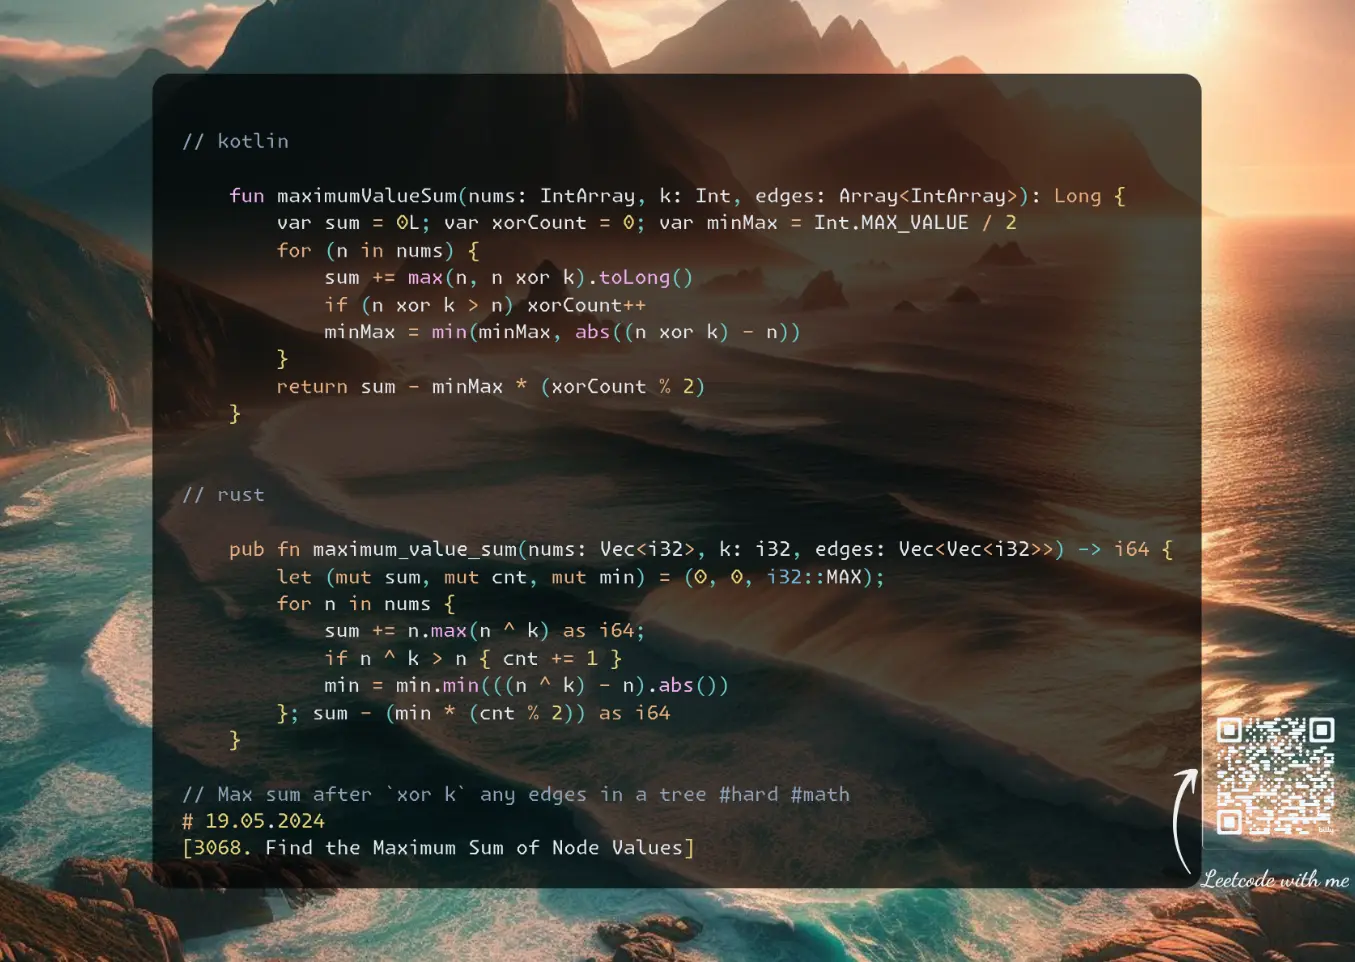
Join me on Telegram
https://t.me/leetcode_daily_unstoppable/607
Problem TLDR
Max sum after xor k any edges in a tree #hard #math
Intuition
Let’s just draw and try to build an intuition.
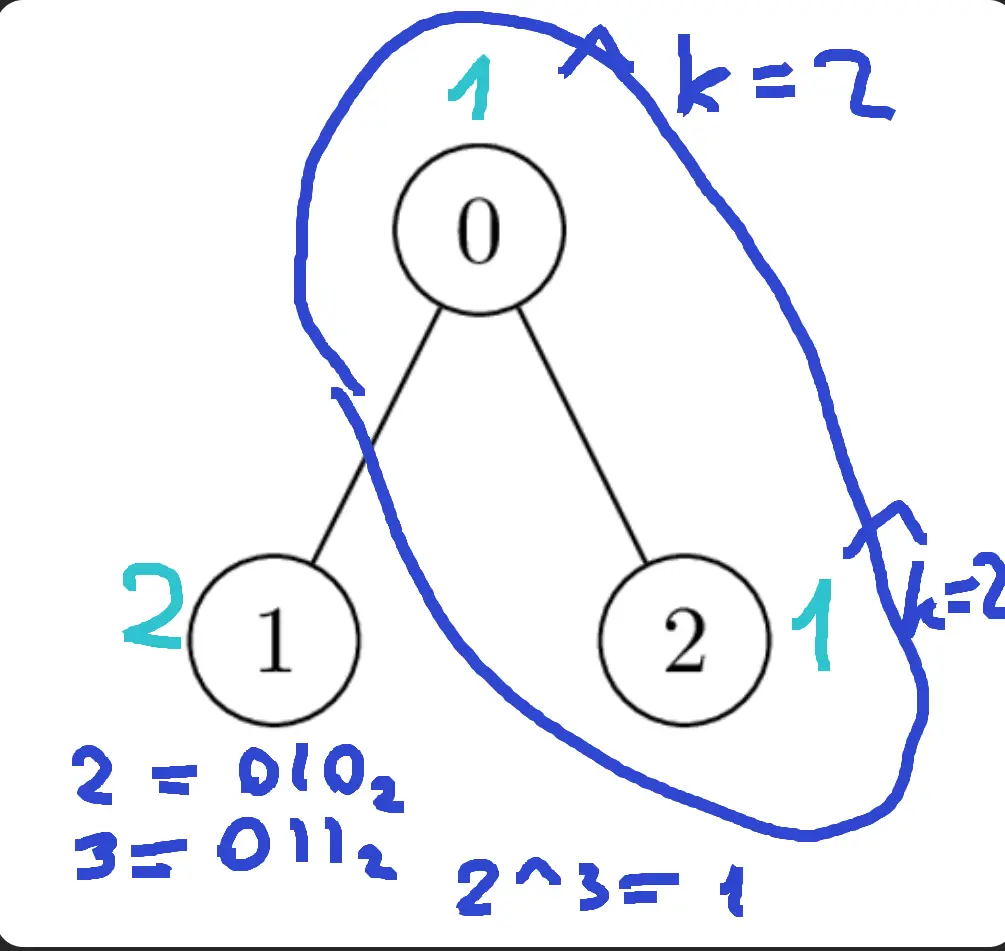
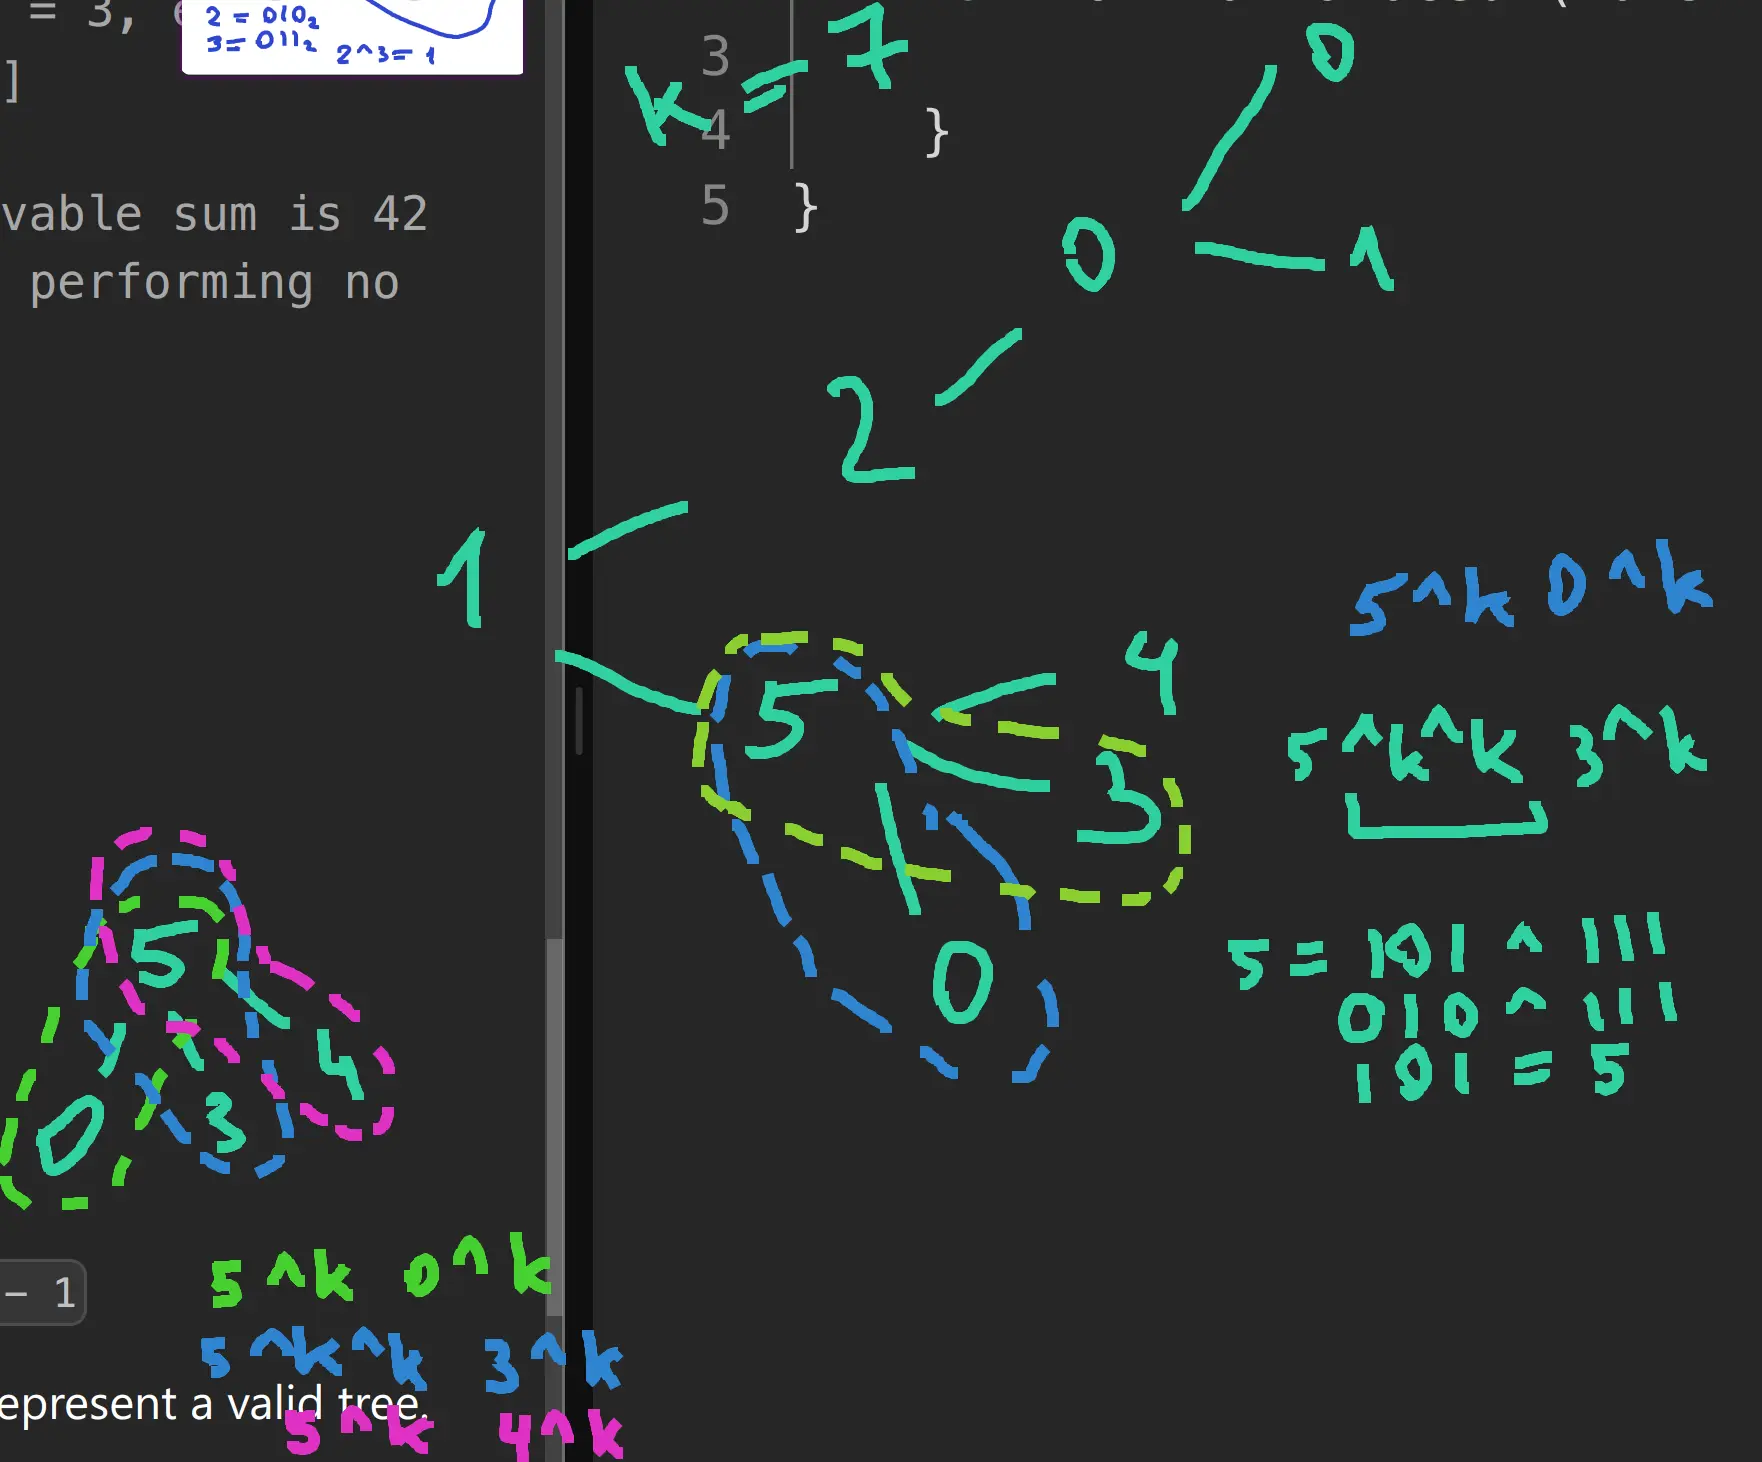 We can cancel out
 xor if we apply an even number of times.
This is where I was stuck and gave up after trying to build the DP solution.
Now, the actual solution: we can cancel out all xor between any two nodes: a-b-c-d, a^k-b^k-c-d, a^k-b-c^k-d, a^k-b-c-d^k. Effectively, the task now is to do xor on all nodes where it gives us increase in the sum.
However, as xor must happen in pairs we still need to consider how many operations we do. For even just take the sum, but for odd there are two cases: flip one xor back, or do one extra xor (that’s why we use abs). To do the extra flip we must choose the minimum return of the value.
Approach
Spend at least 1 hour before giving up.
Complexity
-
Time complexity: \(O(n)\)
-
Space complexity: \(O(1)\)
Code
fun maximumValueSum(nums: IntArray, k: Int, edges: Array<IntArray>): Long {
var sum = 0L; var xorCount = 0; var minMax = Int.MAX_VALUE / 2
for (n in nums) {
sum += max(n, n xor k).toLong()
if (n xor k > n) xorCount++
minMax = min(minMax, abs((n xor k) - n))
}
return sum - minMax * (xorCount % 2)
}
pub fn maximum_value_sum(nums: Vec<i32>, k: i32, edges: Vec<Vec<i32>>) -> i64 {
let (mut sum, mut cnt, mut min) = (0, 0, i32::MAX);
for n in nums {
sum += n.max(n ^ k) as i64;
if n ^ k > n { cnt += 1 }
min = min.min(((n ^ k) - n).abs())
}; sum - (min * (cnt % 2)) as i64
}
18.05.2024
979. Distribute Coins in Binary Tree medium
blog post
substack
youtube
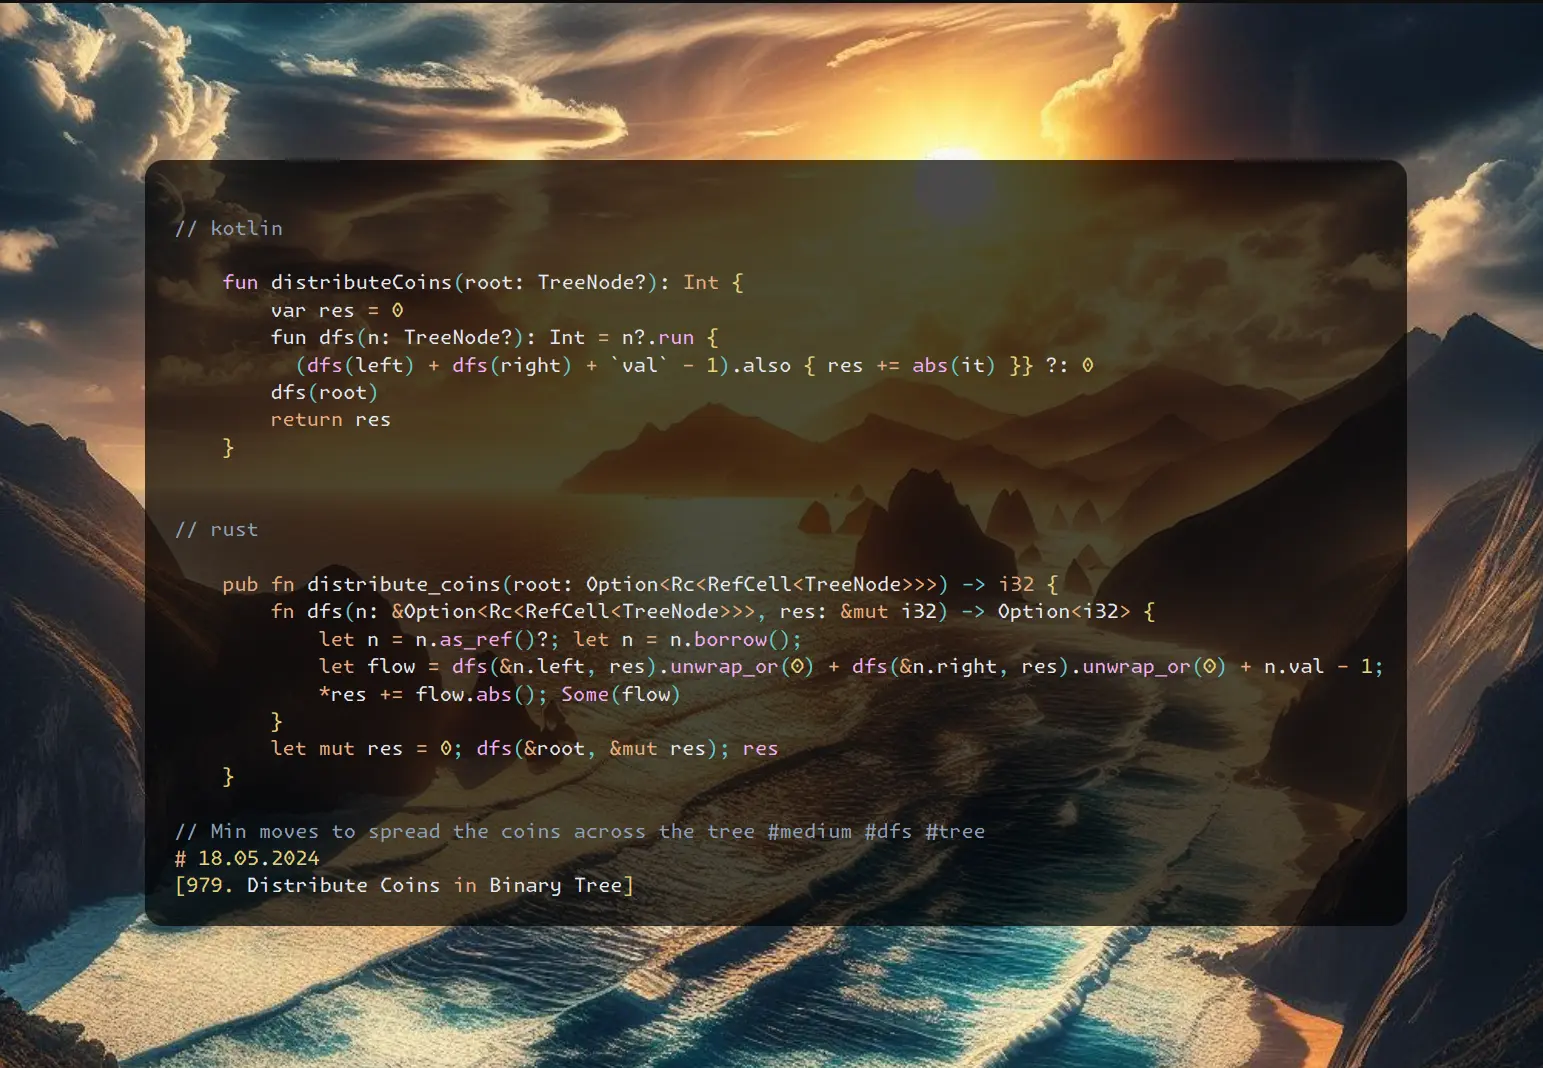 https://youtu.be/-bec2qToKoM
Join me on Telegram
https://t.me/leetcode_daily_unstoppable/606
Problem TLDR
Min moves to spread the coins across the tree #medium #dfs #tree
Intuition
Let’s observe some examples:
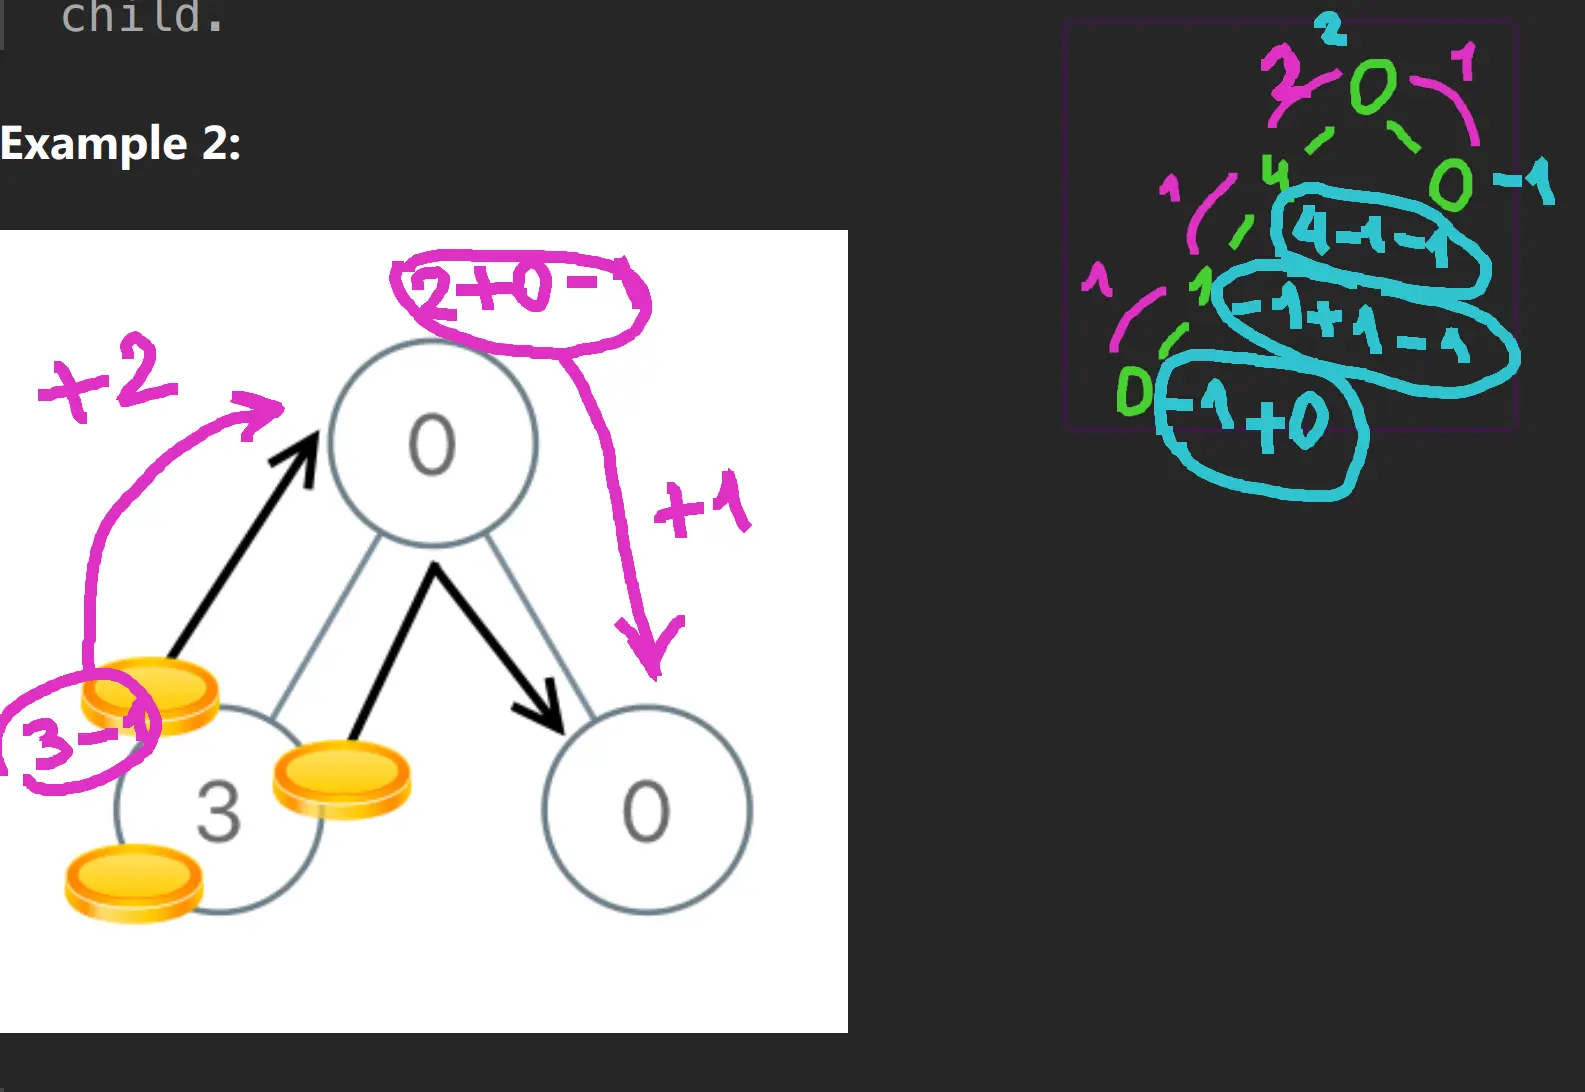 Some observations:
- each coin moves individually, even if we move
2coins at once, it makes no difference to the total moves - eventually, every node will have exactly
1coin We can use abstractflow: 0coins at leaves haveflow = -1, because they are attracting coin- flow is accumulating from children to parent, so we can compute it independently for the
leftandrightnodes - total moves count is sign-independent sum of total flow: we count both negative and positive moves
Approach
- for Rust there is an interesting way to use
Optionin combinations with?operation that will returnNone; it helps to reduce the code size
Complexity
-
Time complexity: \(O(n)\)
-
Space complexity: \(O(log(n))\), for the recursion depth
Code
fun distributeCoins(root: TreeNode?): Int {
var res = 0
fun dfs(n: TreeNode?): Int = n?.run {
(dfs(left) + dfs(right) + `val` - 1).also { res += abs(it) }} ?: 0
dfs(root)
return res
}
pub fn distribute_coins(root: Option<Rc<RefCell<TreeNode>>>) -> i32 {
fn dfs(n: &Option<Rc<RefCell<TreeNode>>>, res: &mut i32) -> Option<i32> {
let n = n.as_ref()?; let n = n.borrow();
let flow = dfs(&n.left, res).unwrap_or(0) + dfs(&n.right, res).unwrap_or(0) + n.val - 1;
*res += flow.abs(); Some(flow)
}
let mut res = 0; dfs(&root, &mut res); res
}
17.05.2024
1325. Delete Leaves With a Given Value easy
blog post
substack
youtube
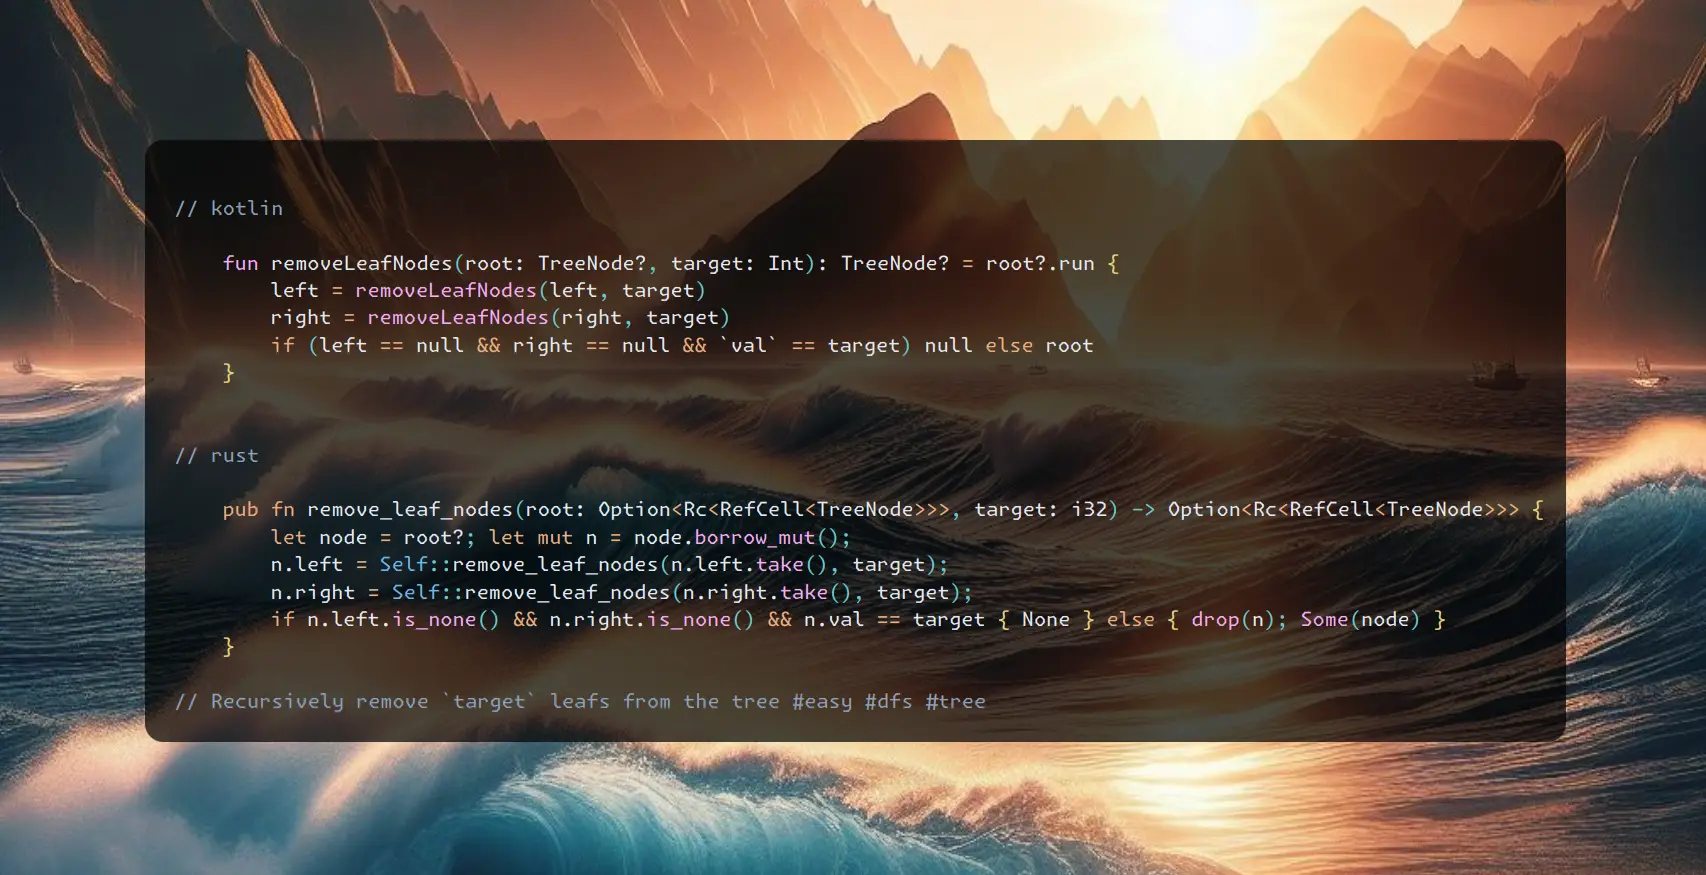
Join me on Telegram
https://t.me/leetcode_daily_unstoppable/605
Problem TLDR
Recursively remove target leafs from the tree #easy #dfs #tree
Intuition
When dealing with Binary Trees try to solve the subproblem recursively.
Approach
- Notice how
dropis used in Rust, without it borrow checker would not allow to returnSome(node)
Complexity
-
Time complexity: \(O(n)\)
-
Space complexity: \(O(log(n))\) for the recursion depth
Code
fun removeLeafNodes(root: TreeNode?, target: Int): TreeNode? = root?.run {
left = removeLeafNodes(left, target)
right = removeLeafNodes(right, target)
if (left == null && right == null && `val` == target) null else root
}
pub fn remove_leaf_nodes(root: Option<Rc<RefCell<TreeNode>>>, target: i32) -> Option<Rc<RefCell<TreeNode>>> {
let node = root?; let mut n = node.borrow_mut();
n.left = Self::remove_leaf_nodes(n.left.take(), target);
n.right = Self::remove_leaf_nodes(n.right.take(), target);
if n.left.is_none() && n.right.is_none() && n.val == target { None } else { drop(n); Some(node) }
}
16.05.2024
2331. Evaluate Boolean Binary Tree easy
blog post
substack
youtube
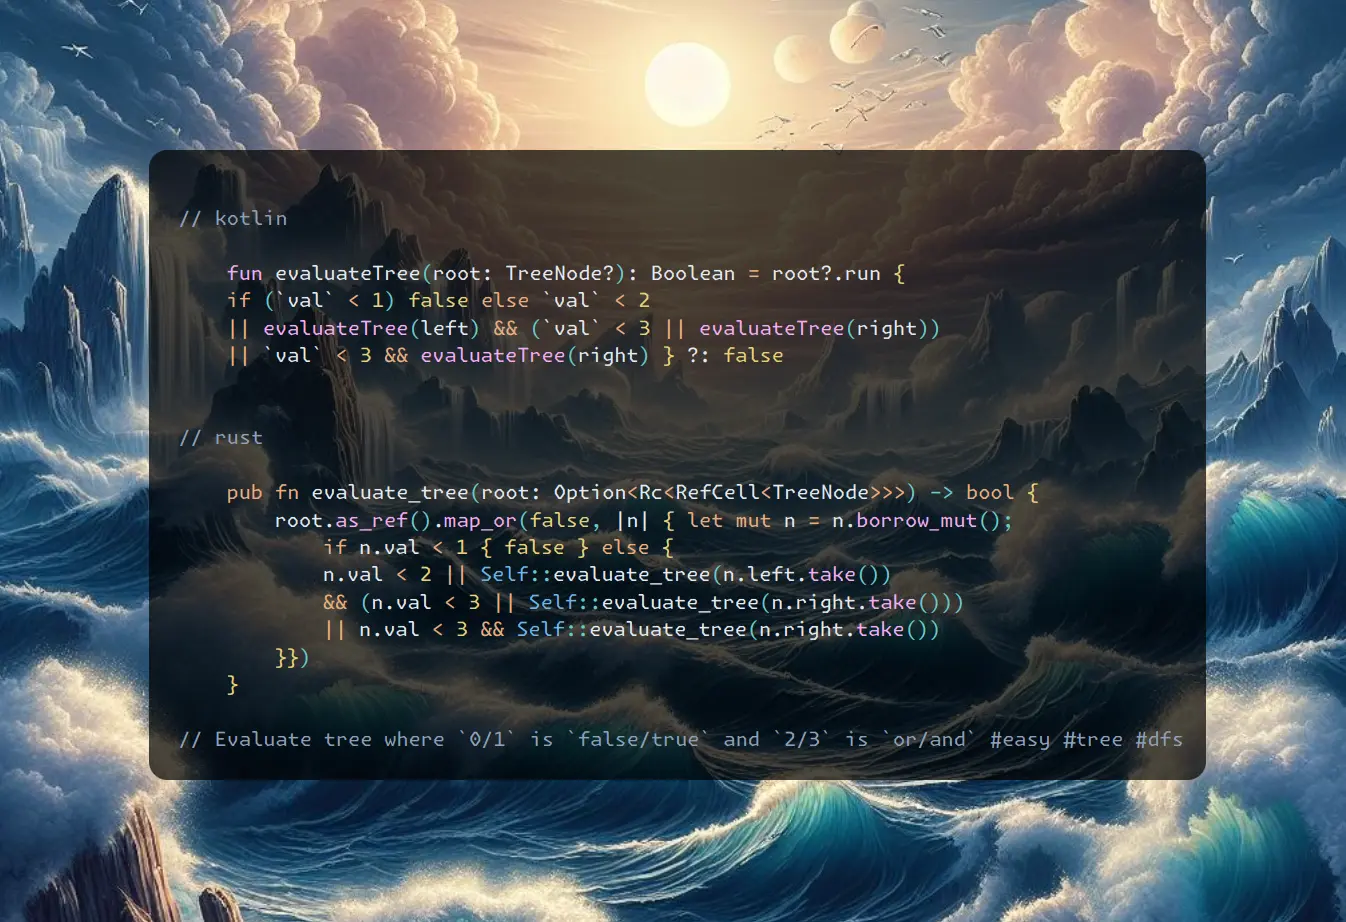
Join me on Telegram
https://t.me/leetcode_daily_unstoppable/604
Problem TLDR
Evaluate tree where 0/1 is false/true and 2/3 is or/and #easy #tree #dfs
Intuition
We can solve a subproblem for each node in a recursion.
Approach
Let’s try to avoid the double walk by changing the boolean operations order.
Complexity
-
Time complexity: \(O(n)\)
-
Space complexity: \(O(log(n))\) for the recursion depth
Code
fun evaluateTree(root: TreeNode?): Boolean = root?.run {
if (`val` < 1) false else `val` < 2
|| evaluateTree(left) && (`val` < 3 || evaluateTree(right))
|| `val` < 3 && evaluateTree(right) } ?: false
pub fn evaluate_tree(root: Option<Rc<RefCell<TreeNode>>>) -> bool {
root.as_ref().map_or(false, |n| { let mut n = n.borrow_mut();
if n.val < 1 { false } else {
n.val < 2 || Self::evaluate_tree(n.left.take())
&& (n.val < 3 || Self::evaluate_tree(n.right.take()))
|| n.val < 3 && Self::evaluate_tree(n.right.take())
}})
}
15.05.2024
2812. Find the Safest Path in a Grid medium
blog post
substack
youtube
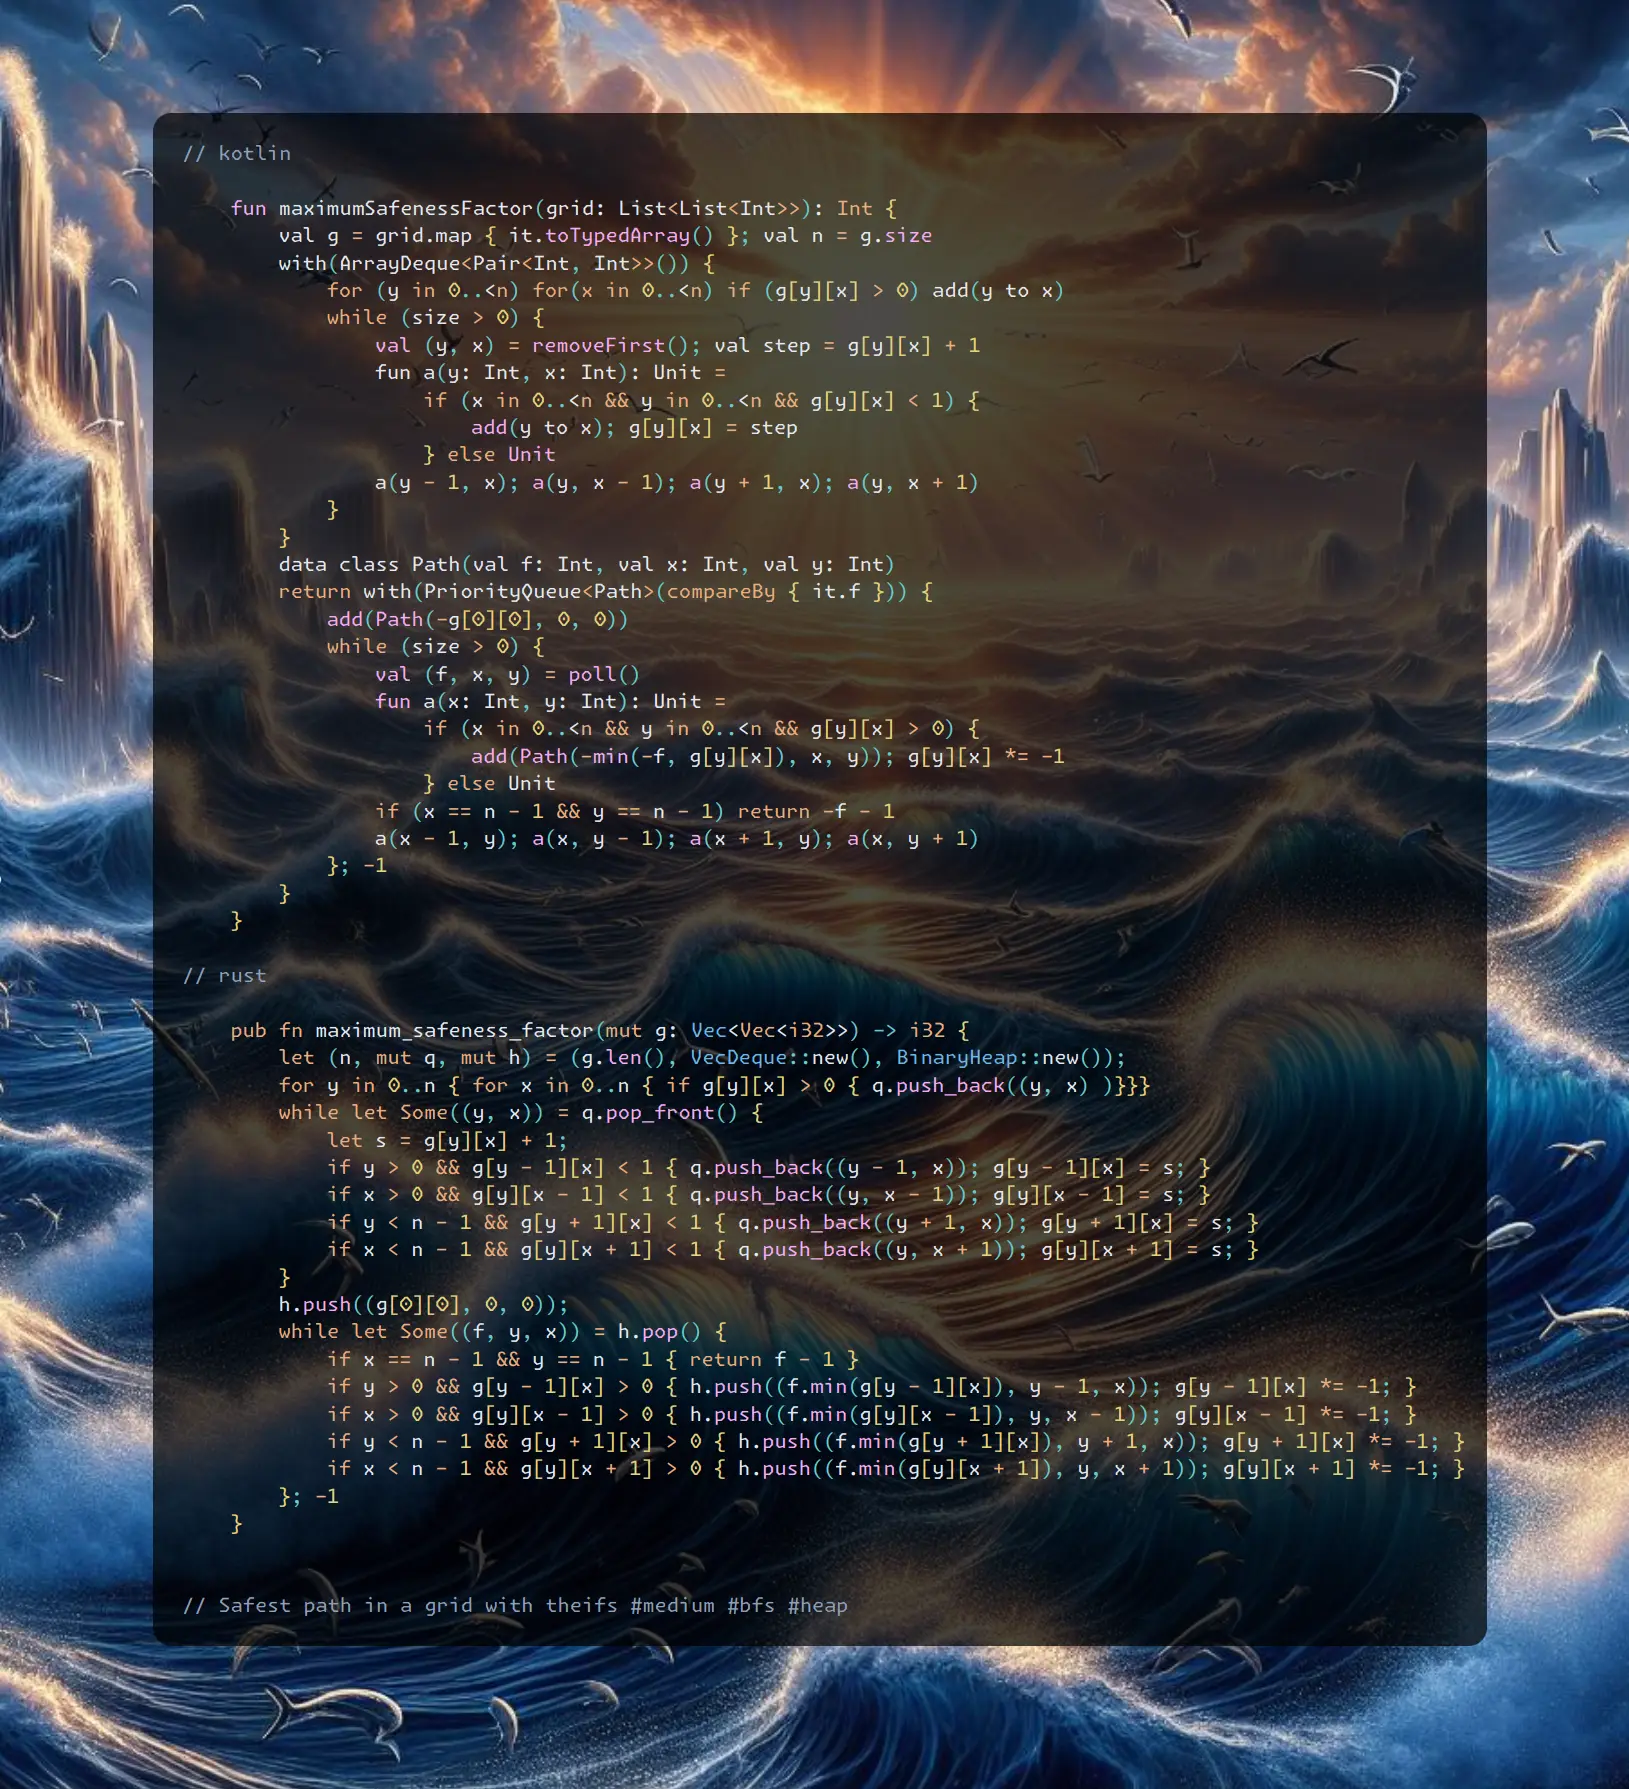
Join me on Telegram
https://t.me/leetcode_daily_unstoppable/603
Problem TLDR
Safest path in a grid with thieves #medium #bfs #heap
Intuition
Let’s firs build a map, marking each cell with its safety number, this can be done with Breadth-First Search from all thieves:
 The path finding part is straightforward Dijkstra: choose the most optimal path from the heap, stop on the first arrival.
Approach
There are some tricks possible:
- use the grid itself as a visited set: check
0and mark with negative - we can avoid some extra work if we start safety with
1
Complexity
-
Time complexity: \(O(nmlog(nm))\)
-
Space complexity: \(O(nm)\)
Code
fun maximumSafenessFactor(grid: List<List<Int>>): Int {
val g = grid.map { it.toTypedArray() }; val n = g.size
with(ArrayDeque<Pair<Int, Int>>()) {
for (y in 0..<n) for(x in 0..<n) if (g[y][x] > 0) add(y to x)
while (size > 0) {
val (y, x) = removeFirst(); val step = g[y][x] + 1
fun a(y: Int, x: Int): Unit =
if (x in 0..<n && y in 0..<n && g[y][x] < 1) {
add(y to x); g[y][x] = step
} else Unit
a(y - 1, x); a(y, x - 1); a(y + 1, x); a(y, x + 1)
}
}
data class Path(val f: Int, val x: Int, val y: Int)
return with(PriorityQueue<Path>(compareBy { it.f })) {
add(Path(-g[0][0], 0, 0))
while (size > 0) {
val (f, x, y) = poll()
fun a(x: Int, y: Int): Unit =
if (x in 0..<n && y in 0..<n && g[y][x] > 0) {
add(Path(-min(-f, g[y][x]), x, y)); g[y][x] *= -1
} else Unit
if (x == n - 1 && y == n - 1) return -f - 1
a(x - 1, y); a(x, y - 1); a(x + 1, y); a(x, y + 1)
}; -1
}
}
pub fn maximum_safeness_factor(mut g: Vec<Vec<i32>>) -> i32 {
let (n, mut q, mut h) = (g.len(), VecDeque::new(), BinaryHeap::new());
for y in 0..n { for x in 0..n { if g[y][x] > 0 { q.push_back((y, x) )}}}
while let Some((y, x)) = q.pop_front() {
let s = g[y][x] + 1;
if y > 0 && g[y - 1][x] < 1 { q.push_back((y - 1, x)); g[y - 1][x] = s; }
if x > 0 && g[y][x - 1] < 1 { q.push_back((y, x - 1)); g[y][x - 1] = s; }
if y < n - 1 && g[y + 1][x] < 1 { q.push_back((y + 1, x)); g[y + 1][x] = s; }
if x < n - 1 && g[y][x + 1] < 1 { q.push_back((y, x + 1)); g[y][x + 1] = s; }
}
h.push((g[0][0], 0, 0));
while let Some((f, y, x)) = h.pop() {
if x == n - 1 && y == n - 1 { return f - 1 }
if y > 0 && g[y - 1][x] > 0 { h.push((f.min(g[y - 1][x]), y - 1, x)); g[y - 1][x] *= -1; }
if x > 0 && g[y][x - 1] > 0 { h.push((f.min(g[y][x - 1]), y, x - 1)); g[y][x - 1] *= -1; }
if y < n - 1 && g[y + 1][x] > 0 { h.push((f.min(g[y + 1][x]), y + 1, x)); g[y + 1][x] *= -1; }
if x < n - 1 && g[y][x + 1] > 0 { h.push((f.min(g[y][x + 1]), y, x + 1)); g[y][x + 1] *= -1; }
}; -1
}
14.05.2024
1219. Path with Maximum Gold medium
blog post
substack
youtube

Join me on Telegram
https://t.me/leetcode_daily_unstoppable/602
Problem TLDR
Max one-way path in matrix #medium #dfs
Intuition
Path search can almost always be done with a Depth-First Search. Given the problem size 15x15, we can do a full search with backtracking.
Approach
Modify the grid to save some lines of code. Don’t do this in a production code however (or document it with warnings).
Complexity
-
Time complexity: \(O(3^p)\), where
pis the longest path or the number of the gold cells, 3 - is the ways count each step -
Space complexity: \(O(p)\), for the recursion depth
Code
fun getMaximumGold(grid: Array<IntArray>): Int {
fun f(y: Int, x: Int): Int =
if (grid.getOrNull(y)?.getOrNull(x) ?: 0 < 1) 0 else {
val v = grid[y][x]; grid[y][x] = 0
v + maxOf(f(y - 1, x), f(y + 1, x), f(y, x - 1), f(y, x + 1))
.also { grid[y][x] = v }
}
return grid.indices.maxOf { y -> grid[0].indices.maxOf { f(y, it) }}
}
pub fn get_maximum_gold(mut grid: Vec<Vec<i32>>) -> i32 {
fn f(y: usize, x: usize, grid: &mut Vec<Vec<i32>>) -> i32 {
let v = grid[y][x]; if v < 1 { return 0 }
let mut r = 0; grid[y][x] = 0;
if y > 0 { r = r.max(f(y - 1, x, grid)) }
if x > 0 { r = r.max(f(y, x - 1, grid)) }
if y < grid.len() - 1 { r = r.max(f(y + 1, x, grid)) }
if x < grid[0].len() - 1 { r = r.max(f(y, x + 1, grid)) }
grid[y][x] = v; r + v
}
let mut res = 0;
for y in 0..grid.len() { for x in 0..grid[0].len() {
res = res.max(f(y, x, &mut grid))
}}; res
}
13.05.2024
861. Score After Flipping Matrix medium
blog post
substack
youtube
Join me on Telegram
https://t.me/leetcode_daily_unstoppable/601
Problem TLDR
Max binary-row sum after toggling rows and columns #medium
Intuition
Let’s consider example:
 Our intuition:
- we can toggle rows only if the
firstbit is0otherwise it will make the number smaller - we can toggle the column only if the number of
0bits is bigger that1bits, otherwise sum will be smaller
Approach
We can toggle rows then toggle columns.
- We didn’t have to actually toggle columns, just choose the
max(count, height - count). - (The tricky part): we didn’t have to toggle rows, just invert each bit if the first bit is zero.
Complexity
-
Time complexity: \(O(nm)\)
-
Space complexity: \(O(1)\)
Code
fun matrixScore(grid: Array<IntArray>) =
grid[0].indices.fold(0) { sum, x ->
var count = grid.indices.sumOf { grid[it][x] xor grid[it][0] }
sum * 2 + max(count, grid.size - count)
}
pub fn matrix_score(mut grid: Vec<Vec<i32>>) -> i32 {
(0..grid[0].len()).fold(0, |sum, x| {
let count: i32 = (0..grid.len()).map(|y| grid[y][0] ^ grid[y][x]).sum();
sum * 2 + count.max(grid.len() as i32 - count)
})
}
12.05.2024
2373. Largest Local Values in a Matrix easy
blog post
substack
youtube
Join me on Telegram
https://t.me/leetcode_daily_unstoppable/600
Problem TLDR
Max pooling by 3x3 matrix #easy
Intuition
The easiest way is to just iterate over the neighbours each time. (However one can possible find an algorithm to do a running-max with a monotonic stack)
Approach
Let’s try to write it shorter this time.
Complexity
-
Time complexity: \(O(n^2k^4)\), where k = 3 is constant
-
Space complexity: \(O(n^2)\)
Code
fun largestLocal(grid: Array<IntArray>) =
Array(grid.size - 2) { y -> IntArray(grid.size - 2) { x ->
(0..8).maxOf { grid[y + it / 3][x + it % 3] }
}}
pub fn largest_local(grid: Vec<Vec<i32>>) -> Vec<Vec<i32>> {
let mut res = vec![vec![0; grid.len() - 2]; grid.len() - 2];
for y in 0..res.len() { for x in 0..res.len() {
res[y][x] = (0..9).map(|i| grid[y + i / 3][x + i % 3]).max().unwrap()
}}; res
}
11.05.2024
857. Minimum Cost to Hire K Workers hard
blog post
substack
youtube
Join me on Telegram
https://t.me/leetcode_daily_unstoppable/599
Problem TLDR
Min cost of k workers each doing quality[i] work for fair rate #hard #heap #sorting
Intuition
Let’s do the painful part - try to solve this problem by bare hands:
// 10 20 5 70 50 30 2
// 5 10 20 30 70 50
// 5/20 10/20
// 5/10
// 5/20 5/10 10/20
// 30,50 30,70 70,50
// 30*4 30*2 50/2=25
// 50/4 70/2 70*2
// take 70: q=10
// i=1 pay=20/10*70=140 q1=20
// i=2 pay=(10/5)*70=35
// sort by quality
// 5 10 20 30 70 50
// take q=5 p=30, price = 30/5=6
// i=1 pay=10*6=60 (less than 70, increase price 70/10=7)
// ...
// convert q-w to prices: 70/10 50/20 30/5
// 7 2.5 6
// sort
// 20 5 10
// 2.5 6.0 7.0 how many workers we can take
// for price = 2.5? 1, cost = 50
// 2.5*20 2.5*5 2.5*10
// 50 7.5 25
// for price = 6.0? 2, cost 120+30=150
// 6*20 6*5 6*10
// 120 30 60
// for price = 7.0? 3, cost 140+35+70=245
// 7*20 7*5 7*10
// 140 35 70
// 20 25 35 prefix sum?
// [5+10=15]
At this point I had an idea: there is a rate which is the wage/quality. The fair rate condition is just we must pay this rate * quality each worker produces.
Now the interesting part: when we sort the workers by thier rate, we can try first with the lowest possible rate and then increase it to the next worker's rate. And we can take as much workers to the left as we want - all of them will agree to this rate as it is the largest so far.
// 4 8 2 2 7 w k=3
// 3 1 10 10 1 q
// sort by cost
// 2 2 4 7 8 w
// 10 10 3 1 1 q 3*4/3 + 10*2*4/3 + 10*2*4/3 = 4*23/3 = 92/3
// 10 20 23 24 25 prefixSum?
The last piece is how to choose k workers from the all available: the simple sliding window is not optimal, as the qualities varies and we can leave cheap at the start.
Let’s just take all the workers with the lowest qualities to pay them less. The cost would be total sum of the workers qualities multiplied by top rate.
Approach
- use a min-heap PriorityQueue to choose the lowest
k - Rust can’t just pick min or sort by
f64key
Complexity
-
Time complexity: \(O(nlog(n))\)
-
Space complexity: \(O(n)\)
Code
fun mincostToHireWorkers(quality: IntArray, wage: IntArray, k: Int): Double {
var qSum = 0; val pq = PriorityQueue<Int>()
return wage.indices.sortedBy { 1.0 * wage[it] / quality[it] }.minOf {
val q = quality[it]; qSum += q; pq += -q
if (pq.size > k) qSum += pq.poll()
if (pq.size >= k) 1.0 * qSum * wage[it] / q else Double.MAX_VALUE
}
}
pub fn mincost_to_hire_workers(quality: Vec<i32>, wage: Vec<i32>, k: i32) -> f64 {
let (mut qSum, mut bh, mut inds) = (0, BinaryHeap::new(), (0..wage.len()).collect::<Vec<_>>());
inds.sort_unstable_by(|&i, &j| (wage[i] * quality[j]).cmp(&(wage[j] * quality[i])));
inds.iter().map(|&i| {
let q = quality[i]; qSum += q; bh.push(q);
if bh.len() as i32 > k { qSum -= bh.pop().unwrap() }
if bh.len() as i32 >= k { qSum as f64 * wage[i] as f64 / q as f64 } else { f64::MAX }
}).min_by(|a, b| a.total_cmp(b)).unwrap()
}
10.05.2024
786. K-th Smallest Prime Fraction medium
blog post
substack
youtube

Join me on Telegram
https://t.me/leetcode_daily_unstoppable/598
Problem TLDR
kth arr[i]/arr[j], i < j, arr[i] < arr[j] #medium #heap #binary_search
Intuition
The n^2-ish solution is trivial: use PriorityQueue to keep lowest k fractions and scan n^2 indices pairs.
The folow up is hard. Let’s observe the fractions in the matrix a/b:
// 1 2 3 5 a
//
// 5 1/5 2/5 3/5
// 3 1/3 2/3
// 2 1/2
// b
//
The idea is to for any particular fraction m count how many fractions are less than it in O(n) time.
We should invent the way of walking the indices based on observation that fractions grow in both directions of the matrix.
Let’s iterate over each a value a = arr[i]. And for each a let’s move b = arr[j] forward while the current fraction is bigger: we can move it only forward and don’t need to backtrack, as if arr[x]/arr[j] > m than arr[x..]/arr[j] is also > m.
// count less than m = 0.5
// i=0 1/2 1/3 1/5
// j=1 j=2 stop on j=2, count(i=0) = 4-2 = size - j
// i=1 2/3 2/5
// j=2 j=3 stop on j=3, count(i=1) = 4-3 = 1
// i=2 3/5
// j=3 j=4 stop on j=4, count = 0
Now, we have a continuous function of count that grows with fraction m in 0..1 and can do a BinarySearch for k on it.
Approach
This BinarySearch is in double space, so we can’t just use m + 1 or m - 1, and lo must not be equal hi.
Complexity
-
Time complexity: \(O(n^2log^2(k))\) for the heap, \(O(nlogn)\) for the binary search (the search space of
0..1is quantized by the number of pairs, so n^2, log(n^2) = 2log(n)) -
Space complexity: \(O(k)\) for the heap, \(O(1)\) for the binary search
Code
fun kthSmallestPrimeFraction(arr: IntArray, k: Int): IntArray {
val pq = PriorityQueue<IntArray>(Comparator<IntArray> { a, b ->
-(a[0] * b[1]).compareTo(b[0] * a[1])
})
for (j in arr.indices) for (i in 0..<j) {
pq += intArrayOf(arr[i], arr[j])
if (pq.size > k) pq.poll()
}
return pq.poll()
}
pub fn kth_smallest_prime_fraction(arr: Vec<i32>, k: i32) -> Vec<i32> {
let (mut lo, mut hi, mut r) = (0.0, 1.0, vec![0, 0]);
while lo < hi {
let (m, mut j, mut cnt, mut max) = (lo + (hi - lo) / 2.0, 1, 0, 0.0);
for i in 0..arr.len() - 1 {
while j < arr.len() && arr[i] as f64 >= m * arr[j] as f64 { j += 1 }
let f = if j < arr.len() { arr[i] as f64 / arr[j] as f64 } else { break };
if f > max { max = f; r = vec![arr[i], arr[j]] }
cnt += (arr.len() - j) as i32
}
if cnt == k { break } else if cnt < k { lo = m } else { hi = m }
}; r
}
09.05.2024
3075. Maximize Happiness of Selected Children medium
blog post
substack
youtube
Join me on Telegram
https://t.me/leetcode_daily_unstoppable/597
Problem TLDR
Sum of k maximums decreasing each step #medium #sorting #heap #quickselect
Intuition
By the problem definition we may assume that optimal solution is to take the largest values first, as smaller values will not decrease the result after reaching zero.
There are several ways to take k largest values: sort the entire array, use Heap (PriorityQueue) or use QuickSelect and sort partially.
Approach
Let’s use PriorityQueue in Kotlin (min heap) and QuickSelect in Rust (select_nth_unstable).
- when using heap we can take at most
kvalues into it to save space and time - Rust’s
select_nth_unstableresult tuple is not very easy to use (do you know a better way?)
Complexity
-
Time complexity: \(O(n + klog(k))\) for the Heap and for the QuickSelect
-
Space complexity: \(O(n)\) for the Heap, \(O(1)\) for the QuickSelect
Code
fun maximumHappinessSum(happiness: IntArray, k: Int): Long {
val pq = PriorityQueue<Int>()
for (h in happiness) { pq += h; if (pq.size > k) pq.poll() }
return (0..<k).sumOf { max(0, pq.poll() + it - k + 1).toLong() }
}
pub fn maximum_happiness_sum(mut happiness: Vec<i32>, k: i32) -> i64 {
let count = 0.max(happiness.len() as i32 - k - 1) as usize;
let gt = if count > 0 { happiness.select_nth_unstable(count).2 }
else { &mut happiness[..] };
gt.sort_unstable_by(|a, b| b.cmp(a));
(0..k).map(|i| 0.max(gt[i as usize] - i) as i64).sum()
}
08.05.2024
506. Relative Ranks easy
blog post
substack
youtube

Join me on Telegram
https://t.me/leetcode_daily_unstoppable/596
Problem TLDR
Convert results array to ranks array #easy #sorting
Intuition
Understand what the problem is:
4 3 2 1 -> "4" "Bronze" "Silver" "Gold
We need to convert each result with it’s position in a sorted order. There are several ways to do this: use a HashMap, Priority Queue, or just sort twice.
Approach
Let’s try to write the minimum lines of code version.
Complexity
-
Time complexity: \(O(nlog(n))\)
-
Space complexity: \(O(n)\)
Code
fun findRelativeRanks(score: IntArray): Array<String> {
val medals = listOf("Gold", "Silver", "Bronze")
val inds = score.indices.sortedByDescending { score[it] }
return inds.indices.sortedBy { inds[it] }.map {
if (it > 2) "${ it + 1 }" else "${ medals[it] } Medal"
}.toTypedArray()
}
pub fn find_relative_ranks(score: Vec<i32>) -> Vec<String> {
let mut inds: Vec<_> = (0..score.len()).collect();
inds.sort_unstable_by_key(|&i| Reverse(score[i]));
let (mut res, medals) = (inds.clone(), vec!["Gold", "Silver", "Bronze"]);
res.sort_unstable_by_key(|&r| inds[r]);
res.iter().map(|&place| if place > 2 { format!("{}", place + 1) }
else { format!("{} Medal", medals[place]) }).collect()
}
07.05.2024
2816. Double a Number Represented as a Linked List medium
blog post
substack
youtube

Join me on Telegram
https://t.me/leetcode_daily_unstoppable/595
Problem TLDR
Double the number as a Linked List #medium #linked_list
Intuition
The trivial solution is to reverse the list and iterate from the back. However, there is a more clever solution (not mine): add sentinel head and compute always the next node.
Approach
- For the Rust: notice how to use
headwithas_mutandas_ref- without them it will not compile as borrow will occur twice. - For the Kotlin solution: let’s use a single extra variable, just for fun.
Complexity
-
Time complexity: \(O(n)\)
-
Space complexity: \(O(1)\)
Code
fun doubleIt(head: ListNode?): ListNode? {
var prev = head
while (head?.next != null) {
val next = head?.next?.next
head?.next?.next = prev
prev = head?.next
head?.next = next
}
var carry = 0
while (prev != null) {
val v = carry + prev.`val` * 2
carry = v / 10
prev.`val` = v % 10
if (head == prev) break
val next = prev.next
prev.next = head?.next
head?.next = prev
prev = next
}
return if (carry > 0) ListNode(1)
.apply { next = head } else head
}
pub fn double_it(mut head: Option<Box<ListNode>>) -> Option<Box<ListNode>> {
let mut head = Some(Box::new(ListNode { val: 0, next: head }));
let mut prev_box = head.as_mut().unwrap();
while let Some(curr_box) = prev_box.next.as_mut() {
let v = curr_box.val * 2;
curr_box.val = v % 10;
prev_box.val += v / 10;
prev_box = curr_box
}
if head.as_ref().unwrap().val < 1 { head.unwrap().next } else { head }
}
06.05.2024
2487. Remove Nodes From Linked List medium
blog post
substack
youtube

Join me on Telegram
https://t.me/leetcode_daily_unstoppable/594
Problem TLDR
Make a Linked List non-increasing #medium #linked_list
Intuition
The trivial way to solve it is to use a monotonic stack technique: remove from the stack all lesser nodes and always add the current. However, there is a clever O(1) memory solution: just reverse the Linked List and iterate from the tail.
Approach
Let’s save some lines of code just for the fun of it: can you use a single extra variable?
Complexity
-
Time complexity: \(O(n)\)
-
Space complexity: \(O(1)\)
Code
fun removeNodes(head: ListNode?): ListNode? {
var m = head
while (head?.next != null) {
val next = head?.next?.next
head?.next?.next = m
m = head?.next
head?.next = next
}
while (m != null) {
val next = if (m == head) null else m.next
if (m.`val` >= (head?.next?.`val` ?: 0)) {
if (m == head) return head
m.next = head?.next
head?.next = m
}
m = next
}
return head?.next
}
pub fn remove_nodes(mut head: Option<Box<ListNode>>) -> Option<Box<ListNode>> {
let (mut curr, mut prev) = (head, None);
while let Some(mut curr_box) = curr {
let next = curr_box.next;
curr_box.next = prev;
prev = Some(curr_box);
curr = next;
}
while let Some(mut prev_box) = prev {
let next = prev_box.next;
if prev_box.val >= curr.as_ref().map_or(0, |curr| curr.val) {
prev_box.next = curr;
curr = Some(prev_box);
}
prev = next
}
curr
}
05.05.2024
237. Delete Node in a Linked List medium
blog post
substack
youtube

Join me on Telegram
https://t.me/leetcode_daily_unstoppable/593
Problem TLDR
Delete current node in a Linked List #medium
Intuition
The O(n) solution is trivial: swap current and next values until the last node reached. There is an O(1) solution exists, and it’s clever: remove just the next node.
Approach
No Rust solution, as there is no template for it in leetcode.com.
Complexity
-
Time complexity: \(O(1)\)
-
Space complexity: \(O(1)\)
Code
fun deleteNode(node: ListNode?) {
node?.`val` = node?.next?.`val`
node?.next = node?.next?.next
}
void deleteNode(ListNode* node) {
*node = *node->next;
}
04.05.2024
881. Boats to Save People medium
blog post
substack
youtube
Join me on Telegram
https://t.me/leetcode_daily_unstoppable/592
Problem TLDR
Minimum total boats with at most 2 people & limit weight #medium #two_pointers #greedy
Intuition
First idea as to try to take as much people as possible in a single boat: if we start with light first, then heavier people might not give a space for a limit. By intuition, we need to try put most heavy and most light people in pairs together:
// 6654321 limit = 6
// i j
// i +1
// i +1
// i j +1
// i j +1
// i +1
Approach
The interesting part is how some conditions are not relevant: we can skip i < j check when moving j--.
Complexity
-
Time complexity: \(O(nlog(n))\)
-
Space complexity: \(O(1)\)
Code
fun numRescueBoats(people: IntArray, limit: Int): Int {
people.sortDescending(); var j = people.lastIndex
for ((i, p) in people.withIndex())
if (i > j) return i
else if (p + people[j] <= limit) j--
return people.size
}
pub fn num_rescue_boats(mut people: Vec<i32>, limit: i32) -> i32 {
people.sort_unstable_by(|a, b| b.cmp(a));
let mut j = people.len() - 1;
for (i, p) in people.iter().enumerate() {
if i > j { return i as _ }
else if p + people[j] <= limit { j -= 1 }
}; people.len() as _
}
03.05.2024
165. Compare Version Numbers medium
blog post
substack
youtube
Join me on Telegram
https://t.me/leetcode_daily_unstoppable/591
Problem TLDR
Compare version numbers #medium
Intuition
We can use two pointers and scan the strings with O(1) memory. More compact and simple code would be by using a split.
Approach
ziphelps to save some lines of code
Complexity
-
Time complexity: \(O(n)\)
-
Space complexity: \(O(n)\), or can be O(1)
Code
fun compareVersion(version1: String, version2: String): Int {
var r1 = version1.split(".").map { it.toInt() }
var r2 = version2.split(".").map { it.toInt() }
val pad = List(abs(r1.size - r2.size)) { 0 }
return (r1 + pad).zip(r2 + pad).firstOrNull { (a, b) -> a != b }
?.let { (a, b) -> a.compareTo(b) } ?: 0
}
pub fn compare_version(version1: String, version2: String) -> i32 {
let v1: Vec<_> = version1.split('.').map(|x| x.parse().unwrap()).collect();
let v2: Vec<_> = version2.split('.').map(|x| x.parse().unwrap()).collect();
for i in 0..v1.len().max(v2.len()) {
let a = if i < v1.len() { v1[i] } else { 0 };
let b = if i < v2.len() { v2[i] } else { 0 };
if a < b { return -1 }
if a > b { return 1 }
}; 0
}
02.05.2024
2441. Largest Positive Integer That Exists With Its Negative easy
blog post
substack
youtube
Join me on Telegram
https://t.me/leetcode_daily_unstoppable/590
Problem TLDR
Max number that has its negative in array #easy #two_pointers
Intuition
One possible solution is to sort array and compare minimums with maximums by moving two pointers from left and right of the array. Another way is to remember which numbers are seen and choose the maximum of them.
Approach
- For the second solution, we can use just a [2000] array, as the total count is not that big.
Complexity
-
Time complexity: \(O(nlog(n))\) and \(O(n)\)
-
Space complexity: \(O(1)\) and \(O(n)\)
Code
fun findMaxK(nums: IntArray): Int {
nums.sort()
var i = 0; var j = nums.lastIndex
while (i < j)
if (nums[i] == -nums[j]) return nums[j]
else if (-nums[i] < nums[j]) j-- else i++
return -1
}
pub fn find_max_k(nums: Vec<i32>) -> i32 {
let (mut counts, mut res) = (vec![0; 2001], -1);
for x in nums {
if counts[1000 - x as usize] > 0 { res = res.max(x.abs()) }
counts[x as usize + 1000] += 1
}; res
}
01.05.2024
2000. Reverse Prefix of Word easy
blog post
substack
youtube
Join me on Telegram
https://t.me/leetcode_daily_unstoppable/589
Problem TLDR
Reverse [..ch] prefix in string #easy
Intuition
First find the position, then reverse the prefix.
Approach
Can you make the code shorter? (Don’t do this in the interview, however, we skipped optimized case of not found index.)
Complexity
-
Time complexity: \(O(n)\)
-
Space complexity: \(O(n)\)
Code
fun reversePrefix(word: String, ch: Char) = String(
word.toCharArray().apply { reverse(0, indexOf(ch) + 1) }
)
pub fn reverse_prefix(mut word: String, ch: char) -> String {
let i = word.find(ch).unwrap_or(0) + 1;
word[..i].chars().rev().chain(word[i..].chars()).collect()
}
30.04.2024
1915. Number of Wonderful Substrings medium
blog post
substack
youtube

Join me on Telegram
https://t.me/leetcode_daily_unstoppable/588
Problem TLDR
Count substrings with at most one odd frequency #medium #bit_manipulation
Intuition
This is a hard problem. Let’s try to look at the problem with our bare hands:
// aba
// a a
// ab -
// b b
// ba -
// aba aba
// aab
// a + xor = a
// aa + xor = 0
// a + xor = a
// aab + xor = b
// ab - xor = ab
// b + xor = b
// * = (aa, a) + b
// dp or two-pointers?
// dp: f(aabb) = f(aab)? + b
// two pointers:
// aabb
// i move i: a + a + b + b + aa + aab + aabb
// j move j: abb + bb
// skip ab?
We quickly run out of possible solutions patterns: neither dp or two pointers approach would work. However, there are some thoughts:
- only odd-even matters, so, we can somehow use
xor xorworks well for intervali..jwhen we pre-compute all the prefixes:xor i..j = xor 0..j xor xor 0..i
This is where my brain has stopped, and I used the hints:
- use prefix’s bitmask, as we only have
10unique chars
Let’s try to make use of the prefix’s bitmasks:
// bitmask 00
// a 01
// a 00
// b 10 m[ab] = m[aab] xor m[a]
// b 00 m[abb] = m[aabb] xor m[a]
// how many previous masks have mismatched bits?
// ~~~~~~~~~~
We know the current prefix’s bitmask m and our interest is how many subarrays on the left are good. We can xor with all the previous masks to find out the xor result of subarrays: this result must have at most one 1 bit. We can compress this search by putting unique masks in a counter HashMap.
// mismatched = differs 1 bit or equal
//
// ab m
// 00
// a 01 +1(00)
// b 11 +1(01)
// 0123
// aabb m res
// 00
//0a 01 +1(00)
//1 a 00 +2(00,01)
//2 b 10 +2(00,00)
//3 b 00 +4(00,01,00,10)
//
Approach
- Another neat trick: we don’t have to check all the masks from a HashMap, just check by changing every of the
10bits of mask. - array is faster, we have at most
2^10unique bits combinations
Complexity
-
Time complexity: \(O(n)\)
-
Space complexity: \(O(2^k)\), k - is an alphabet, at most 2^10 masks total
Code
fun wonderfulSubstrings(word: String): Long {
val masksCounter = LongArray(1024); masksCounter[0] = 1
var m = 0; var res = 0L
for (c in word) {
m = m xor (1 shl (c.code - 'a'.code))
res += masksCounter[m]
for (i in 0..9) res += masksCounter[m xor (1 shl i)]
masksCounter[m]++
}
return res
}
pub fn wonderful_substrings(word: String) -> i64 {
let mut counter = vec![0; 1024]; counter[0] = 1;
let (mut m, mut res) = (0, 0);
for b in word.bytes() {
m ^= 1 << (b - b'a');
res += counter[m];
for i in 0..10 { res += counter[m ^ (1 << i)] }
counter[m] += 1
}; res
}
29.04.2024
2997. Minimum Number of Operations to Make Array XOR Equal to K medium
blog post
substack
youtube
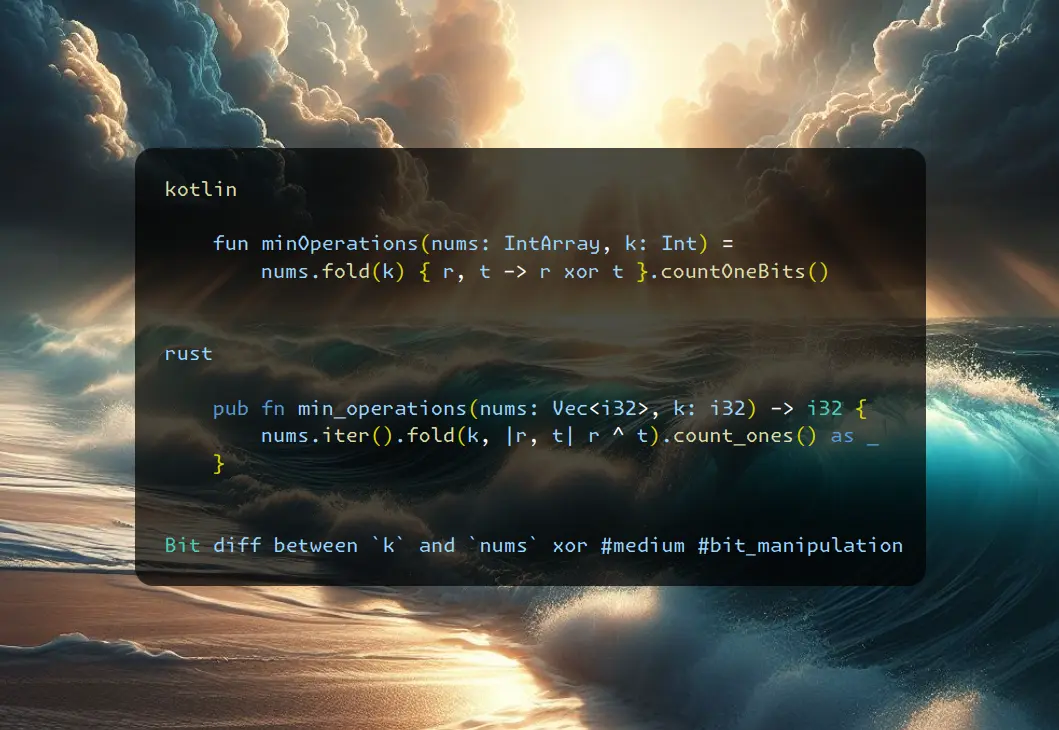
Join me on Telegram
https://t.me/leetcode_daily_unstoppable/587
Problem TLDR
Bit diff between k and nums xor #medium #bit_manipulation
Intuition
Let’s observe how the result xor built:
// 2 010 -> 110
// 1 001
// 3 011 -> 010
// 4 100
// x 100 -> 000 -> 001
// k 001
The result x differs from k by two bit flips: 100 -> 000 -> 001. We can do those bit flips on any number in the array, the final xor does not depend on the number choice.
Approach
Let’s try to use built-in methods: fold, countOneBits, count_ones.
Complexity
-
Time complexity: \(O(n)\)
-
Space complexity: \(O(1)\)
Code
fun minOperations(nums: IntArray, k: Int) =
nums.fold(k) { r, t -> r xor t }.countOneBits()
pub fn min_operations(nums: Vec<i32>, k: i32) -> i32 {
nums.iter().fold(k, |r, t| r ^ t).count_ones() as _
}
28.04.2024
834. Sum of Distances in Tree hard
blog post
substack
youtube

Join me on Telegram
https://t.me/leetcode_daily_unstoppable/586
Problem TLDR
Sums of paths to each leafs in a tree #hard #dfs
Intuition
Let’s observe how the result is calculated for each of the node:
As we see, there are some relationships between sibling nodes: they differ by some law.
Our goal is to reuse the first iteration result.
When we change the root, we are decreasing all the paths that are forwards and increasing all the paths that are backwards. The number of forward and backward paths can be calculated like this:
 Given that, we can derive the formula to change the root:
new root == previous root - forward + backward, or
R2 = R1 - count1 + (n - count1)
Approach
There are two possible ways to solve this: recursion and iteration.
- we can drop the
countsarray and just use theresult - for the post-order iterative solution, we also can simplify some steps: step 0 - go deeper, step 1 - return with result, that is where child nodes are ready, step 2 - again go deeper to do the root changing operation
Complexity
-
Time complexity: \(O(n)\)
-
Space complexity: \(O(n)\)
Code
fun sumOfDistancesInTree(n: Int, edges: Array<IntArray>): IntArray {
val graph = Array(n) { mutableListOf<Int>() }
for ((a, b) in edges) { graph[a] += b; graph[b] += a }
val res = IntArray(n)
fun dfs(curr: Int, from: Int, path: Int): Int = (1 + graph[curr]
.sumOf { if (it != from) dfs(it, curr, path + 1) else 0 })
.also { res[0] += path; if (curr > 0) res[curr] = n - 2 * it }
fun dfs2(curr: Int, from: Int) {
if (curr > 0) res[curr] += res[from]
for (e in graph[curr]) if (e != from) dfs2(e, curr)
}
dfs(0, 0, 0); dfs2(0, 0)
return res
}
pub fn sum_of_distances_in_tree(n: i32, edges: Vec<Vec<i32>>) -> Vec<i32> {
let (mut g, mut res, mut st) = (vec![vec![]; n as usize], vec![0; n as usize], vec![(0, 0, 0, 0)]);
for e in edges { let (a, b) = (e[0] as usize, e[1] as usize); g[a].push(b); g[b].push(a) }
while let Some((curr, from, path, step)) = st.pop() {
if step == 0 {
st.push((curr, from, path, 1));
for &e in &g[curr] { if e != from { st.push((e, curr, path + 1, 0)) }}
res[0] += path
} else if step == 1 {
if curr == 0 { st.push((curr, from, 0, 2)); continue }
for &e in &g[curr] { if e != from { res[curr] -= n - res[e] }}
res[curr] += n - 2
} else {
if curr > 0 { res[curr] += res[from] }
for &e in &g[curr] { if e != from { st.push((e, curr, 0, 2)) }}
}
}; res
}
27.04.2024
514. Freedom Trail hard
blog post
substack
youtube

Join me on Telegram
https://t.me/leetcode_daily_unstoppable/585
Problem TLDR
Min steps to produce key by rotating ring #hard #dynamic_programming #recursion #hash_map
Intuition
Let’s from the current position do the full search by trying each position with give letter. The minimum path is only depending on the current position of the ring and position in the key so it can be memoized.
However, don’t forget to rotate optimally, sometimes it’s a left rotation:
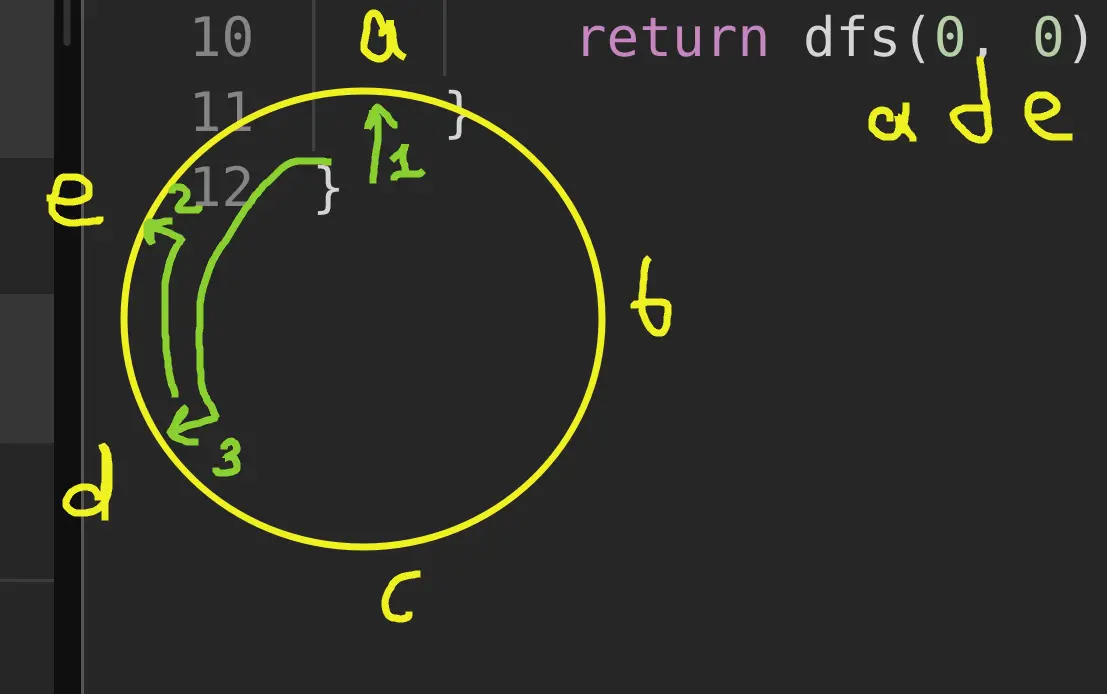
We can store the ring positions ahead of time.
Approach
Another approach is to do a Breadth-First Search: for each key position store all the min-length paths and their positions. Iterate from them at the next key position.
Complexity
-
Time complexity: \(O(r^2k)\), the worst case r^2 if all letters are the same
-
Space complexity: \(O(rk)\)
Code
fun findRotateSteps(ring: String, key: String): Int {
val cToPos = ring.indices.groupBy { ring[it] }
val dp = mutableMapOf<Pair<Int, Int>, Int>()
fun dfs(i: Int, j: Int): Int = if (j == key.length) 0 else
dp.getOrPut(i to j) {
1 + if (ring[i] == key[j]) dfs(i, j + 1) else {
cToPos[key[j]]!!.minOf {
min(abs(i - it), ring.length - abs(i - it)) + dfs(it, j + 1)
}}}
return dfs(0, 0)
}
pub fn find_rotate_steps(ring: String, key: String) -> i32 {
let mut pos = vec![vec![]; 26];
for (i, b) in ring.bytes().enumerate() { pos[(b - b'a') as usize].push(i) }
let mut layer = vec![(0, 0)];
for b in key.bytes() {
let mut next = vec![];
for &i in (&pos[(b - b'a') as usize]).iter() {
next.push((i, layer.iter().map(|&(j, path)| {
let diff = if i > j { i - j } else { j - i };
diff.min(ring.len() - diff) + path
}).min().unwrap()))
}
layer = next
}
(layer.iter().map(|x| x.1).min().unwrap() + key.len()) as i32
}
26.04.2024
1289. Minimum Falling Path Sum II hard
blog post
substack
youtube

Join me on Telegram
https://t.me/leetcode_daily_unstoppable/584
Problem TLDR
Min non-direct path top down in a 2D matrix #hard #dynamic_programming
Intuition
Let’s try an example:
 On each row we need to know the
 min value from the previous row, or the second min, if first is directly up. Then adding this min to the current cell would give us the min-sum.
Approach
We can reuse the matrix for brevety, however don’t do this in the interview or in a production code.
Complexity
-
Time complexity: \(O(nm)\)
-
Space complexity: \(O(1)\), or O(m) if the separate array used
Code
fun minFallingPathSum(grid: Array<IntArray>): Int {
var min1 = -1; var min2 = -1
for (y in grid.indices) { grid[y].let {
if (y > 0) for (x in it.indices)
it[x] += grid[y - 1][if (x == min1) min2 else min1]
min1 = -1; min2 = -1
for (x in it.indices)
if (min1 < 0 || it[x] < it[min1]) {
min2 = min1; min1 = x
} else if (min2 < 0 || it[x] < it[min2]) min2 = x
}}
return grid.last()[min1]
}
pub fn min_falling_path_sum(mut grid: Vec<Vec<i32>>) -> i32 {
let n = grid[0].len(); let (mut min1, mut min2) = (n, n);
for y in 0..grid.len() {
if y > 0 { for x in 0..n {
grid[y][x] += grid[y - 1][if x == min1 { min2 } else { min1 }]
}}
min1 = n; min2 = n;
for x in 0..n {
if min1 == n || grid[y][x] < grid[y][min1] {
min2 = min1; min1 = x
} else if min2 == n || grid[y][x] < grid[y][min2] { min2 = x }
}
}
grid[grid.len() - 1][min1]
}
25.04.2024
2370. Longest Ideal Subsequence medium
blog post
substack
youtube
Join me on Telegram
https://t.me/leetcode_daily_unstoppable/583
Problem TLDR
Max length of less than k adjacent subsequence #medium #dynamic_programming
Intuition
Examining some examples, we see some properties:
// acfgbd k=2
// a a
// c ac
// f f
// g fg
// b acb
// d acbd
- we must be able to backtrack to the previous subsequences, so this is full search or at least memoization problem
- at particular position, we know the result for the suffix given the starting char, so we know 26 results
- we can memoise it by (pos, char) key
Approach
There are some optimizations:
- current result only depends on the next result, so only [26] results are needed
- we can rewrite memoisation recursion with iterative for-loop
- changing the direction of loop is irrelevant, so better iterate forward for cache friendliness
- the clever trick is to consider only adjacent
kchars and only update the current char
Complexity
-
Time complexity: \(O(n)\), assuming the alphabet size is constant
-
Space complexity: \(O(1)\)
Code
fun longestIdealString(s: String, k: Int): Int {
var dp = IntArray(128)
for (c in s) dp = IntArray(128) { max(
if (abs(it - c.code) > k) 0
else 1 + dp[c.code], dp[it]) }
return dp.max()
}
pub fn longest_ideal_string(s: String, k: i32) -> i32 {
let mut dp = vec![0; 26];
for b in s.bytes() {
let lo = ((b - b'a') as usize).saturating_sub(k as usize);
let hi = ((b - b'a') as usize + k as usize).min(25);
dp[(b - b'a') as usize] = 1 + (lo..=hi).map(|a| dp[a]).max().unwrap()
}
*dp.iter().max().unwrap()
}
24.04.2024
1137. N-th Tribonacci Number easy
blog post
substack
youtube
Join me on Telegram
https://t.me/leetcode_daily_unstoppable/582
Problem TLDR
nth Tribonacci number f(n + 3) = f(n) + f(n + 1) + f(n + 2) #easy
Intuition
Use tree variables and compute the result in a for-loop.
Approach
There are some clever approaches:
- we can use an array and loop the index
- we can try to play this with tree variables but without a temp variable
Complexity
-
Time complexity: \(O(n)\)
-
Space complexity: \(O(1)\)
Code
fun tribonacci(n: Int): Int {
if (n < 2) return n
val t = intArrayOf(0, 1, 1)
for (i in 3..n) t[i % 3] = t.sum()
return t[n % 3]
}
pub fn tribonacci(n: i32) -> i32 {
if n < 2 { return n }
let (mut t1, mut t2, mut t0t1) = (1, 1, 1);
for _ in 2..n as usize {
t2 += t0t1;
t0t1 = t1 + t2 - t0t1;
t1 = t0t1 - t1
}; t2
}
23.04.2024
310. Minimum Height Trees medium
blog post
substack
youtube
Join me on Telegram
https://t.me/leetcode_daily_unstoppable/581
Problem TLDR
Center of an acyclic graph #medium #graph #toposort
Intuition
Didn’t solve it myself again.
The naive intuition that didn’t work for me was to move from the edges in BFS manner until a single or just two nodes left. This however doesn’t work for some cases:

After I gave up, in the solution section I saw a Topological Sort: always go from nodes with indegree == 1 and decrease it as you go.
There is also a two-dfs solution exists, it’s very clever: do two dfs runs from leaf to leaf and choose two middles of thier paths.
Approach
- careful with order of decreasing indegree: first decrease, then check for == 1.
Complexity
-
Time complexity: \(O(n)\)
-
Space complexity: \(O(n)\)
Code
fun findMinHeightTrees(n: Int, edges: Array<IntArray>): List<Int> {
val graph = mutableMapOf<Int, MutableList<Int>>()
val indegree = IntArray(n)
for ((a, b) in edges) {
indegree[a]++
indegree[b]++
graph.getOrPut(a) { mutableListOf() } += b
graph.getOrPut(b) { mutableListOf() } += a
}
var layer = mutableListOf<Int>()
for (x in 0..<n) if (indegree[x] < 2) {
layer += x; indegree[x]--
}
while (layer.size > 1) {
val next = mutableListOf<Int>()
for (x in layer) for (y in graph[x]!!) {
indegree[y]--
if (indegree[y] == 1) next += y
}
if (next.size < 1) break
layer = next
}
return layer
}
pub fn find_min_height_trees(n: i32, edges: Vec<Vec<i32>>) -> Vec<i32> {
let mut graph = HashMap::new();
let mut indegree = vec![0; n as usize];
for e in edges {
indegree[e[0] as usize] += 1;
indegree[e[1] as usize] += 1;
graph.entry(e[0]).or_insert(vec![]).push(e[1]);
graph.entry(e[1]).or_insert(vec![]).push(e[0])
}
let mut layer = vec![];
for x in 0..n as usize { if indegree[x] < 2 {
layer.push(x as i32); indegree[x] -= 1
}}
while layer.len() > 1 {
let mut next = vec![];
for x in &layer { if let Some(nb) = graph.get(&x) {
for &y in nb {
indegree[y as usize] -= 1;
if indegree[y as usize] == 1 { next.push(y) }
}
}}
if next.len() < 1 { break }
layer = next
}
layer
}
22.04.2024
752. Open the Lock medium
blog post
substack
youtube

Join me on Telegram
https://t.me/leetcode_daily_unstoppable/580
Problem TLDR
Steps to rotate 4-wheel 0000 -> target #medium #bfs #deque
Intuition
Whe can imagine each rotation as a graph edge and each combination as a graph node. The task now is to find the shortest path. This can be done with BFS.
Approach
We can use Strings or better to just use numbers.
Complexity
-
Time complexity: \(O(E)\), there are total 9999 number of nodes, and each node connected to 42=8 other nodes, so E = 810^4, V = 10^4
-
Space complexity: \(O(N)\), N is size of deadends
Code
fun openLock(deadends: Array<String>, target: String) =
with(ArrayDeque<String>(listOf("0000"))) {
val visited = deadends.toMutableSet()
var step = 0
while (size > 0) {
repeat(size) {
val curr = removeFirst()
if (!visited.add(curr)) return@repeat
if (curr == target) return step
for ((i, c) in curr.withIndex()) {
add(curr.replaceRange(i, i + 1, "${if (c == '9') '0' else c + 1}"))
add(curr.replaceRange(i, i + 1, "${if (c == '0') '9' else c - 1}"))
}
}
step++
}
-1
}
pub fn open_lock(deadends: Vec<String>, target: String) -> i32 {
let target = target.parse::<u16>().unwrap();
let (mut deque, mut step) = (VecDeque::new(), 0);
let mut visited: HashSet<_> = deadends.iter().map(|s| s.parse().unwrap()).collect();
deque.push_back(0000);
while deque.len() > 0 {
for _ in 0..deque.len() {
let curr = deque.pop_front().unwrap();
if !visited.insert(curr) { continue }
if curr == target { return step }
for i in &[1000, 0100, 0010, 0001] {
let wheel = (curr / i) % 10;
deque.push_back((curr - i * wheel) + (i * ((wheel + 1) % 10)));
deque.push_back((curr - i * wheel) + (i * ((wheel + 9) % 10)));
}
}
step += 1
}
-1
}
21.04.2024
1971. Find if Path Exists in Graph easy
blog post
substack
youtube
Join me on Telegram
https://t.me/leetcode_daily_unstoppable/578
Problem TLDR
Are source and destination connected in graph? #easy
Intuition
Let’s check connected components with Union-Find data structure https://en.wikipedia.org/wiki/Disjoint-set_data_structure
Approach
We can use a HashMap or just simple array. To optimize Union-Find root function, we can use path compression step. There are other tricks (https://arxiv.org/pdf/1911.06347.pdf), but let’s keep code shorter.
Complexity
-
Time complexity: \(O(E + V)\), V = n, E = edges.size, assuming
rootis constant forinverse Ackermannfunction (https://codeforces.com/blog/entry/98275) (however only with all the tricks implemented, like ranks and path compressing https://cp-algorithms.com/data_structures/disjoint_set_union.html) -
Space complexity: \(O(V)\)
Code
fun validPath(n: Int, edges: Array<IntArray>, source: Int, destination: Int): Boolean {
val uf = IntArray(n) { it }
fun root(a: Int): Int { var x = a; while (x != uf[x]) x = uf[x]; uf[a] = x; return x }
for ((a, b) in edges) uf[root(a)] = root(b)
return root(source) == root(destination)
}
pub fn valid_path(n: i32, edges: Vec<Vec<i32>>, source: i32, destination: i32) -> bool {
let mut uf = (0..n as usize).collect();
fn root(uf: &mut Vec<usize>, a: i32) -> usize {
let mut x = a as usize; while x != uf[x] { x = uf[x] }; uf[a as usize] = x; x
}
for ab in edges { let a = root(&mut uf, ab[0]); uf[a] = root(&mut uf, ab[1]) }
root(&mut uf, source) == root(&mut uf, destination)
}
20.04.2024
1992. Find All Groups of Farmland medium
blog post
substack
youtube
Join me on Telegram
https://t.me/leetcode_daily_unstoppable/577
Problem TLDR
Count 1-rectangles in 0-1 2D matrix #medium
Intuition
We can use DFS or just move bottom-right, as by task definition all 1-islands are rectangles
Approach
- find the right border, then fill arrays with zeros
- Rust didn’t have a
fillmethod
Complexity
-
Time complexity: \(O(nm)\)
-
Space complexity: \(O(r)\), where
ris a resulting count of islands, can be up tonm/2
Code
fun findFarmland(land: Array<IntArray>) = buildList {
for (y in land.indices) for (x in land[0].indices) { if (land[y][x] > 0) {
var y2 = y; var x2 = x
while (x2 < land[0].size && land[y][x2] > 0) x2++
while (y2 < land.size && land[y2][x] > 0) land[y2++].fill(0, x, x2)
add(intArrayOf(y, x, y2 - 1, x2 - 1))
}}}.toTypedArray()
pub fn find_farmland(mut land: Vec<Vec<i32>>) -> Vec<Vec<i32>> {
let mut res = vec![];
for y in 0..land.len() { for x in 0..land[0].len() { if land[y][x] > 0 {
let (mut y2, mut x2) = (y, x);
while x2 < land[0].len() && land[y][x2] > 0 { x2 += 1 }
while y2 < land.len() && land[y2][x] > 0 {
for i in x..x2 { land[y2][i] = 0 }
y2 += 1
}
res.push(vec![y as i32, x as i32, y2 as i32 - 1, x2 as i32 - 1])
}}}; res
}
19.04.2024
200. Number of Islands medium
blog post
substack
youtube
Join me on Telegram
https://t.me/leetcode_daily_unstoppable/576
Problem TLDR
Count 1-islands in 0-1 a 2D matrix #medium
Intuition
Let’s visit all the connected 1’s and mark them somehow to visit only once.
Alternative solution would be using Union-Find, however for such trivial case it is unnecessary.
Approach
We can modify the input array to mark visited (don’t do this in production code or in interview).
Complexity
-
Time complexity: \(O(nm)\)
-
Space complexity: \(O(1)\), or O(nm) if we forbidden to modify the grid
Code
fun numIslands(grid: Array<CharArray>): Int {
fun dfs(y: Int, x: Int): Boolean =
if (grid[y][x] == '1') {
grid[y][x] = '0'
if (x > 0) dfs(y, x - 1)
if (y > 0) dfs(y - 1, x)
if (x < grid[0].size - 1) dfs(y, x + 1)
if (y < grid.size - 1) dfs(y + 1, x)
true
} else false
return (0..<grid.size * grid[0].size).count {
dfs(it / grid[0].size, it % grid[0].size)
}
}
pub fn num_islands(mut grid: Vec<Vec<char>>) -> i32 {
fn dfs(grid: &mut Vec<Vec<char>>, y: usize, x: usize) -> i32 {
if grid[y][x] == '1' {
grid[y][x] = '0';
if x > 0 { dfs(grid, y, x - 1); }
if y > 0 { dfs(grid, y - 1, x); }
if x < grid[0].len() - 1 { dfs(grid, y, x + 1); }
if y < grid.len() - 1 { dfs(grid, y + 1, x); }
1
} else { 0 }
}
(0..grid.len() * grid[0].len()).map(|xy| {
let x = xy % grid[0].len(); let y = xy / grid[0].len();
dfs(&mut grid, y as usize, x as usize)
}).sum()
}
18.04.2024
463. Island Perimeter easy
blog post
substack
youtube

Join me on Telegram
https://t.me/leetcode_daily_unstoppable/575
Problem TLDR
Perimeter of 1’s islands in 01-matrix #easy
Intuition
Let’s observe the problem example:
 As we see, the perimeter increases on the
 0-1 transitions, we can just count them.
Another neat approach I steal from someone: every 1 increases by 4 and then decreases by 1-1 borders.
Approach
Let’s try to save some keystrokes
- did you know
compareTo(false)will convert Boolean to Int? (same isas i32in Rust)
Complexity
-
Time complexity: \(O(nm)\)
-
Space complexity: \(O(1)\)
Code
fun islandPerimeter(grid: Array<IntArray>) =
(0..<grid.size * grid[0].size).sumBy { xy ->
val x = xy % grid[0].size; val y = xy / grid[0].size
if (grid[y][x] < 1) 0 else
(x < 1 || grid[y][x - 1] < 1).compareTo(false) +
(y < 1 || grid[y - 1][x] < 1).compareTo(false) +
(x == grid[0].lastIndex || grid[y][x + 1] < 1).compareTo(false) +
(y == grid.lastIndex || grid[y + 1][x] < 1).compareTo(false)
}
pub fn island_perimeter(grid: Vec<Vec<i32>>) -> i32 {
let mut p = 0;
for y in 0..grid.len() { for x in 0..grid[0].len() {
if grid[y][x] < 1 { continue }
if y > 0 && grid[y - 1][x] > 0 { p -= 2 }
if x > 0 && grid[y][x - 1] > 0 { p -= 2 }
p += 4
} }; p
}
17.04.2024
988. Smallest String Starting From Leaf medium
blog post
substack
youtube

Join me on Telegram
https://t.me/leetcode_daily_unstoppable/574
Problem TLDR
Smallest string from leaf to root in a Binary Tree #medium
Intuition
After trying some examples with bottom-up approach, we find out one that would not work:
 That means, we should use top down.
Approach
- We can avoid using a global variable, comparing the results.
- The
ifbranching can be smaller if we add some symbol afterzfor a single-leafs.
Complexity
-
Time complexity: \(O(nlog^2(n))\), we prepending to string with length of log(n) log(n) times, can be avoided with StringBuilder and reversing at the last step
-
Space complexity: \(O(log(n))\), recursion depth
Code
fun smallestFromLeaf(root: TreeNode?, s: String = ""): String = root?.run {
val s = "${'a' + `val`}" + s
if (left == null && right == null) s
else minOf(smallestFromLeaf(left, s), smallestFromLeaf(right, s))
} ?: "${ 'z' + 1 }"
pub fn smallest_from_leaf(root: Option<Rc<RefCell<TreeNode>>>) -> String {
fn dfs(n: &Option<Rc<RefCell<TreeNode>>>, s: String) -> String {
n.as_ref().map_or("{".into(), |n| { let n = n.borrow();
let s = ((b'a' + (n.val as u8)) as char).to_string() + &s;
if n.left.is_none() && n.right.is_none() { s }
else { dfs(&n.left, s.clone()).min(dfs(&n.right, s)) }
})
}
dfs(&root, "".into())
}
16.04.2024
623. Add One Row to Tree medium
blog post
substack
youtube

Join me on Telegram
https://t.me/leetcode_daily_unstoppable/573
Problem TLDR
Insert nodes at the depth of the Binary Tree #medium
Intuition
We can use Depth-First or Breadth-First Search
Approach
Let’s use DFS in Kotlin, and BFS in Rust. In a DFS solution we can try to use result of a function to shorten the code: to identify which node is right, mark depth as zero for it.
Complexity
-
Time complexity: \(O(n)\), for both DFS and BFS
-
Space complexity: \(O(log(n))\) for DFS, but O(n) for BFS as the last row can contain as much as
n/2items
Code
fun addOneRow(root: TreeNode?, v: Int, depth: Int): TreeNode? =
if (depth < 2) TreeNode(v).apply { if (depth < 1) right = root else left = root }
else root?.apply {
left = addOneRow(left, v, depth - 1)
right = addOneRow(right, v, if (depth < 3) 0 else depth - 1)
}
pub fn add_one_row(mut root: Option<Rc<RefCell<TreeNode>>>, val: i32, depth: i32) -> Option<Rc<RefCell<TreeNode>>> {
if depth < 2 { return Some(Rc::new(RefCell::new(TreeNode { val: val, left: root, right: None }))) }
let mut queue = VecDeque::new(); queue.push_back(root.clone());
for _ in 2..depth { for _ in 0..queue.len() {
if let Some(n) = queue.pop_front() { if let Some(n) = n {
let n = n.borrow();
queue.push_back(n.left.clone());
queue.push_back(n.right.clone());
} }
} }
while queue.len() > 0 {
if let Some(n) = queue.pop_front() { if let Some(n) = n {
let mut n = n.borrow_mut();
n.left = Some(Rc::new(RefCell::new(TreeNode { val: val, left: n.left.take(), right: None })));
n.right = Some(Rc::new(RefCell::new(TreeNode { val: val, left: None, right: n.right.take() })));
} }
}; root
}
15.04.2024
129. Sum Root to Leaf Numbers medium
blog post
substack
youtube
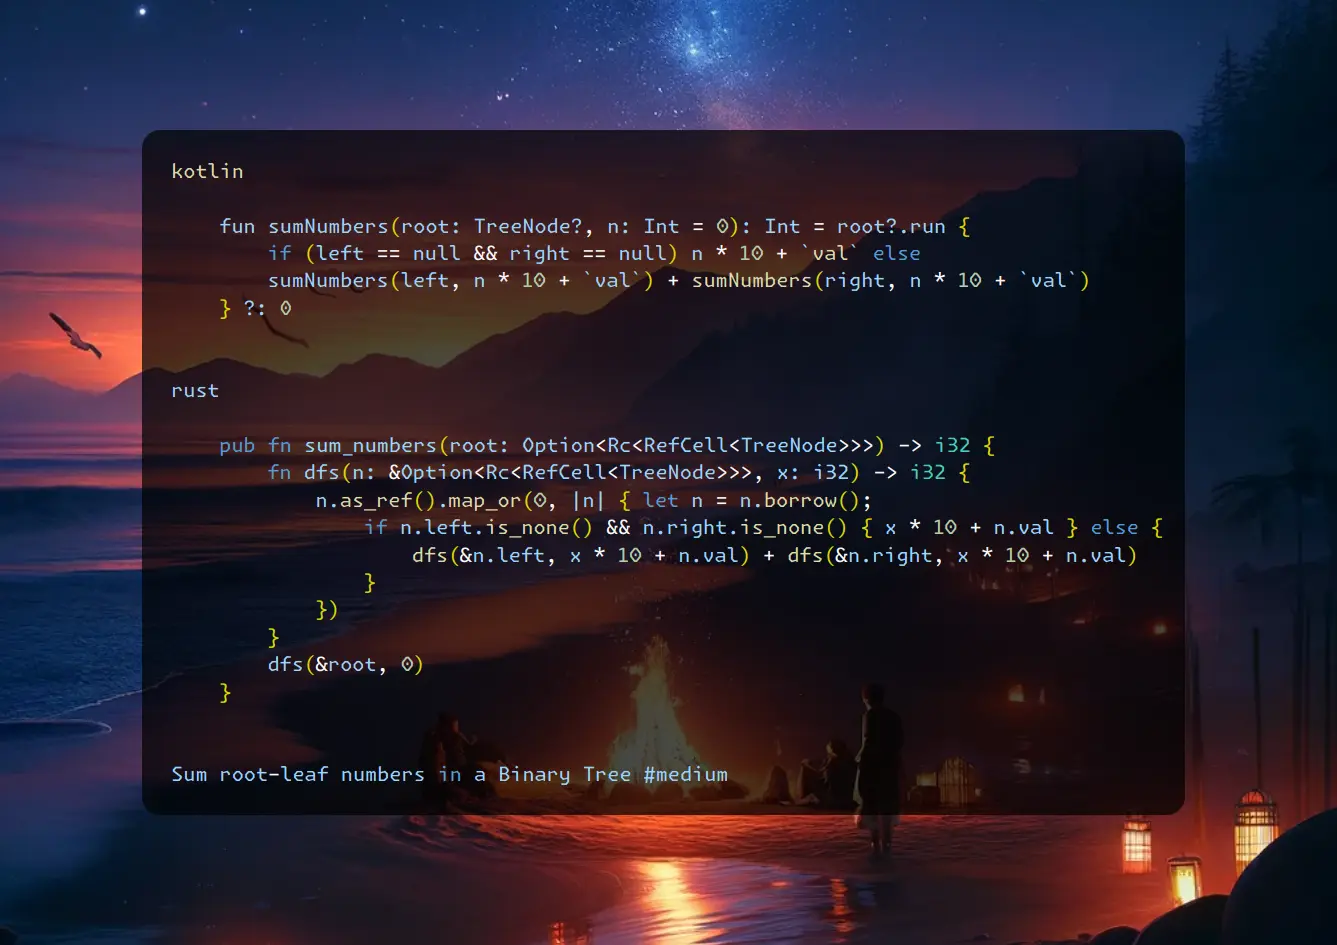
Join me on Telegram
https://t.me/leetcode_daily_unstoppable/572
Problem TLDR
Sum root-leaf numbers in a Binary Tree #medium
Intuition
Pass the number as an argument and return it on leaf nodes
Approach
I for now think it is impossible to reuse the method signature as-is and do it bottom up, at least you must return the power of 10 as an additional value.
Complexity
-
Time complexity: \(O(n)\)
-
Space complexity: \(O(log(n))\), for the recursion, however Morris Traversal will make it O(1)
Code
fun sumNumbers(root: TreeNode?, n: Int = 0): Int = root?.run {
if (left == null && right == null) n * 10 + `val` else
sumNumbers(left, n * 10 + `val`) + sumNumbers(right, n * 10 + `val`)
} ?: 0
pub fn sum_numbers(root: Option<Rc<RefCell<TreeNode>>>) -> i32 {
fn dfs(n: &Option<Rc<RefCell<TreeNode>>>, x: i32) -> i32 {
n.as_ref().map_or(0, |n| { let n = n.borrow();
if n.left.is_none() && n.right.is_none() { x * 10 + n.val } else {
dfs(&n.left, x * 10 + n.val) + dfs(&n.right, x * 10 + n.val)
}
})
}
dfs(&root, 0)
}
14.04.2024
404. Sum of Left Leaves easy
blog post
substack
youtube
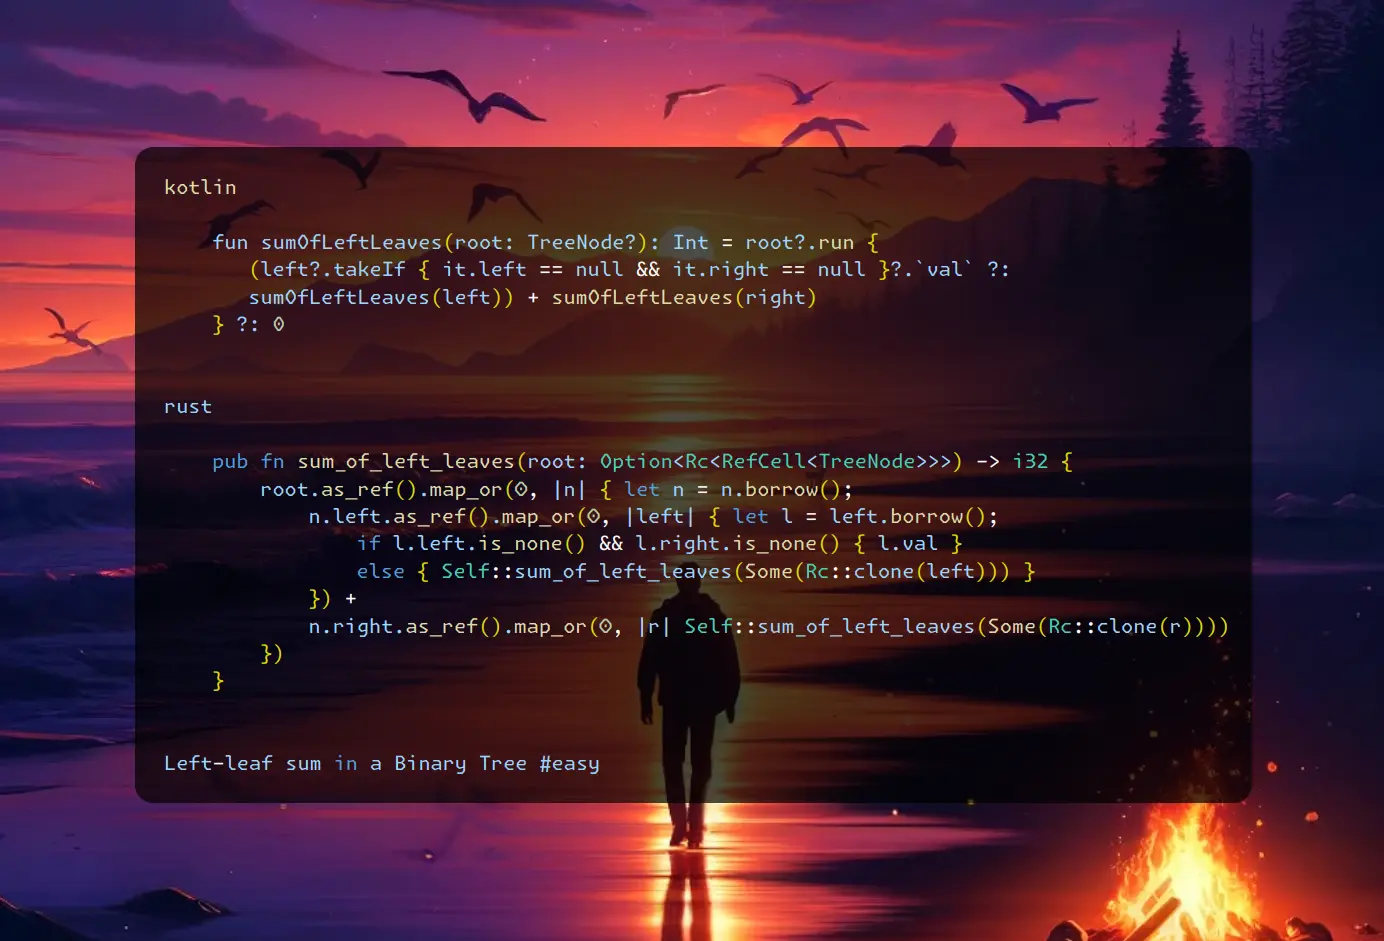
Join me on Telegram
https://t.me/leetcode_daily_unstoppable/571
Problem TLDR
Left-leaf sum in a Binary Tree #easy
Intuition
Do a Depth-First Search and check if left node is a leaf
Approach
Let’s try to reuse the original method’s signature.
- in Rust
Rc::cloneis a cheap operation
Complexity
-
Time complexity: \(O(n)\)
-
Space complexity: \(O(log(n))\), for the recursion stack space
Code
fun sumOfLeftLeaves(root: TreeNode?): Int = root?.run {
(left?.takeIf { it.left == null && it.right == null }?.`val` ?:
sumOfLeftLeaves(left)) + sumOfLeftLeaves(right)
} ?: 0
pub fn sum_of_left_leaves(root: Option<Rc<RefCell<TreeNode>>>) -> i32 {
root.as_ref().map_or(0, |n| { let n = n.borrow();
n.left.as_ref().map_or(0, |left| { let l = left.borrow();
if l.left.is_none() && l.right.is_none() { l.val }
else { Self::sum_of_left_leaves(Some(Rc::clone(left))) }
}) +
n.right.as_ref().map_or(0, |r| Self::sum_of_left_leaves(Some(Rc::clone(r))))
})
}
13.04.2024
85. Maximal Rectangle hard
blog post
substack
youtube
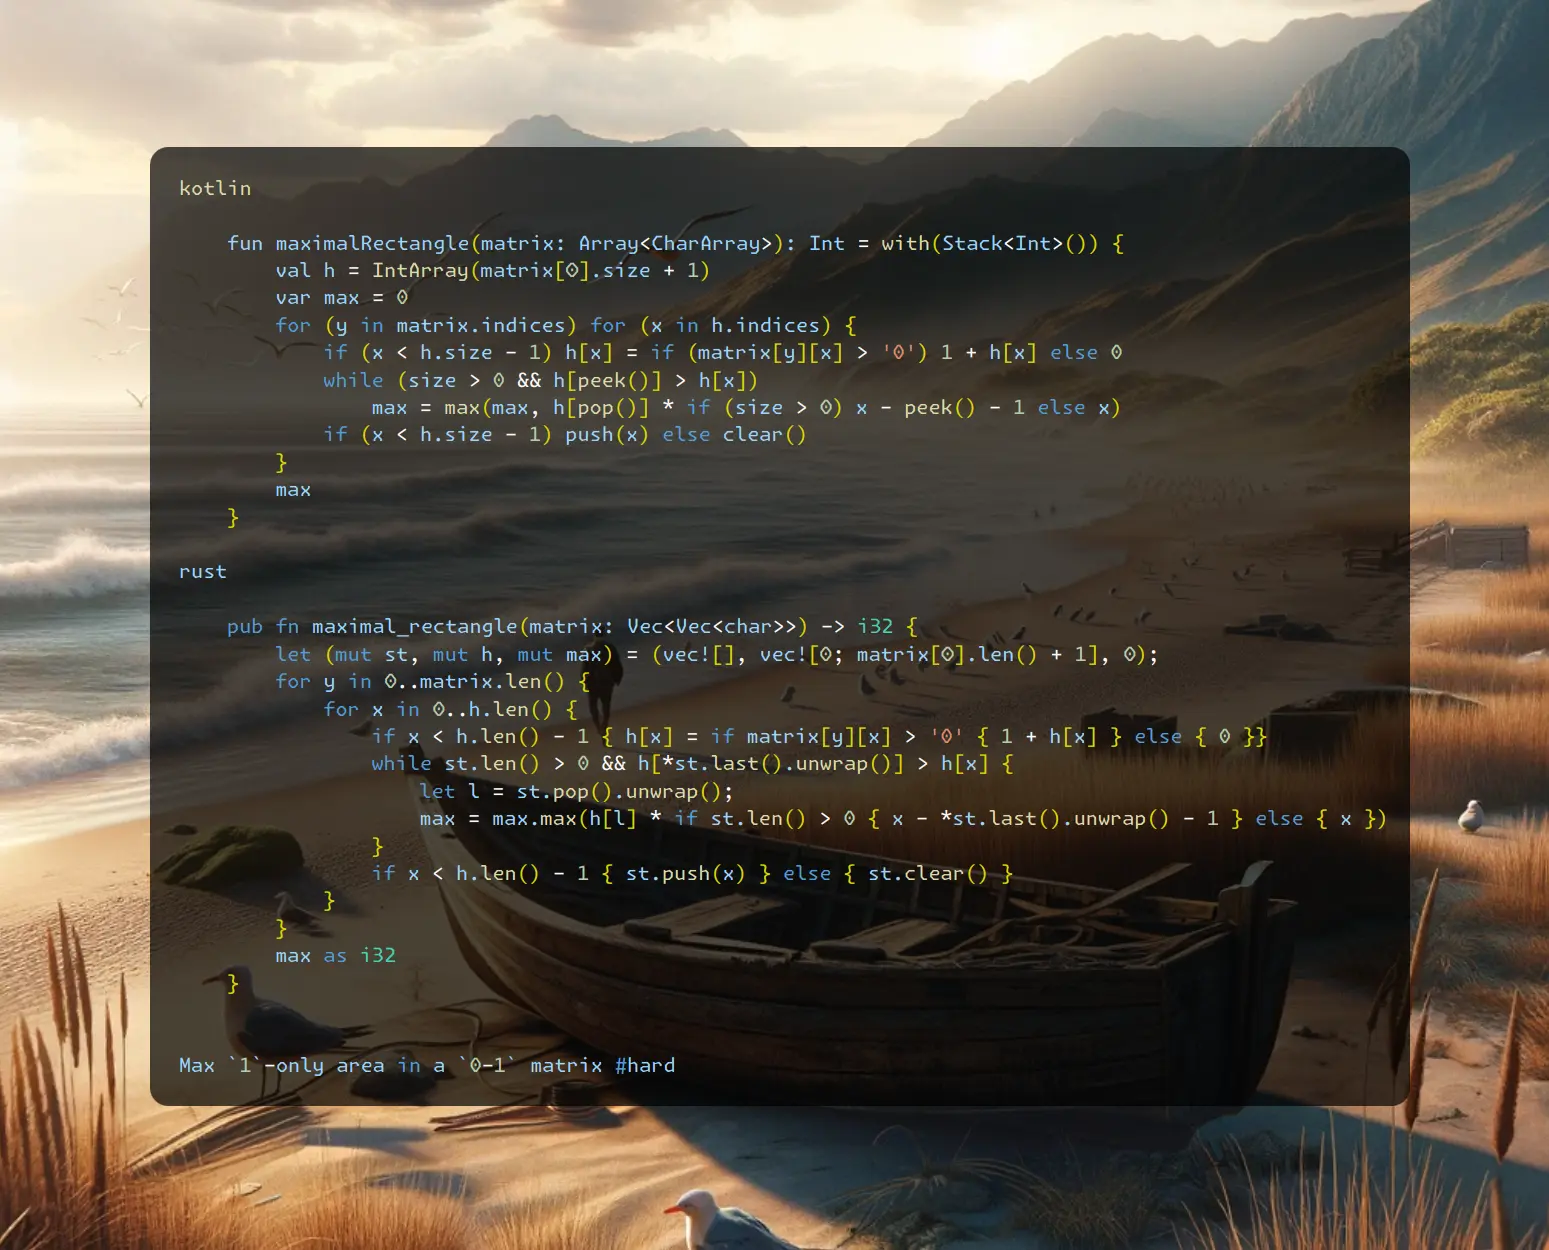
Join me on Telegram
https://t.me/leetcode_daily_unstoppable/570
Problem TLDR
Max 1-only area in a 0-1 matrix #hard
Intuition
The n^4 solution is kind of trivial, just precompute the prefix sums, then do some geometry:
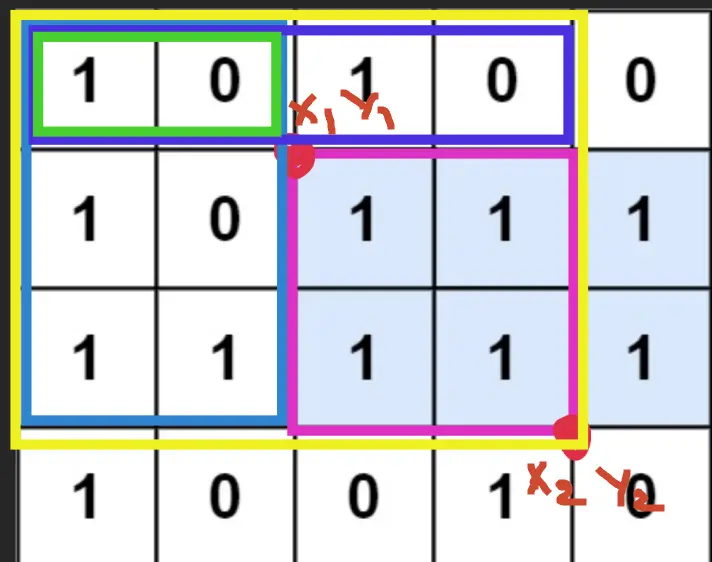
The trick here is to observe a subproblem (https://leetcode.com/problems/largest-rectangle-in-histogram/):
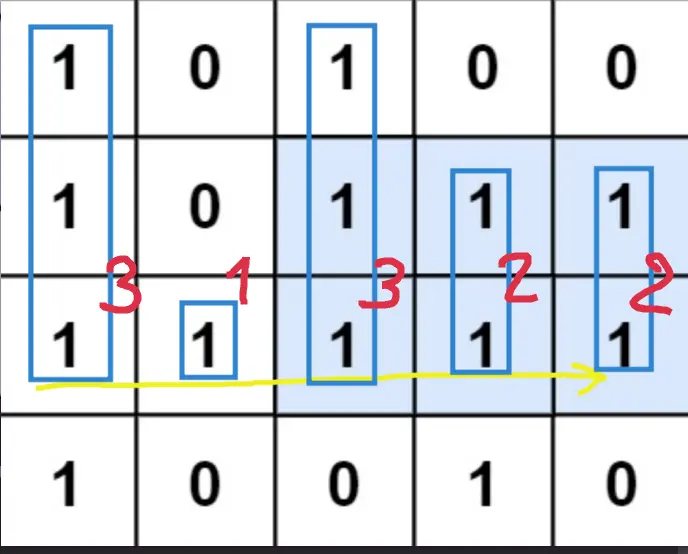 This can be solved using a
 Monotonic Increasing Stack technique:
//i0 1 2 3 4
// 3 1 3 2 2
//0* 3
//1 * 1
//2 * 1 3
//3 * 1 3 2 -> 1 2
//4 * 1 2 2
// * empty
Pop all positions smaller than the current heights. Careful with the area calculation though, the height will be the popping one, and the width is a distance between popped and a new top.
Approach
There are some tricks:
- using a sentinel 0-height at the end of
hwill help to save some lines of code - Stack object can be reused
Complexity
-
Time complexity: \(O(nm)\)
-
Space complexity: \(O(m)\)
Code
```kotlin []
fun maximalRectangle(matrix: Array<CharArray>): Int = with(Stack<Int>()) {
val h = IntArray(matrix[0].size + 1)
var max = 0
for (y in matrix.indices) for (x in h.indices) {
if (x < h.size - 1) h[x] = if (matrix[y][x] > '0') 1 + h[x] else 0
while (size > 0 && h[peek()] > h[x])
max = max(max, h[pop()] * if (size > 0) x - peek() - 1 else x)
if (x < h.size - 1) push(x) else clear()
}
max
}
```rust
pub fn maximal_rectangle(matrix: Vec<Vec<char>>) -> i32 {
let (mut st, mut h, mut max) = (vec![], vec![0; matrix[0].len() + 1], 0);
for y in 0..matrix.len() {
for x in 0..h.len() {
if x < h.len() - 1 { h[x] = if matrix[y][x] > '0' { 1 + h[x] } else { 0 }}
while st.len() > 0 && h[*st.last().unwrap()] > h[x] {
let l = st.pop().unwrap();
max = max.max(h[l] * if st.len() > 0 { x - *st.last().unwrap() - 1 } else { x })
}
if x < h.len() - 1 { st.push(x) } else { st.clear() }
}
}
max as i32
}
12.04.2024
42. Trapping Rain Water hard
blog post
substack
youtube

Problem TLDR
Trap the water in area between vertical walls #hard
Intuition
Let’s observe some examples and try to apply decreasing stack technique somehow:
// #
// # # # #
// # # # # # # # # #
//i0 1 2 3 4 5 6 7 8 91011
// 0 1 0 2 1 0 1 3 2 1 2 1
//0* . 0(0)
//1 * . 1
//2 * . 1(1) 0(2)
//3 * . 2(3) + (3-2)*(1-0)
//4 * . 2(3) 1(4)
//5 * . 2(3) 1(4) 0(5)
//6 * . 2(3) 1(6) + (1-0)*(5-4)
//7 * 3(7) + (2-1)*(6-3)
//2# #
//1## #
//0####
// 0123
//
// 0 1 2 3
// 2 1 0 2
// * 2(0)
// * 2(0) 1(1)
// * 2(0) 1(1) 0(2)
// * 2(3) + a=2,b=1, (i-b-1)*(h[b]-h[a])=(3-1-1)*(1-0)
// a=1,b=0, (3-0-1)*(2-1)
// #
// # #
// # # #
// # # #
// 0 1 2
// 4 2 3
// #
// # #
// # # #
// # # # # #
// # # # # #
// 0 1 2 3 4 5
// 4 2 0 3 2 5
// # #
// # #
// # #
// # # # #
// # # # # # #
// 0 1 2 3 4 5
// 5 2 1 2 1 5
As we meet a new high value we can collect some water. There are corner cases when the left border is smaller than the right.
Approach
- try to come up with as many corner cases as possible
- horizontal width must be between the highest columns
Complexity
-
Time complexity: \(O(n)\)
-
Space complexity: \(O(n)\)
Code
fun trap(height: IntArray): Int = with(Stack<Int>()) {
var sum = 0
for ((i, hb) in height.withIndex()) {
while (size > 0 && height[peek()] <= hb) {
val ha = height[pop()]
if (size > 0) sum += (i - peek() - 1) * (min(hb, height[peek()]) - ha)
}
push(i)
}
return sum
}
pub fn trap(height: Vec<i32>) -> i32 {
let (mut sum, mut stack) = (0, vec![]);
for (i, &hb) in height.iter().enumerate() {
while stack.len() > 0 && height[*stack.last().unwrap()] <= hb {
let ha = height[stack.pop().unwrap()];
if stack.len() > 0 {
let dh = hb.min(height[*stack.last().unwrap()]) - ha;
sum += ((i - *stack.last().unwrap()) as i32 - 1) * dh
}
}
stack.push(i)
}
sum
}
11.04.2024
402. Remove K Digits medium
blog post
substack
youtube
Join me on Telegram
https://t.me/leetcode_daily_unstoppable/568
Problem TLDR
Minimum number after removing k digits #medium
Intuition
Let’s observe some examples:
// 1432219 k=3
// *
// * 14
// * 13 1, remove 4
// * 12 2, remove 3
// * 122
// * 121 3, remove 2
// 12321 k=1
// * 1
// * 12
// * 123
// * 122, remove 3
We can use increasing stack technique to choose which characters to remove: remove all tail that less than a new added char.
Approach
We can use Stack or just a StringBuilder directly. Counter is optional, but also helps to save one line of code.
- we can skip adding
0when string is empty
Complexity
-
Time complexity: \(O(n)\), n^2 when using
deletaAt(0), but time is almost the same (we can use a separate counter to avoid this) -
Space complexity: \(O(n)\)
Code
fun removeKdigits(num: String, k: Int) = buildString {
for (i in num.indices) {
while (i - length < k && length > 0 && last() > num[i])
setLength(lastIndex)
append(num[i])
}
while (num.length - length < k) setLength(lastIndex)
while (firstOrNull() == '0') deleteAt(0)
}.takeIf { it.isNotEmpty() } ?: "0"
pub fn remove_kdigits(num: String, mut k: i32) -> String {
let mut sb = String::with_capacity(num.len() - k as usize);
for c in num.chars() {
while k > 0 && sb.len() > 0 && sb.chars().last().unwrap() > c {
sb.pop();
k -= 1
}
if !sb.is_empty() || c != '0' { sb.push(c) }
}
for _ in 0..k { sb.pop(); }
if sb.is_empty() { sb.push('0') }
sb
}
10.04.2024
950. Reveal Cards In Increasing Order medium
blog post
substack
youtube
Join me on Telegram
https://t.me/leetcode_daily_unstoppable/567
Problem TLDR
Sort cards by rules: take top, next goes bottom #medium
Intuition
Let’s reverse the problem: go from the last number, then prepend a value and rotate.
Approach
We can use ArrayDeque in Kotlin and just a vec[] in Rust (however VecDeque is also handy and make O(1) operation instead of O(n)).
Complexity
-
Time complexity: \(O(nlogn)\), O(n^2) for vec[] solution, but the real time is still 0ms.
-
Space complexity: \(O(n)\)
Code
fun deckRevealedIncreasing(deck: IntArray) = with(ArrayDeque<Int>()) {
deck.sortDescending()
for (n in deck) {
if (size > 0) addFirst(removeLast())
addFirst(n)
}
toIntArray()
}
pub fn deck_revealed_increasing(mut deck: Vec<i32>) -> Vec<i32> {
deck.sort_unstable_by_key(|n| -n);
let mut queue = vec![];
for n in deck {
if queue.len() > 0 { queue.rotate_right(1) }
queue.insert(0, n)
}
queue
}
09.04.2024
2073. Time Needed to Buy Tickets easy
blog post
substack
youtube
Join me on Telegram
https://t.me/leetcode_daily_unstoppable/565
Problem TLDR
Seconds to buy tickets by k-th person in a rotating 1 second queue #easy
Intuition
The brute-force implementation is trivial: just repeat decreasing tickets[i] untile tickets[k] == 0. It will take at most O(n^2) time.
However, there is a one-pass solution. To get the intuition go to the comment section… just a joke. We take tickets[k] for people before k and we don’t take last round tickets for people after k, so only tickets[k] - 1.
Approach
Let’s use some iterators to reduce the number of lines of code:
sumOf, withIndex or iter().enumerate(),
Complexity
-
Time complexity: \(O(n)\)
-
Space complexity: \(O(1)\)
Code
fun timeRequiredToBuy(tickets: IntArray, k: Int) =
tickets.withIndex().sumOf { (i, t) ->
min(tickets[k] - (if (i > k) 1 else 0), t)
}
pub fn time_required_to_buy(tickets: Vec<i32>, k: i32) -> i32 {
tickets.iter().enumerate().map(|(i, &t)|
t.min(tickets[k as usize] - i32::from(i > k as usize))).sum()
}
08.04.2024
1700. Number of Students Unable to Eat Lunch easy
blog post
substack
youtube
Join me on Telegram
https://t.me/leetcode_daily_unstoppable/564
Problem TLDR
First sandwitch not eaten by any while popped from a queue #easy
Intuition
First, understant the problem: we searching the first sandwitch which none of the students are able to eat.
The simulation code is straighforward and takes O(n^2) time which is accepted.
However, we can count how many students are 0-eaters and how many 1-eaters, then stop when none are able to eat current sandwitch.
Approach
We can use two counters or one array. How many lines of code can you save?
Complexity
-
Time complexity: \(O(n)\)
-
Space complexity: \(O(1)\)
Code
fun countStudents(students: IntArray, sandwiches: IntArray): Int {
val count = IntArray(2)
for (s in students) count[s]++
for ((i, s) in sandwiches.withIndex())
if (--count[s] < 0) return students.size - i
return 0
}
pub fn count_students(students: Vec<i32>, sandwiches: Vec<i32>) -> i32 {
let (mut count, n) = (vec![0; 2], students.len());
for s in students { count[s as usize] += 1 }
for (i, &s) in sandwiches.iter().enumerate() {
count[s as usize] -= 1;
if count[s as usize] < 0 { return (n - i) as i32 }
}; 0
}
07.04.2024
678. Valid Parenthesis String medium
blog post
substack
youtube
Join me on Telegram
https://t.me/leetcode_daily_unstoppable/563
Problem TLDR
Are parenthesis valid with wildcard? #medium
Intuition
Let’s observe some examples:
*( w o
* 1
( 1
(*(*(
)*
o < 0
**((
^
As we can see, for example **(( the number of wildcards matches with the number of non-matched parenthesis, and the entire sequence is invalid. However, this sequence in reverse order ))** is simple to resolve with just a single counter. So, the solution would be to use a single counter and check sequence in forward and in reverse order.
Another neat trick that I wouldn’t invent myself in a thousand years, is to consider the open counter as a RangeOpen = (min..max), where every wildcard broadens this range.
Approach
Let’s implement both solutions.
Complexity
-
Time complexity: \(O(n)\)
-
Space complexity: \(O(1)\)
Code
fun checkValidString(s: String): Boolean {
var open = 0
for (c in s)
if (c == '(' || c == '*') open++
else if (c == ')' && --open < 0) return false
open = 0
for (i in s.lastIndex downTo 0)
if (s[i] == ')' || s[i] == '*') open++
else if (s[i] == '(' && --open < 0) return false
return true
}
pub fn check_valid_string(s: String) -> bool {
let mut open = (0, 0);
for b in s.bytes() {
if b == b'(' { open.0 += 1; open.1 += 1 }
else if b == b')' { open.0 -= 1; open.1 -= 1 }
else { open.0 -= 1; open.1 += 1 }
if open.1 < 0 { return false }
if open.0 < 0 { open.0 = 0 }
}
open.0 == 0
}
06.04.2024
1249. Minimum Remove to Make Valid Parentheses medium
blog post
substack
youtube
Join me on Telegram
https://t.me/leetcode_daily_unstoppable/562
Problem TLDR
Remove minimum to make parenthesis valid #medium
Intuition
Let’s imagine some examples to better understand the problem:
(a
a(a
a(a()
(a))a
We can’t just append chars in a single pass. For example (a we don’t know if open bracket is valid or not.
The natural idea would be to use a Stack somehow, but it is unknown how to deal with letters then.
For this example: (a))a, we know that the second closing parenthesis is invalid, so the problem is straighforward. Now the trick is to reverse the problem for this case: (a -> a).
Approach
How many lines of code can you save?
Complexity
-
Time complexity: \(O(n)\)
-
Space complexity: \(O(n)\)
Code
fun minRemoveToMakeValid(s: String) = buildString {
var open = 0
for (c in s) {
if (c == '(') open++
if (c == ')') open--
if (open >= 0) append(c)
open = max(0, open)
}
for (i in length - 1 downTo 0) if (get(i) == '(') {
if (--open < 0) break
deleteAt(i)
}
}
pub fn min_remove_to_make_valid(s: String) -> String {
let (mut open, mut res) = (0, vec![]);
for b in s.bytes() {
if b == b'(' { open += 1 }
if b == b')' { open -= 1 }
if open >= 0 { res.push(b) }
open = open.max(0)
}
for i in (0..res.len()).rev() {
if open == 0 { break }
if res[i] == b'(' {
res.remove(i);
open -= 1
}
}
String::from_utf8(res).unwrap()
}
05.04.2024
1544. Make The String Great easy blog post substack youtube

Join me on Telegram
https://t.me/leetcode_daily_unstoppable/561
Problem TLDR
Remove lowercase-uppercase pairs #easy
Intuition
Consider example:
EbBe
**
E e
After removing the middle bB we have to consider the remaining Ee. We can use Stack to do that.
Approach
In Kotlin: no need for Stack, just use StringBuilder.
In Rust: Vec can be used as a Stack. There is no to_lowercase method returning a char, however there is a to_ascii_lowercase.
Complexity
-
Time complexity: \(O(n)\)
-
Space complexity: \(O(n)\)
Code
fun makeGood(s: String) = buildString {
for (c in s)
if (length > 0 && c != get(lastIndex) &&
c.lowercase() == get(lastIndex).lowercase()
) setLength(lastIndex) else append(c)
}
pub fn make_good(s: String) -> String {
let mut stack = vec![];
for c in s.chars() {
if stack.is_empty() { stack.push(c) }
else {
let p = *stack.last().unwrap();
if c != p && c.to_lowercase().eq(p.to_lowercase()) {
stack.pop();
} else { stack.push(c) }
}
}
stack.iter().collect()
}
04.04.2024
1614. Maximum Nesting Depth of the Parentheses easy
blog post
substack
youtube
Join me on Telegram
https://t.me/leetcode_daily_unstoppable/560
Problem TLDR
Max nested parenthesis #easy
Intuition
No special intuition, just increase or decrease a counter.
Approach
- There is a
maxOfin Kotlin, but solution is not pure functional. It can be withfold.
Complexity
-
Time complexity: \(O(n)\)
-
Space complexity: \(O(1)\)
Code
fun maxDepth(s: String): Int {
var curr = 0
return s.maxOf {
if (it == '(') curr++
if (it == ')') curr--
curr
}
}
pub fn max_depth(s: String) -> i32 {
let (mut curr, mut max) = (0, 0);
for b in s.bytes() {
if b == b'(' { curr += 1 }
if b == b')' { curr -= 1 }
max = max.max(curr)
}
max
}
03.04.2024
79. Word Search medium
blog post
substack
youtube

Join me on Telegram
https://t.me/leetcode_daily_unstoppable/559
Problem TLDR
Does grid have a word path? #medium
Intuition
Simple Depth-First Search for every starting point will give the answer. One trick is to store visited set in a grid itself.
Approach
- Use dummy char to mark visited in a path.
- Don’t forget to restore back.
- Only mark visited right before traveling to the next to avoid failing at restoring.
Complexity
-
Time complexity: \(O(n3^n)\), n is a grid area
-
Space complexity: \(O(n)\)
Code
fun exist(board: Array<CharArray>, word: String): Boolean {
fun dfs(x: Int, y: Int, i: Int): Boolean {
if (i == word.length) return true
if (x !in 0..<board[0].size || y !in 0..<board.size) return false
val c = board[y][x]
if (c != word[i]) return false
board[y][x] = '.'
val res = dfs(x - 1, y, i + 1) || dfs(x + 1, y, i + 1)
|| dfs(x, y - 1, i + 1) || dfs(x, y + 1, i + 1)
board[y][x] = c
return res
}
for (y in 0..<board.size) for (x in 0..<board[0].size)
if (dfs(x, y, 0)) return true
return false
}
pub fn exist(mut board: Vec<Vec<char>>, word: String) -> bool {
fn dfs(mut board: &mut Vec<Vec<char>>, word: &String, x: i32, y: i32, i: usize) -> bool {
if i == word.len() { return true }
if x < 0 || y < 0 || x == board[0].len() as i32 || y == board.len() as i32 { return false }
let c = board[y as usize][x as usize];
if c as u8 != word.as_bytes()[i] { return false }
board[y as usize][x as usize] = '.';
let res =
dfs(board, word, x - 1, y, i + 1) || dfs(board, word, x + 1, y, i + 1) ||
dfs(board, word, x, y - 1, i + 1) || dfs(board, word, x, y + 1, i + 1);
board[y as usize][x as usize] = c; res
}
let (n, m) = (board.len() as i32, board[0].len() as i32);
for y in 0..n { for x in 0..m {
if dfs(&mut board, &word, x, y, 0) { return true }
}}
false
}
02.04.2024
205. Isomorphic Strings easy
blog post
substack
youtube
Join me on Telegram
https://t.me/leetcode_daily_unstoppable/558
Problem TLDR
Can map chars from one string to another? #easy
Intuition
Let’s check if previous mapping is the same, otherwise result is false
Approach
We can use a HashMap or a simple [128] array.
Complexity
-
Time complexity: \(O(n)\)
-
Space complexity: \(O(w)\),
wis an alphabet or O(1)
Code
fun isIsomorphic(s: String, t: String): Boolean {
val map = mutableMapOf<Char, Char>()
val map2 = mutableMapOf<Char, Char>()
for ((i, c) in s.withIndex()) {
if (map[c] != null && map[c] != t[i]) return false
map[c] = t[i]
if (map2[t[i]] != null && map2[t[i]] != c) return false
map2[t[i]] = c
}
return true
}
pub fn is_isomorphic(s: String, t: String) -> bool {
let mut m1 = vec![0; 128]; let mut m2 = m1.clone();
for i in 0..s.len() {
let c1 = s.as_bytes()[i] as usize;
let c2 = t.as_bytes()[i] as usize;
if m1[c1] > 0 && m1[c1] != c2 { return false }
if m2[c2] > 0 && m2[c2] != c1 { return false }
m1[c1] = c2; m2[c2] = c1
}
return true
}
01.04.2024
58. Length of Last Word easy
blog post
substack
youtube
Join me on Telegram
https://t.me/leetcode_daily_unstoppable/557
Problem TLDR
Last word length #easy
Intuition
There are many ways, let’s try to write an efficient solution. Iterate from the end, stop after the first word.
Approach
In Kotlin we can use first, takeWhile and count.
In Rust let’s to write a simple for loop over bytes.
Complexity
-
Time complexity: \(O(w + b)\), where
wis a last word length, andbsuffix blank space length -
Space complexity: \(O(1)\)
Code
fun lengthOfLastWord(s: String) =
((s.lastIndex downTo 0).first { s[it] > ' ' } downTo 0)
.asSequence().takeWhile { s[it] > ' ' }.count()
pub fn length_of_last_word(s: String) -> i32 {
let mut c = 0;
for b in s.bytes().rev() {
if b > b' ' { c += 1 } else if c > 0 { return c }
}
c
}
31.03.2024
2444. Count Subarrays With Fixed Bounds hard
blog post
substack
youtube

Join me on Telegram
https://t.me/leetcode_daily_unstoppable/555
Problem TLDR
Count subarrays of range minK..maxK #hard
Intuition
“all hope abandon ye who enter here”
I’ve failed this question the second time (first was 1 year ago), and still find it very clever.
Consider the safe space as min(a, b)..max(a,b) where a is the last index of minK and b is the last index of maxK. We will remove suffix of 0..j where j is a last out of range minK..maxK.
Let’s examine the trick:
// 1 3 5 2 7 5 1..5
//j
//a
//b
// i
// a
// i
// i
// b +1 = min(a, b) - j = (0 - (-1))
// i +1 = ...same...
another example:
// 0 1 2 3 4 5 6
// 7 5 2 2 5 5 1
//j .
//i .
//a
//b
// i .
// j .
// i .
// b .
// i .
// a . +1
// i
// a +1
// i
// b +3 = 3 - 0
// i
// b +3
The interesting part happen at the index i = 4: it will update the min(a, b), making it a = 3.
Basically, every subarray starting between j..(min(a, b)) and ending at i will have minK and maxK, as min(a,b)..max(a,b) will have them.
Approach
Try to solve it yourself first.
Complexity
-
Time complexity: \(O(n)\)
-
Space complexity: \(O(1)\)
Code
fun countSubarrays(nums: IntArray, minK: Int, maxK: Int): Long {
var res = 0L; var a = -1; var j = -1; var b = -1
for ((i, n) in nums.withIndex()) {
if (n == minK) a = i
if (n == maxK) b = i
if (n !in minK..maxK) j = i
res += max(0, min(a, b) - j)
}
return res
}
pub fn count_subarrays(nums: Vec<i32>, min_k: i32, max_k: i32) -> i64 {
let (mut res, mut a, mut b, mut j) = (0, -1, -1, -1);
for (i, &n) in nums.iter().enumerate() {
if n == min_k { a = i as i64 }
if n == max_k { b = i as i64 }
if n < min_k || n > max_k { j = i as i64 }
res += (a.min(b) - j).max(0)
}
res
}
30.03.2024
992. Subarrays with K Different Integers hard
blog post
substack
youtube

Join me on Telegram
https://t.me/leetcode_daily_unstoppable/554
Problem TLDR
Count subarrays with k distinct numbers #hard
Intuition
We surely can count at most k numbers using sliding window technique: move the right pointer one step at a time, adjust the left pointer until condition met. All subarrays start..k where start in 0..j will have more or equal than k number of distincts if j..k have exatly k of them, so take j at each step.
To count exactly k we can remove subset of at least k from at least k - 1. (The trick here is that the number of at least k - 1 is the bigger one)
Approach
Let’s use a HashMap and some languages sugar:
- Kotlin:
sumOf - Rust: lambda to capture the parameters,
entry.or_insert
Complexity
-
Time complexity: \(O(n)\)
-
Space complexity: \(O(n)\), we have a frequencies stored in a map, can be up to
n
Code
fun subarraysWithKDistinct(nums: IntArray, k: Int): Int {
fun countAtLeast(k: Int): Int {
val freq = mutableMapOf<Int, Int>()
var j = 0; var count = 0
return nums.indices.sumOf { i ->
freq[nums[i]] = 1 + (freq[nums[i]] ?: 0)
if (freq[nums[i]] == 1) count++
while (count > k) {
freq[nums[j]] = freq[nums[j]]!! - 1
if (freq[nums[j++]] == 0) count--
}
j
}
}
return countAtLeast(k - 1) - countAtLeast(k)
}
pub fn subarrays_with_k_distinct(nums: Vec<i32>, k: i32) -> i32 {
let count_at_least = |k: i32| -> i32 {
let (mut freq, mut j, mut count) = (HashMap::new(), 0, 0);
(0..nums.len()).map(|i| {
*freq.entry(&nums[i]).or_insert(0) += 1;
if freq[&nums[i]] == 1 { count += 1 }
while count > k {
*freq.get_mut(&nums[j]).unwrap() -= 1;
if freq[&nums[j]] == 0 { count -= 1}
j += 1;
}
j as i32
}).sum()
};
count_at_least(k - 1) - count_at_least(k)
}
29.03.2024
2962. Count Subarrays Where Max Element Appears at Least K Times medium
blog post
substack
youtube

Join me on Telegram
https://t.me/leetcode_daily_unstoppable/553
Problem TLDR
Count subarrays with at least k array max in #medium
Intuition
Let’s observe an example 1 3 3:
// inverse the problem
// [1], [3], [3], [1 3], [1 3 3], [3 3] // 6
// 1 3 3 ck c
// j .
// i . 1
// i 1 3
// i 2
// j
// j 1 4
// 6-4=2
The problem is more simple if we invert it: count subarrays with less than k maximums. Then it is just a two-pointer problem: increase by one, then shrink until condition < k met.
Another way, is to solve problem at face: left border is the count we need - all subarrays before our j..i will have k max elements if j..i have them.
Approach
Let’s implement both.
Complexity
-
Time complexity: \(O(n)\)
-
Space complexity: \(O(1)\)
Code
fun countSubarrays(nums: IntArray, k: Int): Long {
val n = nums.size.toLong()
val m = nums.max(); var ck = 0; var j = 0
return n * (n + 1) / 2 + nums.indices.sumOf { i ->
if (nums[i] == m) ck++
while (ck >= k) if (nums[j++] == m) ck--
-(i - j + 1).toLong()
}
}
pub fn count_subarrays(nums: Vec<i32>, k: i32) -> i64 {
let (mut j, mut curr, m) = (0, 0, *nums.iter().max().unwrap());
(0..nums.len()).map(|i| {
if nums[i] == m { curr += 1 }
while curr >= k { if nums[j] == m { curr -= 1 }; j += 1 }
j as i64
}).sum()
}
28.03.2024
2958. Length of Longest Subarray With at Most K Frequency medium
blog post
substack
youtube

Join me on Telegram
https://t.me/leetcode_daily_unstoppable/552
Problem TLDR
Max subarray length with frequencies <= k #medium
Intuition
There is a known sliding window pattern: right pointer will increase the frequency and left pointer will decrease it. Not try to expand as much as possible, then shrink until conditions are met.
Approach
- move the right pointer one position at a time
- we can use
maxOfin Kotlin ormaxin Rust
Complexity
-
Time complexity: \(O(n)\)
-
Space complexity: \(O(n)\)
Code
fun maxSubarrayLength(nums: IntArray, k: Int): Int {
val freq = mutableMapOf<Int, Int>(); var j = 0
return nums.indices.maxOf { i ->
freq[nums[i]] = 1 + (freq[nums[i]] ?: 0)
while (freq[nums[i]]!! > k)
freq[nums[j]] = freq[nums[j++]]!! - 1
i - j + 1
}
}
pub fn max_subarray_length(nums: Vec<i32>, k: i32) -> i32 {
let (mut freq, mut j) = (HashMap::new(), 0);
(0..nums.len()).map(|i| {
*freq.entry(nums[i]).or_insert(0) += 1;
while freq[&nums[i]] > k {
*freq.get_mut(&nums[j]).unwrap() -= 1; j += 1
}
i - j + 1
}).max().unwrap() as i32
}
27.03.2024
713. Subarray Product Less Than K medium
blog post
substack
youtube
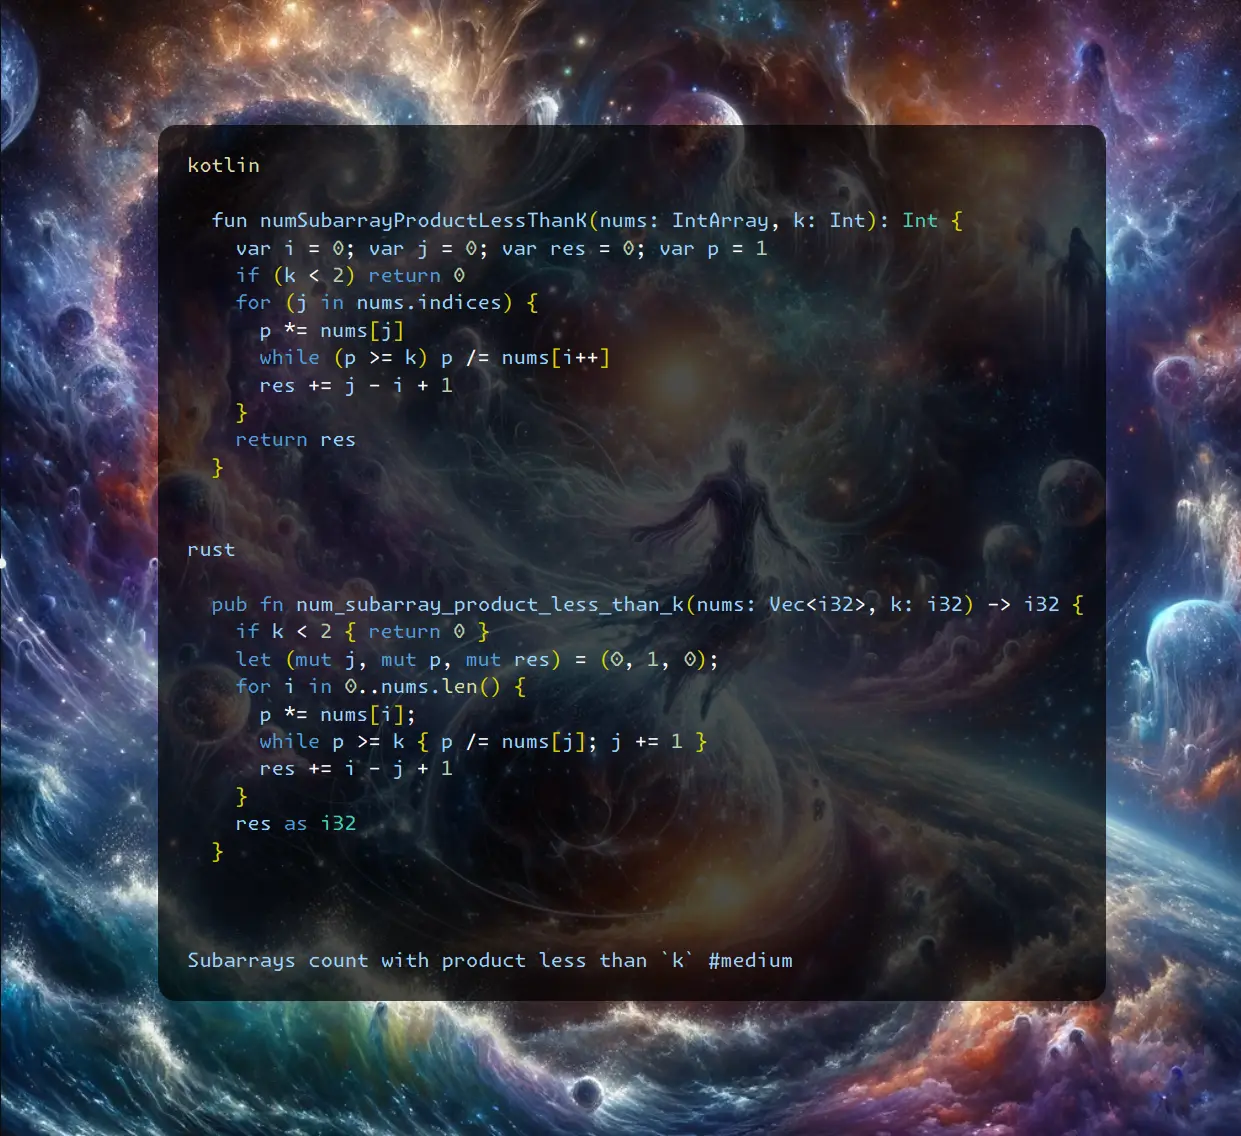
Join me on Telegram
https://t.me/leetcode_daily_unstoppable/551
Problem TLDR
Subarrays count with product less than k #medium
Intuition
Let’s try to use two pointers and move them only once:
// 10 5 2 6 1 1 1 cnt
// i 10 1
// j
// * j 50 +5 3
// * j (100) +2 4
// i 10 5
// * * j 60 +6 7
// * * * j 60 +1 9
// * * * * j 60 +1 11
// * * * * * j 60 +1 13
// i * * * * 12 +1 15
// i * * * 6 +1 17
// i * * 1 +1 19
// i * 1 +1 21
// i 1 +1 23
As we notice, this way gives the correct answer. Expand the first pointer while p < k, then shrink the second pointer.
Approach
Next, some tricks:
- move the right pointer once at a time
- move the second until conditions are met
- adding
(i - j)helps to avoid moving the left pointer - if we handle the corner cases of
k = 0andk = 1, we can use some optimizations:nums[j]will always be less thankafterwhileloop; andiwill always be less thaniin awhileloop.
Complexity
-
Time complexity: \(O(n)\)
-
Space complexity: \(O(1)\)
Code
fun numSubarrayProductLessThanK(nums: IntArray, k: Int): Int {
var i = 0; var j = 0; var res = 0; var p = 1
if (k < 2) return 0
for (j in nums.indices) {
p *= nums[j]
while (p >= k) p /= nums[i++]
res += j - i + 1
}
return res
}
pub fn num_subarray_product_less_than_k(nums: Vec<i32>, k: i32) -> i32 {
if k < 2 { return 0 }
let (mut j, mut p, mut res) = (0, 1, 0);
for i in 0..nums.len() {
p *= nums[i];
while p >= k { p /= nums[j]; j += 1 }
res += i - j + 1
}
res as i32
}
26.03.2024
41. First Missing Positive hard
blog post
substack
youtube
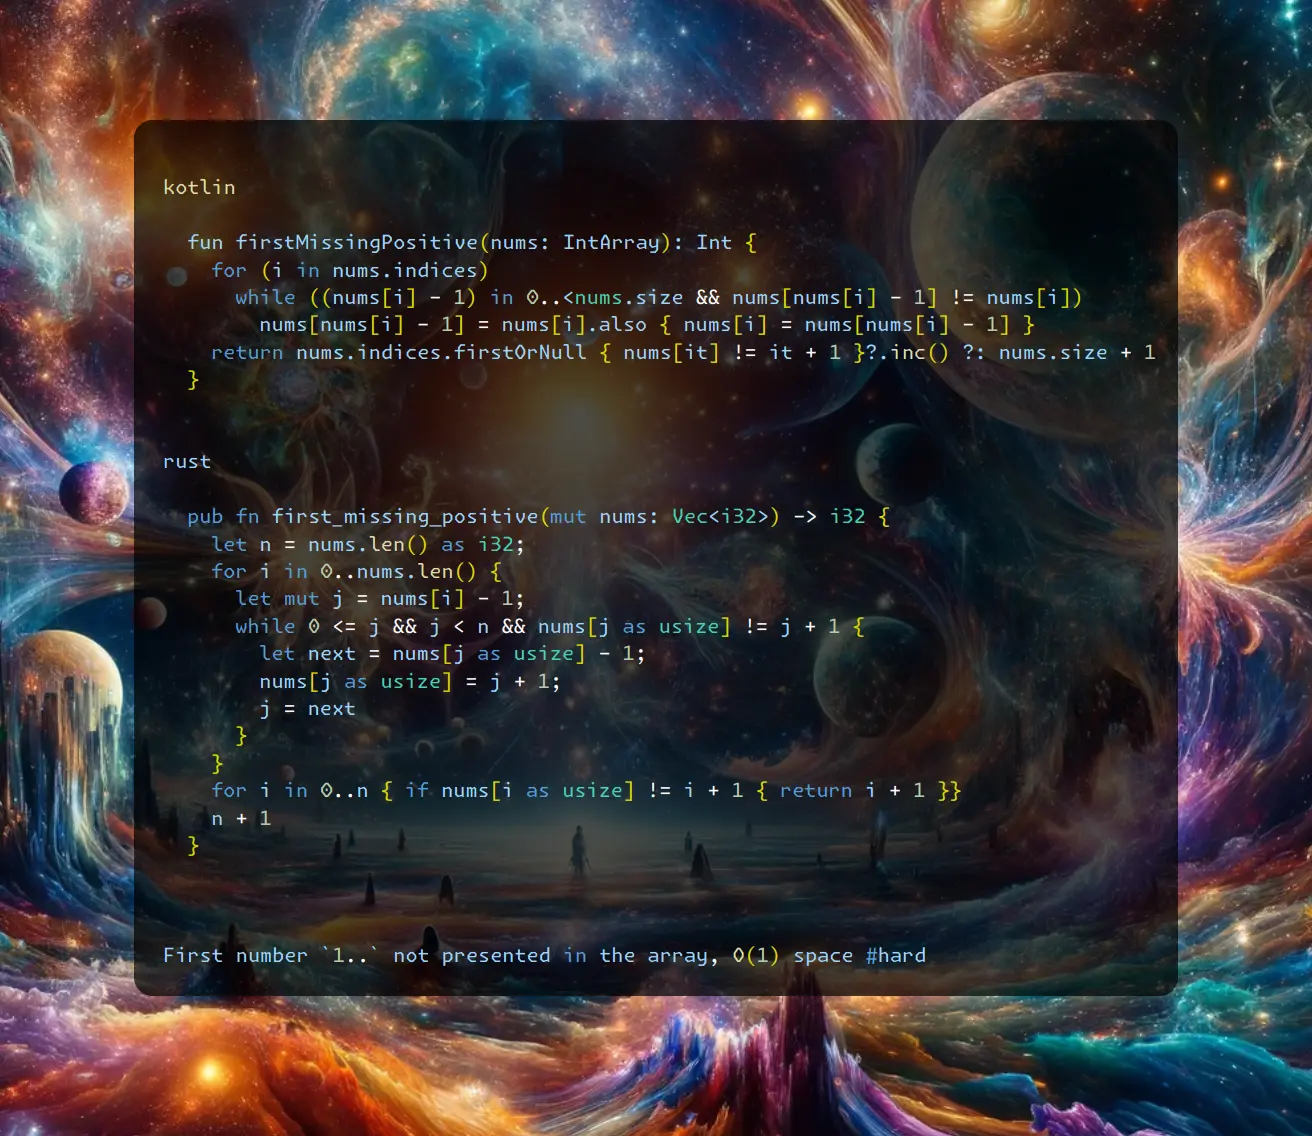
Join me on Telegram
https://t.me/leetcode_daily_unstoppable/550
Problem TLDR
First number 1.. not presented in the array, O(1) space #hard
Intuition
Let’s observe some examples. The idea is to use the array itself, as there is no restriction to modify it:
/*
1 -> 2 -> 3 ...
0 1 2
1 2 0
* 0->1->2->0
0 1 2
0 1 2 3
3 4 -1 1
* 0 -> 3, 3 -> 1, 1 -> 4
0 1 3 4
* 2 -> -1
7 8 9 11 12 1->
*/
We can use the indices of array: every present number must be placed at it’s index. As numbers are start from 1, we didn’t care about anything bigger than nums.size.
Approach
- careful with of-by-one’s,
1must be placed at 0 index and so on.
Complexity
-
Time complexity: \(O(n)\), at most twice if all numbers are present in array
-
Space complexity: \(O(1)\)
Code
fun firstMissingPositive(nums: IntArray): Int {
for (i in nums.indices)
while ((nums[i] - 1) in 0..<nums.size && nums[nums[i] - 1] != nums[i])
nums[nums[i] - 1] = nums[i].also { nums[i] = nums[nums[i] - 1] }
return nums.indices.firstOrNull { nums[it] != it + 1 }?.inc() ?: nums.size + 1
}
pub fn first_missing_positive(mut nums: Vec<i32>) -> i32 {
let n = nums.len() as i32;
for i in 0..nums.len() {
let mut j = nums[i] - 1;
while 0 <= j && j < n && nums[j as usize] != j + 1 {
let next = nums[j as usize] - 1;
nums[j as usize] = j + 1;
j = next
}
}
for i in 0..n { if nums[i as usize] != i + 1 { return i + 1 }}
n + 1
}
25.03.2024
442. Find All Duplicates in an Array medium
blog post
substack
youtube

Join me on Telegram
https://t.me/leetcode_daily_unstoppable/549
Problem TLDR
All duplicate numbers of 1..n using O(1) memory #medium
Intuition
There are no restrictions not to modify the input array, so let’s flat all visited numbers with a negative sign:
// 1 2 3 4 5 6 7 8
// 4 3 2 7 8 2 3 1
// * -
// * -
// - *
// * -
// * -
// - * --2
// - * --3
// - *
Inputs are all positive, the corner cases of negatives and zeros are handled.
Approach
- don’t forget to
abs - Rust didn’t permit to iterate and modify at the same time, use pointers
Complexity
-
Time complexity: \(O(n)\)
-
Space complexity: \(O(1)\)
Code
fun findDuplicates(nums: IntArray) = buildList {
for (x in nums) {
if (nums[abs(x) - 1] < 0) add(abs(x))
nums[abs(x) - 1] *= -1
}
}
pub fn find_duplicates(mut nums: Vec<i32>) -> Vec<i32> {
let mut res = vec![];
for j in 0..nums.len() {
let i = (nums[j].abs() - 1) as usize;
if nums[i] < 0 { res.push(nums[j].abs()) }
nums[i] *= -1
}
res
}
24.03.2024
287. Find the Duplicate Number medium
blog post
substack
youtube
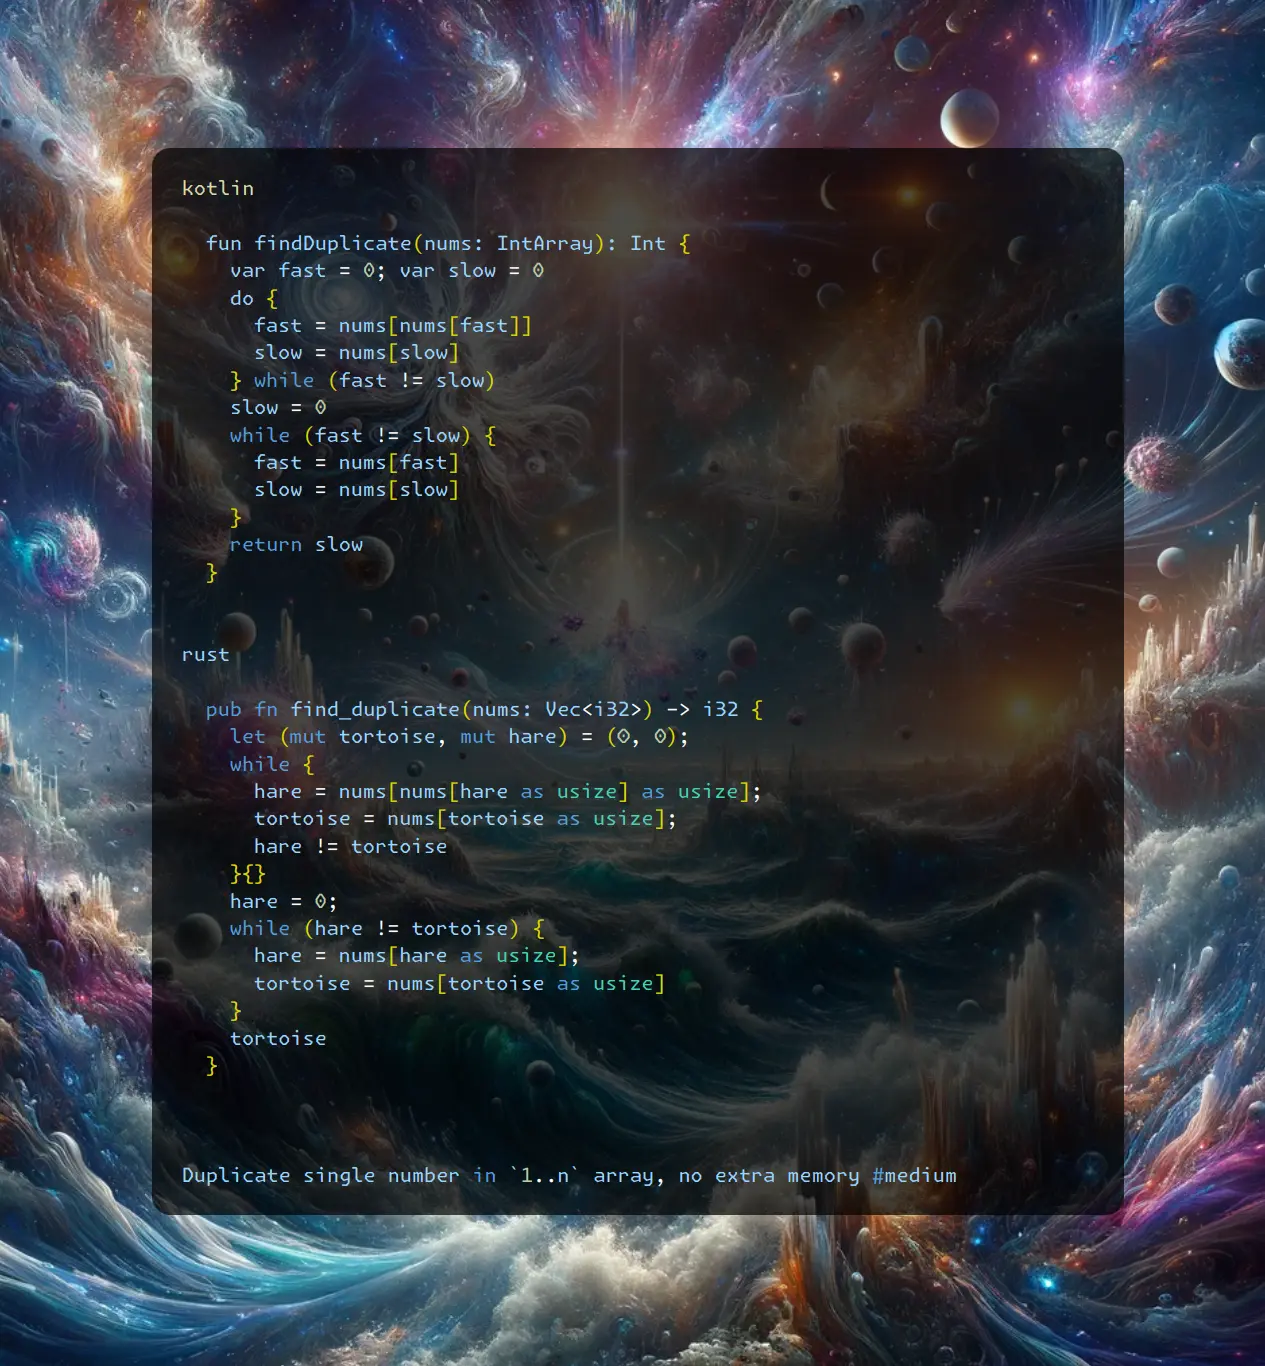
Join me on Telegram
https://t.me/leetcode_daily_unstoppable/548
Problem TLDR
Duplicate single number in 1..n array, no extra memory #medium
Intuition
The idea of existing cycle would come to mind after some hitting your head against the wall. The interesting fact is we must find the node that is not a port of the cycle: so the meeting point will be our answer:
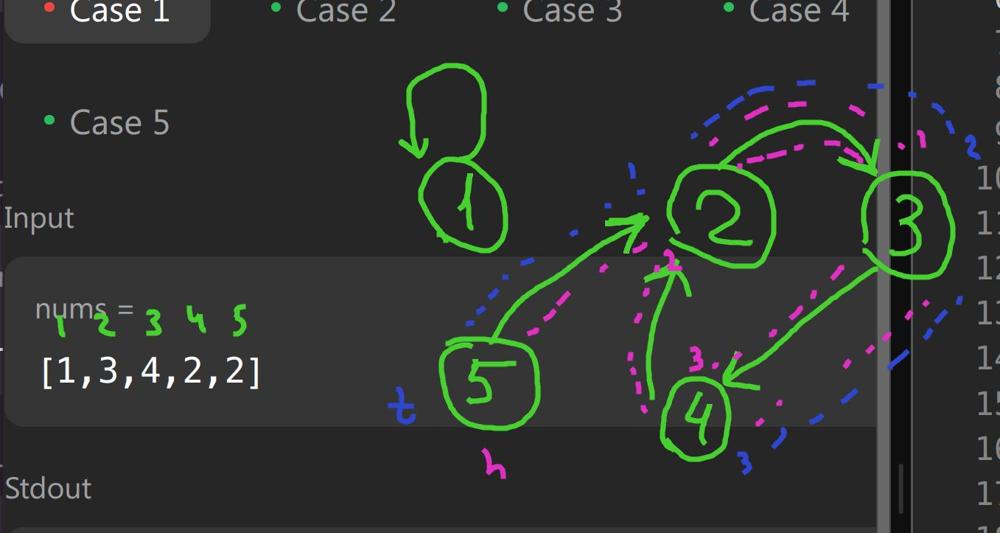 Now the clever trick is we can treat
 node 0 as this external node:
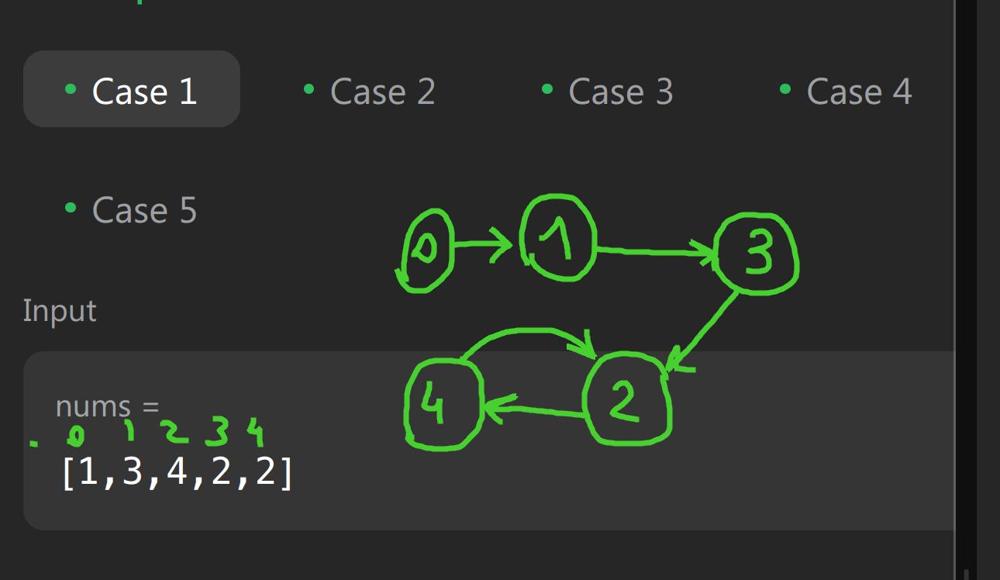 This will coincidentally make our code much cleaner, I think this was the intention of the question authors.
Approach
Draw some circles and arrows, walk the algorithm with your hands. To find the meeting point you must reset one pointer to the start.
- The Rust’s
do-while-doloop is perfectly legal https://programming-idioms.org/idiom/78/do-while-loop/795/rust
Complexity
-
Time complexity: \(O(n)\)
-
Space complexity: \(O(1)\)
Code
fun findDuplicate(nums: IntArray): Int {
var fast = 0; var slow = 0
do {
fast = nums[nums[fast]]
slow = nums[slow]
} while (fast != slow)
slow = 0
while (fast != slow) {
fast = nums[fast]
slow = nums[slow]
}
return slow
}
pub fn find_duplicate(nums: Vec<i32>) -> i32 {
let (mut tortoise, mut hare) = (0, 0);
while {
hare = nums[nums[hare as usize] as usize];
tortoise = nums[tortoise as usize];
hare != tortoise
}{}
hare = 0;
while (hare != tortoise) {
hare = nums[hare as usize];
tortoise = nums[tortoise as usize]
}
tortoise
}
23.03.2024
143. Reorder List medium
blog post
substack
youtube
Join me on Telegram
https://t.me/leetcode_daily_unstoppable/547
Problem TLDR
Reorder Linked List 1->2->3->4->5 -> 1->5->2->4->3 #medium
Intuition
There are no special hints here. However, the optimal solution will require some tricks:
- use Tortoise And Hare algorithm to find the middle
- reverse the second half
- merge two lists
Approach
- Tortoise And Hare: check
fast.next != nullto stop right at the middle - merge lists cleverly: always one into another and swap the points (don’t do this on the interview however, not from the start at least)
- Rust: just gave up and implemented
clone()-solution, sorry
Complexity
-
Time complexity: \(O(n)\)
-
Space complexity: \(O(1)\), O(n) for my Rust solution. There are O(1) solutions exists on the leetcode.
Code
fun reorderList(head: ListNode?): Unit {
var s = head; var f = s
while (f?.next != null) {
f = f?.next?.next
s = s?.next
}
f = null
while (s != null) {
val next = s.next
s.next = f
f = s
s = next
}
s = head
while (s != null) {
val next = s.next
s.next = f
s = f
f = next
}
}
pub fn reorder_list(mut head: &mut Option<Box<ListNode>>) {
let (mut f, mut s, mut c) = (head.clone(), head.clone(), 0);
while f.is_some() && f.as_mut().unwrap().next.is_some() {
f = f.unwrap().next.unwrap().next;
s = s.unwrap().next; c += 1
}
if c < 1 { return }
let mut prev = None;
while let Some(mut s_box) = s {
let next = s_box.next;
s_box.next = prev;
prev = Some(s_box);
s = next;
}
let mut s = head;
while let Some(mut s_box) = s.take() {
let next = s_box.next;
if prev.is_none() && !f.is_some() || next.is_none() && f.is_some() {
s_box.next = None;
return;
}
s_box.next = prev;
s = &mut s.insert(s_box).next;
prev = next;
}
}
22.03.2024
234. Palindrome Linked List easy
blog post
substack
youtube

Problem TLDR
Is Linked List a palindrome #easy
Intuition
Find the middle using tortoise and hare algorithm and reverse it simultaneously.
Approach
- the corners case is to detect
oddorevencount of nodes and do the extra move - gave up on the Rust solution without
clone()
Complexity
-
Time complexity: \(O(n)\)
-
Space complexity: \(O(1)\), O(n) in Rust
Code
fun isPalindrome(head: ListNode?): Boolean {
var fast = head; var slow = head
var prev: ListNode? = null
while (fast?.next != null) {
fast = fast?.next?.next
val next = slow?.next
slow?.next = prev
prev = slow
slow = next
}
if (fast != null) slow = slow?.next
while (prev != null && prev?.`val` == slow?.`val`)
prev = prev?.next.also { slow = slow?.next }
return prev == null
}
pub fn is_palindrome(head: Option<Box<ListNode>>) -> bool {
let (mut fast, mut slow, mut prev) = (head.clone(), head, None);
while fast.is_some() && fast.as_ref().unwrap().next.is_some() {
fast = fast.unwrap().next.unwrap().next;
let mut slow_box = slow.unwrap();
let next = slow_box.next;
slow_box.next = prev;
prev = Some(slow_box);
slow = next
}
if fast.is_some() { slow = slow.unwrap().next }
while let Some(prev_box) = prev {
let slow_box = slow.unwrap();
if prev_box.val != slow_box.val { return false }
prev = prev_box.next; slow = slow_box.next
}; true
}
21.03.2024
206. Reverse Linked List easy
blog post
substack
youtube
Join me on Telegram
https://t.me/leetcode_daily_unstoppable/545
Problem TLDR
Reverse a Linked List #easy
Intuition
We need at least two pointers to store current node and previous.
Approach
In a recursive approach:
- treat result as a new head
- erase the link to the next
- next.next must point to the current
Complexity
-
Time complexity: \(O(n)\)
-
Space complexity: \(O(1)\) or log(n) for the recursion
Code
fun reverseList(head: ListNode?): ListNode? =
head?.next?.let { next ->
head.next = null
reverseList(next).also { next?.next = head }
} ?: head
pub fn reverse_list(mut head: Option<Box<ListNode>>) -> Option<Box<ListNode>> {
let mut curr = head; let mut prev = None;
while let Some(mut curr_box) = curr {
let next = curr_box.next;
curr_box.next = prev;
prev = Some(curr_box);
curr = next;
}
prev
}
Bonus: just a single pointer solution
fun reverseList(head: ListNode?): ListNode? {
var prev = head
while (head?.next != null) {
val next = head?.next?.next
head?.next?.next = prev
prev = head?.next
head?.next = next
}
return prev
}
20.03.2024
1669. Merge In Between Linked Lists medium
blog post
substack
youtube

Join me on Telegram
https://t.me/leetcode_daily_unstoppable/544
Problem TLDR
Replace a segment in a LinkedList #medium
Intuition
Just careful pointers iteration.
Approach
- use dummy to handle the first node removal
- better to write a separate cycles
- Rust is hard
Complexity
-
Time complexity: \(O(n)\)
-
Space complexity: \(O(1)\)
Code
fun mergeInBetween(list1: ListNode?, a: Int, b: Int, list2: ListNode?) =
ListNode(0).run {
next = list1
var curr: ListNode? = this
for (i in 1..a) curr = curr?.next
var after = curr?.next
for (i in a..b) after = after?.next
curr?.next = list2
while (curr?.next != null) curr = curr?.next
curr?.next = after
next
}
pub fn merge_in_between(list1: Option<Box<ListNode>>, a: i32, b: i32, list2: Option<Box<ListNode>>) -> Option<Box<ListNode>> {
let mut dummy = Box::new(ListNode::new(0));
dummy.next = list1;
let mut curr = &mut dummy;
for _ in 0..a { curr = curr.next.as_mut().unwrap() }
let mut after = &mut curr.next;
for _ in a..=b { after = &mut after.as_mut().unwrap().next }
let after_b = after.take(); // Detach the rest of the list after `b`, this will allow the next line for the borrow checker
curr.next = list2;
while let Some(ref mut next) = curr.next { curr = next; }
curr.next = after_b;
dummy.next
}
19.03.2024
621. Task Scheduler medium
blog post
substack
youtube
 https://youtu.be/8t1KNa9iZjA
Join me on Telegram
https://t.me/leetcode_daily_unstoppable/543
Problem TLDR
Count CPU cycles if task can’t run twice in n cycles #medium
Intuition
Let’s try to understand the problem first, by observing the example:
// 0 1 2 3 4 5 6 7
// a a a b b b c d n = 3
// a . . . a . . . a
// b . . . b . . . b
// c d i i
One inefficient way is to take tasks by thier frequency, store availability and adjust cycle forward if no task available. This solution will take O(n) time but with big constant of iterating and sorting the frequencies [26] array.
The clever way is to notice the pattern of how tasks are: there are empty slots between the most frequent task(s).
Approach
In the interview I would choose the first way.
Complexity
-
Time complexity: \(O(n)\)
-
Space complexity: \(O(1)\)
Code
fun leastInterval(tasks: CharArray, n: Int): Int {
val f = IntArray(128); for (c in tasks) f[c.code]++
val maxFreq = f.max()
val countOfMaxFreq = f.count { it == maxFreq }
val slotSize = n - (countOfMaxFreq - 1)
val slotsCount = (maxFreq - 1) * slotSize
val otherTasks = tasks.size - maxFreq * countOfMaxFreq
val idles = max(0, slotsCount - otherTasks)
return tasks.size + idles
}
pub fn least_interval(tasks: Vec<char>, n: i32) -> i32 {
let mut f = vec![0; 128]; for &c in &tasks { f[c as usize] += 1 }
let maxFreq = f.iter().max().unwrap();
let countOfMaxFreq = f.iter().filter(|&x| x == maxFreq).count() as i32;
let slotsCount = (maxFreq - 1) * (n - countOfMaxFreq + 1);
let otherTasks = tasks.len() as i32 - maxFreq * countOfMaxFreq;
tasks.len() as i32 + (slotsCount - otherTasks).max(0)
}
18.03.2024
452. Minimum Number of Arrows to Burst Balloons medium
blog post
substack
youtube

Join me on Telegram
https://t.me/leetcode_daily_unstoppable/542
Problem TLDR
Count non-intersecting intervals #medium
Intuition
After sorting, we can line-sweep scan the intervals and count non-intersected ones.
The edge case is that the right scan border will shrink to the smallest.
[3,9],[7,12],[3,8],[6,8],[9,10],[2,9],[0,9],[3,9],[0,6],[2,8]
0..9 0..6 2..9 2..8 3..9 3..8 3..9 6..8 7..12 9..10
* - 6 - - - - - - |
Approach
Let’s do some codegolf with Kotlin
Complexity
-
Time complexity: \(O(nlog(n))\)
-
Space complexity: \(O(1)\), or O(n) with
sortedBy
Code
fun findMinArrowShots(points: Array<IntArray>): Int =
1 + points.sortedBy { it[0] }.let { p -> p.count { (from, to) ->
(from > p[0][1]).also {
p[0][1] = min(if (it) to else p[0][1], to) }}}
pub fn find_min_arrow_shots(mut points: Vec<Vec<i32>>) -> i32 {
points.sort_unstable_by_key(|p| p[0]);
let (mut shoots, mut right) = (1, points[0][1]);
for p in points {
if p[0] > right { shoots += 1; right = p[1] }
right = right.min(p[1])
}; shoots
}
17.03.2024
57. Insert Interval medium
blog post
substack
youtube

Join me on Telegram
https://t.me/leetcode_daily_unstoppable/541
Problem TLDR
Insert interval into a sorted intervals array #medium
Intuition
There are several ways to attack the problem:
- use single pointer and iterate once
- count prefix and suffix and the middle part
- same as previous, but use the Binary Search
The shortes code is prefix-suffix solution. But you will need to execute some examples to handle indices correctly. In the interview situation, it is better to start without the BinarySearch part.
Approach
To shorted the code let’s use some APIs:
- Kotlin:
asList,run,binarySearchBy - Rust:
binary_search_by_key,unwrap_or,take,chain,once
Complexity
-
Time complexity: \(O(n)\)
-
Space complexity: \(O(n)\) for the result
Code
fun insert(intervals: Array<IntArray>, newInterval: IntArray) =
intervals.asList().run {
var l = binarySearchBy(newInterval[0]) { it[1] }; if (l < 0) l = -l - 1
var r = binarySearchBy(newInterval[1] + 1) { it[0] }; if (r < 0) r = -r - 1
val min = min(newInterval[0], (getOrNull(l) ?: newInterval)[0])
val max = max(newInterval[1], (getOrNull(r - 1) ?: newInterval)[1])
(take(l) + listOf(intArrayOf(min, max)) + drop(r)).toTypedArray()
}
pub fn insert(intervals: Vec<Vec<i32>>, new_interval: Vec<i32>) -> Vec<Vec<i32>> {
let l = match intervals.binary_search_by_key(&new_interval[0], |x| x[1]) {
Ok(pos) => pos, Err(pos) => pos };
let r = match intervals.binary_search_by_key(&(new_interval[1] + 1), |x| x[0]) {
Ok(pos) => pos, Err(pos) => pos };
let min_start = new_interval[0].min(intervals.get(l).unwrap_or(&new_interval)[0]);
let max_end = new_interval[1].max(intervals.get(r - 1).unwrap_or(&new_interval)[1]);
intervals.iter().take(l).cloned()
.chain(std::iter::once(vec![min_start, max_end]))
.chain(intervals.iter().skip(r).cloned()).collect()
}
16.03.2024
525. Contiguous Array medium
blog post
substack
youtube

Join me on Telegram
https://t.me/leetcode_daily_unstoppable/540
Problem TLDR
Max length of subarray sum(0) == sum(1) #medium
Intuition
Let’s observe an example 1 0 1 0 0 1 1 0 0 1 0 0 1 0 1:
// 0 1 2 3 4 5 6 7 8 91011121314
// 1 0 1 0 0 1 1 0 0 1 0 0 1 0 1
// 1 0 1 0-1 0 1 0-1 0-1-2-1-2-1
// * *0 . . . 2
// * *1 . . . 2
// * * * *0. . . 4
// --1 . .
// * * * * * *0 . . 6
// * * * * * *1 . . 6
// * * * * * * * *0 . . 8
// . * * * *-1 . . 4
// * * * * * * * * * *0. . 10
// . * * * * * *-1 . 6
// . --2 .
// . * * * * * * * *-1 . 8
// . * *-2 2
// . * * * * * * * * * *-1 10 = 14 - 4
// 0 1 2 3 4 5 6 7 8 91011121314
Moving the pointer forward and calculating the balance (number of 0 versus number of 1), we can have compute max length up to the current position in O(1). Just store the first encounter of the balance number position.
Approach
Let’s shorten the code with:
- Kotlin:
maxOf,getOrPut - Rust:
max,entry().or_insert
Complexity
-
Time complexity: \(O(n)\)
-
Space complexity: \(O(n)\)
Code
fun findMaxLength(nums: IntArray): Int =
with (mutableMapOf<Int, Int>()) {
put(0, -1); var b = 0
nums.indices.maxOf {
b += if (nums[it] > 0) 1 else -1
it - getOrPut(b) { it }
}
}
pub fn find_max_length(nums: Vec<i32>) -> i32 {
let (mut b, mut bToInd) = (0, HashMap::new());
bToInd.insert(0, -1);
(0..nums.len() as i32).map(|i| {
b += if nums[i as usize] > 0 { 1 } else { -1 };
i - *bToInd.entry(b).or_insert(i)
}).max().unwrap()
}
15.03.2024
238. Product of Array Except Self medium
blog post
substack
youtube
Join me on Telegram
https://t.me/leetcode_daily_unstoppable/539
Problem TLDR
Array of suffix-prefix products #medium
Intuition
Observe an example:
// 1 2 3 4
// * 2*3*4
// 1 * 3*4
// 1*2 * 4
// 1*2*3 *
As we can’t use / operation, let’s precompute suffix and prefix products.
Approach
Then we can think about the space & time optimizations.
Complexity
-
Time complexity: \(O(n)\)
-
Space complexity: \(O(n)\)
Code
fun productExceptSelf(nums: IntArray): IntArray {
val suf = nums.clone()
for (i in nums.lastIndex - 1 downTo 0) suf[i] *= suf[i + 1]
var prev = 1
return IntArray(nums.size) { i ->
prev * suf.getOrElse(i + 1) { 1 }.also { prev *= nums[i] }
}
}
pub fn product_except_self(nums: Vec<i32>) -> Vec<i32> {
let n = nums.len(); let (mut res, mut p) = (vec![1; n], 1);
for i in 1..n { res[i] = nums[i - 1] * res[i - 1] }
for i in (0..n).rev() { res[i] *= p; p *= nums[i] }; res
}
14.03.2024
930. Binary Subarrays With Sum medium
blog post
substack
youtube
 https://youtu.be/C-y7qYgqqxM
Join me on Telegram
https://t.me/leetcode_daily_unstoppable/538
Problem TLDR
Count goal-sum subarrays in a 0-1 array #medium
Intuition
Let’s observe an example:
// [0,0,1,0,1,0,0,0]
//1 * * *
//2 *
//3 * *
//4 *
//5 * *
//6 * * *
//7 * *
//8 * * *
//9 * * *
//10* * * *
//11 * * * *
//12* * * * *
// 1 + 2 + 3 + 2*3
As we count possible subarrays, we see that zeros suffix and prefix matters and we can derive the math formula for them. The corner case is an all-zero array: we just take an arithmetic progression sum.
Approach
- careful with pointers, widen zeros in a separate step
- use a separate variables to count zeros
- move pointers only forward
- check yourself on the corner cases
0, 0and0, 0, 1
Complexity
-
Time complexity: \(O(n)\)
-
Space complexity: \(O(1)\)
Code
fun numSubarraysWithSum(nums: IntArray, goal: Int): Int {
var i = 0; var j = 0; var sum = 0; var res = 0
while (i < nums.size) {
sum += nums[i]
while (sum > goal && j < i) sum -= nums[j++]
if (sum == goal) {
var z1 = 0
while (i + 1 < nums.size && nums[i + 1] == 0) { i++; z1++ }
res += if (goal == 0) (z1 + 1) * (z1 + 2) / 2 else {
var z2 = 0
while (j < i && nums[j] == 0) { j++; z2++ }
1 + z1 + z2 + z1 * z2
}
}; i++
}; return res
}
pub fn num_subarrays_with_sum(nums: Vec<i32>, goal: i32) -> i32 {
let (mut i, mut j, mut sum, mut res) = (0, 0, 0, 0);
while i < nums.len() {
sum += nums[i];
while sum > goal && j < i { sum -= nums[j]; j += 1 }
if sum == goal {
let mut z1 = 0;
while i + 1 < nums.len() && nums[i + 1] == 0 { i += 1; z1 += 1 }
res += if goal == 0 { (z1 + 1) * (z1 + 2) / 2 } else {
let mut z2 = 0;
while j < i && nums[j] == 0 { j += 1; z2 += 1 }
1 + z1 + z2 + z1 * z2
}
}; i += 1
}; res
}
13.03.2024
2485. Find the Pivot Integer easy
blog post
substack
youtube

Join me on Telegram
https://t.me/leetcode_daily_unstoppable/537
Problem TLDR
Pivot of 1..n where sum[1..p] == sum[p..n]. #easy
Intuition
Let’s observe an example:
// 1 2 3 4 5 6 7 8
// 1 2 3 4 5 5 * 6 / 2 = 15
// 6 7 8 8 * 9 / 2 = 36 - 15
// p=6
// p * (p + 1) / 2 == n * (n + 1) / 2 - p * (p - 1) / 2
The left part will increase with the grown of pivot p, so we can use Binary Search in that space.
Another solution is to simplify the equation more:
// x(x + 1)/2 == n(n + 1)/2 - x(x + 1)/2 + x
// x(x + 1) - x == sum
// x^2 == sum
Given that, just check if square root is perfect.
Approach
For more robust Binary Search:
- use inclusive
loandhi - check the last condition
lo == hi - always move the boundaries:
lo = mi + 1,hi = mid - - use a separate condition to exit
Complexity
-
Time complexity: \(O(log(n))\), square root is also log(n)
-
Space complexity: \(O(1)\)
Code
fun pivotInteger(n: Int): Int {
var lo = 1; var hi = n;
while (lo <= hi) {
val p = lo + (hi - lo) / 2
val l = p * (p + 1) / 2
val r = n * (n + 1) / 2 - p * (p - 1) / 2
if (l < r) lo = p + 1 else
if (l > r) hi = p - 1 else return p
}
return -1
}
pub fn pivot_integer(n: i32) -> i32 {
let sum = n * (n + 1) / 2;
let sq = (sum as f32).sqrt() as i32;
if (sq * sq == sum) { sq } else { -1 }
}
12.03.2024
1171. Remove Zero Sum Consecutive Nodes from Linked List medium
blog post
substack
youtube

Join me on Telegram
https://t.me/leetcode_daily_unstoppable/536
Problem TLDR
Remove consequent 0-sum items from a LinkedList #medium
Intuition
Let’s calculate running sum and check if we saw it before. The corner case example:
// 1 3 2 -3 -2 5 5 -5 1
// 1 4 6 3 1 6 11 6 7
// - - - -
// x - -
// 1 5 1
We want to remove 3 2 -3 -2 but sum = 6 is yet stored in our HashMap. So we need to manually clean it. This will not increse the O(n) time complexity as we are walk at most twice.
Approach
The Rust approach is O(n^2). We operate with references like this: first .take() then insert(v) back. (solution from https://leetcode.com/discreaminant2809/)
Complexity
-
Time complexity: \(O(n)\)
-
Space complexity: \(O(n)\)
Code
fun removeZeroSumSublists(head: ListNode?): ListNode? {
val dummy = ListNode(0).apply { next = head }
val sumToNode = mutableMapOf<Int, ListNode>()
var n: ListNode? = dummy; var sum = 0
while (n != null) {
sum += n.`val`
val prev = sumToNode[sum]
if (prev != null) {
var x: ListNode? = prev.next
var s = sum
while (x != n && x != null) {
s += x.`val`
if (x == sumToNode[s]) sumToNode.remove(s)
x = x.next
}
prev.next = n.next
} else sumToNode[sum] = n
n = n.next
}
return dummy.next
}
pub fn remove_zero_sum_sublists(mut head: Option<Box<ListNode>>) -> Option<Box<ListNode>> {
let mut node_i_ref = &mut head;
'out: while let Some(mut node_i) = node_i_ref.take() {
let (mut node_j_ref, mut sum) = (&mut node_i, 0);
loop {
sum += node_j_ref.val;
if sum == 0 {
*node_i_ref = node_j_ref.next.take();
continue 'out;
}
let Some (ref mut next_node_j_ref) = node_j_ref.next else { break };
node_j_ref = next_node_j_ref;
}
node_i_ref = &mut node_i_ref.insert(node_i).next;
}
head
}
11.03.2024
791. Custom Sort String medium
blog post
substack
youtube
Join me on Telegram
https://t.me/leetcode_daily_unstoppable/535
Problem TLDR
Construct string from s using order #medium
Intuition
Two ways to solve: use sort (we need a stable sort algorithm), or use frequency.
Approach
When using sort, take care of -1 case.
When using frequency, we can use it as a counter too ( -= 1).
Complexity
-
Time complexity: \(O(n)\), or nlog(n) for sorting
-
Space complexity: \(O(n)\)
Code
fun customSortString(order: String, s: String) = s
.toMutableList()
.sortedBy { order.indexOf(it).takeIf { it >= 0 } ?: 200 }
.joinToString("")
pub fn custom_sort_string(order: String, s: String) -> String {
let (mut freq, mut res) = (vec![0; 26], String::new());
for b in s.bytes() { freq[(b - b'a') as usize] += 1 }
for b in order.bytes() {
let i = (b - b'a') as usize;
while freq[i] > 0 { freq[i] -= 1; res.push(b as char) }
}
for b in s.bytes() {
if freq[(b - b'a') as usize] > 0 { res.push(b as char) }
}; res
}
10.03.2024
349. Intersection of Two Arrays easy
blog post
substack
youtube

Join me on Telegram
https://t.me/leetcode_daily_unstoppable/534
Problem TLDR
Intersection of two nums arrays #easy
Intuition
Built-in Set has an intersect method, that will do the trick. However, as a follow up, there is a O(1) memory solution using sorting (can be done with O(1) memory https://stackoverflow.com/questions/55008384/can-quicksort-be-implemented-in-c-without-stack-and-recursion), then just use two-pointers pattern, move the lowest:
...
if nums1[i] < nums2[j] { i += 1 } else
if nums1[i] > nums2[j] { j += 1 } else {
let x = nums1[i]; res.push(x);
while (i < nums1.len() && nums1[i] == x) { i += 1 }
while (j < nums2.len() && nums2[j] == x) { j += 1 }
}
...
Approach
Let’s write shorter code, to save our own space and time by using built-in implementations.
- Rust wants
into_iterinstead ofiter, asitermakesvec<&&i32> - Rust didn’t compile without
cloned
Complexity
-
Time complexity: \(O(n)\)
-
Space complexity: \(O(n)\)
Code
fun intersection(nums1: IntArray, nums2: IntArray) =
nums1.toSet().intersect(nums2.toSet()).toIntArray()
pub fn intersection(mut nums1: Vec<i32>, mut nums2: Vec<i32>) -> Vec<i32> {
nums1.into_iter().collect::<HashSet<_>>()
.intersection(&nums2.into_iter().collect()).cloned().collect()
}
09.03.2024
2540. Minimum Common Value easy
blog post
substack
youtube
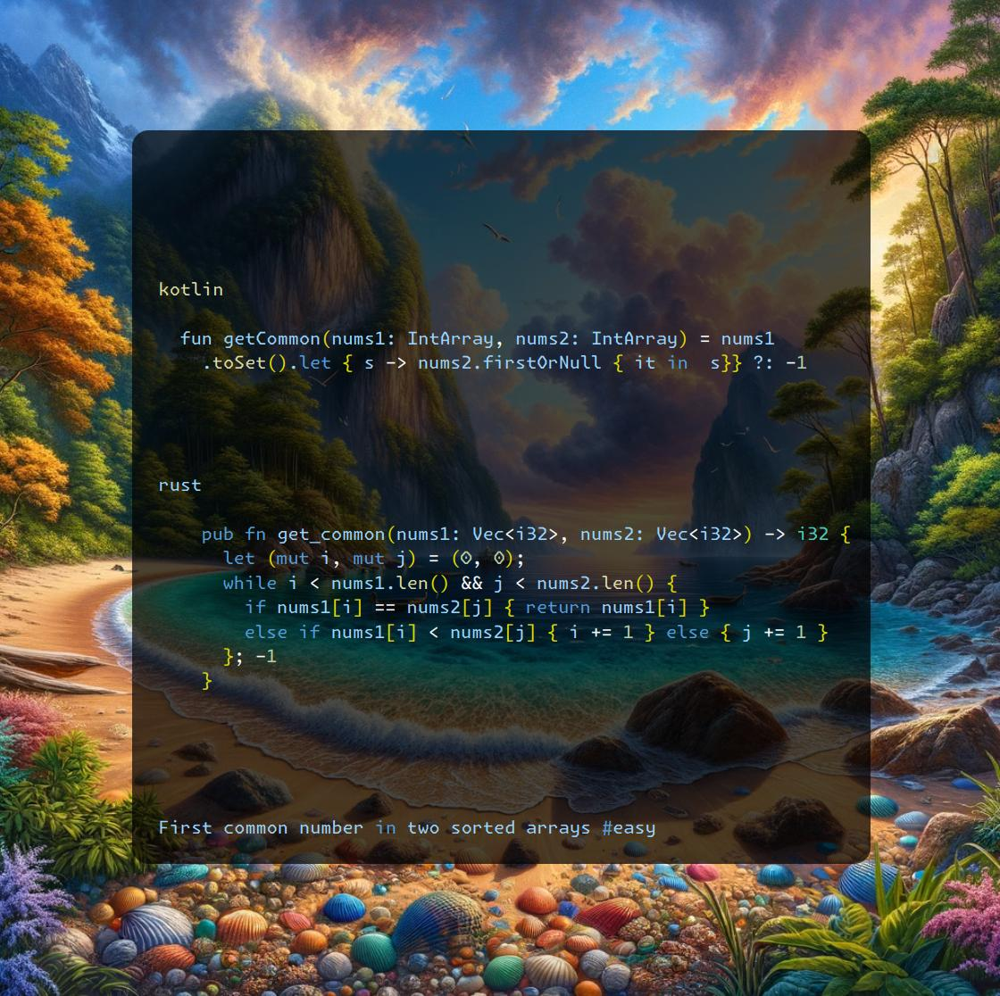
Join me on Telegram
https://t.me/leetcode_daily_unstoppable/533
Problem TLDR
First common number in two sorted arrays #easy
Intuition
There is a short solution with Set and more optimal with two pointers: move the lowest one.
Approach
Let’s implement both of them.
Complexity
-
Time complexity: \(O(n)\)
-
Space complexity: \(O(1)\), or O(n) for
Setsolution
Code
fun getCommon(nums1: IntArray, nums2: IntArray) = nums1
.toSet().let { s -> nums2.firstOrNull { it in s}} ?: -1
pub fn get_common(nums1: Vec<i32>, nums2: Vec<i32>) -> i32 {
let (mut i, mut j) = (0, 0);
while i < nums1.len() && j < nums2.len() {
if nums1[i] == nums2[j] { return nums1[i] }
else if nums1[i] < nums2[j] { i += 1 } else { j += 1 }
}; -1
}
08.03.2024
3005. Count Elements With Maximum Frequency easy
blog post
substack
youtube
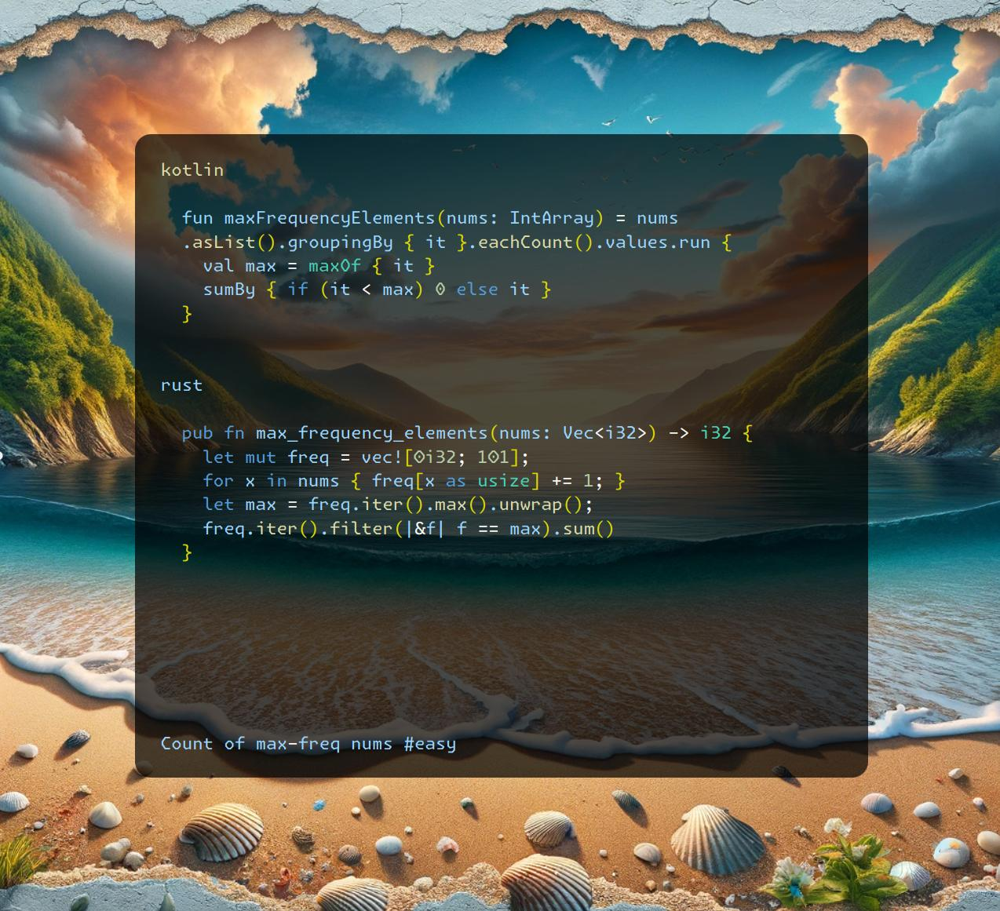
Join me on Telegram
https://t.me/leetcode_daily_unstoppable/532
Problem TLDR
Count of max-freq nums #easy
Intuition
Count frequencies, then filter by max and sum.
Approach
There are at most 100 elements, we can use array to count.
Complexity
-
Time complexity: \(O(n)\)
-
Space complexity: \(O(n)\)
Code
fun maxFrequencyElements(nums: IntArray) = nums
.asList().groupingBy { it }.eachCount().values.run {
val max = maxOf { it }
sumBy { if (it < max) 0 else it }
}
pub fn max_frequency_elements(nums: Vec<i32>) -> i32 {
let mut freq = vec![0i32; 101];
for x in nums { freq[x as usize] += 1; }
let max = freq.iter().max().unwrap();
freq.iter().filter(|&f| f == max).sum()
}
07.03.2024
876. Middle of the Linked List easy
blog post
substack
youtube

Join me on Telegram
https://t.me/leetcode_daily_unstoppable/531
Problem TLDR
Middle of the Linked List #easy
Intuition
Use Tortoise and Hare algorithm https://cp-algorithms.com/others/tortoise_and_hare.html
Approach
We can check fast.next or just fast, but careful with moving slow. Better test yourself with examples: [1], [1,2], [1,2,3], [1,2,3,4].
Complexity
-
Time complexity: \(O(n)\)
-
Space complexity: \(O(1)\)
Code
fun middleNode(head: ListNode?): ListNode? {
var s = head; var f = s
while (f?.next != null) {
f = f?.next?.next; s = s?.next
}
return s
}
pub fn middle_node(head: Option<Box<ListNode>>) -> Option<Box<ListNode>> {
let (mut s, mut f) = (head.clone(), head);
while f.is_some() {
f = f.unwrap().next;
if f.is_some() { f = f.unwrap().next; s = s.unwrap().next }
}
s
}
06.03.2024
141. Linked List Cycle easy
blog post
substack
youtube
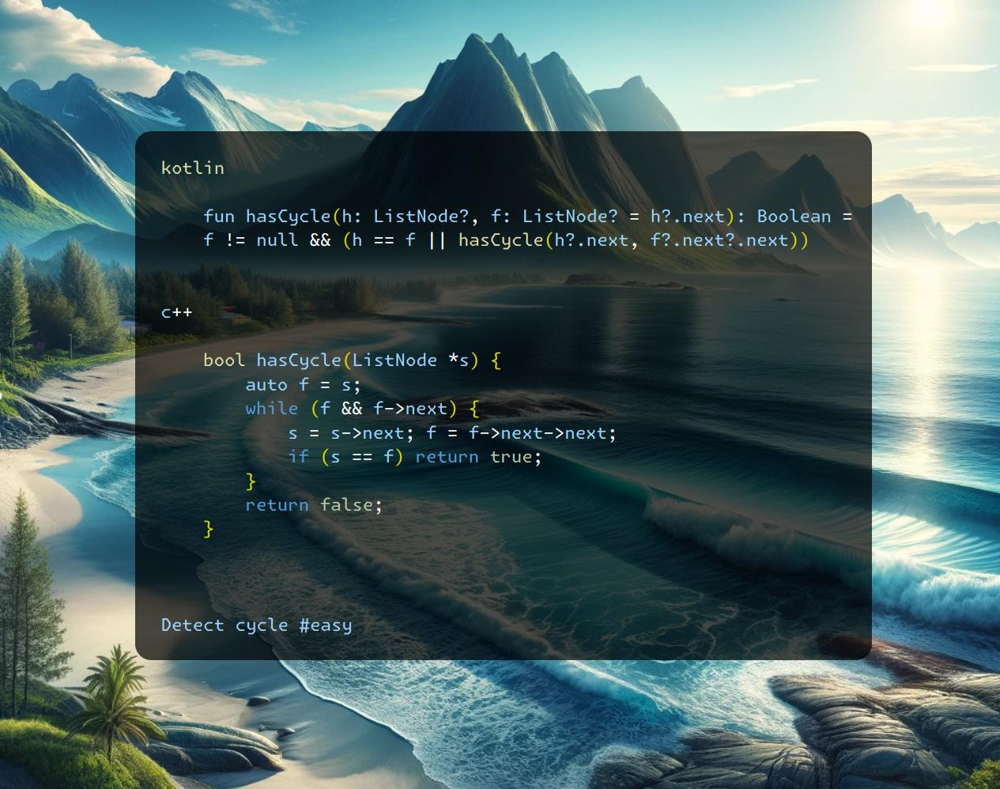
Join me on Telegram
https://t.me/leetcode_daily_unstoppable/530
Problem TLDR
Detect cycle #easy
Intuition
Use two pointers, fast and slow, they will meet sometime.
Approach
No Rust in the templates provided, sorry.
Complexity
-
Time complexity: \(O(n)\)
-
Space complexity: \(O(1)\)
Code
fun hasCycle(h: ListNode?, f: ListNode? = h?.next): Boolean =
f != null && (h == f || hasCycle(h?.next, f?.next?.next))
bool hasCycle(ListNode *s) {
auto f = s;
while (f && f->next) {
s = s->next; f = f->next->next;
if (s == f) return true;
}
return false;
}
05.03.2024
1750. Minimum Length of String After Deleting Similar Ends medium
blog post
substack
youtube

Join me on Telegram
https://t.me/leetcode_daily_unstoppable/529
Problem TLDR
Min length after trimming matching prefix-suffix several times. #medium
Intuition
By looking at the examples, greedy approach should be the optimal one.
Approach
- careful with indices, they must stop at the remaining part
Complexity
-
Time complexity: \(O(n)\)
-
Space complexity: \(O(1)\)
Code
fun minimumLength(s: String): Int {
var i = 0; var j = s.lastIndex
while (i < j && s[i] == s[j]) {
while (i + 1 < j && s[i + 1] == s[j]) i++
while (i < j - 1 && s[i] == s[j - 1]) j--
i++; j--
}
return j - i + 1
}
pub fn minimum_length(s: String) -> i32 {
let (mut i, mut j, s) = (0, s.len() - 1, s.as_bytes());
while i < j && s[i] == s[j] {
while i + 1 < j && s[i + 1] == s[j] { i += 1 }
while i < j - 1 && s[i] == s[j - 1] { j -= 1 }
i += 1; j -= 1
}
1 + (j - i) as i32
}
04.03.2024
948. Bag of Tokens medium
blog post
substack
youtube

Join me on Telegram
https://t.me/leetcode_daily_unstoppable/528
Problem TLDR
Max score converting power to token[i] and token[i] to score. #medium
Intuition
Let’s observe some examples by our bare hands:
// 100 200 300 400 p 200 s 0
// - 100 1
// + 500 0
// - 300 1
// - 0 2
// 200 400 400 400 p 200 s 0
// - 0 1
// + 400 0
// -
As we can see, the greedy approach can possibly be the optimal one after sorting the array.
Approach
- careful with empty arrays in Rust:
len() - 1will crash
Complexity
-
Time complexity: \(O(nlog(n))\)
-
Space complexity: \(O(1)\)
Code
fun bagOfTokensScore(tokens: IntArray, power: Int): Int {
tokens.sort()
var i = 0; var j = tokens.lastIndex
var p = power; var s = 0; var m = 0
while (i <= j)
if (p >= tokens[i]) { p -= tokens[i++]; m = max(m, ++s) }
else if (s-- > 0) p += tokens[j--] else break
return m
}
pub fn bag_of_tokens_score(mut tokens: Vec<i32>, mut power: i32) -> i32 {
tokens.sort_unstable(); if tokens.is_empty() { return 0 }
let (mut i, mut j, mut s, mut m) = (0, tokens.len() - 1, 0, 0);
while i <= j {
if power >= tokens[i] {
s += 1; power -= tokens[i]; i += 1; m = m.max(s)
} else if s > 0 {
s -= 1; power += tokens[j]; j -= 1;
} else { break }
}; m
}
03.03.2024
19. Remove Nth Node From End of List medium
blog post
substack
youtube
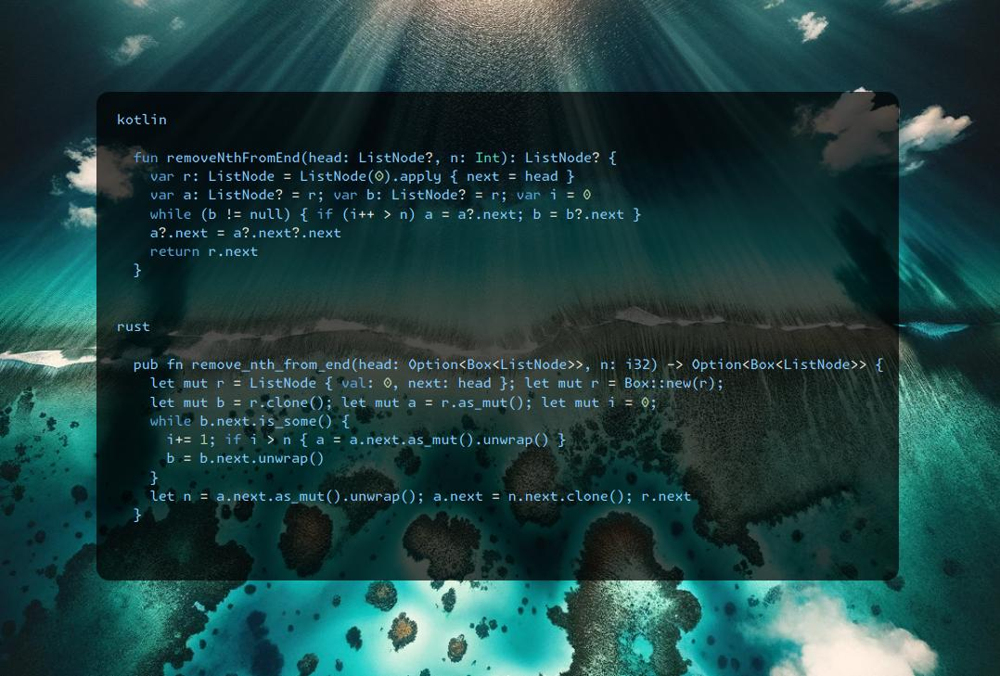
Join me on Telegram
https://t.me/leetcode_daily_unstoppable/527
Problem TLDR
Remove nth node from the tail of linked list.
Intuition
There is a two-pointer technique: fast pointer moves n nodes from the slow, then they go together until the end.
Approach
Some tricks:
- Use dummy first node to handle the head removal case.
- We can use counter to make it one pass. Rust borrow checker makes the task non trivial: one pointer must be mutable, another must be cloned.
Complexity
-
Time complexity: \(O(n)\)
-
Space complexity: \(O(1)\)
Code
fun removeNthFromEnd(head: ListNode?, n: Int): ListNode? {
var r: ListNode = ListNode(0).apply { next = head }
var a: ListNode? = r; var b: ListNode? = r; var i = 0
while (b != null) { if (i++ > n) a = a?.next; b = b?.next }
a?.next = a?.next?.next
return r.next
}
pub fn remove_nth_from_end(head: Option<Box<ListNode>>, n: i32) -> Option<Box<ListNode>> {
let mut r = ListNode { val: 0, next: head }; let mut r = Box::new(r);
let mut b = r.clone(); let mut a = r.as_mut(); let mut i = 0;
while b.next.is_some() {
i+= 1; if i > n { a = a.next.as_mut().unwrap() }
b = b.next.unwrap()
}
let n = a.next.as_mut().unwrap(); a.next = n.next.clone(); r.next
}
02.03.2024
977. Squares of a Sorted Array easy
blog post
substack
youtube
Join me on Telegram
https://t.me/leetcode_daily_unstoppable/526
Problem TLDR
Sorted squares.
Intuition
We can build the result bottom up or top down. Either way, we need two pointers: for the negative and for the positive.
Approach
Can we made it shorter?
Complexity
-
Time complexity: \(O(n)\)
-
Space complexity: \(O(n)\)
Code
fun sortedSquares(nums: IntArray): IntArray {
var i = 0; var j = nums.lastIndex;
return IntArray(nums.size) {
(if (abs(nums[i]) > abs(nums[j]))
nums[i++] else nums[j--]).let { it * it }
}.apply { reverse() }
}
pub fn sorted_squares(nums: Vec<i32>) -> Vec<i32> {
let (mut i, mut j) = (0, nums.len() - 1);
let mut v: Vec<_> = (0..=j).map(|_|
if nums[i].abs() > nums[j].abs() {
i += 1; nums[i - 1] * nums[i - 1]
} else { j -= 1; nums[j + 1] * nums[j + 1] })
.collect(); v.reverse(); v
}
01.03.2024
2864. Maximum Odd Binary Number easy
blog post
substack
youtube
Join me on Telegram
https://t.me/leetcode_daily_unstoppable/525
Problem TLDR
Max odd number string rearrangement.
Intuition
Count zeros and ones and build a string.
Approach
Let’s try to find the shortest version of code.
Complexity
-
Time complexity: \(O(n)\)$
-
Space complexity: \(O(n)\)
Code
fun maximumOddBinaryNumber(s: String) =
s.count { it == '0' }.let {
"1".repeat(s.length - it - 1) + "0".repeat(it) + "1"
}
pub fn maximum_odd_binary_number(s: String) -> String {
let c0 = s.bytes().filter(|b| *b == b'0').count();
format!("{}{}1", "1".repeat(s.len() - c0 - 1), "0".repeat(c0))
}
29.02.2024
1609. Even Odd Tree medium
blog post
substack
youtube

Join me on Telegram
https://t.me/leetcode_daily_unstoppable/523
Problem TLDR
Binary tree levels are odd increasing and even decreasing.
Intuition
Just use level-order BFS traversal.
Approach
Let’s try to make code shorter by simplifying the if condition.
Complexity
-
Time complexity: \(O(n)\)
-
Space complexity: \(O(n)\), the last level of the Binary Tree is almost
n/2nodes.
Code
fun isEvenOddTree(root: TreeNode?) = ArrayDeque<TreeNode>().run {
root?.let { add(it) }
var inc = true
while (size > 0) {
var prev = 0
repeat(size) { removeFirst().run {
if (`val` % 2 > 0 != inc || `val` == prev
|| `val` < prev == inc && prev > 0) return false
left?.let { add(it) }; right?.let { add(it) }
prev = `val`
}}
inc = !inc
}; true
}
pub fn is_even_odd_tree(root: Option<Rc<RefCell<TreeNode>>>) -> bool {
let mut q = VecDeque::new();
if let Some(n) = root { q.push_back(n) }
let mut inc = true;
while !q.is_empty() {
let mut prev = 0;
for _ in 0..q.len() { if let Some(n) = q.pop_front() {
let n = n.borrow(); let v = n.val;
if (v % 2 > 0) != inc || v == prev
|| (v < prev) == inc && prev > 0 { return false }
if let Some(l) = n.left.clone() { q.push_back(l) }
if let Some(r) = n.right.clone() { q.push_back(r) }
prev = v
}}
inc = !inc
} true
}
28.02.2024
513. Find Bottom Left Tree Value medium
blog post
substack
youtube

Join me on Telegram
https://t.me/leetcode_daily_unstoppable/522
Problem TLDR
Leftmost node value of the last level of the Binary Tree.
Intuition
Just solve this problem for both left and right children, then choose the winner with most depth.
Approach
Code looks nicer when dfs function accepts nullable value.
Complexity
-
Time complexity: \(O(n)\)
-
Space complexity: \(O(log(n))\)
Code
fun findBottomLeftValue(root: TreeNode?): Int {
fun dfs(n: TreeNode?): List<Int> = n?.run {
if (left == null && right == null) listOf(`val`, 1) else {
val l = dfs(left); val r = dfs(right)
val m = if (r[1] > l[1]) r else l
listOf(m[0], m[1] + 1)
}} ?: listOf(Int.MIN_VALUE, 0)
return dfs(root)[0]
}
pub fn find_bottom_left_value(root: Option<Rc<RefCell<TreeNode>>>) -> i32 {
fn dfs(n: &Option<Rc<RefCell<TreeNode>>>) -> (i32, i32) {
n.as_ref().map_or((i32::MIN, 0), |n| { let n = n.borrow();
if !n.left.is_some() && !n.right.is_some() { (n.val, 1) } else {
let (l, r) = (dfs(&n.left), dfs(&n.right));
let m = if r.1 > l.1 { r } else { l };
(m.0, m.1 + 1)
}})}
dfs(&root).0
}
27.02.2024
543. Diameter of Binary Tree easy
blog post
substack
youtube
Join me on Telegram
https://t.me/leetcode_daily_unstoppable/521
Problem TLDR
Max distance between any nodes in binary tree.
Intuition
Distance is the sum of the longest depths in left and right nodes.
Approach
We can return a pair of sum and max depth, but modifying an external variable looks simpler.
Complexity
-
Time complexity: \(O(n)\)
-
Space complexity: \(O(log(n))\)
Code
fun diameterOfBinaryTree(root: TreeNode?): Int {
var max = 0
fun dfs(n: TreeNode?): Int = n?.run {
val l = dfs(left); val r = dfs(right)
max = max(max, l + r); 1 + max(l, r)
} ?: 0
dfs(root)
return max
}
pub fn diameter_of_binary_tree(root: Option<Rc<RefCell<TreeNode>>>) -> i32 {
let mut res = 0;
fn dfs(n: &Option<Rc<RefCell<TreeNode>>>, res: &mut i32) -> i32 {
n.as_ref().map_or(0, |n| { let n = n.borrow();
let (l, r) = (dfs(&n.left, res), dfs(&n.right, res));
*res = (*res).max(l + r); 1 + l.max(r)
})
}
dfs(&root, &mut res); res
}
26.02.2024
100. Same Tree easy
blog post
substack
youtube
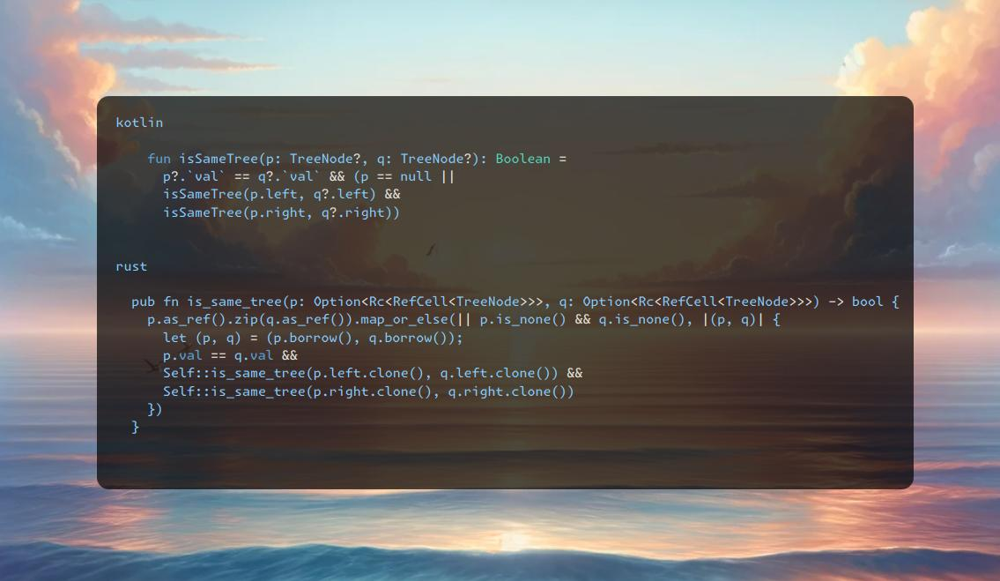
Join me on Telegram
https://t.me/leetcode_daily_unstoppable/519
Problem TLDR
Are two binary trees equal?
Intuition
Use recursion to check current nodes and subtrees.
Complexity
-
Time complexity: \(O(n)\)
-
Space complexity: \(O(log(n))\) for the recursion depth
Code
fun isSameTree(p: TreeNode?, q: TreeNode?): Boolean =
p?.`val` == q?.`val` && (p == null ||
isSameTree(p.left, q?.left) &&
isSameTree(p.right, q?.right))
pub fn is_same_tree(p: Option<Rc<RefCell<TreeNode>>>, q: Option<Rc<RefCell<TreeNode>>>) -> bool {
p.as_ref().zip(q.as_ref()).map_or_else(|| p.is_none() && q.is_none(), |(p, q)| {
let (p, q) = (p.borrow(), q.borrow());
p.val == q.val &&
Self::is_same_tree(p.left.clone(), q.left.clone()) &&
Self::is_same_tree(p.right.clone(), q.right.clone())
})
}
25.02.2024
2709. Greatest Common Divisor Traversal hard
blog post
substack
youtube

Join me on Telegram
https://t.me/leetcode_daily_unstoppable/518
Problem TLDR
Are all numbers connected through gcd?
Intuition
The n^2 solution is trivial, just remember how to calculate the GCD.
Let’s see how to optimize it by using all the possible hints and observing the example. To connect 4 to 3 we expect some number that are multiple of 2 and 3. Those are prime numbers. It gives us the idea, that numbers can be connected throug the primes.
Let’s build all the primes and assign our numbers to each. To build the primes, let’s use Sieve of Eratosthenes https://en.wikipedia.org/wiki/Sieve_of_Eratosthenes.
// 4 3 12 8
// 2 3 5 7 11 13 17 19 23 29 31
// 4
// 3
//12 12
// 8
In this example, we assign 4, 12 and 8 to prime 2, 3 and 12 to prime 3. The two islands of primes 2 and 3 are connected through the number 12.
Another example with the corner case of 1:
The different solution is to compute all the factors of each number and connect the numbers instead of the primes.
Approach
- use Union-Find and path compression
uf[x] = uf[uf[x]] - factors are less than
sqrt(n)
Complexity
-
Time complexity: \(O(nsqrt(n))\)
-
Space complexity: \(O(n)\)
Code
fun canTraverseAllPairs(nums: IntArray): Boolean {
if (nums.contains(1)) return nums.size == 1
val nums = nums.toSet().toList()
val p = BooleanArray(nums.max() + 1) { true }
for (i in 2..sqrt(p.size.toDouble()).toInt()) if (p[i])
for (j in i * i..<p.size step i) p[j] = false
val primes = (2..<p.size).filter { p[it] }
val uf = IntArray(primes.size) { it }
fun Int.root(): Int {
var x = this; while (x != uf[x]) x = uf[x]
uf[this] = x; return x
}
val islands = HashSet<Int>()
for (x in nums) {
var prev = -1
for (i in primes.indices) if (x % primes[i] == 0) {
islands += i
if (prev != -1) uf[prev.root()] = i.root()
prev = i
}
}
val oneOf = islands.firstOrNull()?.root() ?: -1
return islands.all { it.root() == oneOf }
}
pub fn can_traverse_all_pairs(nums: Vec<i32>) -> bool {
let mut uf: Vec<_> = (0..nums.len()).collect();
fn root(uf: &mut Vec<usize>, mut x: usize) -> usize {
while x != uf[x] { x = uf[x]; uf[x] = uf[uf[x]] } x}
let mut mp = HashMap::<i32, usize>::new();
for (i, &x) in nums.iter().enumerate() {
if x == 1 { return nums.len() == 1 }
let mut factors = vec![x];
let mut a = x;
for b in 2..=(x as f64).sqrt() as i32 {
while a % b == 0 { a /= b; factors.push(b) }
}
if a > 1 { factors.push(a) }
for &f in &factors {
if let Some(&j) = mp.get(&f) {
let ra = root(&mut uf, i);
uf[ra] = root(&mut uf, j);
}
mp.insert(f, i);
}
}
let ra = root(&mut uf, 0);
(0..uf.len()).all(|b| root(&mut uf, b) == ra)
}
24.02.2024
2092. Find All People With Secret hard blog post substack youtube
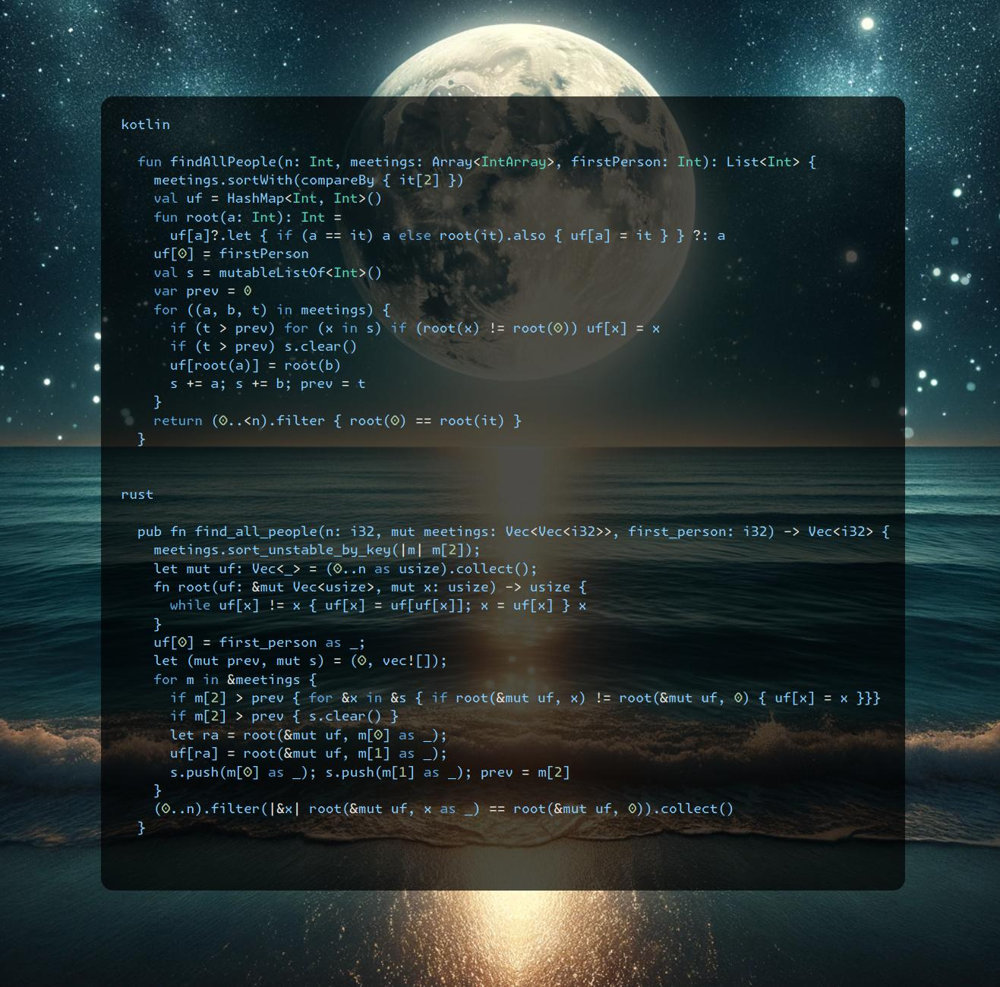
Join me on Telegram
https://t.me/leetcode_daily_unstoppable/517
Problem TLDR
Who knows 0 and firstPerson’s secret after group meetings at times: [personA, personB, time].
Intuition
To share the secret between people we can use a known Union-Find data structure. The corner case is when the meeting time is passed and no one knowns a secret: we must revert a union for these people.
Approach
To make Union-Find more performant, there are several tricks. One of them is a path compression: after finding the root, set all the intermediates to root. Ranks are more complex and not worth the lines of code.
Complexity
-
Time complexity: \(O(an)\),
ais close to 1 -
Space complexity: \(O(n)\)
Code
fun findAllPeople(n: Int, meetings: Array<IntArray>, firstPerson: Int): List<Int> {
meetings.sortWith(compareBy { it[2] })
val uf = HashMap<Int, Int>()
fun root(a: Int): Int =
uf[a]?.let { if (a == it) a else root(it).also { uf[a] = it } } ?: a
uf[0] = firstPerson
val s = mutableListOf<Int>()
var prev = 0
for ((a, b, t) in meetings) {
if (t > prev) for (x in s) if (root(x) != root(0)) uf[x] = x
if (t > prev) s.clear()
uf[root(a)] = root(b)
s += a; s += b; prev = t
}
return (0..<n).filter { root(0) == root(it) }
}
pub fn find_all_people(n: i32, mut meetings: Vec<Vec<i32>>, first_person: i32) -> Vec<i32> {
meetings.sort_unstable_by_key(|m| m[2]);
let mut uf: Vec<_> = (0..n as usize).collect();
fn root(uf: &mut Vec<usize>, mut x: usize) -> usize {
while uf[x] != x { uf[x] = uf[uf[x]]; x = uf[x] } x
}
uf[0] = first_person as _;
let (mut prev, mut s) = (0, vec![]);
for m in &meetings {
if m[2] > prev { for &x in &s { if root(&mut uf, x) != root(&mut uf, 0) { uf[x] = x }}}
if m[2] > prev { s.clear() }
let ra = root(&mut uf, m[0] as _);
uf[ra] = root(&mut uf, m[1] as _);
s.push(m[0] as _); s.push(m[1] as _); prev = m[2]
}
(0..n).filter(|&x| root(&mut uf, x as _) == root(&mut uf, 0)).collect()
}
23.02.2024
787. Cheapest Flights Within K Stops medium blog post substack youtube

Join me on Telegram
https://t.me/leetcode_daily_unstoppable/516
Problem TLDR
Cheapest travel src -> dst with at most k stops in a directed weighted graph.
Approach
There is a Floyd-Warshall algorithm for such problems: make k rounds of travel trough all the reachable edges and improve the so-far cost.
- we must make a copy of the previous step, to avoid flying more than one step in a round
Complexity
-
Time complexity: \(O(kne)\), where
eis edges -
Space complexity: \(O(n)\)
Code
fun findCheapestPrice(n: Int, flights: Array<IntArray>, src: Int, dst: Int, k: Int): Int {
val costs = IntArray(n) { Int.MAX_VALUE / 2 }
costs[src] = 0
repeat(k + 1) {
val prev = costs.clone()
for ((f, t, c) in flights)
costs[t] = min(costs[t], prev[f] + c)
}
return costs[dst].takeIf { it < Int.MAX_VALUE / 2 } ?: -1
}
pub fn find_cheapest_price(n: i32, flights: Vec<Vec<i32>>, src: i32, dst: i32, k: i32) -> i32 {
let mut costs = vec![i32::MAX / 2 ; n as usize];
costs[src as usize] = 0;
for _ in 0..=k {
let prev = costs.clone();
for e in &flights {
costs[e[1] as usize] = costs[e[1] as usize].min(prev[e[0] as usize] + e[2])
}
}
if costs[dst as usize] < i32::MAX / 2 { costs[dst as usize] } else { -1 }
}
22.02.2024
997. Find the Town Judge easy
blog post
substack
youtube

Join me on Telegram
https://t.me/leetcode_daily_unstoppable/515
Problem TLDR
Find who trusts nobody and everybody trusts him in [trust, trusted] array.
Intuition
First, potential judge is from set 1..n excluding all the people who trust someone trust.map { it[0] }.
Next, check everybody trust him count == n - 1.
Another approach, is to count in-degree and out-degree nodes in graph.
Approach
For the second approach, we didn’t need to count out-degrees, just make in-degrees non-usable.
Let’s try to shorten the code.
- Kotlin: use
toSet,map,takeIf,count,first - Rust:
find,map_or.
Complexity
-
Time complexity: \(O(n)\)
-
Space complexity: \(O(n)\)
Code
fun findJudge(n: Int, trust: Array<IntArray>) =
((1..n).toSet() - trust.map { it[0] }.toSet())
.takeIf { it.size == 1 }?.first()
?.takeIf { j ->
trust.count { it[1] == j } == n - 1
} ?: -1
pub fn find_judge(n: i32, trust: Vec<Vec<i32>>) -> i32 {
let mut deg = vec![0; n as usize + 1];
for e in trust {
deg[e[0] as usize] += n;
deg[e[1] as usize] += 1;
}
(1..deg.len()).find(|&j| deg[j] == n - 1).map_or(-1, |j| j as i32)
}
21.02.2024
201. Bitwise AND of Numbers Range medium
blog post
substack
youtube
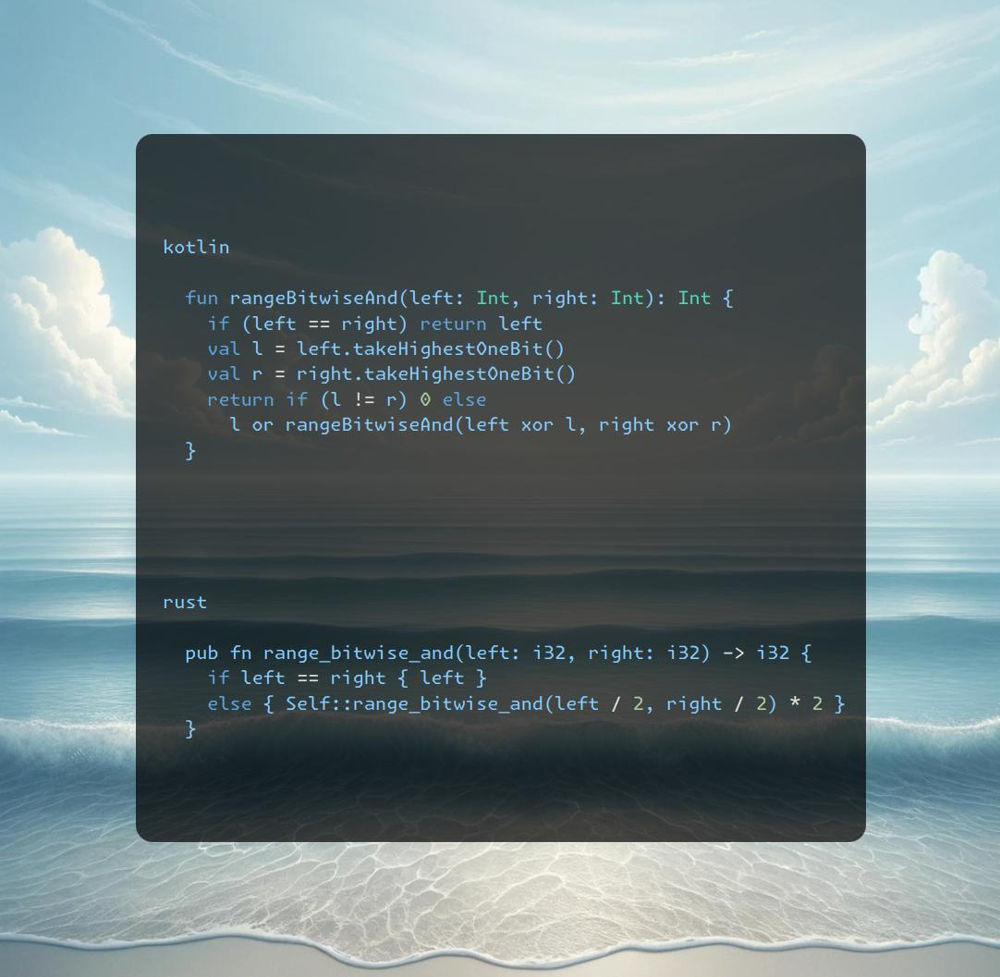
Join me on Telegram
https://t.me/leetcode_daily_unstoppable/514
Problem TLDR
Bitwise AND for [left..right].
Intuition
To understand the problem, let’s observe how this works:
// 0 0000
// 1 0001 2^0
// 2 0010
// 3 0011
// 4 0100 3..4 = 0 2^2
// 5 0101 3..5 = 0
// 6 0110
// 7 0111 6..7
// 8 1000 2^3
// 9 1001 7..9 = 0
Some observations:
- When interval intersects
4,8and so on, itANDoperation becomes0. - Otherwise, we take the common prefix:
6: 0110 & 7: 0111 = 0110.
Approach
We can take the most significant bit and compare it.
In another way, we can just find the common prefix trimming the bits from the right side.
Complexity
-
Time complexity: \(O(1)\), at most 32 calls happens
-
Space complexity: \(O(1)\)
Code
fun rangeBitwiseAnd(left: Int, right: Int): Int {
if (left == right) return left
val l = left.takeHighestOneBit()
val r = right.takeHighestOneBit()
return if (l != r) 0 else
l or rangeBitwiseAnd(left xor l, right xor r)
}
pub fn range_bitwise_and(left: i32, right: i32) -> i32 {
if left == right { left }
else { Self::range_bitwise_and(left / 2, right / 2) * 2 }
}
20.02.2024
268. Missing Number easy
blog post
substack
youtube

Join me on Telegram
https://t.me/leetcode_daily_unstoppable/513
Problem TLDR
Missing in [0..n] number.
Intuition
There are several ways to find it:
- subtracting sums
- doing xor
- computing sum with a math
n * (n + 1) / 2
Approach
Write what is easier for you, then learn the other solutions. Xor especially.
Complexity
-
Time complexity: \(O(n)\)
-
Space complexity: \(O(1)\)
Code
fun missingNumber(nums: IntArray): Int =
(1..nums.size).sum() - nums.sum()
pub fn missing_number(nums: Vec<i32>) -> i32 {
nums.iter().enumerate().map(|(i, n)| i as i32 + 1 - n).sum()
}
19.02.2024
231. Power of Two easy
blog post
substack
youtube
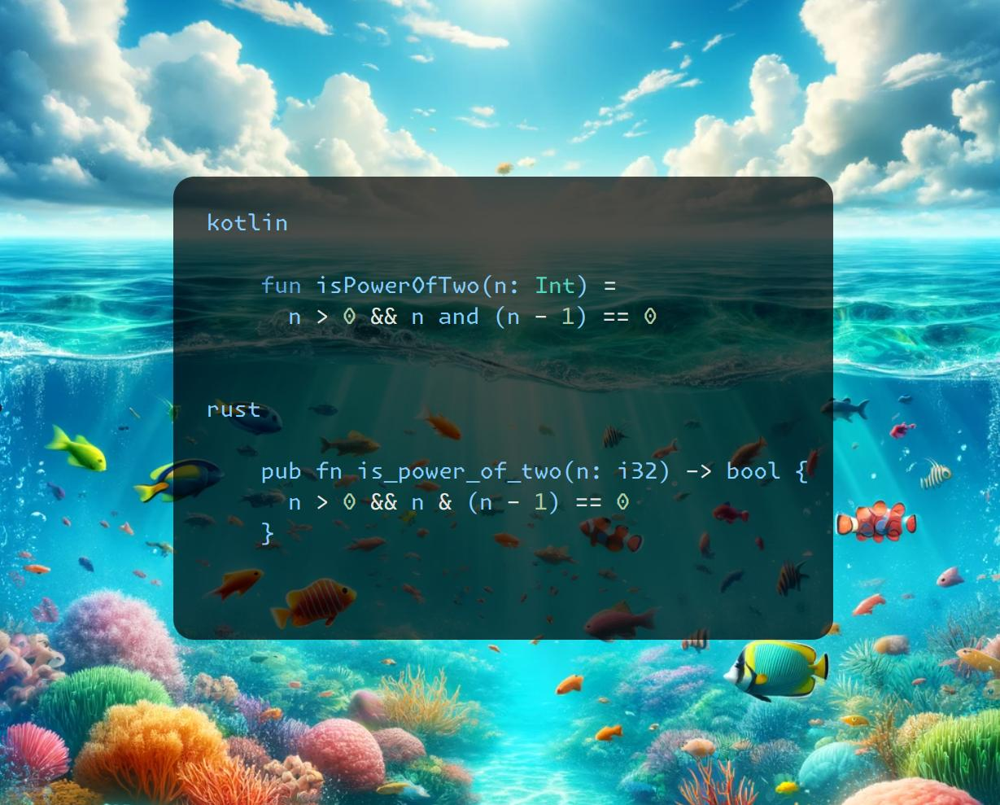
Join me on Telegram
https://t.me/leetcode_daily_unstoppable/511
Problem TLDR
Is number 2^x?
Intuition
Power of two number has just one bit on: 2 -> 10, 4 -> 100, 8 -> 1000.
There is a known bit trick to turn off a single rightmost bit: n & (n - 1).
Approach
- careful with the negative numbers and zero
Complexity
-
Time complexity: \(O(1)\)
-
Space complexity: \(O(1)\)
Code
fun isPowerOfTwo(n: Int) =
n > 0 && n and (n - 1) == 0
pub fn is_power_of_two(n: i32) -> bool {
n > 0 && n & (n - 1) == 0
}
18.02.2024
2402. Meeting Rooms III hard
blog post
substack
youtube

Join me on Telegram
https://t.me/leetcode_daily_unstoppable/510
Problem TLDR
Most frequent room of 0..<n where each meeting[i]=[start, end) takes or delays until first available.
Intuition
Let’s observe the process of choosing the room for each meeting:
// 0 1 0,10 1,5 2,7 3,4
//10 0,10
// 5 1,5
// 2,7
// 10 5,10=5+(7-2)
// 3,4
//11 10,11
// 0 1 2 1,20 2,10 3,5 4,9 6,8
//20 1,20
// 10 2,10
// 5 3,5
// 4,9
// 10 5,10
// 6,8
// 12 10,12
// 0 1 2 3 18,19 3,12 17,19 2,13 7,10
// 2,13 3,12 7,10 17,19 18,19
// 13 2,13
// 12 3,12
// 10 7,10
// 19 17,19
// <-19 18,19
// 1 1 2 1
// 0 1 2 3 19,20 14,15 13,14 11,20
// 11,20 13,14 14,15 19,20
//20 *
// 14 *
// <-15
Some caveats are:
- we must take room with lowest index
- this room must be empty or meeting must already end
- the interesting case is when some rooms are still empty, but some already finished the meeting.
To handle finished meetings, we can just repopulate the PriorityQueue with the current time.
Approach
Let’s try to write a minimal code implementation.
- Kotiln heap is a min-heap, Rust is a max-heap
- Kotlin
maxByis not greedy, returns first max. Rustmax_by_keyis greedy and returns the last visited max, so not useful here.
Complexity
-
Time complexity: \(O(mnlon(n))\),
mis a meetings size. Repopulation process isnlog(n). Just finding the minimum is O(mn). -
Space complexity: \(O(n)\)
Code
fun mostBooked(n: Int, meetings: Array<IntArray>): Int {
meetings.sortWith(compareBy { it[0] })
val v = LongArray(n); val freq = IntArray(n)
for ((s, f) in meetings) {
val room = (0..<n).firstOrNull { v[it] <= s } ?: v.indexOf(v.min())
if (v[room] > s) v[room] += (f - s).toLong() else v[room] = f.toLong()
freq[room]++
}
return freq.indexOf(freq.max())
}
pub fn most_booked(n: i32, mut meetings: Vec<Vec<i32>>) -> i32 {
let (mut v, mut freq) = (vec![0; n as usize], vec![0; n as usize]);
meetings.sort_unstable();
for m in meetings {
let (s, f) = (m[0] as i64, m[1] as i64);
let room = v.iter().position(|&v| v <= s).unwrap_or_else(|| {
let min = *v.iter().min().unwrap();
v.iter().position(|&v| v == min).unwrap() });
freq[room] += 1;
v[room] = if v[room] > s { f - s + v[room] } else { f }
}
let max = *freq.iter().max().unwrap();
freq.iter().position(|&f| f == max).unwrap() as i32
}
17.02.2024
1642. Furthest Building You Can Reach medium
blog post
substack
youtube

Join me on Telegram
https://t.me/leetcode_daily_unstoppable/509
Problem TLDR
Max index to climb diff = a[i +1] - a[i] > 0 using bricks -= diff and ladders– for each.
Intuition
First, understand the problem by observing the inputs:
// 0 1 2 3 4 5 6 7 8
// 4 12 2 7 3 18 20 3 19 10 2
// 8 5 15 2 16
// b l l b
- only increasing pairs matters
- it is better to use the
laddersfor the biggestdiffs
The simple solution without tricks is to do a BinarySearch: can we reach the mid-point using all the bricks and ladders? Then just sort diffs in 0..mid range and take bricks for the smaller and ladders for the others. This solution would cost us O(nlog^2(n)) and it passes.
However, in the leetcode comments, I spot that there is an O(nlogn) solution exists. The idea is to grab as much bricks as we can and if we cannot, then we can drop back some (biggest) pile of bricks and pretend we used the ladders instead. We can do this trick at most ladders’ times.
Approach
Try not to write the if checks that are irrelevant.
- BinaryHeap in Rust is a
maxheap - PriorityQueue in Kotlin is a
minheap, usereverseOrder
Complexity
-
Time complexity: \(O(nlog(n))\)
-
Space complexity: \(O(n)\)
Code
fun furthestBuilding(heights: IntArray, bricks: Int, ladders: Int): Int {
val pq = PriorityQueue<Int>(reverseOrder())
var b = bricks; var l = ladders
for (i in 1..<heights.size) {
val diff = heights[i] - heights[i - 1]
if (diff <= 0) continue
pq += diff
if (b < diff && l-- > 0) b += pq.poll()
if (b < diff) return i - 1
b -= diff
}
return heights.lastIndex
}
pub fn furthest_building(heights: Vec<i32>, mut bricks: i32, mut ladders: i32) -> i32 {
let mut hp = BinaryHeap::new();
for i in 1..heights.len() {
let diff = heights[i] - heights[i - 1];
if diff <= 0 { continue }
hp.push(diff);
if bricks < diff && ladders > 0 {
bricks += hp.pop().unwrap();
ladders -= 1;
}
if bricks < diff { return i as i32 - 1 }
bricks -= diff;
}
heights.len() as i32 - 1
}
16.02.2024
1481. Least Number of Unique Integers after K Removals medium
blog post
substack
youtube

Join me on Telegram
https://t.me/leetcode_daily_unstoppable/507
Problem TLDR
Min uniq count after removing k numbers.
Intuition
Just to be sure what the problem is about, let’s write some other examples: [1,2,3,4,4] k = 3, [1,2,3,4,4,4] k = 3, [1,2,3,3,4,4,4] k = 3. The first two will give the same unswer 1, the last one is 2, however. As soon as we understood the problem, just implement the algorithm: sort numbers by frequency and remove from smallest to the largest.
Approach
Let’s try to make the code shorter, by using languages:
- Kotlin:
asList,groupingBy,eachCount,sorted,run - Rust:
entry+or_insert,Vec::from_iter,into_values,sort_unstable,fold
Complexity
-
Time complexity: \(O(nlog(n))\), worst case, all numbers are uniq
-
Space complexity: \(O(n)\)
Code
fun findLeastNumOfUniqueInts(arr: IntArray, k: Int) = arr
.asList().groupingBy { it }.eachCount()
.values.sorted().run {
var c = k
size - count { c >= it.also { c -= it } }
}
pub fn find_least_num_of_unique_ints(arr: Vec<i32>, mut k: i32) -> i32 {
let mut freq = HashMap::new();
for x in arr { *freq.entry(x).or_insert(0) += 1 }
let mut freq = Vec::from_iter(freq.into_values());
freq.sort_unstable();
freq.iter().fold(freq.len() as i32, |acc, count| {
k -= count;
if k < 0 { acc } else { acc - 1 }
})
}
15.02.2024
2971. Find Polygon With the Largest Perimeter medium
blog post
substack
youtube

Join me on Telegram
https://t.me/leetcode_daily_unstoppable/506
Problem TLDR
The largest subset sum(a[..i]) > a[i + 1] where a is a subset of array.
Intuition
First, understand the problem: [1,12,1,2,5,50,3] doesn’t have a polygon, but [1,12,1,2,5,23,3] does. After this, the solution is trivial: take numbers in increasing order, compare with sum and check.
Approach
Let’s try to use the languages.
- Kotlin:
sorted,fold - Rust:
sort_unstable,iter,fold
Complexity
-
Time complexity: \(O(nlog(n))\)
-
Space complexity: \(O(1)\),
sortedtakes O(n) but can be avoided
Code
fun largestPerimeter(nums: IntArray) = nums
.sorted()
.fold(0L to -1L) { (s, r), x ->
s + x to if (s > x) s + x else r
}.second
pub fn largest_perimeter(mut nums: Vec<i32>) -> i64 {
nums.sort_unstable();
nums.iter().fold((0, -1), |(s, r), &x|
(s + x as i64, if s > x as i64 { s + x as i64 } else { r })
).1
}
14.02.2024
2149. Rearrange Array Elements by Sign medium
blog post
substack
youtube

Join me on Telegram
https://t.me/leetcode_daily_unstoppable/505
Problem TLDR
Rearrange array to positive-negative sequence.
Intuition
First is to understand that we can’t do this in-place: for example 1 1 1 1 1 1 -1 -1 -1 -1 -1 -1 we must store somewhere the 1s that is changed by -1s.
Next, just use two pointers and a separate result array.
Approach
We can use ping-pong technique for pointers and make work with only the current pointer. Some language’s APIs:
- Kotlin:
indexOfFirst,also,find - Rust:
iter,position,find
Complexity
-
Time complexity: \(O(n)\)
-
Space complexity: \(O(n)\)
Code
fun rearrangeArray(nums: IntArray): IntArray {
var i = nums.indexOfFirst { it > 0 }
var j = nums.indexOfFirst { it < 0 }
return IntArray(nums.size) {
nums[i].also { n ->
i = (i + 1..<nums.size)
.find { n > 0 == nums[it] > 0 } ?: 0
i = j.also { j = i }
}
}
}
pub fn rearrange_array(nums: Vec<i32>) -> Vec<i32> {
let mut i = nums.iter().position(|&n| n > 0).unwrap();
let mut j = nums.iter().position(|&n| n < 0).unwrap();
(0..nums.len()).map(|_| {
let n = nums[i];
i = (i + 1..nums.len())
.find(|&i| (n > 0) == (nums[i] > 0)).unwrap_or(0);
(i, j) = (j, i); n
}).collect()
}
13.02.2024
2108. Find First Palindromic String in the Array easy
blog post
substack
youtube

Join me on Telegram
https://t.me/leetcode_daily_unstoppable/504
Problem TLDR
Find a palindrome.
Intuition
Compare first chars with the last.
Approach
Let’s use some API’s:
- Kotlin:
firstOrNull,all - Rust:
into_iter,find,chars,eq,rev,unwrap_or_else,into. Theeqcompares two iterators with O(1) space.
Complexity
-
Time complexity: \(O(wn)\)
-
Space complexity: \(O(1)\)
Code
fun firstPalindrome(words: Array<String>) =
words.firstOrNull { w ->
(0..w.length / 2).all { w[it] == w[w.lastIndex - it] }
} ?: ""
pub fn first_palindrome(words: Vec<String>) -> String {
words.into_iter().find(|w|
w.chars().eq(w.chars().rev())
).unwrap_or_else(|| "".into())
}
12.02.2024
169. Majority Element easy
blog post
substack
youtube
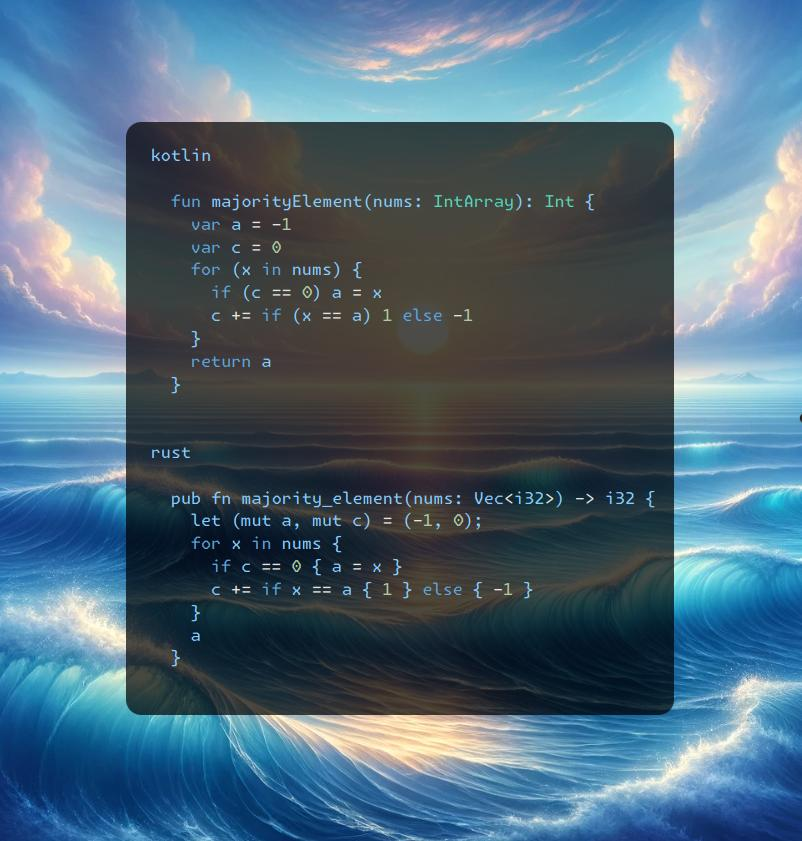
Join me on Telegram
https://t.me/leetcode_daily_unstoppable/503
Problem TLDR
Element with frequency > nums.len / 2.
Intuition
First thing is to understand the problem, as we need to find not only the most frequent element, but frequency is given > nums.len / 2 by the input constraints.
Next, let’s observe examples:
 There are properties derived from the observation:
- sequence can spread other elements between the common
- common can exist in several islands
- the second common island size is less than first common
- island can be single one We can write an ugly algorithm full of ‘ifs’ now.
fun majorityElement(nums: IntArray): Int {
var a = -1
var b = -1
var countA = 1
var countB = 0
var currCount = 1
var prev = -1
for (x in nums) {
if (x == prev) {
currCount++
if (currCount > nums.size / 2) return x
} else {
if (currCount > 1) {
if (a == -1) a = prev
else if (b == -1) b = prev
if (prev == a) {
countA += currCount
}
if (prev == b) {
countB += currCount
}
}
currCount = 1
}
prev = x
}
if (a == -1) a = prev
else if (b == -1) b = prev
if (prev == a) {
countA += currCount
} else if (prev == b) {
countB += currCount
}
return if (a == -1 && b == -1) {
nums[0]
} else if (countA > countB) a else b
}
Approach
However, for our pleasure, there is a comment section of leetcode exists, find some big head solution there: it works like a magic for me still. Count the current frequency and decrease it by all others. If others are sum up to a bigger value, our candidate is not the hero.
Complexity
-
Time complexity: \(O(n)\)
-
Space complexity: \(O(1)\)
Code
fun majorityElement(nums: IntArray): Int {
var a = -1
var c = 0
for (x in nums) {
if (c == 0) a = x
c += if (x == a) 1 else -1
}
return a
}
pub fn majority_element(nums: Vec<i32>) -> i32 {
let (mut a, mut c) = (-1, 0);
for x in nums {
if c == 0 { a = x }
c += if x == a { 1 } else { -1 }
}
a
}
11.02.2024
1463. Cherry Pickup II medium blog post substack youtube

Join me on Telegram
https://t.me/leetcode_daily_unstoppable/502
Problem TLDR
Maximum paths sum of two robots top-down in XY grid.
Intuition
One way is to try all possible paths, but that will give TLE.
However, we can notice, that only start position of two robots matters, so result can be cached:
Another neat optimization is to forbid to intersect the paths.
Approach
Can you make code shorter?
- wrapping_add for Rust
- takeIf, maxOf, in Range for Kotlin
Complexity
-
Time complexity: \(O(mn^2)\)
-
Space complexity: \((mn^2)\)
Code
fun cherryPickup(grid: Array<IntArray>): Int {
val r = 0..<grid[0].size
val ways = listOf(-1 to -1, -1 to 0, -1 to 1,
0 to -1, 0 to 0, 0 to 1,
1 to -1, 1 to 0, 1 to 1)
val dp = Array(grid.size) {
Array(grid[0].size) {
IntArray(grid[0].size) { -1 } } }
fun dfs(y: Int, x1: Int, x2: Int): Int =
dp[y][x1][x2].takeIf { it >= 0 } ?: {
grid[y][x1] + grid[y][x2] +
if (y == grid.lastIndex) 0 else ways.maxOf { (dx1, dx2) ->
val nx1 = x1 + dx1
val nx2 = x2 + dx2
if (nx1 in r && nx2 in r && nx1 < nx2) { dfs(y + 1, nx1, nx2) } else 0
}}().also { dp[y][x1][x2] = it }
return dfs(0, 0, grid[0].lastIndex)
}
pub fn cherry_pickup(grid: Vec<Vec<i32>>) -> i32 {
let (h, w, mut ans) = (grid.len(), grid[0].len(), 0);
let mut dp = vec![vec![vec![-1; w]; w]; h];
dp[0][0][w - 1] = grid[0][0] + grid[0][w - 1];
for y in 1..h {
for x1 in 0..w { for x2 in 0..w {
let prev = if y > 0 { dp[y - 1][x1][x2] } else { 0 };
if prev < 0 { continue }
for d1 in -1..=1 { for d2 in -1..=1 {
let x1 = x1.wrapping_add(d1 as usize);
let x2 = x2.wrapping_add(d2 as usize);
if x1 < x2 && x2 < w {
let f = prev + grid[y][x1] + grid[y][x2];
dp[y][x1][x2] = dp[y][x1][x2].max(f);
ans = ans.max(f);
}
}}
}}
}
ans
}
10.02.2024
647. Palindromic Substrings medium
blog post
substack
youtube

Join me on Telegram
https://t.me/leetcode_daily_unstoppable/501
Problem TLDR
Count palindromes substrings.
Intuition
There are two possible ways to solve this, one is Dynamic Programming, let’s observe some examples first:
// aba
// b -> a b a aba
// abcba
// a b c b a bcb abcba
// aaba -> a a b a aa aba
Palindrome can be defined as dp[i][j] = s[i] == s[j] && dp[i - 1][j + 1]. This takes quadratic space and time.
Other way to solve is to try to expand from each position. This will be more optimal, as it takes O(1) space and possible O(n) time if there is no palindromes in string. The worst case is O(n^2) however.
Approach
Can we make code shorter?
- avoid checking the boundaries of dp[] by playing with initial values and indices
Complexity
-
Time complexity: \(O(n^2)\)
-
Space complexity: \(O(n^2)\) or O(1) for the second.
Code
fun countSubstrings(s: String): Int {
val dp = Array(s.length + 1) { i ->
BooleanArray(s.length + 1) { i >= it }}
return s.indices.sumOf { j ->
(j downTo 0).count { i ->
s[i] == s[j] && dp[i + 1][j]
.also { dp[i][j + 1] = it } } }
}
pub fn count_substrings(s: String) -> i32 {
let s = s.as_bytes();
let c = |mut l: i32, mut r: usize| -> i32 {
let mut count = 0;
while l >= 0 && r < s.len() && s[l as usize] == s[r] {
l -= 1; r += 1; count += 1;
}
count
};
(0..s.len()).map(|i| c(i as i32, i) + c(i as i32, i + 1)).sum()
}
09.02.2024
368. Largest Divisible Subset medium
blog post
substack
youtube

Join me on Telegram
https://t.me/leetcode_daily_unstoppable/500
Problem TLDR
| Longest subset of divisible by s[i] % s[j] == 0 | s[j] % s[i] == 0. |
Intuition
Sort always helps, so do it. Let’s imagine a sequence of numbers like this:
// 1 3 9 15 27 30 60
// 1 3 9 27
// 1 3 15 30 60
// 3 4 8 16
There is a choice to be made: take 9 or 15. So we can search with DFS and try to take each number.
Also, there are some interesting things happening: for every position there is only one longest suffix subsequence. We can cache it.
Approach
I didn’t solve it the second time, so I can’t give you the working approach yet. Try as hard as you can for 1 hour, then give up and look for solutions. My problem was: didn’t considered DP, but wrote working backtracking solution. Also, I have attempted the graph solution to find a longest path, but that was TLE.
Complexity
-
Time complexity: \(O(n^2)\)
-
Space complexity: \(O(n^2)\)
Code
fun largestDivisibleSubset(nums: IntArray): List<Int> {
nums.sort()
val dp = mutableMapOf<Int, List<Int>>()
fun dfs(i: Int): List<Int> = dp.getOrPut(i) {
var seq = listOf<Int>()
val x = if (i == 0) 1 else nums[i - 1]
for (j in i..<nums.size) if (nums[j] % x == 0) {
val next = listOf(nums[j]) + dfs(j + 1)
if (next.size > seq.size) seq = next
}
seq
}
return dfs(0)
}
pub fn largest_divisible_subset(mut nums: Vec<i32>) -> Vec<i32> {
nums.sort_unstable();
let mut dp: HashMap<usize, Vec<i32>> = HashMap::new();
fn dfs(nums: &[i32], i: usize, dp: &mut HashMap<usize, Vec<i32>>) -> Vec<i32> {
dp.get(&i).cloned().unwrap_or_else(|| {
let x = nums.get(i.wrapping_sub(1)).copied().unwrap_or(1);
let largest_seq = (i..nums.len())
.filter(|&j| nums[j] % x == 0)
.map(|j| {
let mut next = vec![nums[j]];
next.extend(dfs(nums, j + 1, dp));
next
})
.max_by_key(|seq| seq.len())
.unwrap_or_else(Vec::new);
dp.insert(i, largest_seq.clone());
largest_seq
})
}
dfs(&nums, 0, &mut dp)
}
08.02.2024
279. Perfect Squares medium
blog post
substack
youtube
Join me on Telegram
https://t.me/leetcode_daily_unstoppable/499
Problem TLDR
Min square numbers sum up to n.
Intuition
By wrong intuition would be just subtract maximum possible square number: 12 = 9 + remainder. So, we should explore all of possible squares and choose min count of them. We can do DFS and cache the result. To pass the TLE, we need to rewrite it back into bottom up DP.
Approach
Let’s write as shorter as we can by using:
- Kotlin:
minOf,sqrtwithoutMath,toFloatvstoDouble - Rust:
(1..) - avoid case of
x = 0to safely invokeminOfandunwrap
Complexity
-
Time complexity: \(O(nsqrt(n))\)
-
Space complexity: \(O(n)\)
Code
fun numSquares(n: Int): Int {
val dp = IntArray(n + 1)
for (x in 1..n)
dp[x] = (1..sqrt(x.toFloat()).toInt())
.minOf { 1 + dp[x - it * it] }
return dp[n]
}
pub fn num_squares(n: i32) -> i32 {
let mut dp = vec![0; n as usize + 1];
for x in 1..=n as usize {
dp[x] = (1..).take_while(|&k| k * k <= x)
.map(|k| 1 + dp[x - k * k]).min().unwrap();
}
dp[n as usize]
}
07.02.2024
451. Sort Characters By Frequency medium
blog post
substack
youtube
Join me on Telegram
https://t.me/leetcode_daily_unstoppable/498
Problem TLDR
Sort string by char’s frequencies.
Intuition
The optimal solution would be to sort [128] size array of frequencies, then build a string in O(n). There are some other ways, however…
Approach
Let’s explore the shortest versions of code by using the API:
- Kotlin: groupBy, sortedBy, flatMap, joinToString
- Rust: vec![], sort_unstable_by_key, just sorting the whole string takes 3ms
Complexity
-
Time complexity: \(O(n)\), or O(nlog(n)) for sorting the whole string
-
Space complexity: \(O(n)\)
Code
fun frequencySort(s: String) = s
.groupBy { it }.values
.sortedBy { -it.size }
.flatMap { it }
.joinToString("")
pub fn frequency_sort(s: String) -> String {
let mut f = vec![0; 128];
for b in s.bytes() { f[b as usize] += 1 }
let mut cs: Vec<_> = s.chars().collect();
cs.sort_unstable_by_key(|&c| (-f[c as usize], c));
cs.iter().collect()
}
06.02.2024
49. Group Anagrams medium
blog post
substack
youtube
Join me on Telegram
https://t.me/leetcode_daily_unstoppable/497
Problem TLDR
Group words by chars in them.
Intuition
We can use char’s frequencies or just sorted words as keys to grouping.
Approach
Use the standard API for Kotlin and Rust:
- groupBy vs no grouping method in Rust (but have in itertools)
- entry().or_insert_with for Rust
- keys are faster to just sort instead of count in Rust
Complexity
-
Time complexity: \(O(mn)\), for counting, mlog(n) for sorting
-
Space complexity: \(O(mn)\)
Code
fun groupAnagrams(strs: Array<String>): List<List<String>> =
strs.groupBy { it.groupBy { it } }.values.toList()
pub fn group_anagrams(strs: Vec<String>) -> Vec<Vec<String>> {
let mut groups = HashMap::new();
for s in strs {
let mut key: Vec<_> = s.bytes().collect();
key.sort_unstable();
groups.entry(key).or_insert_with(Vec::new).push(s);
}
groups.into_values().collect()
}
05.02.2024
387. First Unique Character in a String easy
blog post
substack
youtube

Join me on Telegram
https://t.me/leetcode_daily_unstoppable/496
Problem TLDR
First non-repeating char position.
Intuition
Compute char’s frequencies, then find first of 1.
Approach
Let’s try to make code shorter: Kotlin:
- groupBy
- run
- indexOfFirst Rust:
- vec![]
- String.find
- map_or
Complexity
-
Time complexity: \(O(n)\)
-
Space complexity: \(O(1)\)
Code
fun firstUniqChar(s: String) = s.groupBy { it }
.run { s.indexOfFirst { this[it]!!.size < 2 } }
pub fn first_uniq_char(s: String) -> i32 {
let mut f = vec![0; 128];
for b in s.bytes() { f[b as usize] += 1 }
s.find(|c| f[c as usize] < 2).map_or(-1, |i| i as i32)
}
04.02.2024
76. Minimum Window Substring hard
blog post
substack
youtube
Join me on Telegram
https://t.me/leetcode_daily_unstoppable/495
Problem TLDR
Minimum window of s including all chars of t.
Intuition
The greedy approach with sliding window would work: move right window pointer right until all chars are obtained. Then move left border until condition no longer met.
There is an optimization possible: remove the need to check all character’s frequencies by counting how many chars are absent.
Approach
Let’s try to shorten the code:
.drop.takeis shorter thansubstring, as skipping oneif- range in Rust are nice
intoshortern thanto_string
Complexity
-
Time complexity: \(O(n + m)\)
-
Space complexity: \(O(1)\)
Code
fun minWindow(s: String, t: String): String {
val freq = IntArray(128)
for (c in t) freq[c.code]++
var i = 0
var r = arrayOf(s.length, s.length + 1)
var count = t.length
for ((j, c) in s.withIndex()) {
if (freq[c.code]-- > 0) count--
while (count == 0) {
if (j - i + 1 < r[1]) r = arrayOf(i, j - i + 1)
if (freq[s[i++].code]++ == 0) count++
}
}
return s.drop(r[0]).take(r[1])
}
pub fn min_window(s: String, t: String) -> String {
let mut freq = vec![0; 128];
for b in t.bytes() { freq[b as usize] += 1; }
let (mut i, mut r, mut c) = (0, 0..0, t.len());
for (j, b) in s.bytes().enumerate() {
if freq[b as usize] > 0 { c -= 1; }
freq[b as usize] -= 1;
while c == 0 {
if j - i + 1 < r.len() || r.len() == 0 { r = i..j + 1; }
let a = s.as_bytes()[i] as usize;
freq[a] += 1; if freq[a] > 0 { c += 1; }
i += 1;
}
}
s[r].into()
}
03.02.2024
1043. Partition Array for Maximum Sum medium
blog post
substack
youtube

Join me on Telegram
https://t.me/leetcode_daily_unstoppable/493
Problem TLDR
Max sum of partition array into chunks size of at most k filled with max value in chunk.
Intuition
Let’s just brute force with Depth-First Search starting from each i position: search for the end of chunk j and choose the maximum of the sum. max_sum[i] = optimal_chunk + max_sum[chunk_len]. This can be cached by the i.
Then rewrite into bottom up DP.
Approach
- use size + 1 for dp, to avoid ‘if’s
- careful with the problem definition: it is not the max count of chunks, it is the chunks lengths up to
k
Complexity
-
Time complexity: \(O(n^2)\)
-
Space complexity: \(O(n)\)
Code
fun maxSumAfterPartitioning(arr: IntArray, k: Int): Int {
val dp = IntArray(arr.size + 1)
for (i in arr.indices) {
var max = 0
for (j in i downTo max(0, i - k + 1)) {
max = max(max, arr[j])
dp[i + 1] = max(dp[i + 1], (i - j + 1) * max + dp[j])
}
}
return dp[arr.size]
}
pub fn max_sum_after_partitioning(arr: Vec<i32>, k: i32) -> i32 {
let mut dp = vec![0; arr.len() + 1];
for i in 0..arr.len() {
let mut max_v = 0;
for j in (0..=i).rev().take(k as usize) {
max_v = max_v.max(arr[j]);
dp[i + 1] = dp[i + 1].max((i - j + 1) as i32 * max_v + dp[j]);
}
}
dp[arr.len()]
}
02.02.2024
1291. Sequential Digits medium
blog post
substack
youtube

Join me on Telegram
https://t.me/leetcode_daily_unstoppable/492
Problem TLDR
Numbers with sequential digits in low..high range.
Intuition
Let’s write down all of them:
// 1 2 3 4 5 6 7 8 9
// 12 23 34 45 57 67 78 89
// 123 234 345 456 678 789
// 1234 2345 3456 4567 5678 6789
// 12345 23456 34567 45678 56789
// 123456 234567 345678 456789
// 1234567 2345678 3456789
// 12345678 23456789
// 123456789
After that you will get the intuition how they are built: we scan pairs, increasing first ten times and appending last digit of the second.
Approach
Let’s try to leverage the standard iterators in Kotlin & Rust:
- runningFold vs scan
- windowed vs window
- flatten vs flatten
Complexity
-
Time complexity: \(O(1)\)
-
Space complexity: \(O(1)\)
Code
fun sequentialDigits(low: Int, high: Int) =
(1..9).runningFold((1..9).toList()) { r, _ ->
r.windowed(2) { it[0] * 10 + it[1] % 10 }
}.flatten().filter { it in low..high }
pub fn sequential_digits(low: i32, high: i32) -> Vec<i32> {
(1..10).scan((1..10).collect::<Vec<_>>(), |s, _| {
let r = Some(s.clone());
*s = s.windows(2).map(|w| w[0] * 10 + w[1] % 10).collect(); r
}).flatten().filter(|&x| low <= x && x <= high).collect()
}
01.02.2024
2966. Divide Array Into Arrays With Max Difference medium
blog post
substack
youtube

Join me on Telegram
https://t.me/leetcode_daily_unstoppable/491
Problem TLDR
Split array into tripples with at most k difference.
Intuition
Sort, then just check k condition.
Approach
Let’s use iterators in Kotlin and Rust:
- chunked vs chunks
- sorted() vs sort_unstable() (no sorted iterator in Rust)
- takeIf() vs ..
- all() vs any()
- .. map(), to_vec(), collect(), vec![]
Complexity
-
Time complexity: \(O(nlog(n))\)
-
Space complexity: \(O(n)\)
Code
fun divideArray(nums: IntArray, k: Int) = nums
.sorted().chunked(3).toTypedArray()
.takeIf { it.all { it[2] - it[0] <= k } } ?: arrayOf()
pub fn divide_array(mut nums: Vec<i32>, k: i32) -> Vec<Vec<i32>> {
nums.sort_unstable();
if nums.chunks(3).any(|c| c[2] - c[0] > k) { vec![] }
else { nums.chunks(3).map(|c| c.to_vec()).collect() }
}
31.01.2024
739. Daily Temperatures medium
blog post
substack
youtube

Join me on Telegram
https://t.me/leetcode_daily_unstoppable/489
Problem TLDR
Array of distances to the next largest.
Intuition
Let’s walk array backwards and observe which numbers we need to keep track of and which are irrelevant:
0 1 2 3 4 5 6 7
73 74 75 71 69 72 76 73
73 73 7
76 76 6
72 76 72 6 5 6 - 5 = 1
69 76 72 69 6 5 4
71 76 72 71 6 5 3 5 - 3 = 2
As we see, we must keep the increasing orders of values and drop each less than current. This technique is a known pattern called Monotonic Stack.
Approach
There are several ways to write that, let’s try to be brief.
Complexity
-
Time complexity: \(O(n)\)
-
Space complexity: \(O(n)\)
Code
fun dailyTemperatures(temps: IntArray): IntArray =
Stack<Int>().run {
temps.indices.reversed().map { i ->
while (size > 0 && temps[peek()] <= temps[i]) pop()
(if (size > 0) peek() - i else 0).also { push(i) }
}.reversed().toIntArray()
}
pub fn daily_temperatures(temps: Vec<i32>) -> Vec<i32> {
let (mut r, mut s) = (vec![0; temps.len()], vec![]);
for (i, &t) in temps.iter().enumerate().rev() {
while s.last().map_or(false, |&j| temps[j] <= t) { s.pop(); }
r[i] = (*s.last().unwrap_or(&i) - i) as i32;
s.push(i);
}
r
}
30.01.2024
150. Evaluate Reverse Polish Notation medium
blog post
substack
youtube

Join me on Telegram
https://t.me/leetcode_daily_unstoppable/488
Problem TLDR
Solve Reverse Polish Notation.
Intuition
Push to stack until operation met, then pop twice and do op.
Approach
Let’s try to be brief.
Complexity
-
Time complexity: \(O(n)\)
-
Space complexity: \(O(n)\)
Code
fun evalRPN(tokens: Array<String>) = Stack<Int>().run {
for (s in tokens) push(when (s) {
"+" -> pop() + pop()
"-" -> -pop() + pop()
"*" -> pop() * pop()
"/" -> pop().let { pop() / it }
else -> s.toInt()
})
pop()
}
pub fn eval_rpn(tokens: Vec<String>) -> i32 {
let mut s = vec![];
for t in tokens { if let Ok(n) = t.parse() { s.push(n) }
else { let (a, b) = (s.pop().unwrap(), s.pop().unwrap());
s.push(match t.as_str() {
"+" => a + b, "-" => b - a, "*" => a * b, _ => b / a }) }}
s[0]
}
29.01.2024
232. Implement Queue using Stacks easy
blog post
substack
youtube

Join me on Telegram
https://t.me/leetcode_daily_unstoppable/487
Problem TLDR
Queue by 2 stacks.
Intuition
Let’s write down how the numbers are added:
stack a: [1 2]
stack b: []
peek:
a: [1]
b: [2]
a: []
b: [2 1], b.peek == 1
Approach
Let’s do some code golf.
Complexity
-
Time complexity: \(O(1)\) for total operations. In general, stack drain is a rare operation
-
Space complexity: \(O(n)\) for total operations.
Code
class MyQueue() {
val a = Stack<Int>()
val b = Stack<Int>()
fun push(x: Int) = a.push(x)
fun pop() = peek().also { b.pop() }
fun peek(): Int {
if (b.size < 1) while (a.size > 0) b += a.pop()
return b.peek()
}
fun empty() = a.size + b.size == 0
}
struct MyQueue(Vec<i32>, Vec<i32>);
impl MyQueue {
fn new() -> Self { Self(vec![], vec![]) }
fn push(&mut self, x: i32) { self.0.push(x); }
fn pop(&mut self) -> i32 { self.peek(); self.1.pop().unwrap() }
fn peek(&mut self) -> i32 {
if self.1.is_empty() { self.1.extend(self.0.drain(..).rev()); }
*self.1.last().unwrap()
}
fn empty(&self) -> bool { self.0.len() + self.1.len() == 0 }
}
28.01.2024
1074. Number of Submatrices That Sum to Target hard
blog post
substack
youtube

Join me on Telegram
https://t.me/leetcode_daily_unstoppable/486
Problem TLDR
Count submatrix target sums.
Intuition
Precompute prefix sums, then calculate submatrix sum in O(1).
Approach
- use [n+1][m+1] to avoid
ifs - there are O(n^3) solution exists
Complexity
-
Time complexity: \(O(n^4)\)
-
Space complexity: \(O(n^2)\)
Code
fun numSubmatrixSumTarget(matrix: Array<IntArray>, target: Int): Int {
val s = Array(matrix.size + 1) { IntArray(matrix[0].size + 1) }
return (1..<s.size).sumOf { y -> (1..<s[0].size).sumOf { x ->
s[y][x] = matrix[y - 1][x - 1] + s[y - 1][x] + s[y][x - 1] - s[y - 1][x - 1]
(0..<y).sumOf { y1 -> (0..<x).count { x1 ->
target == s[y][x] - s[y1][x] - s[y][x1] + s[y1][x1]
}}
}}
}
pub fn num_submatrix_sum_target(matrix: Vec<Vec<i32>>, target: i32) -> i32 {
let mut s = vec![vec![0; matrix[0].len() + 1]; matrix.len() + 1];
(1..s.len()).map(|y| (1..s[0].len()).map(|x| {
s[y][x] = matrix[y - 1][x - 1] + s[y - 1][x] + s[y][x - 1] - s[y - 1][x - 1];
(0..y).map(|y1| (0..x).filter_map(|x1|
if target == s[y][x] - s[y1][x] - s[y][x1] + s[y1][x1] { Some(1) } else { None }
).count() as i32).sum::<i32>()
}).sum::<i32>()).sum()
}
27.01.2024
629. K Inverse Pairs Array hard
blog post
substack
youtube
Join me on Telegram
https://t.me/leetcode_daily_unstoppable/485
Problem TLDR
Number of arrays of 1..n with k reversed order pairs.
Intuition
First step: write down all the arrays for some example n, for every possible k:
// 1 2 3 4
// f(4,1) = 3
// 1 3 2 4 [. . . 32 . . ] 3 f(3, 1) = 2 = 1 + f(2, 1)
// 1 2 4 3 [43 . . . . . ] 4 f(2, 1) = 1
// 2 1 3 4 [. . . . . 21] 2
// f(4, 2) = 5
// 1 3 4 2 [. 42 . 32 . . ] 4 f(4, 2) = 1 + f(3, 1) + f(3, 2) = 1 + sum_j_k(f(2, j))
// 1 4 2 3 [43 42 . . . . ] 4 f(3, 2) = 1 + f(2, 1) = 2
// 2 1 4 3 [43 . . . . 21] 4 f(2, 2) = 0
// 2 3 1 4 [. . . . 31 21] 3 f(3, 2) = 2
// 3 1 2 4 [. . . 32 31 . ] 3
// f(4, 3) = 6
// 1 4 3 2 [43 42 . 32 . . ] 4 f(4, 3) = 1 + f(3, 1) + f(3, 2) + f(3, 3)
// 2 3 4 1 [. . 41 . 31 21] 4
// 2 4 1 3 [43 . 41 . . 21] 4
// 3 1 4 2 [. 42 . 32 31 . ] 4
// 3 2 1 4 [. . . 32 31 21] 3 f(3, 3) = 1
// 4 1 2 3 [43 42 41 . . . ] 4
// f(4, 4) = 5
// 2 4 3 1 [43 . 41 . 31 21] 4
// 3 2 4 1 [. . 41 32 31 21] 4 f(4, 4) = f(3, 1) + f(3, 2) + f(3, 3) + f(3, 4)
// 3 4 1 2 [. 42 41 32 31 . ] 4 f(3, 4) = 0
// 4 1 3 2 [43 42 41 32 . . ] 4
// 4 2 1 3 [43 42 41 . . 21] 4
// f(4, 5) = 3
// 3 4 2 1 [. 42 41 32 31 21] 4 f(4, 5) = f(3, 2) + f(3, 3)
// 4 3 1 2 [43 42 41 32 31 . ] 4
// 4 2 3 1 [43 42 41 . 31 21] 4
// f(4, 6) = 1
// 4 3 2 1 [43 42 41 32 31 21] 4 f(4, 6) = f(3, 3) = 1
// f(5, 10) = 1
// f(5, x) = 1, x = 6 + 4 = 10, f(5, 10) = 1, f(5, 9) = f(4, 6) + f(4, 5) = 1+3=4
// f(6, 15) = 1 f(5, 8) = f(4, 6) + f(4, 5) + f(4, 4) = 1+3+5=9
// f(7, 21) = 1 f(5, 7) = f(5, 8) + f(4, 3) = 9+6=15
// f(8, 28) = 1 f(5, 6) = f(5, 7) + f(4, 2) = 15+5 =20
// f(5, 5) = f(5, 6) + f(4, 1) = 20+3=23--->22
// f(5, 4) = f(5, 5) + 1 = 24--->20
// f(5, 3) = 1 + f(4,1)+f(4,2)+f(4,3) = 1+3+5+6=15
// f(5, 2) = 1 + f(4,1) + f(4, 2) = 1+3+5 = 9
// f(5, 1) = 1 + f(4, 1)= 1+3=4
// f(5, 0) = 1
// f(0) = 0
// f(1) = 1
// f(2) = 1 1
// f(3) = 1 2 2 1
// 0 1 2 3 4 5 6
//
// 1 2 2 1
// 1 2 2 1
// 1 3 5 6 5 3 1
// f(4) = 1 3 5 (6) 5 3 1 1=0+1,3=1+2,5=3+2,6=5+1,5=6-1,3=5-2,1=3-2,0=1-1
// + 1 3 4 6 5 3 1
// - 1 3 5 6 5 3
// 0 1 2 3 4 5 6 7 8 9 10
//
// 1 3 5 6 5 3 1
// 1 3 5 6 5 3 1
// 1 4 9 15 20 22 20 15 9 4 1
// 0 1 2 3 4 5 6 7 8 9 10
// 5 = 10 - (7 - 2)
// f(5) = 1 4 9 15 (20 22 20) 15 9 4 1 20 = 15+5, 22 = 20+3-1, 20=22+1-3, 15=20-5, 9=15-6, 4=9-5, 1=4-3
// f(6) = 1 5 14 28 48 70 90 105 ??? 10590 70 48 28 14 5 1
// f(7) = 1 6 20 48
// f(6, 15) = 1
// f(9, 36) = 1 f(6, 14) = f(5, 10) + f(5, 9) = 1+4 = 5
// f(6, 13) = f(5, 10) + f(5, 9) + f(5, 8) = 5+9=14
// f(6, 12) =
// [15..]+
// [..15]-
// [ 21 ]
After several hours (3 in my case) of staring at those numbers the idea should came to your mind: there is a pattern.
For every n, if all the numbers are reversed, then there are exactly Fibonacci(n) reversed pairs:
// f(5, x) = 1, x = 6 + 4 = 10, f(5, 10) = 1
// f(6, 15) = 1
// f(7, 21) = 1
// f(8, 28) = 1
Another pattern is how we make a move in n space:
f(3, 1) = 2 = 1 + f(2, 1)
f(4, 2) = 1 + f(3, 1) + f(3, 2) = 1 + sum_j_k(f(2, j))
f(3, 2) = 1 + f(2, 1) = 2
f(4, 3) = 1 + f(3, 1) + f(3, 2) + f(3, 3)
f(4, 4) = f(3, 1) + f(3, 2) + f(3, 3) + f(3, 4)
It almost works, until it not: at some point pattern breaks, so search what is it.
Let’s write all the k numbers for each n:
f(0) = 0
f(1) = 1
f(2) = 1 1
f(3) = 1 2 2 1
f(4) = 1 3 5 6 5 3 1
f(5) = 1 4 9 15 20 22 20 15 9 4 1
There is a symmetry and we can deduce it by intuition: add the previous and at some point start to remove:
// 1 2 2 1
// 1 2 2 1
// 1 3 5 6 5 3 1
// 1 3 5 6 5 3 1
// 1 3 5 6 5 3 1
// 1 4 9 15 20 22 20 15 9 4 1
Now, the picture is clear. At some index we must start to remove the previous sequence.
We are not finished yet, however: solution will give TLE. Fibonacci became too big. So, another hint: numbers after k doesn’t matter.
Approach
This is a filter problem: it filters you.
- we can hold only
knumbers - we can ping-pong swap two dp arrays
Complexity
-
Time complexity: \(O(nk)\)
-
Space complexity: \(O(k)\)
Code
fun kInversePairs(n: Int, k: Int): Int {
var fib = 1
var prev = LongArray(k + 1).apply { this[0] = 1 }
var curr = LongArray(k + 1)
repeat(n) {
fib = fib + it
var c = 0L
for (x in 0..k) {
if (x < fib - it) c += prev[x]
if (x - it > 0) c -= prev[x - it - 1]
curr[x] = (c + 1_000_000_007L) % 1_000_000_007L
}
prev = curr.also { curr = prev }
}
return if (k >= fib) 0 else prev[k].toInt()
}
pub fn k_inverse_pairs(n: i32, k: i32) -> i32 {
let mut fib = 1;
let mut prev = vec![1; (k + 1) as usize];
let mut curr = vec![1; (k + 1) as usize];
for i in 0..n {
fib = fib + i;
let mut c = 0i64;
for x in 0..=k {
if x < fib - i { c += prev[x as usize]; }
if x - i > 0 { c -= prev[(x - i - 1) as usize]; }
curr[x as usize] = (c + 1_000_000_007) % 1_000_000_007;
}
std::mem::swap(&mut prev, &mut curr);
}
if k >= fib { 0 } else { prev[k as usize] as i32 }
}
26.01.2024
576. Out of Boundary Paths medium
blog post
substack
youtube

Join me on Telegram
https://t.me/leetcode_daily_unstoppable/484
Problem TLDR
Number of paths from cell in grid to out of boundary.
Intuition
Let’s do a Brute-Force Depth-First Search from the current cell to neighbors. If we are out of boundary, we have a 1 path, and 0 if moves are out. Then add memoization with a HashMap.
Approach
- using
longhelps to shorten the code
Complexity
-
Time complexity: \(O(nmv)\)
-
Space complexity: \(O(nmv)\)
Code
fun findPaths(m: Int, n: Int, maxMove: Int, startRow: Int, startColumn: Int): Int {
val dp = mutableMapOf<Pair<Pair<Int, Int>, Int>, Long>()
fun dfs(y: Int, x: Int, move: Int): Long = dp.getOrPut(y to x to move) {
if (y < 0 || x < 0 || y == m || x == n) 1L
else if (move <= 0) 0L else
dfs(y - 1, x, move - 1) +
dfs(y + 1, x, move - 1) +
dfs(y, x - 1, move - 1) +
dfs(y, x + 1, move - 1) } % 1_000_000_007L
return dfs(startRow, startColumn, maxMove).toInt()
}
pub fn find_paths(m: i32, n: i32, max_move: i32, start_row: i32, start_column: i32) -> i32 {
let mut dp = HashMap::new();
fn dfs( y: i32, x: i32, mov: i32, m: i32, n: i32, dp: &mut HashMap<(i32, i32, i32), i64> ) -> i64 {
if y < 0 || x < 0 || y == m || x == n { 1 } else if mov<= 0 { 0 } else {
if let Some(&cache) = dp.get(&(y, x, mov)) { cache } else {
let result = (dfs(y - 1, x, mov - 1, m, n, dp) +
dfs(y + 1, x, mov - 1, m, n, dp) +
dfs(y, x - 1, mov - 1, m, n, dp) +
dfs(y, x + 1, mov - 1, m, n, dp)) % 1_000_000_007;
dp.insert((y, x, mov), result); result
}
}
}
dfs(start_row, start_column, max_move, m, n, &mut dp) as i32
}
25.01.2024
1143. Longest Common Subsequence medium
blog post
substack
youtube

Join me on Telegram
https://t.me/leetcode_daily_unstoppable/483
Problem TLDR
Longest common subsequence of two strings.
Intuition
We can start from a brute force solution: given the current positions i and j we take them into common if text1[i] == text2[j] or choose between taking from text1[i] and text2[j] if not. The result will only depend on the current positions, so can be cached. From this, we can rewrite the solution to iterative version.
Approach
- use
len + 1dp size to avoid boundary checks - forward iteration is faster, but
dp[0][0]must be the out of boundary value foldcan save us some lines of code- there is a 1D-memory dp solution exists
Complexity
-
Time complexity: \(O(n^2)\)
-
Space complexity: \(O(n^2)\)
Code
fun longestCommonSubsequence(text1: String, text2: String): Int {
val dp = Array(text1.length + 1) { IntArray(text2.length + 1) }
for (i in text1.lastIndex downTo 0)
for (j in text2.lastIndex downTo 0)
dp[i][j] = if (text1[i] == text2[j])
1 + dp[i + 1][j + 1] else
max(dp[i + 1][j], dp[i][j + 1])
return dp[0][0]
}
pub fn longest_common_subsequence(text1: String, text2: String) -> i32 {
let mut dp = vec![vec![0; text2.len() + 1]; text1.len() + 1];
text1.bytes().enumerate().fold(0, |_, (i, a)|
text2.bytes().enumerate().fold(0, |r, (j, b)| {
let l = if a == b { 1 + dp[i][j] } else { dp[i][j + 1].max(r) };
dp[i + 1][j + 1] = l; l
})
)
}
24.01.2024
1457. Pseudo-Palindromic Paths in a Binary Tree medium
blog post
substack
youtube

Join me on Telegram
https://t.me/leetcode_daily_unstoppable/482
Problem TLDR
Count can-form-a-palindrome paths root-leaf in a binary tree.
Intuition
Let’s walk a binary tree with Depth-First Search and check the frequencies in path’s numbers. To form a palindrome, only a single frequency can be odd.
Approach
- only odd-even matters, so we can store just boolean flags mask
Complexity
-
Time complexity: \(O(n)\)
-
Space complexity: \(O(log(n))\)
Code
fun pseudoPalindromicPaths (root: TreeNode?): Int {
fun dfs(n: TreeNode?, freq: Int): Int = n?.run {
val f = freq xor (1 shl `val`)
if (left == null && right == null) {
if (f and (f - 1) == 0) 1 else 0
} else dfs(left, f) + dfs(right, f)
} ?: 0
return dfs(root, 0)
}
pub fn pseudo_palindromic_paths (root: Option<Rc<RefCell<TreeNode>>>) -> i32 {
fn dfs(n: &Option<Rc<RefCell<TreeNode>>>, freq: i32) -> i32 {
n.as_ref().map_or(0, |n| {
let n = n.borrow();
let f = freq ^ (1 << n.val);
dfs(&n.left, f) + dfs(&n.right, f) +
(n.left.is_none() && n.right.is_none() && (f & (f - 1) == 0)) as i32
})
}
dfs(&root, 0)
}
23.01.2024
1239. Maximum Length of a Concatenated String with Unique Characters medium
blog post
substack
youtube

Join me on Telegram
https://t.me/leetcode_daily_unstoppable/481
Problem TLDR
Max length subsequence of strings array with unique chars.
Intuition
Let’s do a brute-force Depth-First Search and keep track of used chars so far.
Approach
- we must exclude all strings with duplicate chars
- we can use bit masks, then
mask xor wordmust not be equalmask or wordfor them not to intersect
Complexity
-
Time complexity: \(O(2^n)\)
-
Space complexity: \(O(n)\)
Code
fun maxLength(arr: List<String>): Int {
val sets = arr.filter { it.toSet().size == it.length }
fun dfs(i: Int, s: Set<Char>): Int = if (i == sets.size) 0
else max(
if (sets[i].any { it in s }) 0 else
sets[i].length + dfs(i + 1, s + sets[i].toSet()),
dfs(i + 1, s)
)
return dfs(0, setOf())
}
pub fn max_length(arr: Vec<String>) -> i32 {
let bits: Vec<_> = arr.into_iter()
.filter(|s| s.len() == s.chars().collect::<HashSet<_>>().len())
.map(|s| s.bytes().fold(0, |m, c| m | 1 << (c - b'a')))
.collect();
fn dfs(bits: &[i32], i: usize, mask: i32) -> i32 {
if i == bits.len() { 0 } else {
dfs(bits, i + 1, mask).max(
if (bits[i] | mask != bits[i] ^ mask) { 0 } else
{ bits[i].count_ones() as i32 + dfs(bits, i + 1, mask | bits[i]) }
)}
}
dfs(&bits, 0, 0)
}
22.01.2024
645. Set Mismatch easy
blog post
substack
youtube

Join me on Telegram
https://t.me/leetcode_daily_unstoppable/480
Problem TLDR
Return missing and duplicated number in 1..n array with one number replaced.
Intuition
First try to find a xor solution by observing xor differencies. Then give up and just compare sorted order or even better HashSet with expected.
Approach
- delta sums is a trivial approach, use it in an interview
- learn about xor solution (homework)
Complexity
-
Time complexity: \(O(n)\)
-
Space complexity: \(O(n)\)
Code
fun findErrorNums(nums: IntArray) = with(nums) {
val missing = ((1..size) - toSet()).first()
val delta = sum() - (size + 1) * size / 2
intArrayOf(missing + delta, missing)
}
pub fn find_error_nums(nums: Vec<i32>) -> Vec<i32> {
let sz = nums.len() as i32;
let sum: i32 = nums.iter().sum();
let set_sum: i32 = nums.into_iter().collect::<HashSet<_>>().iter().sum();
vec![sum - set_sum, sz * (sz + 1) / 2 - set_sum]
}
21.01.2024
198. House Robber medium
blog post
substack
youtube
https://youtu.be/UeejjxR-skM
Join me on Telegram
https://t.me/leetcode_daily_unstoppable/479
Problem TLDR
Max sum to rob non adjacent items in array.
Intuition
Let’s inspect how robber acts by scanning array home by home:
// 2 7 9 3 1
// 2 max(2) = 2
// 7 max(7, 2) = 7
// b a 9 max(9 + b, a) = 11
// b a 3 max(3 + b, a) = 11
// b a 1 max(1 + b, a) = 12
We see that he can choose to take the current home and drop the previous, or keep the previous. Only the two last sums matter.
Approach
- save some lines of code by using
fold
Complexity
-
Time complexity: \(O(n)\)
-
Space complexity: \(O(1)\)
Code
fun rob(nums: IntArray) =
nums.fold(0 to 0) { (a, b), x -> max(x + b, a) to a }.first
pub fn rob(nums: Vec<i32>) -> i32 {
nums.iter().fold((0, 0), |(a, b), &x| (b, b.max(a + x))).1
}
20.01.2024
907. Sum of Subarray Minimums medium
blog post
substack
youtube

Join me on Telegram
https://t.me/leetcode_daily_unstoppable/478
Problem TLDR
Sum of minimums of all array ranges.
Intuition
To build an intuition, we must write some examples where numbers will increase and decrease.
Next, write down all the subarrays and see how the result differs when we add another number.
Let g[i] be minimums for all subarrays [i..]. Result for all subarrays is f[i] = g[i] + f[i + 1].
Now, let’s find how g can be split into subproblems:
// 5 2 1
// 0 1 2 3 4 5 6 7 8 910111213
// g(5 2 3 5 4 3 2 1 3 2 3 2 1 4) = 5 + g(2 3 5 4 3 2 1 3 2 3 2 1 4)
// 2 1
// g(2 3 5 4 3 2 1 3 2 3 2 1 4) = 2 + g(2 2 2 2) + g(2 1 3 2 3 2 1 4)
// 3 2 1
// g(3 5 4 3 2 1 3 2 3 2 1 4) = 3 + g(3 3) + g(3 2 1 3 2 3 2 1 4)
// 5 4 3 2 1
// g(5 4 3 2 1 3 2 3 2 1 4) = 5 + g(4 3 2 1 3 2 3 2 1 4)
// 4 3 2 1
// g(4 3 2 1 3 2 3 2 1 4) = 4 + g(3 2 1 3 2 3 2 1 4)
// 3 2 1
// g(3 2 1 3 2 3 2 1 4) = 3 + g(2 1 3 2 3 2 1 4)
// 2 1
// g(2 1 3 2 3 2 1 4) = 2 + g(1 3 2 3 2 1 4)
Notice the pattern: if next value (right to left) is bigger, we just reuse previous g, but if it is smaller, we need to find closest positions and replace all the numbers to arr[i].
To do this step in O(1) there is a known Increasing Stack technique: put values that bigger and each smaller value will discard all larger numbers.
Approach
- use index
sizeto store absent value and safely accessg[j] - use
foldto reduce some lines of code
Complexity
-
Time complexity: \(O(n)\)
-
Space complexity: \(O(n)\)
Code
fun sumSubarrayMins(arr: IntArray) = with(Stack<Int>()) {
val g = IntArray(arr.size + 1)
(arr.lastIndex downTo 0).fold(0) { prev, i ->
while (isNotEmpty() && arr[peek()] >= arr[i]) pop()
val j = if (isEmpty()) arr.size else peek()
g[i] = (j - i) * arr[i] + g[j]
push(i)
(prev + g[i]) % 1_000_000_007
}
}
pub fn sum_subarray_mins(arr: Vec<i32>) -> i32 {
let (mut s, mut g) = (Vec::new(), vec![0; arr.len() + 1]);
arr.iter().enumerate().rev().fold(0, |f, (i, &v)| {
while s.last().map_or(false, |&j| arr[j] >= v) { s.pop(); }
let j = *s.last().unwrap_or(&arr.len());
g[i] = (j - i) as i32 * v + g[j];
s.push(i);
(f + g[i]) % 1_000_000_007
})
}
19.01.2024
931. Minimum Falling Path Sum medium
blog post
substack
youtube
Join me on Telegram
https://t.me/leetcode_daily_unstoppable/477
Problem TLDR
Min sum moving bottom center, left, right in 2D matrix.
Intuition
At every cell we must add it value to path plus min of a three direct top cells as they are the only way here.
Approach
We can reuse the matrix or better use separate temporal array.
Complexity
-
Time complexity: \(O(mn)\)
-
Space complexity: \(O(1)\), or O(m) to not corrupt the inputs
Code
fun minFallingPathSum(matrix: Array<IntArray>): Int {
for (y in 1..<matrix.size) for (x in 0..<matrix[0].size)
matrix[y][x] += (max(0, x - 1)..min(x + 1, matrix[0].lastIndex))
.minOf { matrix[y - 1][it] }
return matrix.last().min()
}
pub fn min_falling_path_sum(matrix: Vec<Vec<i32>>) -> i32 {
*matrix.into_iter().reduce(|dp, row|
row.iter().enumerate().map(|(x, &v)|
v + dp[x.max(1) - 1..=(x + 1).min(dp.len() - 1)]
.iter().min().unwrap()
).collect()
).unwrap().iter().min().unwrap()
}
18.01.2024
70. Climbing Stairs easy
blog post
substack
youtube
Join me on Telegram
https://t.me/leetcode_daily_unstoppable/476
Problem TLDR
Ways to climb n stairs by 1 or 2 steps.
Intuition
Start with brute force DFS search: either go one or two steps and cache the result in a HashMap<Int, Int>. Then convert solution to iterative version, as only two previous values matter.
Approach
- no need to check
if n < 4 - save some lines of code with
also
Complexity
-
Time complexity: \(O(n)\)
-
Space complexity: \(O(1)\)
Code
fun climbStairs(n: Int): Int {
var p = 0
var c = 1
for (i in 1..n) c += p.also { p = c }
return c
}
pub fn climb_stairs(n: i32) -> i32 {
(0..n).fold((0, 1), |(p, c), _| (c, p + c)).1
}
17.01.2024
1207. Unique Number of Occurrences easy
blog post
substack
youtube
Join me on Telegram
https://t.me/leetcode_daily_unstoppable/474
Problem TLDR
Are array frequencies unique.
Intuition
Just count frequencies.
Approach
Let’s use some Kotlin’s API:
- asList
- groupingBy
- eachCount
- groupBy
- run
Complexity
-
Time complexity: \(O(n)\)
-
Space complexity: \(O(n)\)
Code
fun uniqueOccurrences(arr: IntArray) =
arr.asList().groupingBy { it }.eachCount().values.run {
toSet().size == size
}
pub fn unique_occurrences(arr: Vec<i32>) -> bool {
let occ = arr.iter().fold(HashMap::new(), |mut m, &x| {
*m.entry(x).or_insert(0) += 1; m
});
occ.len() == occ.values().collect::<HashSet<_>>().len()
}
16.01.2024
380. Insert Delete GetRandom O(1) medium
blog post
substack
youtube
Join me on Telegram
https://t.me/leetcode_daily_unstoppable/473
Problem TLDR
Implement HashSet
Intuition
There is a random method exists in Kotlin’s MutableSet https://kotlinlang.org/api/latest/jvm/stdlib/kotlin.collections/random.html.
However, let’s just use array to store values and save positions in a HashMap. The order in array didn’t matter, so we can remove elements in O(1).
Approach
To save some symbols of code, we can extend from ArrayList.
Complexity
-
Time complexity: \(O(1)\), per operation
-
Space complexity: \(O(1)\), per operation
Code
class RandomizedSet(): ArrayList<Int>() {
val vToPos = HashMap<Int, Int>()
fun insert(v: Int): Boolean {
if (vToPos.contains(v)) return false
add(v)
vToPos[v] = lastIndex
return true
}
override fun remove(v: Int): Boolean {
val pos = vToPos.remove(v) ?: return false
set(pos, last())
if (last() != v) vToPos[last()] = pos
removeLast()
return true
}
fun getRandom() = random()
}
use rand::{thread_rng, Rng};
use std::collections::HashMap;
struct RandomizedSet {
vec: Vec<i32>,
v_to_i: HashMap<i32, usize>,
}
impl RandomizedSet {
fn new() -> Self {
Self { vec: vec![], v_to_i: HashMap::new() }
}
fn insert(&mut self, v: i32) -> bool {
if self.v_to_i.entry(v).or_insert(self.vec.len()) != &self.vec.len() {
return false;
}
self.vec.push(v);
true
}
fn remove(&mut self, v: i32) -> bool {
self.v_to_i.remove(&v).map_or(false, |i| {
let last = self.vec.pop().unwrap();
if (last != v) {
self.vec[i] = last;
self.v_to_i.insert(last, i);
}
true
})
}
fn get_random(&self) -> i32 {
self.vec[thread_rng().gen_range(0, self.vec.len())]
}
}
15.01.2024
2225. Find Players With Zero or One Losses medium
blog post
substack
youtube
Join me on Telegram
https://t.me/leetcode_daily_unstoppable/472
Problem TLDR
[sorted winners list, sorted single lose list]
Intuition
No special algorithms here, just a set manipulation.
Approach
Let’s use some Kotlin’s API:
- map
- groupingBy
- eachCount
- filter
- sorted
Complexity
-
Time complexity: \(O(nlog(n))\)
-
Space complexity: \(O(n)\)
Code
fun findWinners(matches: Array<IntArray>) = buildList {
val winners = matches.map { it[0] }.toSet()
val losers = matches.groupingBy { it[1] }.eachCount()
add((winners - losers.keys).sorted())
add(losers.filter { (k, v) -> v == 1 }.keys.sorted())
}
14.01.2024
1657. Determine if Two Strings Are Close medium
blog post
substack
youtube
Join me on Telegram
https://t.me/leetcode_daily_unstoppable/471
Problem TLDR
Are strings convertible by swapping existing chars positions or frequencies.
Intuition
By the problem definition, we must compare the frequencies numbers. Also, sets of chars must be equal.
Approach
Let’s use some Kotlin’s API:
- groupingBy
- eachCount
- run
- sorted
Complexity
-
Time complexity: \(O(n)\), as we are sorting only 26 elements
-
Space complexity: \(O(n)\)
Code
fun String.f() = groupingBy { it }.eachCount()
.run { keys to values.sorted() }
fun closeStrings(word1: String, word2: String) =
word1.f() == word2.f()
13.01.2024
1347. Minimum Number of Steps to Make Two Strings Anagram medium
blog post
substack
youtube
Join me on Telegram
https://t.me/leetcode_daily_unstoppable/470
Problem TLDR
Min operations to make string t anagram of s.
Intuition
Let’s compare char’s frequencies of those two strings.
Approach
- careful: as we replacing one kind of chars with another, we must decrease that another counter
Complexity
-
Time complexity: \(O(n)\)
-
Space complexity: \(O(1)\)
Code
fun minSteps(s: String, t: String) =
IntArray(128).let {
for (c in s) it[c.toInt()]++
for (c in t) it[c.toInt()]--
it.sumOf { abs(it) } / 2
}
12.01.2024
1704. Determine if String Halves Are Alike easy
blog post
substack
youtube
Join me on Telegram
https://t.me/leetcode_daily_unstoppable/469
Problem TLDR
https://t.me/leetcode_daily_unstoppable/469
Approach
Let’s use some Kotlin’s API:
- toSet
- take
- drop
- count
Complexity
-
Time complexity: \(O(n)\)
-
Space complexity: \(O(n)\), can be O(1) with
asSequence
Code
val vw = "aeiouAEIOU".toSet()
fun halvesAreAlike(s: String) =
s.take(s.length / 2).count { it in vw } ==
s.drop(s.length / 2).count { it in vw }
11.01.2024
1026. Maximum Difference Between Node and Ancestor medium
blog post
substack
youtube

Join me on Telegram
https://t.me/leetcode_daily_unstoppable/468
Problem TLDR
Max diff between node and ancestor in a binary tree.
Intuition
Let’s traverse the tree with Depth-First Search and keep track of the max and min values.
Approach
- careful with corner case: min and max must be in the same ancestor-child hierarchy
- we can use external variable, or put it in each result
Complexity
-
Time complexity: \(O(n)\)
-
Space complexity: \(O(log(n))\)
Code
fun maxAncestorDiff(root: TreeNode?): Int {
var res = 0
fun dfs(n: TreeNode?): List<Int> = n?.run {
(dfs(left) + dfs(right) + listOf(`val`)).run {
listOf(min(), max()).onEach { res = max(res, abs(`val` - it)) }
}
} ?: listOf()
dfs(root)
return res
}
10.01.2024
2385. Amount of Time for Binary Tree to Be Infected medium
blog post
substack
youtube
Join me on Telegram
https://t.me/leetcode_daily_unstoppable/467
Problem TLDR
Max distance from node in a Binary Tree.
Intuition
Let’s build a graph, then do a Breadth-First Search from starting node.
Approach
We can store it in a parent[TreeNode] map or just in two directional node to list<node> graph.
Complexity
-
Time complexity: \(O(n)\)
-
Space complexity: \(O(n)\)
Code
fun amountOfTime(root: TreeNode?, start: Int): Int {
val fromTo = mutableMapOf<TreeNode, MutableList<TreeNode>>()
var queue = ArrayDeque<TreeNode>()
val visited = mutableSetOf<TreeNode>()
fun dfs(n: TreeNode): Unit = with (n) {
if (`val` == start) {
queue.add(n)
visited.add(n)
}
left?.let {
fromTo.getOrPut(n) { mutableListOf() } += it
fromTo.getOrPut(it) { mutableListOf() } += n
dfs(it)
}
right?.let {
fromTo.getOrPut(n) { mutableListOf() } += it
fromTo.getOrPut(it) { mutableListOf() } += n
dfs(it)
}
}
root?.let { dfs(it) }
var time = -1
while (queue.isNotEmpty()) {
repeat(queue.size) {
var x = queue.removeFirst()
fromTo[x]?.onEach {
if (visited.add(it)) queue.add(it)
}
}
time++
}
return time
}
9.01.2024
872. Leaf-Similar Trees easy
blog post
substack
youtube
Join me on Telegram
https://t.me/leetcode_daily_unstoppable/466
Problem TLDR
Are leafs sequences equal for two trees.
Intuition
Let’s build a leafs lists and compare them.
Approach
Let’s use recursive function.
Complexity
-
Time complexity: \(O(n)\)
-
Space complexity: \(O(n)\)
Code
fun leafs(n: TreeNode?): List<Int> = n?.run {
(leafs(left) + leafs(right))
.takeIf { it.isNotEmpty() } ?: listOf(`val`)
} ?: listOf()
fun leafSimilar(root1: TreeNode?, root2: TreeNode?) =
leafs(root1) == leafs(root2)
8.01.2024
938. Range Sum of BST easy
blog post
substack
youtube
Join me on Telegram
https://t.me/leetcode_daily_unstoppable/465
Problem TLDR
Sum of BST in range [low..high].
Intuition
Let’s iterate it using a Depth-First Search and check if each value is in the range.
Approach
- Careful: if the current node is out of range, we still must visit its children.
- However, we can prune visit on the one side
Complexity
-
Time complexity: \(O(r)\), r is a range
-
Space complexity: \(O(log(n))\)
Code
fun rangeSumBST(root: TreeNode?, low: Int, high: Int): Int =
root?.run {
(if (`val` in low..high) `val` else 0) +
(if (`val` > low) rangeSumBST(left, low, high) else 0) +
(if (`val` < high) rangeSumBST(right, low, high) else 0)
} ?: 0
7.01.2024
446. Arithmetic Slices II - Subsequence hard
blog post
substack
youtube
Join me on Telegram
https://t.me/leetcode_daily_unstoppable/464
Problem TLDR
Count of arithmetic subsequences.
Intuition
We can take every pair and search for the third element.
The result only depends on the diff and suffix array position, so can be cached.
Approach
- be careful how to count each new element: first add the
1then add the suffix count. Wrong approach: just count the1at the end of the sequence.
Complexity
-
Time complexity: \(O(n^2)\), it looks like n^4, but the
dfsn^2 part will only go deep once -
Space complexity: \(O(n^2)\)
Code
fun numberOfArithmeticSlices(nums: IntArray): Int {
val dp = mutableMapOf<Pair<Int, Int>, Int>()
fun dfs(i: Int, k: Int): Int = dp.getOrPut(i to k) {
var count = 0
for (j in i + 1..<nums.size)
if (nums[i].toLong() - nums[k] == nums[j].toLong() - nums[i])
count += 1 + dfs(j, i)
count
}
var count = 0
for (i in nums.indices)
for (j in i + 1..<nums.size)
count += dfs(j, i)
return count
}
6.01.2024
1235. Maximum Profit in Job Scheduling hard
blog post
substack
youtube
Join me on Telegram
https://t.me/leetcode_daily_unstoppable/463
Problem TLDR
Max profit in non-intersecting jobs given startTime[], endTime[] and profit[].
Intuition
Start with sorting jobs by the startTime. Then let’s try to find a subproblem: consider the only last element - it has maximum profit in itself. Then, move one index left: now, if we take the element, we must drop all the intersected jobs. Given that logic, there is a Dynamic Programming recurrence: dp[i] = max(dp[i + 1], profit[i] + dp[next]).
The tricky part is how to faster find the next non-intersecting position: we can use the Binary Search
Approach
Try to solve the problem for examples, there are only several ways you could try: greedy or dp. After 1 hour, use the hints.
Complexity
-
Time complexity: \(O(nlog(n))\)
-
Space complexity: \(O(n)\)
Code
fun jobScheduling(startTime: IntArray, endTime: IntArray, profit: IntArray): Int {
val inds = startTime.indices.sortedBy { startTime[it] }
val dp = IntArray(inds.size + 1)
for (i in inds.indices.reversed()) {
var lo = i + 1
var hi = inds.lastIndex
while (lo <= hi) {
val m = lo + (hi - lo) / 2
if (endTime[inds[i]] > startTime[inds[m]]) lo = m + 1 else hi = m - 1
}
dp[i] = max(dp[i + 1], profit[inds[i]] + dp[lo])
}
return dp[0]
}
5.01.2024
300. Longest Increasing Subsequence medium
blog post
substack
youtube
Join me on Telegram
https://t.me/leetcode_daily_unstoppable/462
Problem TLDR
Longest increasing subsequence length.
Intuition
This is a classical problem that has the optimal algorithm that you must know https://en.wikipedia.org/wiki/Longest_increasing_subsequence.
For every new number, check its position in an increasing sequence by Binary Search:
- already in a sequence, do nothing
- bigger than the last, insert
- interesting part: in the middle, replace the insertion position (next after the closest smaller)
increasing sequence
1 3 5 7 9 insert 6
^
1 3 5 6 9
As we do not care about the actual numbers, only the length, this would work. (To restore the actual subsequence, we must remember each predecessor, see the wiki)
Approach
If you didn’t remember how to restore the insertion point from binarySearch (-i-1), better implement it yourself:
- use inclusive
loandhi - always check the result `if (x == nums[mid]) pos = mid
- always move the borders
lo = mid + 1,hi = mid - 1
Complexity
-
Time complexity: \(O(nlog(n))\)
-
Space complexity: \(O(n)\)
Code
fun lengthOfLIS(nums: IntArray): Int {
val seq = mutableListOf<Int>()
for (x in nums)
if (seq.isEmpty()) seq += x else {
var i = seq.binarySearch(x)
if (i < 0) i = -i - 1
if (i == seq.size) seq += x else seq[i] = x
}
return seq.size
}
4.01.2024
2870. Minimum Number of Operations to Make Array Empty medium
blog post
substack
youtube
Join me on Telegram
https://t.me/leetcode_daily_unstoppable/461
Problem TLDR
Minimum pairs or triples duplicate removal operations to empty array of numbers.
Intuition
The first idea, is to count each kind of number. Then we must analyze each frequency: the number of removal operations ops will be the same for each f, so we can write a Dynamic Programming recurrent formula: ops(f) = 1 + min(ops(f - 2), ops(f - 3)). This is an accepted solution.
Then, we can think about other ways to optimally split f into a sum of a*2 + b*3: we must maximize b and minimize a. To do that, let’s prioritize f % 3 == 0 check. Our checks will be in this order:
f % 3 == 0 -> f / 3
(f - 2) % 3 == 0 -> 1 + f / 2
((f - 2) - 2) % 3 == 0 -> 1 + f / 2
... and so on
However, we can spot that recurrence repeat itself like this: f, f - 2, f - 4, f - 6, .... As 6 is also divisible by 3, there are total three checks needed: f % 3, (f - 2) % 3 and (f - 4) % 3.
Approach
Write the recurrent DFS function, then add a HashMap cache, then optimize everything out. Use the Kotlin’s API:
- groupBy
- mapValues
- sumOf
Complexity
-
Time complexity: \(O(n)\)
-
Space complexity: \(O(n)\)
Code
fun minOperations(nums: IntArray) = nums
.groupBy { it }.mapValues { it.value.size }.values
.sumOf { f -> when {
f < 2 -> return -1
f % 3 == 0 -> f / 3
(f - 2) % 3 == 0 || (f - 4) % 3 == 0 -> 1 + f / 3
else -> return -1
}}
3.01.2024
2125. Number of Laser Beams in a Bank medium
blog post
substack
youtube
Join me on Telegram
https://t.me/leetcode_daily_unstoppable/460
Problem TLDR
Beams count between consequent non-empty row’s 1s.
Intuition
By the problem definition, count = sum_i_j(count_i * count_j)
Approach
Let’s use some Kotlin’s API:
- map
- filter
- windowed
- sum
Complexity
-
Time complexity: \(O(nm)\)
-
Space complexity: \(O(n)\), can be reduced to O(1) with
asSequenceandfold.
Code
fun numberOfBeams(bank: Array<String>) =
bank.map { it.count { it == '1' } }
.filter { it > 0 }
.windowed(2)
.map { (a, b) -> a * b }
.sum() ?: 0
2.01.2024
2610. Convert an Array Into a 2D Array With Conditions medium blog post substack youtube \) where, u - number of uniq elements, f - max frequency. Worst case O(n^2):
1 2 3 4 1 1 1 1, u = n / 2, f = n / 2. This can be improved to O(n) by removing the empty collections fromfreq. -
Space complexity: \(O(n)\)
Code
fun findMatrix(nums: IntArray): List<List<Int>> {
val freq = nums.groupBy { it }
.mapValues { it.value.toMutableList() }
return buildList {
repeat(freq.values.maxOf { it.size }) {
add(buildList {
for ((k, v) in freq)
if (v.isNotEmpty()) add(v.removeLast())
})
}
}
}
1.01.2024
455. Assign Cookies easy
blog post
substack
youtube
Join me on Telegram
https://t.me/leetcode_daily_unstoppable/458
Problem TLDR
Max count of greedy children g[Int] to assign cookies with sizes s[Int].
Intuition
The optimal way to assign cookies is to start with less greed. We can put cookies and children in two PriorityQueues or just sort two arrays and maintain two pointers.
Approach
- PriorityQueue is a more error-safe solution, also didn’t modify the input.
- Careful with the pointers, check yourself with simple examples:
g=[1] s=[1],g=[2] s=[1]
Complexity
-
Time complexity: \(O(nlog(n))\)
-
Space complexity: \(O(1)\)
Code
fun findContentChildren(g: IntArray, s: IntArray): Int {
g.sort()
s.sort()
var j = 0
return g.count {
while (j < s.size && s[j] < it ) j++
j++ < s.size
}
}
31.12.2023
1624. Largest Substring Between Two Equal Characters easy
blog post
substack
youtube
 https://youtu.be/BF4M70PncfE
Join me on Telegram
https://t.me/leetcode_daily_unstoppable/456
Problem TLDR
Max distance between same chars in string.
Intuition
We must remember the first occurrence position of each kind of character.
Complexity
-
Time complexity: \(O(n)\)
-
Space complexity: \(O(1)\)
Code
fun maxLengthBetweenEqualCharacters(s: String) =
with(mutableMapOf<Char, Int>()) {
s.indices.maxOf { it - 1 - getOrPut(s[it]) { it } }
}
30.12.2023
1897. Redistribute Characters to Make All Strings Equal easy
blog post
substack
youtube
Join me on Telegram
https://t.me/leetcode_daily_unstoppable/455
Problem TLDR
Is it possible to split all the words[] characters into words.size groups.
Intuition
To understand the problem, consider example: a abc abbcc -> [abc] [abc] [abc]. We know the result words count, and we know the count of each kind of character. So, just make sure, every character’s count can be separated into words.size groups.
Approach
- to better understand the problem, consider adding more examples
- there can be more than one repeating character in group,
[aabc] [aabc] [aabc]
Complexity
-
Time complexity: \(O(nw)\)
-
Space complexity: \(O(1)\)
Code
fun makeEqual(words: Array<String>) =
IntArray(26).apply {
for (w in words) for (c in w) this[c.toInt() - 'a'.toInt()]++
}.all { it % words.size == 0 }
29.12.2023
1335. Minimum Difficulty of a Job Schedule hard
blog post
substack
youtube
Join me on Telegram
https://t.me/leetcode_daily_unstoppable/454
Problem TLDR
Min sum of maximums jobDifficulty[i] per day d preserving the order
Intuition
Let’s brute-force optimal interval of jobs jobInd..j for every day using Depth-First Search. The result will only depend on the starting jobInd and the current day, so can be cached.
Approach
- pay attention to the problem description, preserving jobs order matters here
Complexity
-
Time complexity: \(O(dn^2)\),
dnfor the recursion depth and anothernfor the inner loop -
Space complexity: \(O(dn)\)
Code
fun minDifficulty(jobDifficulty: IntArray, d: Int): Int {
val dp = mutableMapOf<Pair<Int, Int>, Int>()
fun dfs(jobInd: Int, day: Int): Int = when {
jobInd == jobDifficulty.size -> if (day == d) 0 else Int.MAX_VALUE / 2
day == d -> Int.MAX_VALUE / 2
else -> dp.getOrPut(jobInd to day) {
var max = 0
(jobInd..jobDifficulty.lastIndex).minOf { i ->
max = max(max, jobDifficulty[i])
max + dfs(i + 1, day + 1)
}
}}
return dfs(0, 0).takeIf { it < Int.MAX_VALUE / 2 } ?: -1
}
28.12.2023
1531. String Compression II hard
blog post
substack
youtube
Join me on Telegram
https://t.me/leetcode_daily_unstoppable/453
Problem TLDR
Min length of run-length encoded aabcc -> a2bc3 after deleting at most k characters
Intuition
Let’s consider starting from every position, then we can split the problem: result[i] = some_function(i..j) + result[j].
The hardest part is to find an optimal j position.
The wrong way: trying to count how many s[j]==s[i], and to keep them, removing all other chars s[j]!=s[i]. This didn’t give us the optimal solution for s[i..j], as we forced to keep s[0].
The correct way: keeping the most frequent char in s[i..j], removing all other chars.
Approach
Spend 1-2.5 hours max on the problem, then steal someone else’s solution. Don’t feel sorry, it’s just a numbers game.
Complexity
-
Time complexity: \(O(kn^2)\)
-
Space complexity: \(O(kn)\)
Code
fun getLengthOfOptimalCompression(s: String, k: Int): Int {
val dp = mutableMapOf<Pair<Int, Int>, Int>()
fun dfs(i: Int, toRemove: Int): Int =
if (toRemove < 0) Int.MAX_VALUE / 2
else if (i >= s.length - toRemove) 0
else dp.getOrPut(i to toRemove) {
val freq = IntArray(128)
var mostFreq = 0
(i..s.lastIndex).minOf { j ->
mostFreq = max(mostFreq, ++freq[s[j].toInt()])
when (mostFreq) {
0 -> 0
1 -> 1
else -> mostFreq.toString().length + 1
} + dfs(j + 1, toRemove - (j - i + 1 - mostFreq))
}
}
return dfs(0, k)
}
27.12.2023
1578. Minimum Time to Make Rope Colorful medium
blog post
substack
youtube
Join me on Telegram
https://t.me/leetcode_daily_unstoppable/452
Problem TLDR
Min sum of removed duplicates in array.
Intuition
The brute-force approach is to just consider keeping/remove every item, that can be cached in [size, 26] array.
However, there is a more optimal greedy solution: scan symbols one by one, and from each duplicate island remove the maximum of it.
Approach
Start from writing more verbose solution, keeping separate variables for currentSum, totalSum, and two separate conditions: if we meet a duplicate or not.
Then optimize it out.
Complexity
-
Time complexity: \(O(n)\)
-
Space complexity: \(O(1)\)
Code
fun minCost(colors: String, neededTime: IntArray): Int {
var sum = 0
var max = 0
var prev = '.'
for ((i, c) in colors.withIndex()) {
sum += neededTime[i]
if (prev != c) sum -= max.also { max = 0 }
max = max(max, neededTime[i])
prev = c
}
return sum - max
}
26.12.2023
1155. Number of Dice Rolls With Target Sum medium
blog post
substack
youtube
Join me on Telegram
https://t.me/leetcode_daily_unstoppable/451
Problem TLDR
Ways to throw once n dices with k faces to make target sum.
Intuition
Let’s consider each dice and try all the possible face. By repeating the process for all the dices, check if the final sum is equal to the target. The result will only depend on the dice count and target sum, so it can be cached.
Approach
Write brute force DFS, than add HashMap or array cache.
Complexity
-
Time complexity: \(O(nkt)\), nt - is a DFS search space, k - is the iteration inside
-
Space complexity: \(O(nt)\)
Code
fun numRollsToTarget(n: Int, k: Int, target: Int): Int {
val dp = mutableMapOf<Pair<Int, Int>, Int>()
fun dfs(c: Int, s: Int): Int =
dp.getOrPut(c to s) { when {
c == 0 -> if (s == 0) 1 else 0
s <= 0 -> 0
else -> (1..k).fold(0) { ways, d ->
(ways + dfs(c - 1, s - d)) % 1_000_000_007
}
} }
return dfs(n, target)
}
25.12.2023
91. Decode Ways medium
blog post
substack
youtube

Join me on Telegram
https://t.me/leetcode_daily_unstoppable/450
Problem TLDR
Ways to decode back ‘A’ -> ‘1’, ‘B’ -> ‘2’ … ‘Z’ -> ‘26’
Intuition
Let’s consider each position and do a DFS to check how many successfull paths exist.
For each position, we know the answer for the rest of the string, so it can be cached.
Approach
Start from implementing brute-force DFS, consider two cases: take just one char and take two chars. After that, introduce the cache, it can be an array or a HashMap<position, result>. Extra step, is to notice, the current value only depends on the two next values, so rewrite DFS into a reversed loop and store two previous results. The boss step is to do some code golf.
Complexity
-
Time complexity: \(O(n)\)
-
Space complexity: \(O(1)\)
Code
fun numDecodings(s: String): Int =
s.indices.reversed().fold(0 to 1) { (prev, curr), i ->
curr to if (s[i] == '0') 0 else
curr + if (s.drop(i).take(2).toInt() in 10..26) prev else 0
}.second
24.12.2023
1758. Minimum Changes To Make Alternating Binary String easy
blog post
substack
youtube
Join me on Telegram
https://t.me/leetcode_daily_unstoppable/449
TLDR
Minimum operations to make 01-string with no two adjacent equal
Intuition
There are only two possible final variations - odd zeros even ones or even zeros odd ones. We can count how many positions to changes for each of them, then return smallest counter.
Approach
In a stressfull situation better to just use 4 counters: oddOnes, evenOnes, oddZeros, evenZeros. Then do something with them.
Complexity
-
Time complexity: \(O(n)\)
-
Space complexity: \(O(1)\)
Code
fun minOperations(s: String): Int {
var oddOnesEvenZeros = 0
var oddZerosEvenOnes = 0
for (i in s.indices) when {
s[i] == '0' && i % 2 == 0 -> oddZerosEvenOnes++
s[i] == '0' && i % 2 != 0 -> oddOnesEvenZeros++
s[i] == '1' && i % 2 == 0 -> oddOnesEvenZeros++
s[i] == '1' && i % 2 != 0 -> oddZerosEvenOnes++
}
return min(oddOnesEvenZeros, oddZerosEvenOnes)
}
23.12.2023
1496. Path Crossing easy
blog post
substack
Join me on Telegram
https://t.me/leetcode_daily_unstoppable/448
Problem TLDR
Is path string of ‘N’, ‘E’, ‘W’, ‘S’ crosses
Intuition
We can simulate the path and remember visited coordinates
Complexity
-
Time complexity: \(O(n)\)
-
Space complexity: \(O(n)\)
Code
fun isPathCrossing(path: String): Boolean {
val visited = mutableSetOf(0 to 0)
var x = 0
var y = 0
return !path.all { when (it) {
'N' -> y++
'S' -> y--
'E' -> x++
else -> x-- }
visited.add(x to y)
}
}
22.12.2023
1422. Maximum Score After Splitting a String easy
blog post
substack
Join me on Telegram
https://t.me/leetcode_daily_unstoppable/447
Problem TLDR
Max left_zeros + right_ones in 01-array
Intuition
We can count ones and then scan from the beginning modifying the ones and zeros counts. After some retrospect, we can do this with score variable.
Complexity
-
Time complexity: \(O(n)\)
-
Space complexity: \(O(1)\), dropLast(1) creates the second list, but we can just use pointers or
asSequence
Code
fun maxScore(s: String): Int {
var score = s.count { it == '1' }
return s.dropLast(1).maxOf {
if (it == '0') ++score else --score
}
}
21.12.2023
1637. Widest Vertical Area Between Two Points Containing No Points easy
blog post
substack
Join me on Telegram
https://t.me/leetcode_daily_unstoppable/446
Problem TLDR
Max x window between xy points
Intuition
We can sort points by x and scan max window between them
Complexity
-
Time complexity: \(O(nlog(n))\)
-
Space complexity: \(O(n)\)
Code
fun maxWidthOfVerticalArea(points: Array<IntArray>): Int =
points
.sortedBy { it[0] }
.windowed(2)
.maxOf { it[1][0] - it[0][0] }
20.12.2023
2706. Buy Two Chocolates easy
blog post
substack
Join me on Telegram
https://t.me/leetcode_daily_unstoppable/445
Problem TLDR
Money change after two chocolates bought
Complexity
-
Time complexity: \(O(n)\)
-
Space complexity: \(O(1)\)
Code
fun buyChoco(prices: IntArray, money: Int): Int {
var (a, b) = Int.MAX_VALUE to Int.MAX_VALUE
for (x in prices)
if (x < a) a = x.also { b = a }
else if (x < b) b = x
return (money - a - b).takeIf { it >= 0 } ?: money
}
19.12.2023
661. Image Smoother easy
blog post
substack
Join me on Telegram
https://t.me/leetcode_daily_unstoppable/444
Problem TLDR
3x3 average of each cell in 2D matrix
Complexity
-
Time complexity: \(O(nm)\)
-
Space complexity: \(O(nm)\)
Code
fun imageSmoother(img: Array<IntArray>): Array<IntArray> =
Array(img.size) {
val ys = (max(0, it - 1)..min(img.lastIndex, it + 1)).asSequence()
IntArray(img[0].size) {
val xs = (max(0, it - 1)..min(img[0].lastIndex, it + 1)).asSequence()
ys.flatMap { y -> xs.map { img[y][it] } }.average().toInt()
}
}
18.12.2023
1913. Maximum Product Difference Between Two Pairs easy
blog post
substack
youtube
Join me on Telegram
https://t.me/leetcode_daily_unstoppable/443
Problem TLDR
max * second_max - min * second_min
Intuition
We can sort an array, or just find max and second max in a linear way.
Complexity
-
Time complexity: \(O(n)\)
-
Space complexity: \(O(1)\)
Code
fun maxProductDifference(nums: IntArray): Int {
var (a, b, c, d) = listOf(0, 0, Int.MAX_VALUE, Int.MAX_VALUE)
for (x in nums) {
if (x > a) b = a.also { a = x } else if (x > b) b = x
if (x < d) c = d.also { d = x } else if (x < c) c = x
}
return a * b - c * d
}
17.12.2023
2353. Design a Food Rating System medium
blog post
substack
Join me on Telegram
https://t.me/leetcode_daily_unstoppable/442
Problem TLDR
Given foods, cuisines and ratings implement efficient methods changeRating(food, newRating) and highestRated(cuisine)
Intuition
Given that we must maintain sorted order by rating and be able to change the rating, the TreeSet may help, as it provides O(logN) amortized time for remove(obj).
Approach
Start with inefficient implementation, like do the linear search in both methods. Then decide what data structures can help to quickly find an item.
- keep in mind, that
constructorshould also be efficient
Complexity
-
Time complexity: \(O(log(n))\) for either method
-
Space complexity: \(O(n)\)
Code
class FoodRatings(val foods: Array<String>, val cuisines: Array<String>, val ratings: IntArray) {
val foodToInd = foods.indices.groupBy { foods[it] }
val cuisineToInds: MutableMap<String, TreeSet<Int>> = mutableMapOf()
init {
for (ind in cuisines.indices)
cuisineToInds.getOrPut(cuisines[ind]) {
TreeSet(compareBy({ -ratings[it] }, { foods[it] }))
} += ind
}
fun changeRating(food: String, newRating: Int) {
val ind = foodToInd[food]!![0]
if (ratings[ind] != newRating) {
val sortedInds = cuisineToInds[cuisines[ind]]!!
sortedInds.remove(ind)
ratings[ind] = newRating
sortedInds.add(ind)
}
}
fun highestRated(cuisine: String): String = foods[cuisineToInds[cuisine]!!.first()]
}
16.12.2023
242. Valid Anagram easy
blog post
substack
Join me on Telegram
https://t.me/leetcode_daily_unstoppable/440
Complexity
-
Time complexity: \(O(n)\)
-
Space complexity: \(O(n)\), can also be solved in O(1) by computing the
hash
Code
fun isAnagram(s: String, t: String): Boolean =
s.groupBy { it } == t.groupBy { it }
15.12.2023
1436. Destination City easy
blog post
substack
Join me on Telegram
https://t.me/leetcode_daily_unstoppable/439
Complexity
-
Time complexity: \(O(n)\)
-
Space complexity: \(O(n)\), with
toSet
Code
fun destCity(paths: List<List<String>>): String =
(paths.map { it[1] } - paths.map { it[0] }).first()
14.12.2023
2482. Difference Between Ones and Zeros in Row and Column easy
blog post
substack
Join me on Telegram
https://t.me/leetcode_daily_unstoppable/438
Problem TLDR
diff[i][j] = onesRowi + onesColj - zerosRowi - zerosColj
Complexity
-
Time complexity: \(O(nm)\)
-
Space complexity: \(O(nm)\)
Code
fun onesMinusZeros(grid: Array<IntArray>): Array<IntArray> {
val onesRow = grid.map { it.count { it == 1 } }
val zerosRow = grid.map { it.count { it == 0 } }
val onesCol = grid[0].indices.map { x -> grid.indices.count { grid[it][x] == 1 } }
val zerosCol = grid[0].indices.map { x -> grid.indices.count { grid[it][x] == 0 } }
return Array(grid.size) { y -> IntArray(grid[0].size) { x ->
onesRow[y] + onesCol[x] - zerosRow[y] - zerosCol[x]
}}
}
13.12.2023
1582. Special Positions in a Binary Matrix easy
blog post
substack
Join me on Telegram
https://t.me/leetcode_daily_unstoppable/437
Complexity
-
Time complexity: \(O((nm)^2)\)
-
Space complexity: \(O(1)\)
Code
fun numSpecial(mat: Array<IntArray>): Int {
var count = 0
for (y in 0..mat.lastIndex)
for (x in 0..mat[y].lastIndex)
if (mat[y][x] == 1
&& (0..mat.lastIndex).filter { it != y }.all { mat[it][x] == 0}
&& (0..mat[y].lastIndex).filter { it != x }.all { mat[y][it] == 0})
count++
return count
}
12.12.2023
1464. Maximum Product of Two Elements in an Array easy
blog post
substack
youtube
Join me on Telegram
https://t.me/leetcode_daily_unstoppable/436
Intuition
We can sort, we can search twice for indices, we can scan once with two variables.
Complexity
-
Time complexity: \(O(n)\)
-
Space complexity: \(O(1)\)
Code
fun maxProduct(nums: IntArray): Int = with(nums.indices){
maxBy { nums[it] }.let { i ->
(nums[i] - 1) * (nums[filter { it != i }.maxBy { nums[it] }] - 1)
}}
11.12.2023
1287. Element Appearing More Than 25% In Sorted Array easy
blog post
substack
Join me on Telegram
https://t.me/leetcode_daily_unstoppable/435
Problem TLDR
Most frequent element
Complexity
-
Time complexity: \(O(n)\)
-
Space complexity: \(O(n)\), can be O(1)
Code
fun findSpecialInteger(arr: IntArray): Int =
arr.groupBy { it }
.maxBy { (k, v) -> v.size }!!
.key
10.12.2023
867. Transpose Matrix easy
blog post
substack
youtube
Join me on Telegram
https://t.me/leetcode_daily_unstoppable/434
Problem TLDR
Transpose 2D matrix
Complexity
-
Time complexity: \(O(n)\)
-
Space complexity: \(O(n)\)
Code
fun transpose(matrix: Array<IntArray>): Array<IntArray> =
Array(matrix[0].size) { x ->
IntArray(matrix.size) { y ->
matrix[y][x]
}
}
09.12.2023
94. Binary Tree Inorder Traversal easy
blog post
substack
youtube
Join me on Telegram
https://t.me/leetcode_daily_unstoppable/433
Problem TLDR
Inorder traversal
Intuition
Nothing special. For the iterative solution we can use Morris traversal.
Complexity
-
Time complexity: \(O(n)\)
-
Space complexity: \(O(n)\)
Code
fun inorderTraversal(root: TreeNode?): List<Int> = root?.run {
inorderTraversal(left) + listOf(`val`) + inorderTraversal(right)
} ?: listOf<Int>()
08.12.2023
606. Construct String from Binary Tree easy
blog post
substack
youtube
Join me on Telegram
https://t.me/leetcode_daily_unstoppable/432
Problem TLDR
Pre-order binary tree serialization
Intuition
Let’s write a recursive solution.
Complexity
-
Time complexity: \(O(n)\)
-
Space complexity: \(O(n)\)
Code
fun tree2str(root: TreeNode?): String = root?.run {
val left = tree2str(left)
val right = tree2str(right)
val curr = "${`val`}"
if (left == "" && right == "") curr
else if (right == "") "$curr($left)"
else "$curr($left)($right)"
} ?: ""
07.12.2023
1903. Largest Odd Number in String easy
blog post
substack
Join me on Telegram
https://t.me/leetcode_daily_unstoppable/431
Problem TLDR
Largest odd number in a string
Intuition
Just search for the last odd
Approach
Let’s write Kotlin one-liner
Complexity
-
Time complexity: \(O(n)\)
-
Space complexity: \(O(n)\)
Code
fun largestOddNumber(num: String): String =
num.dropLastWhile { it.toInt() % 2 == 0 }
05.12.2023
1688. Count of Matches in Tournament easy
blog post
substack
youtube
Join me on Telegram
https://t.me/leetcode_daily_unstoppable/428
Problem TLDR
Count of odd-even matches according to the rules x/2 or 1+(x-1)/2.
Intuition
The naive solution is to just implement what is asked.
Approach
Then you go read others people solutions and found this: n-1.
Complexity
-
Time complexity: \(O(log(n))\)
-
Space complexity: \(O(1)\)
Code
fun numberOfMatches(n: Int): Int {
var x = n
var matches = 0
while (x > 1) {
if (x % 2 == 0) {
matches += x / 2
x = x / 2
} else {
matches += (x - 1) / 2
x = 1 + (x - 1) / 2
}
}
return matches
}
04.12.2023
2264. Largest 3-Same-Digit Number in String easy
blog post
substack
youtube
Join me on Telegram
https://t.me/leetcode_daily_unstoppable/427
Problem TLDR
Largest 3-same-digit number in a string
Intuition
There are totally 10 such numbers: 000, 111, ..., 999.
Approach
Let’s use Kotlin’s API
Complexity
-
Time complexity: \(O(n)\)
-
Space complexity: \(O(n)\), can be O(1) with
asSequence()
Code
fun largestGoodInteger(num: String): String =
num.windowed(3)
.filter { it[0] == it[1] && it[0] == it[2] }
.maxByOrNull { it[0] } ?: ""
03.12.2023
1266. Minimum Time Visiting All Points easy
blog post
substack
youtube
Join me on Telegram
https://t.me/leetcode_daily_unstoppable/426
Problem TLDR
Path coordinates distance in XY plane
Intuition
For each pair of points lets compute diagonal distance and the remainder: time = diag + remainder. Given that remainder = max(dx, dy) - diag, we derive the formula.
Approach
Let’s use some Kotlin’s API:
Complexity
-
Time complexity: \(O(n)\)
-
Space complexity: \(O(1)\)
Code
fun minTimeToVisitAllPoints(points: Array<IntArray>): Int =
points.asSequence().windowed(2).sumBy { (from, to) ->
max(abs(to[0] - from[0]), abs(to[1] - from[1]))
}
02.12.2023
1160. Find Words That Can Be Formed by Characters easy
blog post
substack
youtube
Join me on Telegram
https://t.me/leetcode_daily_unstoppable/425
Problem TLDR
Sum of words lengths constructed by chairs
Intuition
Just use the char frequencies map
Approach
Some Kotlin’s API:
- groupBy
- sumBy
- all
- let
Complexity
-
Time complexity: \(O(n)\)
-
Space complexity: \(O(n)\), can be O(1)
Code
fun countCharacters(words: Array<String>, chars: String): Int =
chars.groupBy { it }.let { freq ->
words.sumBy {
val wfreq = it.groupBy { it }
if (wfreq.keys.all { freq[it] != null
&& wfreq[it]!!.size <= freq[it]!!.size })
it.length else 0
}
}
01.12.2023
1662. Check If Two String Arrays are Equivalent easy
blog post
substack
youtube
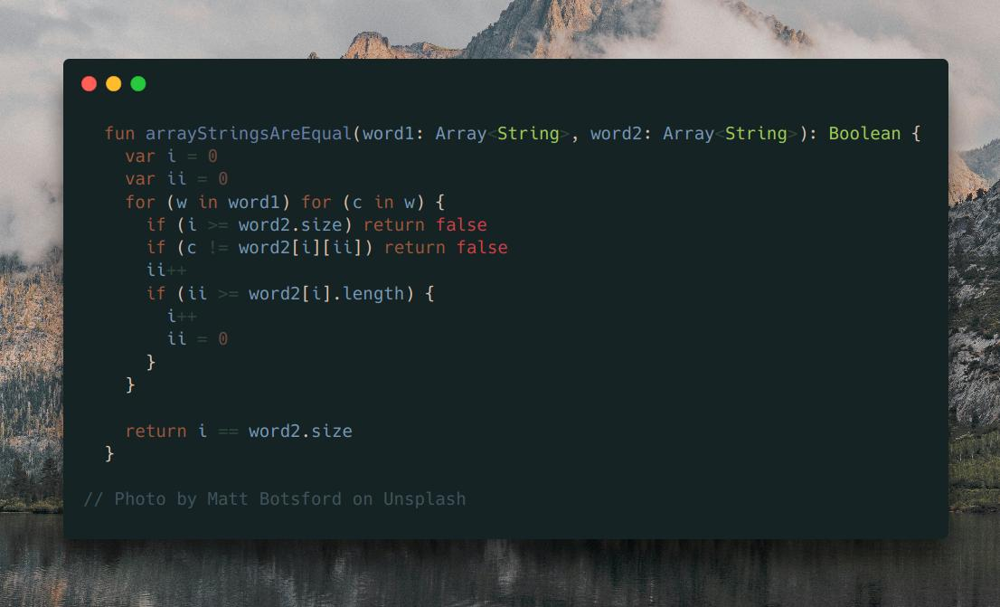
Join me on Telegram
https://t.me/leetcode_daily_unstoppable/423
Problem TLDR
Two dimensional array equals
Intuition
There is a one-liner that takes O(n) memory: ord1.joinToString("") == word2.joinToString(""). Let’s use two-pointer approach to reduce the memory footprint.
Approach
- we can iterate with
foron a first word, and use the pointer variable for the second
Complexity
-
Time complexity: \(O(n)\)
-
Space complexity: \(O(1)\)
Code
fun arrayStringsAreEqual(word1: Array<String>, word2: Array<String>): Boolean {
var i = 0
var ii = 0
for (w in word1) for (c in w) {
if (i >= word2.size) return false
if (c != word2[i][ii]) return false
ii++
if (ii >= word2[i].length) {
i++
ii = 0
}
}
return i == word2.size
}
30.11.2023
1611. Minimum One Bit Operations to Make Integers Zero hard
blog post
substack
youtube

Join me on Telegram
https://t.me/leetcode_daily_unstoppable/421
Problem TLDR
Minimum rounds of inverting rightmost bit or left of the rightmost 1 bit to make n zero
Intuition
Let’s observe the example:
// 6
// 110
// 010 b
// 011 a
// 001 b
// 000 a
// 10 = 2 + f(1) = 2^1 + f(2^0)
// 11 a
// 01 b -> f(1)
// 100 = 4 + f(10) = 2^2 + f(2^1)
// 101 a
// 111 b
// 110 a
// 010 b -> f(10)
// 1000 = 8 + f(100) = 2^3 + f(2^2)
// 1001 a
// 1011 b
// 1010 a
// 1110 b
// 1111 a
// 1101 b
// 1100 a
// 0100 b -> f(100)
There are two tricks we can derive:
- Each signle-bit number has a recurrent count of operations: f(0b100) = 0b100 + f(0b10) and so on.
- The hard trick: when we consider the non-single-bit number, like
1101, we dof(0b1101) = f(0b1000) - f(0b100) + f(0b1).
Complexity
-
Time complexity: \(O(log(n))\)
-
Space complexity: \(O(log(n))\)
Code
fun minimumOneBitOperations(n: Int): Int {
val f = HashMap<Int, Int>()
f[0] = 0
f[1] = 1
var curr = 2
while (curr > 0) {
f[curr] = curr + f[curr / 2]!!
curr *= 2
}
var res = 0
var sign = 1;
for (i in 0..31) {
val bit = 1 shl i
if (n and bit != 0) {
res += sign * f[bit]!!
sign = -sign
}
}
return Math.abs(res)
}
29.11.2023
191. Number of 1 Bits easy
blog post
substack
youtube
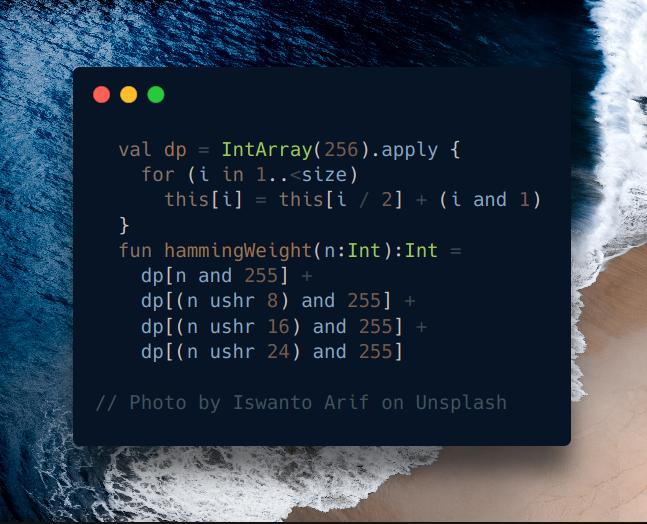
Join me on Telegram
https://t.me/leetcode_daily_unstoppable/420
Problem TLDR
Bits count
Intuition
The optimal solution would be using built-in n.countOneBits().
However, there is a knonw technique using tabulation DP to count bits. The recurrence is: count(n) = count(n « 1) + 1?1:0. For example, count(1111) = 1 + count(111). Or, count(110) = 0 + count(11)
Approach
- carefult with the table size, it must be 2^8=256
Complexity
-
Time complexity: \(O(1)\)
-
Space complexity: \(O(1)\)
Code
val dp = IntArray(256).apply {
for (i in 1..<size)
this[i] = this[i / 2] + (i and 1)
}
fun hammingWeight(n:Int):Int =
dp[n and 255] +
dp[(n ushr 8) and 255] +
dp[(n ushr 16) and 255] +
dp[(n ushr 24) and 255]
28.11.2023
2147. Number of Ways to Divide a Long Corridor hard
blog post
substack
youtube
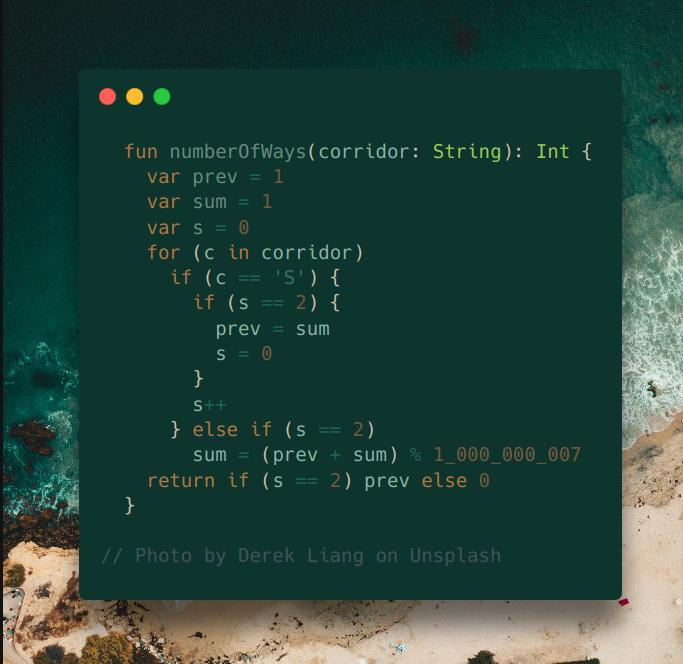
Join me on Telegram
https://t.me/leetcode_daily_unstoppable/419
Problem TLDR
Count ways to place borders separating pairs of ‘S’ in ‘SP’ string
Intuition
We can scan linearly and do the interesting stuff after each two ‘S’: each new ‘P’ adds ‘sum’ ways to the total. The last pair of ‘S’ don’t need a border.
// ssppspsppsspp
// ss 1
// ssp 2
// sspp 3
// sps 3
// spsp 3+3=6
// spspp 6+3=9 <-- return this
// ss 9
// ssp 9+9=18
// sspp 18+9=27 discard this result, as it is last
Approach
Carefult what ‘sum’ to add, save the last sum to a separate variable.
Complexity
-
Time complexity: \(O(n)\)
-
Space complexity: \(O(1)\)
Code
fun numberOfWays(corridor: String): Int {
var prev = 1
var sum = 1
var s = 0
for (c in corridor)
if (c == 'S') {
if (s == 2) {
prev = sum
s = 0
}
s++
} else if (s == 2)
sum = (prev + sum) % 1_000_000_007
return if (s == 2) prev else 0
}
27.11.2023
935. Knight Dialer medium
blog post
substack
youtube
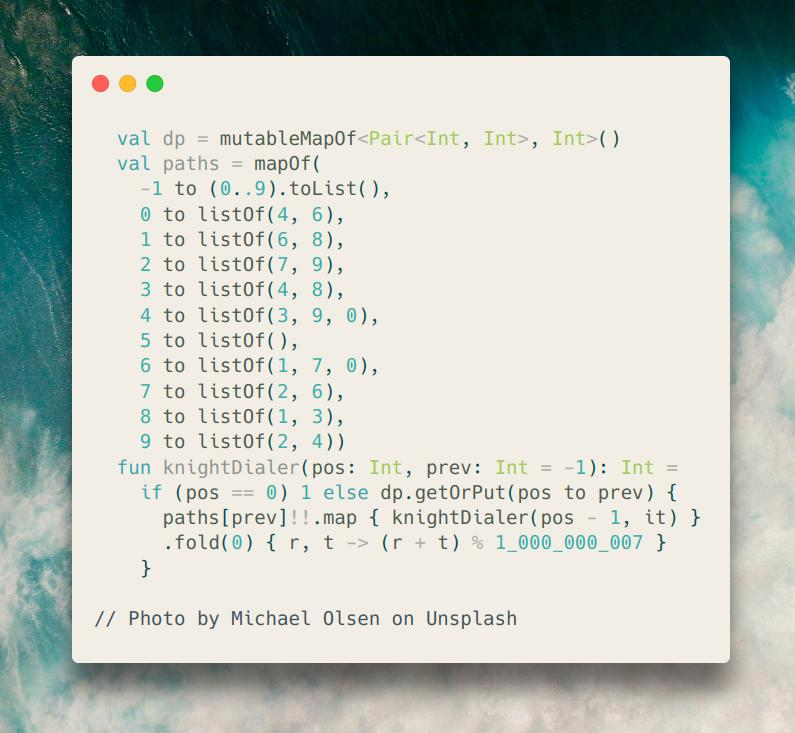
Join me on Telegram
https://t.me/leetcode_daily_unstoppable/418
Problem TLDR
Count of dialer n-length numbers formed by pressing in a chess Knight’s moves
Intuition
We can search with Depth-First Search for every position and count every path that has n digits in it.
The result will only depend on a previous number and count of the remaining moves, so can be cached.
Approach
Let’s write a separate paths map: current digit to next possible.
Complexity
-
Time complexity: \(O(n)\),
10digits is a constant value -
Space complexity: \(O(n)\)
Code
val dp = mutableMapOf<Pair<Int, Int>, Int>()
val paths = mapOf(
-1 to (0..9).toList(),
0 to listOf(4, 6),
1 to listOf(6, 8),
2 to listOf(7, 9),
3 to listOf(4, 8),
4 to listOf(3, 9, 0),
5 to listOf(),
6 to listOf(1, 7, 0),
7 to listOf(2, 6),
8 to listOf(1, 3),
9 to listOf(2, 4))
fun knightDialer(pos: Int, prev: Int = -1): Int =
if (pos == 0) 1 else dp.getOrPut(pos to prev) {
paths[prev]!!.map { knightDialer(pos - 1, it) }
.fold(0) { r, t -> (r + t) % 1_000_000_007 }
}
26.11.2023
1727. Largest Submatrix With Rearrangements medium
blog post
substack
youtube
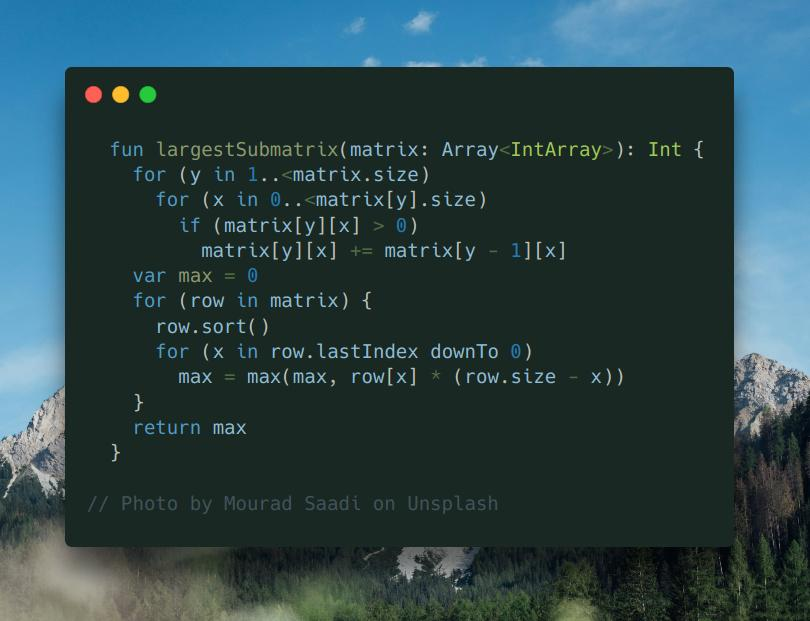
Join me on Telegram
https://t.me/leetcode_daily_unstoppable/417
Problem TLDR
Max area of 1 submatrix after sorting columns optimally
Intuition
Use hint :(
Ok, if we store the heights of the columns we can analyze each row independently, by choosing the largest heights first. The area will be height * width, where width will be the current position:
Approach
We can reuse the matrix, but don’t do this in a production code without a warning.
Complexity
-
Time complexity: \(O(nmlog(m))\)
-
Space complexity: \(O(1)\)
Code
fun largestSubmatrix(matrix: Array<IntArray>): Int {
for (y in 1..<matrix.size)
for (x in 0..<matrix[y].size)
if (matrix[y][x] > 0)
matrix[y][x] += matrix[y - 1][x]
var max = 0
for (row in matrix) {
row.sort()
for (x in row.lastIndex downTo 0)
max = max(max, row[x] * (row.size - x))
}
return max
}
25.11.2023
1685. Sum of Absolute Differences in a Sorted Array medium
blog post
substack
youtube
Join me on Telegram
https://t.me/leetcode_daily_unstoppable/416
Problem TLDR
Array to sum_j(abs(arr[i] - arr[j])) for each i
Intuition
This is an arithmetic problem. We need to pay attention of an abs sign, given the array in a sorted order.
// 0 1 2 3 4 5
// a b c d e f
// c: c-a + c-b + c-c + d-c + e-c + f-c
// c * (1 + 1 + 1-1 -1 -1-1) -a-b+d+e+f
// (i+1 - (size + 1 - (i + 1)))
// (i + 1 - size - 1 +i + 1)
// (2*i - size + 1)
// d: d-a + d-b + d-c + d-d + e-d +f-d
// d * (1+1+1+1-1-1-1)
// i=3 2*3-6+1=1
// soFar = a+b
// sum = a+b+c+d+e+f
// i = 2
// curr = sum - soFar + nums[i] * (2*i - size + 1)
// 2 3 5
// sum = 10
// soFar = 2
// i=0 10 - 2 + 2 * (2*0-3+1)=10-6=4 xxx
// 2-2 + 3-2 + 5-2 = 2 * (1-1-1-1) + (3 + 5)
// 3-2 + 3-3 + 5-3 = 3 * (1+1-1-1) - 2 + (5)
// (2*1-3+1) (sum-soFar)
// 5-2 + 5-3 + 5-5 = 5 * (1+1+1-1) -2-3 + (0)
Approach
Evaluate some examples, then derive the formula.
Complexity
-
Time complexity: \(O(n)\)
-
Space complexity: \(O(n)\)
Code
fun getSumAbsoluteDifferences(nums: IntArray): IntArray {
val sum = nums.sum()
var soFar = 0
return IntArray(nums.size) { i ->
soFar += nums[i]
(sum - 2 * soFar + nums[i] * (2 * i - nums.size + 2))
}
}
24.11.2023
1561. Maximum Number of Coins You Can Get medium
blog post
substack
youtube
Join me on Telegram
https://t.me/leetcode_daily_unstoppable/415
Problem TLDR
Get sum of second maxes of triples from array
Intuition
Observing the example:
// 1 2 3 4 5 6 7 8 9
// * * * 8
// * * * 6
// * * * 4
// size = x + 2x
we can deduce an optimal algorithm: give bob the smallest value, and take the second largest. There are exactly size / 3 moves total.
Approach
Let’s write it in a functional style, using Kotlin’s API:
- sorted
- drop
- chunked
- sumBy
Complexity
-
Time complexity: \(O(nlog(n))\)
-
Space complexity: \(O(n)\), can be O(1) when sorted in-place
Code
fun maxCoins(piles: IntArray): Int =
piles.sorted()
.drop(piles.size / 3)
.chunked(2)
.sumBy { it[0] }
23.11.2023
1630. Arithmetic Subarrays medium
blog post
substack
Join me on Telegram
https://t.me/leetcode_daily_unstoppable/414
Problem TLDR
Query array ranges can form arithmetic sequence
Intuition
Given the problem contraints, the naive solution would work: just sort the subarray and check the diff.
Approach
We can use PriorityQueue
Complexity
-
Time complexity: \(O(n^2log(n))\)
-
Space complexity: \(O(n)\)
Code
fun checkArithmeticSubarrays(nums: IntArray, l: IntArray, r: IntArray) =
List(l.size) { ind ->
val pq = PriorityQueue<Int>()
for (i in l[ind]..r[ind]) pq.add(nums[i])
val diff = -pq.poll() + pq.peek()
var prev = pq.poll()
while (pq.isNotEmpty()) {
if (pq.peek() - prev != diff) return@List false
prev = pq.poll()
}
true
}
22.11.2023
1424. Diagonal Traverse II medium
blog post
substack
Join me on Telegram
https://t.me/leetcode_daily_unstoppable/413
Problem TLDR
Diagonal 2D matrix order with prunes
Intuition
The naive solution is to adjust the pointers x and y. However, that will cost O(max(x)*max(y)) and give TLE.
Let’s just sort indices pairs (x y) and take them one by one.
Approach
Use some Kotlin’s features:
- with
- let
- indices
- compareBy({ one }, { two })
Complexity
-
Time complexity: \(O(nlog(n))\)
-
Space complexity: \(O(n)\)
Code
fun findDiagonalOrder(nums: List<List<Int>>): IntArray =
with(PriorityQueue<Pair<Int, Int>>(compareBy(
{ it.first + it.second }, { it.first }, { it.second }
))) {
for (y in nums.indices)
for (x in nums[y].indices) add(x to y)
IntArray(size) { poll().let { (x, y) -> nums[y][x]} }
}
21.11.2023
1814. Count Nice Pairs in an Array medium
blog post
substack
Join me on Telegram
https://t.me/leetcode_daily_unstoppable/412
Problem TLDR
Count pairs x-rev(x) == y-rev(y), where rev(123) = 321
Intuition
For simplicity, let’s redefine the equation, keeping i and j on a separate parts \(nums[i] - rev(nums[i]) == nums[j] - rev(nums[j])\). Now, we can precompute nums[i] - rev(nums[i]). The remaining part of an algorithm is how to calculate count of the duplicate numbers in a linear scan.
Approach
Let’s use a HashMap to count the previous numbers count. Each new number will make a count new pairs.
Complexity
-
Time complexity: \(O(nlg(n))\), lg(n) - for the
rev() -
Space complexity: \(O(n)\)
Code
fun countNicePairs(nums: IntArray): Int {
val counts = HashMap<Int, Int>()
var sum = 0
for (x in nums) {
var n = x
var rev = 0
while (n > 0) {
rev = (n % 10) + rev * 10
n = n / 10
}
val count = counts[x - rev] ?: 0
sum = (sum + count) % 1_000_000_007
counts[x - rev] = count + 1
}
return sum
}
20.11.2023
2391. Minimum Amount of Time to Collect Garbage medium
blog post
substack
Join me on Telegram
https://t.me/leetcode_daily_unstoppable/411
Problem TLDR
Time to pick 3-typed garbage[] by 3 trucks traveling to the right travel[] time
Intuition
We can hardcode the algorithm from the description examples, for each truck individually.
Approach
Let’s try to minify the code:
- all garbage must be picked up, so add
garbage.sumBy { it.length } - for each type, truck will travel until the last index with this type
Complexity
-
Time complexity: \(O(n)\)
-
Space complexity: \(O(1)\)
Code
fun garbageCollection(garbage: Array<String>, travel: IntArray): Int =
garbage.sumBy { it.length } +
"MPG".sumBy { c ->
(1..garbage.indexOfLast { c in it }).sumBy { travel[it - 1] }
}
19.11.2023
1887. Reduction Operations to Make the Array Elements Equal medium
blog post
substack
Join me on Telegram
https://t.me/leetcode_daily_unstoppable/410
Problem TLDR
Number of operations to decrease all elements to the next smallest
Intuition
The algorithm pretty much in a problem definition, just implement it.
Approach
- iterate from the second position, to simplify the initial conditions
Complexity
-
Time complexity: \(O(nlog())\)
-
Space complexity: \(O(n)\)
Code
fun reductionOperations(nums: IntArray): Int {
nums.sort()
return (nums.size - 2 downTo 0).sumBy {
if (nums[it] < nums[it + 1]) nums.size - 1 - it else 0
}
}
18.11.2023
1838. Frequency of the Most Frequent Element medium
blog post
substack
Join me on Telegram
https://t.me/leetcode_daily_unstoppable/408
Problem TLDR
Max count of equal numbers if increment arr[i] k times
Intuition
Let’s sort the array and scan numbers from small to hi. As we’re doing only the increment operations, only the left part of the current position matters. Let’s see how much items we can make equal to the current arr[i]:
// 1 4 8 13 inc
// 4 4 8 13 3
// ^
// 8 8 ^ 3 + 2 * (8 - 4) = 8 + 3 = 12
// 1 8 ^ 12 - (8 - 1) = 4
When taking a new element 8, our total increment operations inc grows by the difference between two previous 4 4 and the current 8.
If inc becomes bigger than k, we can move the from position, returning nums[i] - nums[from] operations back.
Approach
- use inclusive
fromandto - always compute the
max - make initial conditions from the
0element position, and iterate from1to avoid overthinking
Complexity
-
Time complexity: \(O(nlog(n))\)
-
Space complexity: \(O(1)\)
Code
fun maxFrequency(nums: IntArray, k: Int): Int {
nums.sort()
var from = 0
var inc = 0
var max = 1
for (to in 1..<nums.size) {
inc += (to - from) * (nums[to] - nums[to - 1])
while (from <= to && inc > k)
inc -= nums[to] - nums[from++]
max = max(max, to - from + 1)
}
return max
}
17.11.2023
1877. Minimize Maximum Pair Sum in Array medium
blog post
substack
Join me on Telegram
https://t.me/leetcode_daily_unstoppable/407
Problem TLDR
Minimum possible max of array pairs sums
Intuition
The optimal construction way is to pair smallest to largest.
Approach
We can use two pointers and iteration, let’s write non-optimal one-liner however
Complexity
-
Time complexity: \(O(nlog(n))\)
-
Space complexity: \(O(1)\), this solution takes O(n), but can be rewritten
Code
fun minPairSum(nums: IntArray): Int =
nums.sorted().run {
zip(asReversed()).maxOf { it.first + it.second }
}
16.11.2023
1980. Find Unique Binary String medium
blog post
substack
Join me on Telegram
https://t.me/leetcode_daily_unstoppable/406
Problem TLDR
First absent number in a binary string array
Intuition
The naive solution would be searching in all the numbers 0..2^n. However, if we convert strings to ints and sort them, we can do a linear scan to detect first absent.
Approach
- use padStart to convert back
Complexity
-
Time complexity: \(O(nlog(n))\)
-
Space complexity: \(O(n)\)
Code
fun findDifferentBinaryString(nums: Array<String>): String {
var next = 0
for (x in nums.sorted()) {
if (x.toInt(2) > next) break
next++
}
return next.toString(2).padStart(nums[0].length, '0')
}
15.11.2023
1846. Maximum Element After Decreasing and Rearranging medium
blog post
substack
Join me on Telegram
https://t.me/leetcode_daily_unstoppable/405
Problem TLDR
Max number from converting array to non decreasing
Intuition
First, sort the array. Now, for every missing number, 1 3 5 -> 2 we can take one of the numbers from the highest, 1 2 3.
We can use a counter and a Priority Queue.
For example:
array: 1 5 100 100 100
counter: 1 2 3 4 5
Approach
Let’s use some Kotlin’s sugar:
- with
- asList
Complexity
-
Time complexity: \(O(nlog(n))\)
-
Space complexity: \(O(n)\)
Code
fun maximumElementAfterDecrementingAndRearranging(arr: IntArray): Int =
with(PriorityQueue<Int>().apply { addAll(arr.asList()) }) {
var max = 0
while (isNotEmpty()) if (poll() > max) max++
max
}
Shorter version:
14.11.2023
1930. Unique Length-3 Palindromic Subsequences medium
blog post
substack
Join me on Telegram
https://t.me/leetcode_daily_unstoppable/403
Problem TLDR
Count of unique palindrome substrings of length 3
Intuition
We can count how many other characters between group of the current
Approach
Let’s use Kotlin API:
- groupBy
- filterValues
- indexOf
- lastIndexOf
Complexity
-
Time complexity: \(O(n)\), we can also use
withIndexto avoid searchingindexOfandlastIndexOf. -
Space complexity: \(O(1)\), if we store frequencies in an
IntArray
Code
fun countPalindromicSubsequence(s: String): Int {
val freq = s.groupBy { it }.filterValues { it.size > 1 }
var count = 0
for ((l, f) in freq) {
if (f.size > 2) count++
val visited = HashSet<Char>()
for (i in s.indexOf(l)..s.lastIndexOf(l))
if (s[i] != l && visited.add(s[i])) count++
}
return count
}
13.11.2023
2785. Sort Vowels in a String medium
blog post
substack

Join me on Telegram
https://t.me/leetcode_daily_unstoppable/402
Problem TLDR
Sort vowels in a string
Intuition
The sorted result will only depend of the vowels frequencies.
Approach
Let’s use Kotlin API:
- groupBy
- mapValues
- buildString
Complexity
-
Time complexity: \(O(n)\)
-
Space complexity: \(O(n)\)
Code
fun sortVowels(s: String): String {
val freq = s.groupBy { it }.mapValues({ it.value.size }).toMutableMap()
val vl = mutableListOf('A', 'E', 'I', 'O', 'U', 'a', 'e', 'i', 'o', 'u')
val vs = vl.toSet()
return buildString {
for (c in s)
if (c in vs) {
while (freq[vl.first()].let { it == null || it <= 0 }) vl.removeFirst()
freq[vl.first()] = freq[vl.first()]!! - 1
append(vl.first())
} else append(c)
}
}
12.11.2023
815. Bus Routes hard
blog post
substack
Join me on Telegram
https://t.me/leetcode_daily_unstoppable/401
Problem TLDR
Minimum buses to travel by given routes
Intuition
The Breadth-First Search in a routes graph would work.
Build stop to route association to know which of the routes are next.
Approach
Some optimizations:
- eliminate the trivial case
source == target - remove a visited stop from
stopToRoutegraph - there is at most
routes.sizebuses needed - remember the visited stop
Complexity
-
Time complexity: \(O(RS)\)
-
Space complexity: \(O(RS)\)
Code
fun numBusesToDestination(routes: Array<IntArray>, source: Int, target: Int): Int {
if (source == target) return 0
val stopToRoute = mutableMapOf<Int, MutableList<Int>>()
for (i in routes.indices)
for (stop in routes[i])
stopToRoute.getOrPut(stop) { mutableListOf() } += i
return with(ArrayDeque<Int>()) {
add(source)
val visited = mutableSetOf<Int>()
for (bus in 1..routes.size)
repeat(size) {
for (route in stopToRoute.remove(removeFirst()) ?: emptyList())
if (visited.add(route)) for (s in routes[route])
if (s == target) return@with bus else add(s)
}
-1
}
}
11.11.2023
2642. Design Graph With Shortest Path Calculator hard
blog post
substack

Problem TLDR
Implement graph with shortest path searching
Intuition
There is no special knowledge here, just a simple Dijkstra, that is BFS in a space of the shortest-so-far paths
Approach
- the
visitedset will improve the speed
Complexity
-
Time complexity: \(O(Vlog(E))\)
-
Space complexity: \(O(E)\)
Code
class Graph(n: Int, edges: Array<IntArray>) :
HashMap<Int, MutableList<IntArray>>() {
init { for (e in edges) addEdge(e) }
fun addEdge(edge: IntArray) {
getOrPut(edge[0]) { mutableListOf() } += edge
}
fun shortestPath(node1: Int, node2: Int): Int =
with(PriorityQueue<Pair<Int, Int>>(compareBy({ it.second }))) {
add(node1 to 0)
val visited = HashSet<Int>()
while (isNotEmpty()) {
val (n, wp) = poll()
if (n == node2) return@with wp
if (visited.add(n))
get(n)?.onEach { (_, s, w) -> add(s to (w + wp))}
}
-1
}
}
10.11.2023
1743. Restore the Array From Adjacent Pairs medium
blog post
substack
Join me on Telegram
https://t.me/leetcode_daily_unstoppable/399
Problem TLDR
Restore an array from adjacent pairs
Intuition
We can form an undirected graph and do a Depth-First Search
Complexity
-
Time complexity: \(O(n)\)
-
Space complexity: \(O(n)\)
Code
fun restoreArray(adjacentPairs: Array<IntArray>): IntArray {
val fromTo = mutableMapOf<Int, MutableList<Int>>()
for ((from, to) in adjacentPairs) {
fromTo.getOrPut(from) { mutableListOf() } += to
fromTo.getOrPut(to) { mutableListOf() } += from
}
val visited = HashSet<Int>()
with(ArrayDeque<Int>()) {
add(fromTo.keys.first { fromTo[it]!!.size == 1 }!!)
return IntArray(adjacentPairs.size + 1) {
while (first() in visited) removeFirst()
removeFirst().also {
visited.add(it)
fromTo[it]?.onEach { add(it) }
}
}
}
}
09.11.2023
1759. Count Number of Homogenous Substrings medium
blog post
substack
Join me on Telegram
https://t.me/leetcode_daily_unstoppable/398
Problem TLDR
Count of substrings of same chars
Intuition
Just count current len and add to total
// abbcccaa c t
// a 1 1
// b 1 2
// b 2 4
// c 1 5
// c 2 7
// c 3 10
// a 1 11
// a 2 13
Approach
- don’t forget to update
prev
Complexity
-
Time complexity: \(O(n)\)
-
Space complexity: \(O(1)\)
Code
fun countHomogenous(s: String): Int {
var total = 0
var count = 0
var prev = '.'
for (c in s) {
if (c == prev) count++
else count = 1
total = (total + count) % 1_000_000_007
prev = c
}
return total
}
08.11.2023
2849. Determine if a Cell Is Reachable at a Given Time medium
blog post
substack
Join me on Telegram
https://t.me/leetcode_daily_unstoppable/397
Problem TLDR
Is path possible on grid sx, sy -> fx, fy
Intuition
Given the problem size, we can’t use DP, as it will take O(n^2). However, we must notice, that if the shortest path is reachable, than any other path can be formed to travel at any time.
Approach
The shortest path will consist of only the difference between coordinates.
Complexity
-
Time complexity: \(O(1)\)
-
Space complexity: \(O(1)\)
Code
fun isReachableAtTime(sx: Int, sy: Int, fx: Int, fy: Int, t: Int): Boolean {
var dx = Math.abs(fx - sx)
var dy = Math.abs(fy - sy)
var both = min(dx, dy)
var other = max(dx, dy) - both
var total = both + other
return total <= t && (total > 0 || t != 1)
}
07.11.2023
1921. Eliminate Maximum Number of Monsters medium
blog post
substack
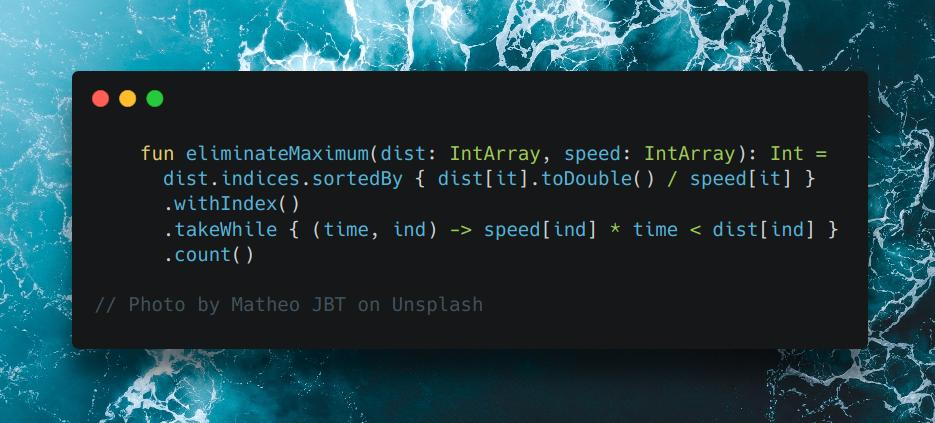
Join me on Telegram
https://t.me/leetcode_daily_unstoppable/396
Problem TLDR
Count possible 1-minute kills in a game of dist[] targets falling with speed[]
Intuition
Each target has it’s own arrival time_i = dist[i] / speed[i]. We must prioritize targets by it.
Approach
Let’s use Kotlin API:
- indices
- sortedBy
- withIndex
- takeWhile
- time becomes just a target index
Complexity
-
Time complexity: \(O(nlog(n))\)
-
Space complexity: \(O(n)\)
Code
fun eliminateMaximum(dist: IntArray, speed: IntArray): Int =
dist.indices.sortedBy { dist[it].toDouble() / speed[it] }
.withIndex()
.takeWhile { (time, ind) -> speed[ind] * time < dist[ind] }
.count()
06.11.2023
1845. Seat Reservation Manager medium
blog post
substack
Join me on Telegram
https://t.me/leetcode_daily_unstoppable/395
Problem TLDR
Design reservation number system
Intuition
The naive approach is to just use PriorityQueue as is:
class SeatManager(n: Int): PriorityQueue<Int>() {
init { for (x in 1..n) add(x) }
fun reserve() = poll()
fun unreserve(seatNumber: Int) = add(seatNumber)
}
However, we can improve the memory cost by noticing, that we can shrink the heap when max is returned.
Approach
- we can save some lines of code by using extending the class (prefer a field instead in a production code to not exprose the heap directly)
Complexity
-
Time complexity: \(O(log(n))\) for operations
-
Space complexity: \(O(n)\)
Code
class SeatManager(n: Int): PriorityQueue<Int>() {
var max = 0
fun reserve() = if (isEmpty()) ++max else poll()
fun unreserve(seatNumber: Int) {
if (seatNumber == max) max--
else add(seatNumber)
}
}
05.11.2023
1535. Find the Winner of an Array Game medium
blog post
substack
Join me on Telegram
https://t.me/leetcode_daily_unstoppable/394
Problem TLDR
Find maximum of the k nearest in array
Intuition
Looking at some examples:
// 0 1 2 3 4 5
// 1 3 2 5 4 10 3
// 3 2 5 4 10 1 3
// 3 5 4 10 1 2 5
// 5 4 10 1 2 3 5
// 5 10 1 2 3 4 10
// 10 1 2 3 4 5 10 ...
we can deduce that the problem is trivial when k >= arr.size - it is just a maximum.
Now, when k < arr.size we can just simulate the given algorithm and stop on the first k-winner.
Approach
- we can iterate over
1..arr.lastIndexor use a clever initializationwins = -1
Complexity
-
Time complexity: \(O(n)\)
-
Space complexity: \(O(1)\)
Code
fun getWinner(arr: IntArray, k: Int): Int {
var wins = -1
var max = arr[0]
for (x in arr) {
if (x > max) {
wins = 1
max = x
} else wins++
if (wins == k) break
}
return max
}
04.11.2023
1503. Last Moment Before All Ants Fall Out of a Plank medium
blog post
substack
Join me on Telegram
https://t.me/leetcode_daily_unstoppable/392
Problem TLDR
Max time ants on a line when goint left and right
Intuition
Use the hint: ants can pass through
Approach
The problem becomes trivial
Complexity
-
Time complexity: \(O(n)\)
-
Space complexity: \(O(1)\)
Code
fun getLastMoment(n: Int, left: IntArray, right: IntArray): Int =
max(left.maxOrNull() ?: 0, n - (right.minOrNull() ?: n))
03.11.2023
767. Reorganize String medium
blog post
substack
Join me on Telegram
https://t.me/leetcode_daily_unstoppable/391
Problem TLDR
Non-repeating consequent chars string from another string
Intuition
The naive brute force solution is to do Depth-First Search and memoization by given current char, previous one and used chars set. It gives TLE, as it takes O(n^3).
Next, use hint.
To take chars one by one from the two most frequent we will use a PriorityQueue
Approach
- if previous is equal to the current and there is no other chars - we can’t make a result
- consider appending in a single point of code to simplify the solution
- use Kotlin’s API:
buildString,compareByDescending,onEach
Complexity
-
Time complexity: \(O(n)\), assume constant
128log(128)for a Heap sorting -
Space complexity: \(O(n)\)
Code
fun reorganizeString(s: String): String = buildString {
val freq = IntArray(128)
s.onEach { freq[it.toInt()]++ }
val pq = PriorityQueue<Char>(compareByDescending { freq[it.toInt()] })
for (c in 'a'..'z') if (freq[c.toInt()] > 0) pq.add(c)
while (pq.isNotEmpty()) {
var c = pq.poll()
if (isNotEmpty() && last() == c) {
if (pq.isEmpty()) return ""
c = pq.poll()
pq.add(last())
}
append(c)
if (--freq[c.toInt()] > 0) pq.add(c)
}
}
02.11.2023
2265. Count Nodes Equal to Average of Subtree medium
blog post
substack
Join me on Telegram
https://t.me/leetcode_daily_unstoppable/390
Problem TLDR
Number of nodes in a tree where val == sum / count of a subtree
Intuition
Just do a Depth First Search and return sum and count of a subtree.
Approach
- avoid nulls when traversing the tree
Complexity
-
Time complexity: \(O(n)\)
-
Space complexity: \(O(log(n))\) for the recursion depth
Code
fun averageOfSubtree(root: TreeNode?): Int {
var res = 0
fun dfs(n: TreeNode): Pair<Int, Int> {
val (ls, lc) = n.left?.let { dfs(it) } ?: 0 to 0
val (rs, rc) = n.right?.let { dfs(it) } ?: 0 to 0
val sum = n.`val` + ls + rs
val count = 1 + lc + rc
if (n.`val` == sum / count) res++
return sum to count
}
root?.let { dfs(it) }
return res
}
01.11.2023
501. Find Mode in Binary Search Tree easy
blog post
substack
Join me on Telegram
https://t.me/leetcode_daily_unstoppable/389
Problem TLDR
Most frequent elements in a Binary Search Tree
Intuition
A simple solution is to use a frequency map.
Another way is the linear scan of the increasing sequence. For example, 1 1 1 2 2 2 3 3 4 4 4: we can use one counter and drop the previous result if counter is more than the previous max.
Approach
To convert the Binary Search Tree into an increasing sequence, we can do an in-order traversal.
Complexity
-
Time complexity: \(O(n)\)
-
Space complexity: \(O(n)\), result can be
nif numbers are unique
Code
fun findMode(root: TreeNode?): IntArray {
val res = mutableListOf<Int>()
var maxCount = 0
var count = 0
var prev = Int.MAX_VALUE
fun dfs(n: TreeNode) {
n.left?.let { dfs(it) }
if (prev == n.`val`) {
count++
} else {
count = 1
prev = n.`val`
}
if (count == maxCount) {
res += n.`val`
} else if (count > maxCount) {
maxCount = count
res.clear()
res += n.`val`
}
n.right?.let { dfs(it) }
}
root?.let { dfs(it) }
return res.toIntArray()
}
31.10.2023
2433. Find The Original Array of Prefix Xor medium
blog post
substack
Join me on Telegram
https://t.me/leetcode_daily_unstoppable/387
Problem TLDR
Reverse xor operation
Intuition
Let’s observe how xor works:
// 010 2
// 101 5
// 111 7
// 5 xor 7 = 2
// 101 xor 111 = 010
// 5 xor 2 = 101 xor 010 = 111
We can reverse the xor operation by applying it again: a ^ b = c, then a ^ c = b
Approach
There are several ways to write this:
- by using
mapIndexed - by in-place iteration
- by creating a new array
Let’s use Kotlin’s array constructor lambda and getOrElse.
Complexity
-
Time complexity: \(O(n)\)
-
Space complexity: \(O(n)\)
Code
fun findArray(pref: IntArray) = IntArray(pref.size) {
pref[it] xor pref.getOrElse(it - 1) { 0 }
}
30.10.2023
1356. Sort Integers by The Number of 1 Bits easy
blog post
substack

Join me on Telegram
https://t.me/leetcode_daily_unstoppable/386
Problem TLDR
Sort an array comparing by bit count and value
Intuition
Let’s use some Kotlin API
Approach
countOneBitssortedWithcompareBy
Complexity
-
Time complexity: \(O(nlog(n))\)
-
Space complexity: \(O(n)\)
Code
fun sortByBits(arr: IntArray): IntArray = arr
.sortedWith(compareBy({ it.countOneBits() }, { it }))
.toIntArray()
29.10.2023
458. Poor Pigs hard blog post substack
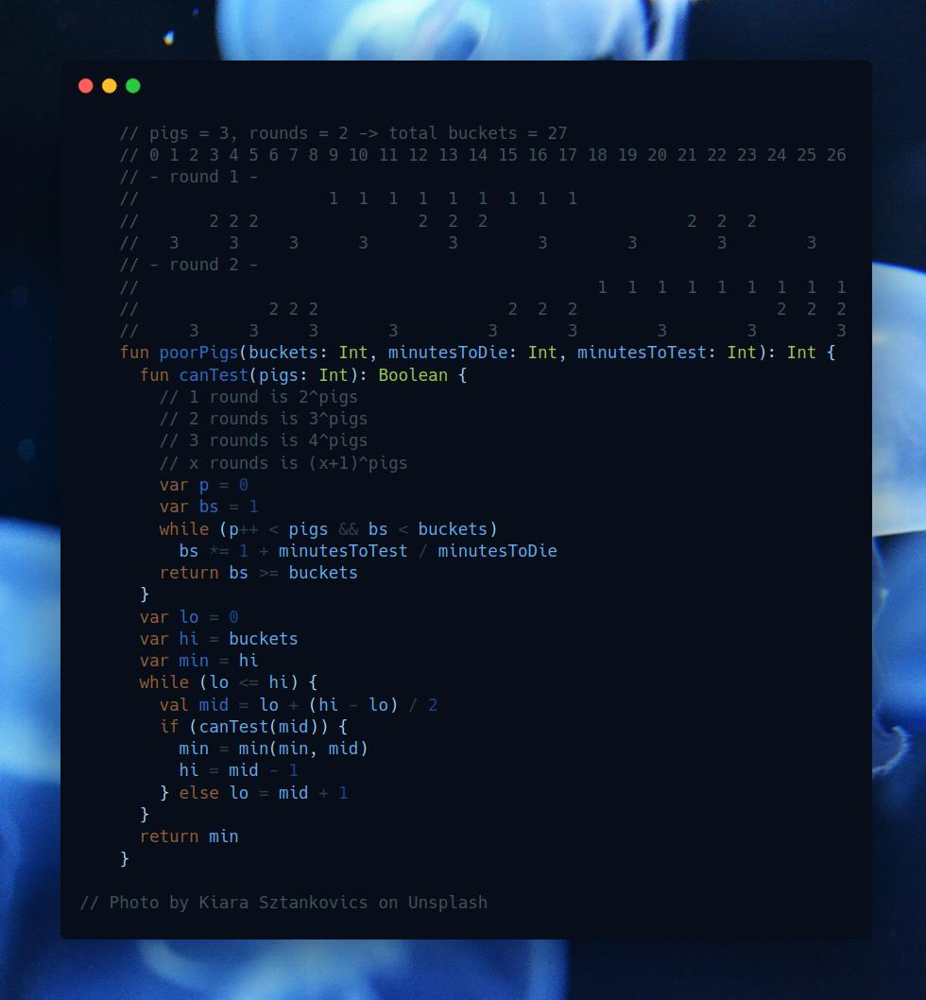
Join me on Telegram
https://t.me/leetcode_daily_unstoppable/385
Problem TLDR
Minimum pigs to find a poison in buckets in k rounds
Intuition
The first idea is, with the number of pigs increasing, the possibility to successfully test in the given time grows from impossible to possible. This gives us the idea to use a Binary Search.
However, now we must solve another problem: given the pigs and rounds, how many buckets we can test?
One simple insight is: let’s assign unique pigs pattern to each of the bucket.
We can brute-force this problem and use memorization. Consider each pig, it can avoid participation, and can participate in all the rounds:
val dp = mutableMapOf<Int, Int>()
fun numPatterns(pigs: Int): Int {
fun dfs(curr: Int): Int = if (curr == 0) 1 else dp.getOrPut(curr) {
val take = dfs(curr - 1)
if (take >= buckets) take else take + take * minutesToTest / minutesToDie
}
return dfs(pigs)
}
This number grows quickly, so we trim it by the buckets number maximum.
Another way to solve this, is to observe those unique patterns.
If we have just one round, 3 pigs, there are total 8 patterns:
// pigs = 3 rounds = 1
// 123
// 0 000 no pig drinks
// 1 001 pig #3 drinks
// 2 010 pig #2 drinks
// 3 011 pigs #2 and #3 drinks
// 4 100 pig #1 drinks
// 5 101 pigs #1 and #3 drinks
// 6 110 pigs #1 and #2 drinks
// 7 111 all pig drinks
or,
//
// 0 1 2 3 4 5 6 7
// 1 1 1 1 <-- pig #1
// 2 2 2 2 <-- pig #2
// 3 3 3 3 <-- pig #3
Now, if one bucket is a poison, we immediately know which one of those 8 buckets by its unique pattern.
Ok, so 3 pigs for 1 round enables to test 8 or 2^3 buckets. It is evident, that for 1 round the number of possible buckets is 2^pigs
How this changes with the growth of rounds? Let’s observe another example, 3 pigs, 2 rounds:
//
// 3 pigs, 2 rounds:
// 123
// 0 000
// 1 001
// 2 002
// 3 010
// 4 011
// 5 012
// 6 020
// 7 021
// 8 022
// 9 100
//10 101
//11 102
//12 110
//13 111
//14 112
//15 120
//16 121
//17 122
//18 200
//19 201
//20 202
//21 210
//22 211
//23 212
//24 220
//25 221
//26 222
or,
// 0 1 2 3 4 5 6 7 8 9 10 11 12 13 14 15 16 17 18 19 20 21 22 23 24 25 26
// - round 1 -
// 1 1 1 1 1 1 1 1 1
// 2 2 2 2 2 2 2 2 2
// 3 3 3 3 3 3 3 3 3
// - round 2 -
// 1 1 1 1 1 1 1 1 1
// 2 2 2 2 2 2 2 2 2
// 3 3 3 3 3 3 3 3 3
Each pigs pattern consists of the 3 pigs, and each pig defined as round 1 or round 2.
This results in 27 unique patterns, or buckets being able to test, or 3^3. Let’s extrapolate this formula: buckets = (1 + rounds) ^ pigs
Approach
For better Binary Search, use:
- inclusive
loandhi - check the last condition
lo == hi - always move
loorhi - always compute the result independently
min = min(min, mid)
Complexity
-
Time complexity: \(O(log^2(buckets))\), one
logfor the Binary Search, another is forcanTestfunction -
Space complexity: \(O(1)\)
Code
DFS + memo
fun poorPigs(buckets: Int, minutesToDie: Int, minutesToTest: Int): Int {
val dp = mutableMapOf<Int, Int>()
fun numPatterns(pigs: Int): Int {
fun dfs(curr: Int): Int = if (curr == 0) 1 else dp.getOrPut(curr) {
val take = dfs(curr - 1)
if (take >= buckets) take else take + take * minutesToTest / minutesToDie
}
return dfs(pigs)
}
var lo = 0
var hi = buckets
var min = hi
while (lo <= hi) {
val mid = lo + (hi - lo) / 2
if (numPatterns(mid) >= buckets) {
min = min(min, mid)
hi = mid - 1
} else lo = mid + 1
}
return min
}
The more clever version:
fun poorPigs(buckets: Int, minutesToDie: Int, minutesToTest: Int): Int {
fun canTest(pigs: Int): Boolean {
var p = 0
var bs = 1
while (p++ < pigs) {
bs *= 1 + minutesToTest / minutesToDie
if (bs >= buckets) return true
}
return bs >= buckets
}
var lo = 0
var hi = buckets
var min = hi
while (lo <= hi) {
val mid = lo + (hi - lo) / 2
if (canTest(mid)) {
min = min(min, mid)
hi = mid - 1
} else lo = mid + 1
}
return min
}
28.10.2023
1220. Count Vowels Permutation hard
blog post
substack
Join me on Telegram
https://t.me/leetcode_daily_unstoppable/384
Problem TLDR
Count of n lengths paths according to graph rules a->e, e->(a, i), etc
Intuition
This is a straghtforward DFS + memoization dynamic programming problem. Given the current position and the previous character, we know the suffix answer. It is independent of any other factors, so can be cached.
Approach
Let’s write DFS + memo
- use Kotlin’s
sumOfAPI
Complexity
-
Time complexity: \(O(n)\)
-
Space complexity: \(O(n)\)
Code
fun countVowelPermutation(n: Int): Int {
val vs = mapOf('a' to arrayOf('e'),
'e' to arrayOf('a', 'i'),
'i' to arrayOf('a', 'e', 'o', 'u'),
'o' to arrayOf('i', 'u'),
'u' to arrayOf('a'),
'.' to arrayOf('a', 'e', 'i', 'o', 'u'))
val dp = mutableMapOf<Pair<Int, Char>, Long>()
fun dfs(i: Int, c: Char): Long = if (i == n) 1L else
dp.getOrPut(i to c) { vs[c]!!.sumOf { dfs(i + 1, it) } } %
1_000_000_007L
return dfs(0, '.').toInt()
}
Iterative version
 Another one-liner
27.10.2023
5. Longest Palindromic Substring medium
blog post
substack
 Golf version
Join me on Telegram
https://t.me/leetcode_daily_unstoppable/383
Problem TLDR
Longest palindrome substring
Intuition
If dp[from][to] answering whether substring s(from, to) is a palindrome, then dp[from][to] = s[from] == s[to] && dp[from + 1][to - 1]
Approach
- We can cleverly initialize the
dparray to avoid some corner cases checks. - It is better to store just two indices. For simplicity, let’s just do
substringeach time.
Complexity
-
Time complexity: \(O(n^2)\)
-
Space complexity: \(O(n^2)\)
Code
fun longestPalindrome(s: String): String {
val dp = Array(s.length) { i -> BooleanArray(s.length) { i >= it } }
var res = s.take(1)
for (to in s.indices) for (from in to - 1 downTo 0) {
dp[from][to] = s[from] == s[to] && dp[from + 1][to - 1]
if (dp[from][to] && to - from + 1 > res.length)
res = s.substring(from, to + 1)
}
return res
}
26.10.2023
823. Binary Trees With Factors medium
blog post
substack
Join me on Telegram
https://t.me/leetcode_daily_unstoppable/382
Problem TLDR
Number of trees from arr where each k node has i and j leafs arr[k]=arr[j]*arr[i]
Intuition
By naive intuition we can walk array in n^2 manner and collect all the matching multiplications. However, there is a nested depth, and we need a law how to add this to the result.
Let’s observe the pattern:
// 12 3 4 6 2
// 2x3=6 a
// 3x2=6 b
// 3x4=12 c
// 4x3=12 d
// 2x6=12 e
// 6x2=12 f
// 2x2=4 g
// 5 + [a b c d e f g] + [ca] + [da] + [ea eb] + [fa fb] = 18
If we start from node e we must include both a and b. The equation becomes: f(k)=SUM(f(i)*f(j)). For node e: k=12, i=2, j=6, f(12)=f(2)*f(6), f(6)=f(3)*f(2) + f(2)*f(3)=2
If we sort the array, we will make sure, lower values are calculated.
We can think about this like a graph: 2x3->6->12
Approach
Calculate each array values individually using DFS + memo, then sum.
Complexity
-
Time complexity: \(O(n^2)\)
-
Space complexity: \(O(n^2)\)
Code
fun numFactoredBinaryTrees(arr: IntArray): Int {
var set = arr.toSet()
arr.sort()
val dp = mutableMapOf<Int, Long>()
fun dfs(a: Int): Long = dp.getOrPut(a) {
1L + arr.sumOf {
if (a % it == 0 && set.contains(a / it))
dfs(it) * dfs(a / it) else 0L
}
}
return (arr.sumOf { dfs(it) } % 1_000_000_007L).toInt()
}
25.10.2023
779. K-th Symbol in Grammar medium
blog post
substack
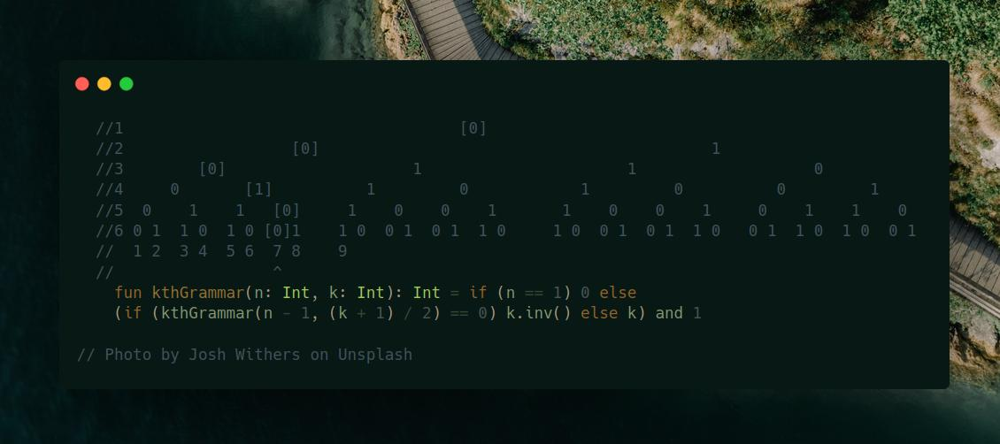
Join me on Telegram
https://t.me/leetcode_daily_unstoppable/381
Problem TLDR
Binary Tree 0 -> 01, 1 -> 10 at [n][k] position
Intuition
Let’s draw the example and see the pattern:
//1 [0]
//2 [0] 1
//3 [0] 1 1 0
//4 0 [1] 1 0 1 0 0 1
//5 0 1 1 [0] 1 0 0 1 1 0 0 1 0 1 1 0
//6 0 1 1 0 1 0 [0]1 1 0 0 1 0 1 1 0 1 0 0 1 0 1 1 0 0 1 1 0 1 0 0 1
// 1 2 3 4 5 6 7 8 9
// ^
Some observations:
- Every
0starts its own tree, and every1start its own pattern of a tree. - We can know the position in the previous row:
(k + 1) / 2 - If previous value is
0, current pair is01, otherwise10
Approach
- we don’t need to memorize the recursion, as it goes straightforward up
- we can use
and 1bit operation instead of% 2
Complexity
-
Time complexity: \(O(n)\)
-
Space complexity: \(O(n)\)
Code
fun kthGrammar(n: Int, k: Int): Int = if (n == 1) 0 else
(if (kthGrammar(n - 1, (k + 1) / 2) == 0) k.inv() else k) and 1
24.10.2023
515. Find Largest Value in Each Tree Row medium
blog post
substack
Join me on Telegram
https://t.me/leetcode_daily_unstoppable/380
Problem TLDR
Binary Tree’s maxes of the levels
Intuition
Just use Breadth-First Search
Approach
Let’s use some Kotlin’s API:
- generateSequence
- maxOf
Complexity
-
Time complexity: \(O(n)\)
-
Space complexity: \(O(n)\)
Code
fun largestValues(root: TreeNode?): List<Int> =
with(ArrayDeque<TreeNode>()) {
root?.let { add(it) }
generateSequence { if (isEmpty()) null else
(1..size).maxOf {
with(removeFirst()) {
left?.let { add(it) }
right?.let { add(it) }
`val`
}
}
}.toList()
}
23.10.2023
342. Power of Four easy
blog post
substack
Join me on Telegram
https://t.me/leetcode_daily_unstoppable/379
Problem TLDR
Is n == x^4?
Intuition
There are several ways to solve this. We need to look at the bit representation of some examples, there are an even number of trailing zeros and always just a single 1 bit:
// 4 100
// 16 10000
// 64 1000000
Approach
if (n == 1) true else if (n == 0) false
else n % 4 == 0 && isPowerOfFour(n / 4)
Bit shift approach:
var x = n
var count = 0
while (x > 0 && x and 1 == 0) {
x = x shr 1
count++
}
return x == 1 && count % 2 == 0
Bit mask approach:
n > 0 && (n and (n - 1)) == 0 && (n and 0b0101_0101_0101_0101__0101_0101_0101_0101 != 0)
Use Kotlin countTrailingZeroBits. Or do a Binary Search if you write that algorithm by hand:
unsigned int c = 32; // c will be the number of zero bits on the right
v &= -signed(v);
if (v) c--;
if (v & 0x0000FFFF) c -= 16;
if (v & 0x00FF00FF) c -= 8;
if (v & 0x0F0F0F0F) c -= 4;
if (v & 0x33333333) c -= 2;
if (v & 0x55555555) c -= 1;
Complexity
-
Time complexity: \(O(1)\), for bit mask solution
-
Space complexity: \(O(1)\)
Code
fun isPowerOfFour(n: Int): Boolean = n > 0 &&
(n and (n - 1)) == 0 && n.countTrailingZeroBits() % 2 == 0
22.10.2023
1793. Maximum Score of a Good Subarray hard
blog post
substack
Join me on Telegram
https://t.me/leetcode_daily_unstoppable/378
Problem TLDR
Max of window_min * (window_size) for window having nums[k]
Intuition
This is not a problem where you need to find a minimum of a sliding window.
By description, we must always include nums[k]. Let’s start from here and try to optimally add numbers to the left and to the right of it.
Approach
- in an interview, it is safer to write 3 separate loops: move both pointers, then move two others separately:
while (i > 0 && j < nums.lastIndex) ...
while (i > 0) ...
while (j < nums.lastIndex) ...
Complexity
-
Time complexity: \(O(n)\)
-
Space complexity: \(O(1)\)
Code
fun maximumScore(nums: IntArray, k: Int): Int {
var i = k
var j = k
var min = nums[k]
return generateSequence { when {
i == 0 && j == nums.lastIndex -> null
i > 0 && j < nums.lastIndex -> if (nums[i - 1] > nums[j + 1]) --i else ++j
i > 0 -> --i else -> ++j
} }.maxOfOrNull {
min = min(min, nums[it])
min * (j - i + 1)
} ?: nums[k]
}
21.10.2023
1425. Constrained Subsequence Sum hard
blog post
substack
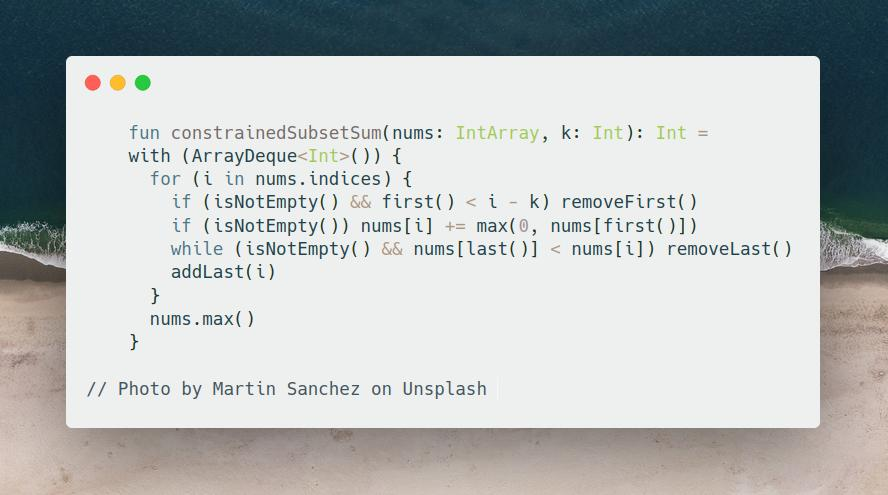
Join me on Telegram
https://t.me/leetcode_daily_unstoppable/377
Problem TLDR
Max sum of subsequence i - j <= k
Intuition
The naive DP approach is to do DFS and memoization:
fun constrainedSubsetSum(nums: IntArray, k: Int): Int {
val dp = mutableMapOf<Int, Int>()
fun dfs(i: Int): Int = if (i >= nums.size) 0 else dp.getOrPut(i) {
var max = nums[i]
for (j in 1..k) max = max(max, nums[i] + dfs(i + j))
max
}
return (0..<nums.size).maxOf { dfs(it) }
}
This solution takes O(nk) time and gives TLE.
Let’s rewrite it to the iterative version to think about further optimization:
fun constrainedSubsetSum(nums: IntArray, k: Int): Int {
val dp = mutableMapOf<Int, Int>()
for (i in nums.indices)
dp[i] = nums[i] + (i - k..i).maxOf { dp[it] ?: 0 }
return dp.values.max()
}
Next, read a hint :) It will suggest to use a Heap. Indeed, looking at this code, we’re just choosing a maximum value from the last k values:
fun constrainedSubsetSum(nums: IntArray, k: Int): Int =
with (PriorityQueue<Int>(reverseOrder())) {
val dp = mutableMapOf<Int, Int>()
for (i in nums.indices) {
if (i - k > 0) remove(dp[i - k - 1])
dp[i] = nums[i] + max(0, peek() ?: 0)
add(dp[i])
}
dp.values.max()
}
This solution takes O(nlog(k)) time and still gives TLE.
Let’s look at other’s people solutions, just take a hint: decreasing queue. This technique must be remembered, as it is a common trick to find a maximum in a sliding window with O(1) time.
Approach
Decreasing queue flushes all the values that smaller than the current.
- we’ll store the indices to remove them later if out of
k - careful with indices
Complexity
-
Time complexity: \(O(n)\)
-
Space complexity: \(O(k)\)
Code
fun constrainedSubsetSum(nums: IntArray, k: Int): Int =
with (ArrayDeque<Int>()) {
for (i in nums.indices) {
if (isNotEmpty() && first() < i - k) removeFirst()
if (isNotEmpty()) nums[i] += max(0, nums[first()])
while (isNotEmpty() && nums[last()] < nums[i]) removeLast()
addLast(i)
}
nums.max()
}
20.10.2023
341. Flatten Nested List Iterator medium
blog post
substack
Join me on Telegram
https://t.me/leetcode_daily_unstoppable/376
Problem TLDR
Implement graph iterator
Intuition
We need to save all the deep levels positions, so let’s use a Stack.
Approach
- we can store
nextIntinteger in a separate variable, or just leave it in a Stack and dopoponnext() - it is better to
advanceafter eachnext()call to know if there is a next position - careful with the order of elements when expanding
Complexity
-
Time complexity: \(O(n)\)
-
Space complexity: \(O(n)\)
Code
class NestedIterator(nestedList: List<NestedInteger>) : Stack<NestedInteger>() {
init {
addAll(nestedList.reversed())
advance()
}
fun advance() {
while (isNotEmpty() && !peek().isInteger()) {
addAll(pop().list.reversed())
}
}
fun next(): Int = pop().integer.also { advance() }
fun hasNext(): Boolean = isNotEmpty()
}
19.10.2023
844. Backspace String Compare medium
blog post
substack
Join me on Telegram
https://t.me/leetcode_daily_unstoppable/375
Problem TDLR
Are typing with backspace sequences equal
Intuition
We can use a Stack to evaluate the resulting strings. However, scanning from the end and counting backspaces would work better.
Approach
Remove all of the backspaced chars before comparing
Complexity
-
Time complexity: \(O(n)\)
-
Space complexity: \(O(1)\)
Code
fun backspaceCompare(s: String, t: String): Boolean {
var si = s.lastIndex
var ti = t.lastIndex
while (si >= 0 || ti >= 0) {
var bs = 0
while (si >= 0 && (s[si] == '#' || bs > 0))
if (s[si--] == '#') bs++ else bs--
bs = 0
while (ti >= 0 && (t[ti] == '#' || bs > 0))
if (t[ti--] == '#') bs++ else bs--
if (si < 0 != ti < 0) return false
if (si >= 0 && s[si--] != t[ti--]) return false
}
return true
}
18.10.2023
2050. Parallel Courses III hard
blog post
substack
Join me on Telegram
https://t.me/leetcode_daily_unstoppable/374
Problem TLDR
Shortest time to visit all nodes in relations=[from, to] graph
Intuition
We can start from nodes without out siblings - leafs and do Depth-First Search from them, calculating time for each sibling in parallel and choosing the maximum. That is an optimal way to visit all the nodes. For each node, a solution can be cached.
Approach
Let’s use some Kotlin’s API:
- calculate leafs by subtracting all
fromnodes from all the nodes1..n - form a graph
Map<Int, List<Int>>by usinggroupBy - choose the maximum and return it with
maxOf - get and put to map with
getOrPut
Complexity
-
Time complexity: \(O(nr)\), will visit each node only once, r - average siblings count for each node
-
Space complexity: \(O(n)\)
Code
fun minimumTime(n: Int, relations: Array<IntArray>, time: IntArray): Int {
val lastNodes = (1..n) - relations.map { it[0] }
val fromTo = relations.groupBy({ it[1] }, { it[0] })
val cache = mutableMapOf<Int, Int>()
fun dfs(curr: Int): Int = cache.getOrPut(curr) {
time[curr - 1] + (fromTo[curr]?.maxOf { dfs(it) } ?: 0)
}
return lastNodes.maxOf { dfs(it) }
}
P.S.: we can also just choose the maximum, as it will be the longest path:
fun minimumTime(n: Int, relations: Array<IntArray>, time: IntArray): Int {
val fromTo = relations.groupBy({ it[1] }, { it[0] })
val cache = mutableMapOf<Int, Int>()
fun dfs(curr: Int): Int = cache.getOrPut(curr) {
time[curr - 1] + (fromTo[curr]?.maxOf { dfs(it) } ?: 0)
}
return (1..n).maxOf { dfs(it) }
}
17.10.2023
1361. Validate Binary Tree Nodes medium
blog post
substack
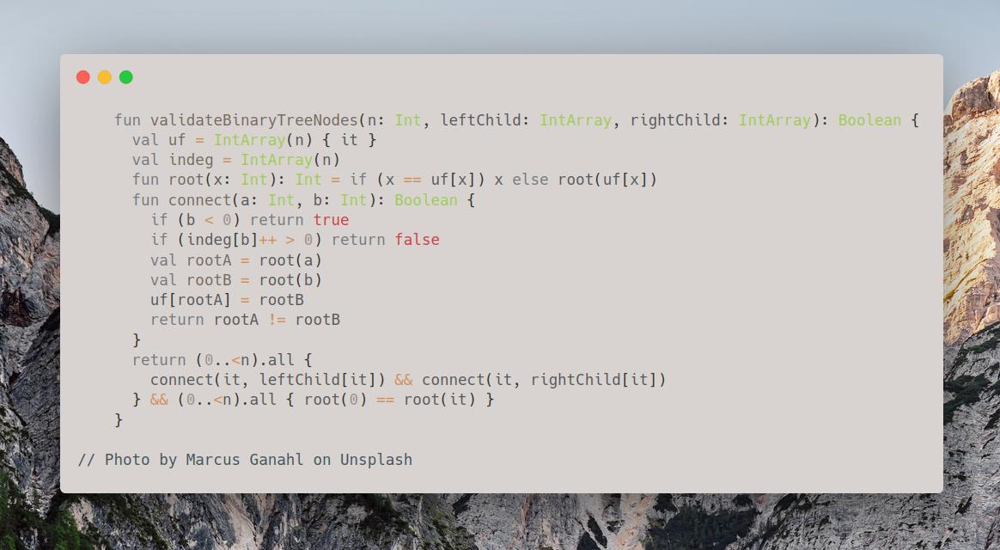
Join me on Telegram
https://t.me/leetcode_daily_unstoppable/373
Problem TLDR
Is Binary Tree of leftChild[] & rightChild[] valid
Intuition
There are some examples:
Tree is valid if:
- all the leafs are connected
- there is no leaf with more than one in nodes
Approach
For connections check let’s use Union-Find. We also must count in nodes.
Complexity
-
Time complexity: \(O(an)\), a - is for Union-Find search, it is less than 10 for Int.MAX_VALUE nodes, if we implement ranks in Union-Find
-
Space complexity: \(O(n)\)
Code
fun validateBinaryTreeNodes(n: Int, leftChild: IntArray, rightChild: IntArray): Boolean {
val uf = IntArray(n) { it }
val indeg = IntArray(n)
fun root(x: Int): Int = if (x == uf[x]) x else root(uf[x])
fun connect(a: Int, b: Int): Boolean {
if (b < 0) return true
if (indeg[b]++ > 0) return false
val rootA = root(a)
val rootB = root(b)
uf[rootA] = rootB
return rootA != rootB
}
return (0..<n).all {
connect(it, leftChild[it]) && connect(it, rightChild[it])
} && (0..<n).all { root(0) == root(it) }
}
16.10.2023
119. Pascal’s Triangle II easy
blog post
substack
Join me on Telegram
https://t.me/leetcode_daily_unstoppable/372
Problem TLDR
Pascal’s Triangle
Intuition
One way is to generate sequence:
fun getRow(rowIndex: Int): List<Int> =
generateSequence(listOf(1)) {
listOf(1) + it.windowed(2) { it.sum() } + 1
}.elementAtOrElse(rowIndex) { listOf() }
Another way is to use fold
Approach
- notice, we can add a simple
1to collection by+ - use
sumandwindowed
Complexity
-
Time complexity: \(O(n^2)\)
-
Space complexity: \(O(n)\)
Code
fun getRow(rowIndex: Int): List<Int> =
(1..rowIndex).fold(listOf(1)) { r, _ ->
listOf(1) + r.windowed(2) { it.sum() } + 1
}
15.10.2023
1269. Number of Ways to Stay in the Same Place After Some Steps hard
blog post
substack
Join me on Telegram
https://t.me/leetcode_daily_unstoppable/371
Problem TLDR
Number of ways to return to 0 after moving left, right or stay steps time
Intuition
We can do a brute force Depth First Search, each time moving position to the left, right or stay, adjusting steps left. After all the steps used, we count the way if it is at 0 position.
The result will only depend on the inputs, so can be cached.
Approach
- one optimization can be to use only half of the array, as it is symmetrical
- use
wheninstead ofif - else, because you can forgetelse:
if (some) 0L
if (other) 1L // must be `else if`
Complexity
-
Time complexity: \(O(s^2)\), max index can be no more than number of steps, as we move by 1 at a time
-
Space complexity: \(O(s^2)\)
Code
fun numWays(steps: Int, arrLen: Int): Int {
val m = 1_000_000_007L
val dp = mutableMapOf<Pair<Int, Int>, Long>()
fun dfs(i: Int, s: Int): Long = dp.getOrPut(i to s) { when {
s == steps && i == 0 -> 1L
i < 0 || i >= arrLen || s >= steps -> 0L
else -> {
val leftRight = (dfs(i - 1, s + 1) + dfs(i + 1, s + 1)) % m
val stay = dfs(i, s + 1)
(leftRight + stay) % m
}
} }
return dfs(0, 0).toInt()
}
14.10.2023
2742. Painting the Walls hard
blog post
substack
Join me on Telegram
https://t.me/leetcode_daily_unstoppable/369
Problem TLDR
Min cost to complete all tasks using one paid cost[] & time[] and one free 0 & 1 workers
Intuition
Let’s use a Depth First Search and try each wall by free and by paid workers.
After all the walls taken, we see if it is a valid combination: if paid worker time less than free worker time, then free worker dares to take task before paid worker, so it is invalid. We will track the time, keeping it around zero: if free worker takes a task, time flies back, otherwise time goes forward by paid worker request. The valid combination is t >= 0.
fun dfs(i: Int, t: Int): Int = dp.getOrPut(i to t) {
if (i == cost.size) { if (t < 0) 1_000_000_000 else 0 }
else {
val takePaid = cost[i] + dfs(i + 1, t + time[i])
val takeFree = dfs(i + 1, t - 1)
min(takePaid, takeFree)
}
}
This solution almost works, however gives TLE, so we need another trick min(cost.size, t + time[i]):
- Pay attention that free worker takes exactly
1point of time that is, can paint all the walls bynpoints of time. - So, after time passes
npoints it’s over, we can use free worker, or basically we’re done. - An example of that is times:
7 6 5 4 3 2 1. If paid worker takes task with time7, all the other tasks will be left for free worker, because he is doing them by1points of time.
Approach
- store two Int’s in one by bits shifting
- or use an
Arrayfor the cache, but code becomes complex
Complexity
-
Time complexity: \(O(n^2)\)
-
Space complexity: \(O(n^2)\)
Code
fun paintWalls(cost: IntArray, time: IntArray): Int {
val dp = mutableMapOf<Int, Int>()
fun dfs(i: Int, t: Int): Int = dp.getOrPut((i shl 16) + t) {
if (i == cost.size) { if (t < 0) 1_000_000_000 else 0 }
else {
val takePaid = cost[i] + dfs(i + 1, min(cost.size, t + time[i]))
val takeFree = dfs(i + 1, t - 1)
min(takePaid, takeFree)
}
}
return dfs(0, 0)
}
13.10.2023
746. Min Cost Climbing Stairs easy
blog post
substack
Join me on Telegram
https://t.me/leetcode_daily_unstoppable/368
Problem TLDR
Classic DP: climbing stairs
Intuition
Start with brute force approach: consider every position and choose one of a two - use current stair or use next. Given that, the result will only depend on the input position, so can be cached. This will give a simple DFS + memo DP code:
fun minCostClimbingStairs(cost: IntArray): Int {
val dp = mutableMapOf<Int, Int>()
fun dfs(curr: Int): Int = dp.getOrPut(curr) {
if (curr >= cost.lastIndex) 0
else min(
cost[curr] + dfs(curr + 1),
cost[curr + 1] + dfs(curr + 2)
)
}
return dfs(0)
}
This is accepted, but can be better if rewritten to bottom up and optimized.
Approach
After rewriting the recursive solution to iterative bottom up, we can notice, that only two of the previous values are always used. Convert dp array into two variables.
Complexity
-
Time complexity: \(O(n)\)
-
Space complexity: \(O(1)\)
Code
fun minCostClimbingStairs(cost: IntArray): Int {
var curr = 0
var prev = 0
for (i in 0..<cost.lastIndex)
curr = min(cost[i + 1] + curr, cost[i] + prev)
.also { prev = curr }
return curr
}
12.10.2023
1095. Find in Mountain Array hard
blog post
substack
Join me on Telegram
https://t.me/leetcode_daily_unstoppable/367
Problem TLDR
Binary Search in a mountain
Intuition
First, find the top of the slope. Next, do two Binary Searches on the left and on the right slopes
Approach
- to find a top search for where the increasing slope ends
For better Binary Search code
- use inclusive
loandhi - check the last condition
lo == hi - always update the result
top = max(top, mid) - always move the borders
lo = mid + 1,hi = mid - 1 - move border that cuts off the irrelevant part of the array
Complexity
-
Time complexity: \(O(log(n))\)
-
Space complexity: \(O(1)\)
Code
fun findInMountainArray(target: Int, mountainArr: MountainArray): Int {
var lo = 1
var hi = mountainArr.length() - 1
var top = -1
while (lo <= hi) {
val mid = lo + (hi - lo) / 2
if (mountainArr.get(mid - 1) < mountainArr.get(mid)) {
top = max(top, mid)
lo = mid + 1
} else hi = mid - 1
}
lo = 0
hi = top
while (lo <= hi) {
val mid = lo + (hi - lo) / 2
val m = mountainArr.get(mid)
if (m == target) return mid
if (m < target) lo = mid + 1 else hi = mid - 1
}
lo = top
hi = mountainArr.length() - 1
while (lo <= hi) {
val mid = lo + (hi - lo) / 2
val m = mountainArr.get(mid)
if (m == target) return mid
if (m < target) hi = mid - 1 else lo = mid + 1
}
return -1
}
11.10.2023
2251. Number of Flowers in Full Bloom hard
blog post
substack
Join me on Telegram
https://t.me/leetcode_daily_unstoppable/366
Problem TLDR
Array of counts of segments in intersection
Intuition
We need to quickly count how many segments are for any particular time. If we sort segments by from position, we can use line sweep, and we also need to track times when count decreases.
To find out how many people in a time range we can sort them and use Binary Search.
Approach
- to track count changes let’s store time
deltas intimeToDeltaHashMap - careful with storing decreases, they are starting in
to + 1 - instead of sorting the segments we can use a
TreeMap - we need to preserve
peoples order, so use separate sortedindicescollection
For better Binary Search code:
- use inclusive
loandhi - check the last condition
lo == hi - always save a good result
peopleIndBefore = max(.., mid) - always move the borders
lo = mid + 1,hi = mid - 1 - if
midis less thantargetdrop everything on the left side:lo = mid + 1
Complexity
-
Time complexity: \(O(nlog(n))\)
-
Space complexity: \(O(n)\)
Code
fun fullBloomFlowers(flowers: Array<IntArray>, people: IntArray): IntArray {
val peopleInds = people.indices.sortedBy { people[it] }
val timeToDelta = TreeMap<Int, Int>()
for ((from, to) in flowers) {
timeToDelta[from] = 1 + (timeToDelta[from] ?: 0)
timeToDelta[to + 1] = -1 + (timeToDelta[to + 1] ?: 0)
}
val res = IntArray(people.size)
var count = 0
var lastPeopleInd = -1
timeToDelta.onEach { (time, delta) ->
var lo = max(0, lastPeopleInd - 1)
var hi = peopleInds.lastIndex
var peopleIndBefore = -1
while (lo <= hi) {
val mid = lo + (hi - lo) / 2
if (people[peopleInds[mid]] < time) {
peopleIndBefore = max(peopleIndBefore, mid)
lo = mid + 1
} else hi = mid - 1
}
for (i in max(0, lastPeopleInd)..peopleIndBefore) res[peopleInds[i]] = count
count += delta
lastPeopleInd = peopleIndBefore + 1
}
return res
}
10.10.2023
2009. Minimum Number of Operations to Make Array Continuous hard
blog post
substack
Join me on Telegram
https://t.me/leetcode_daily_unstoppable/365
Problem TLDR
Min replacements to make array continuous a[i] = a[i - 1] + 1
Intuition
Use hint. There are some ideas to solve this:
- if we choose any particular number from the array, we know how the result array must look like -
1 3 4 -> 1 2 3 or 3 4 5 or 4 5 6 - we can sort the array and discard all numbers left to the current and right to the last of the result. For example,
1 3 4, if current number is1we drop all numbers bigger than3as1 2 3is a result. - to find the position of the right border, we can use a Binary Search
- now we have a range of numbers that almost good, but there can be
duplicates. To count how many duplicates in range in O(1) we can precompute a prefix counter of the unique numbers.
Approach
Look at someone else’s solution. For better Binary Search code:
- use inclusive
loandhi - check the last condition
lo == hi - always move the border
lo = mid + 1,hi = mid - 1 - always update the result
toPos = min(toPos, mid) - choose which border to move by discarding not relevant
midposition:if nums[mid] is less than target, we can drop all numbers to the left, so move lo
Complexity
-
Time complexity: \(O(nlog(n))\)
-
Space complexity: \(O(n)\)
Code
fun minOperations(nums: IntArray): Int {
nums.sort()
val uniqPrefix = IntArray(nums.size) { 1 }
for (i in 1..<nums.size) {
uniqPrefix[i] = uniqPrefix[i - 1]
if (nums[i] != nums[i - 1]) uniqPrefix[i]++
}
var minOps = nums.size - 1
for (i in nums.indices) {
val from = nums[i]
val to = from + nums.size - 1
var lo = i
var hi = nums.size - 1
var toPos = nums.size
while (lo <= hi) {
val mid = lo + (hi - lo) / 2
if (nums[mid] > to) {
toPos = min(toPos, mid)
hi = mid - 1
} else lo = mid + 1
}
val uniqCount = max(0, uniqPrefix[toPos - 1] - uniqPrefix[i]) + 1
minOps = min(minOps, nums.size - uniqCount)
}
return minOps
}
9.10.2023
34. Find First and Last Position of Element in Sorted Array medium
blog post
substack
Join me on Telegram
https://t.me/leetcode_daily_unstoppable/364
Problem TLDR
Binary Search range
Intuition
Just write a Binary Search
Approach
For simpler code:
- use inclusive
loandhi - check the last condition
lo == hi - always move the borders
lo = mid + 1,hi = mid - 1 - always write the found result
if (nums[mid] == target) - to understand which border to move, consider this thought:
if this position is definitely less than target, we can drop it and all that less than it
Complexity
-
Time complexity: \(O(log(n))\)
-
Space complexity: \(O(1)\)
Code
fun searchRange(nums: IntArray, target: Int): IntArray {
var from = -1
var lo = 0
var hi = nums.lastIndex
while (lo <= hi) {
val mid = lo + (hi - lo) / 2
if (nums[mid] == target) from = min(max(from, nums.size), mid)
if (nums[mid] < target) lo = mid + 1
else hi = mid - 1
}
var to = from
lo = maxOf(0, from)
hi = nums.lastIndex
while (lo <= hi) {
val mid = lo + (hi - lo) / 2
if (nums[mid] == target) to = max(min(-1, to), mid)
if (nums[mid] <= target) lo = mid + 1
else hi = mid - 1
}
return intArrayOf(from, to)
}
8.10.2023
1458. Max Dot Product of Two Subsequences hard
blog post
substack
Join me on Telegram
https://t.me/leetcode_daily_unstoppable/363
Problem TLDR
Max product of two subsequences
Intuition
We can search in all possible subsequences in O(n^2) by choosing between: take element and stop, take and continue, skip first, skip second.
Approach
The top-down aproach is trivial, let’s modify it into bottom up.
- use sentry
dpsize to avoid writingifs
Complexity
-
Time complexity: \(O(n^2)\)
-
Space complexity: \(O(n^2)\)
Code
fun maxDotProduct(nums1: IntArray, nums2: IntArray): Int {
val dp = Array(nums1.size + 1) { Array(nums2.size + 1) { -1000000 } }
for (j in nums2.lastIndex downTo 0)
for (i in nums1.lastIndex downTo 0)
dp[i][j] = maxOf(
nums1[i] * nums2[j],
nums1[i] * nums2[j] + dp[i + 1][j + 1],
dp[i][j + 1],
dp[i + 1][j])
return dp[0][0]
}
7.10.2023
1420. Build Array Where You Can Find The Maximum Exactly K Comparisons hard
blog post
substack
Join me on Telegram
https://t.me/leetcode_daily_unstoppable/362
Problem TLDR
Count possible arrays of n 1..m values increasing k times
Intuition
First, try to write down some examples of arrays. There are some laws of how the number of arrays grows.
Next, use hint :)
Then just write Depth First Search of all possible numbers for each position and count how many times numbers grows. Stop search when it is bigger than k times. The result can be cached.
Approach
- use Long to avoid overflows
Complexity
-
Time complexity: \(O(nkm^2)\), nkm - is a search depth, and another m for internal loop
-
Space complexity: \(O(nkm)\)
Code
fun numOfArrays(n: Int, m: Int, k: Int): Int {
val mod = 1_000_000_007L
val dp = Array(n) { Array(m + 1) { Array(k + 1) { -1L } } }
fun dfs(i: Int, max: Int, c: Int): Long =
if (c > k) 0L
else if (i == n) { if (c == k) 1L else 0L }
else dp[i][max][c].takeIf { it >= 0 } ?: {
var sum = (max * dfs(i + 1, max, c)) % mod
for (x in (max + 1)..m)
sum = (sum + dfs(i + 1, x, c + 1)) % mod
sum
}().also { dp[i][max][c] = it }
return dfs(0, 0, 0).toInt()
}
6.10.2023
343. Integer Break medium
blog post
substack
Join me on Telegram
https://t.me/leetcode_daily_unstoppable/361
Problem TLDR
Max multiplication of the number split
Intuition
We can search from all possible splits. The result will only depend on the input n, so can be cached.
Approach
- one corner case is the small numbers, like
2, 3, 4: ensure there is at least one split happen
Complexity
-
Time complexity: \(O(n^2)\), recursion depth is
nand anothernis in the loop. Without cache, it would be n^n -
Space complexity: \(O(n)\)
Code
val cache = mutableMapOf<Int, Int>()
fun integerBreak(n: Int, canTake: Boolean = false): Int =
if (n == 0) 1 else cache.getOrPut(n) {
(1..if (canTake) n else n - 1).map {
it * integerBreak(n - it, true)
}.max()
}
5.10.2023
229. Majority Element II medium
blog post
substack
Join me on Telegram
https://t.me/leetcode_daily_unstoppable/360
Problem TLDR
Elements with frequency > size / 3
Intuition
The naive solution, which is to count frequencies, can be this one-liner:
fun majorityElement(nums: IntArray) = nums
.groupBy { it }
.filter { (k, v) -> v.size > nums.size / 3 }
.map { (k, v) -> k }
However, to solve it in O(1) we need to read the hint: Moore algo.
One idea is that there are at most only two such elements can coexist:
// 111 123 333
// 1111 1234 4444
// 11111 12345 55555
The second idea is a clever counting of three buckets: first candidate, second candidate and others. We decrease candidates counters if x in the others bucket, and change candidate if it’s counter 0.
Approach
Steal someone’s else solution or ask ChatGPT about Moore algorithm to find majority element.
- make sure you understand why the resulting elements are majority
Complexity
-
Time complexity: \(O(n)\)
-
Space complexity: \(O(1)\)
Code
fun majorityElement(nums: IntArray): List<Int> {
var x1 = Int.MIN_VALUE
var x2 = Int.MIN_VALUE
var count1 = 0
var count2 = 0
for (x in nums) when {
x != x2 && count1 == 0 -> x1 = x.also { count1 = 1 }
x != x1 && count2 == 0 -> x2 = x.also { count2 = 1 }
x == x1 -> count1++
x == x2 -> count2++
else -> {
count1 = maxOf(0, count1 - 1)
count2 = maxOf(0, count2 - 1)
}
}
return buildList {
if (nums.count { it == x1 } > nums.size / 3) add(x1)
if (nums.count { it == x2 } > nums.size / 3) add(x2)
}
}
4.10.2023
706. Design HashMap easy
blog post
substack
Join me on Telegram
https://t.me/leetcode_daily_unstoppable/359
Problem TLDR
Design a HashMap
Intuition
The simple implementation consists of a growing array of buckets, where each bucket is a list of key-value pairs.
Approach
For better performance:
- use
LinkedList - start with smaller buckets size
Complexity
-
Time complexity: \(O(1)\)
-
Space complexity: \(O(1)\), for all operations
Code
class MyHashMap() {
var table = Array<MutableList<Pair<Int, Int>>>(16) { mutableListOf() }
var count = 0
fun bucket(key: Int) = table[key % table.size]
fun rehash() = with(table.flatMap { it }) {
table = Array(table.size * 2) { mutableListOf() }
for ((key, value) in this) bucket(key) += key to value
}
fun put(key: Int, value: Int) = with(bucket(key)) {
if (removeAll { it.first == key }) count++
this += key to value
if (count > table.size) rehash()
}
fun get(key: Int) = bucket(key)
.firstOrNull { it.first == key }?.second ?: -1
fun remove(key: Int) {
if (bucket(key).removeAll { it.first == key }) count--
}
}
3.10.2023
1512. Number of Good Pairs easy
blog post
substack
Join me on Telegram
https://t.me/leetcode_daily_unstoppable/358
Problem TLDR
Count equal pairs
Intuition
The naive N^2 solution will work.
Another idea is to store the number frequency so far and add it to the current result.
Approach
Let’s use Kotlin’s API:
- with
- fold
Complexity
-
Time complexity: \(O(n)\)
-
Space complexity: \(O(n)\)
Code
fun numIdenticalPairs(nums: IntArray) = with(IntArray(101)) {
nums.fold(0) { r, t -> r + this[t].also { this[t]++ } }
}
2.10.2023
2038. Remove Colored Pieces if Both Neighbors are the Same Color medium
blog post
substack
Join me on Telegram
https://t.me/leetcode_daily_unstoppable/357
Problem TLDR
Is A wins in middle-removing AAA or BBB game
Intuition
We quickly observe, that removing A in BBAAABB doesn’t make B turn possible, so the outcome does not depend on how exactly positions are removed. A can win if it’s possible game turns are more than B. So, the problem is to find how many consequent A’s and B’s are.
Approach
We can count A and B in a single pass, however, let’s write a two-pass one-liner using window Kotlin method.
Complexity
-
Time complexity: \(O(n)\)
-
Space complexity: \(O(n)\), can be O(1) if
asSequenceused
Code
fun winnerOfGame(colors: String) = with(colors.windowed(3)) {
count { it.all { it == 'A' } } > count { it.all { it == 'B' } }
}
1.10.2023
557. Reverse Words in a String III easy
blog post
substack
Join me on Telegram
https://t.me/leetcode_daily_unstoppable/356
Problem TLDR
Reverse words
Intuition
In an interview in-place solution expected. Maintain two pointers, and adjust one until end of word reached. This still takes O(N) space in JVM.
Approach
Let’s write a one-liner using Kotlin’s API
Complexity
-
Time complexity: \(O(n)\)
-
Space complexity: \(O(n)\)
Code
fun reverseWords(s: String) =
s.reversed().split(" ").reversed().joinToString(" ")
30.09.2023
456. 132 Pattern medium blog post substack
Join me on Telegram
https://t.me/leetcode_daily_unstoppable/355
Problem TLDR
132 pattern in array
Intuition
If we slide the array from behind, we simplify the task to find the smallest element. When searching for largest decreasing subsequence we can use a monotonic Stack.
Approach
- we must remember the popped element, as it is the second largest one
Complexity
-
Time complexity: \(O(n)\)
-
Space complexity: \(O(1)\)
Code
fun find132pattern(nums: IntArray): Boolean {
val stack = Stack<Int>()
var lo = Int.MIN_VALUE
return (nums.lastIndex downTo 0).any { i ->
while (stack.isNotEmpty() && stack.peek() < nums[i]) lo = stack.pop()
stack.push(nums[i])
nums[i] < lo
}
}
29.09.2023
896. Monotonic Array easy
blog post
substack
Join me on Telegram
https://t.me/leetcode_daily_unstoppable/354
Problem TLDR
Is array monotonic
Intuition
Let’s compute the diffs, then array is monotonic if all the diffs have the same sign.
Approach
Let’s use Kotlin’s API:
- asSequence - to avoid creating a collection
- map
- filter
- windowed - scans array by
xsized sliding window
Complexity
-
Time complexity: \(O(n)\)
-
Space complexity: \(O(1)\)
Code
fun isMonotonic(nums: IntArray) =
nums.asSequence().windowed(2)
.map { it[0] - it[1] }
.filter { it != 0 }
.windowed(2)
.all { it[0] > 0 == it[1] > 0 }
28.09.2023
905. Sort Array By Parity easy
blog post
substack
Join me on Telegram
https://t.me/leetcode_daily_unstoppable/353
Problem TLDR
Sort an array by even-odd
Intuition
There are built-in functions. However, in an interview manual partition is expected: maintain the sorted border l and adjust it after swapping.
Approach
Let’s write them all.
Complexity
-
Time complexity: \(O(n)\)
-
Space complexity: \(O(1)\)
Code
// 1
fun sortArrayByParity(nums: IntArray) = nums.also {
var l = 0
for (r in nums.indices) if (nums[r] % 2 == 0)
nums[r] = nums[l].also { nums[l++] = nums[r] }
}
// 2
fun sortArrayByParity(nums: IntArray) =
nums.partition { it % 2 == 0 }.toList().flatten()
// 3
fun sortArrayByParity(nums: IntArray) = nums.sortedBy { it % 2 }
27.09.2023
880. Decoded String at Index medium
blog post
substack
Join me on Telegram
https://t.me/leetcode_daily_unstoppable/352
Problem TLDR
k-th character in an encoded string like a3b2=aaabaaab
Intuition
We know the resulting length at every position of the encoded string. For example,
a3b2
1348
The next step, just walk from the end of the string and adjust k, by undoing repeating operation:
// a2b2c2
// 0 1 2 3 4 5 6 7 8 9 10 11 12 13
// a a b a a b c a a b a a b c
// a2b2c2 = 2 x a2b2c = 2*(a2b2 + c) =
// 2*(2*(a2 + b) + c) = 2*(2*(2*a + b) + c)
// k=9 9%(len(a2b2c)/2)
//
// a3b2 k=7
// 12345678
// aaabaaab
// aaab k=7%4=3
//
// abcd2 k=6
// 12345678
// abcdabcd k%4=2
Approach
- use Long to avoid overflow
- check digit with
isDigit - Kotlin have a nice conversion function
digitToInt - corner case is when
searchis become0`, we must return first non-digit character
Complexity
-
Time complexity: \(O(n)\)
-
Space complexity: \(O(n)\)
Code
fun decodeAtIndex(s: String, k: Int): String {
val lens = LongArray(s.length) { 1L }
for (i in 1..s.lastIndex) lens[i] = if (s[i].isDigit())
lens[i - 1] * s[i].digitToInt()
else lens[i - 1] + 1
var search = k.toLong()
for (i in s.lastIndex downTo 0) if (s[i].isDigit())
search = search % (lens[i] / s[i].digitToInt().toLong())
else if (lens[i] == search || search == 0L) return "" + s[i]
throw error("not found")
}
26.09.2023
316. Remove Duplicate Letters medium
blog post
substack
Join me on Telegram
https://t.me/leetcode_daily_unstoppable/351
Problem TLDR
Lexicographical smallest subsequence without duplicates
Intuition
The brute force way would be to just consider every position and do a DFS. To pass the test case, however, there is a greedy way: let’s take characters and pop them if new is smaller and the duplicate exists later in a string.
// 01234
// 234
// bcabc
// * b
// * bc
// * a, pop c, pop b
// * ab
// * abc
Approach
We can use Kotlin’s buildString API instead of a Stack
Complexity
-
Time complexity: \(O(n)\)
-
Space complexity: \(O(1)\)
Code
fun removeDuplicateLetters(s: String) = buildString {
var visited = mutableSetOf<Char>()
val lastInds = mutableMapOf<Char, Int>()
s.onEachIndexed { i, c -> lastInds[c] = i}
s.onEachIndexed { i, c ->
if (visited.add(c)) {
while (isNotEmpty() && last() > c && i < lastInds[last()]!!)
visited.remove(last()).also { setLength(lastIndex) }
append(c)
}
}
}
25.09.2023
389. Find the Difference easy
blog post
substack
Join me on Telegram
https://t.me/leetcode_daily_unstoppable/350
Problem TLDR
Strings difference by a single char
Intuition
We can use frequency map. Or just calculate total sum by Char Int value.
Approach
Let’s use Kotlin’s API sumBy
Complexity
-
Time complexity: \(O(n)\)
-
Space complexity: \(O(1)\)
Code
fun findTheDifference(s: String, t: String) =
(t.sumBy { it.toInt() } - s.sumBy { it.toInt() }).toChar()
24.09.2023
799. Champagne Tower medium
blog post
substack
Join me on Telegram
https://t.me/leetcode_daily_unstoppable/349
Problem TLDR
Positional flow value in a Pascal’s Triangle
Intuition
Let’s treat every glass value as the total flow passed through it. Otherwise, it is a standard Pascal’s Triangle problem: reuse the previous row to compute the next.
Approach
- if flow is less than
1.0(full), it will contribute0.0to the next row. This can be written asmax(0, x - 1) - careful with a champagne, it will beat you in a head
Complexity
-
Time complexity: \(O(n^2)\)
-
Space complexity: \(O(n)\)
Code
fun champagneTower(poured: Int, query_row: Int, query_glass: Int): Double {
var flow = listOf(poured.toDouble())
repeat(query_row) {
val middle = flow.windowed(2).map { (a, b) ->
max(0.0, a - 1.0) / 2 + max(0.0, b - 1.0) / 2
}
val edge = listOf(maxOf(0.0, flow.first() - 1.0) / 2)
flow = edge + middle + edge
}
return minOf(flow[query_glass], 1.0)
}
23.09.2023
1048. Longest String Chain medium
blog post
substack
Join me on Telegram
https://t.me/leetcode_daily_unstoppable/348
Problem TLDR
Longest chain of words with single character added
Intuition
We can build a graph, then use DFS to find a maximum depth. To detect predecessor, we can use two pointers.
Approach
Careful with two pointers: iterate over short string and adjust the second pointer for long, not vice versa.
Complexity
-
Time complexity: \(O(w*n^2)\), to build a graph
-
Space complexity: \(O(n^2)\), for graph
Code
fun longestStrChain(words: Array<String>): Int {
fun isPred(a: String, b: String): Boolean {
if (a.length != b.length - 1) return false
var i = -1
return !a.any {
i++
while (i < b.length && it != b[i]) i++
i == b.length
}
}
val fromTo = mutableMapOf<String, MutableSet<String>>()
for (a in words)
for (b in words)
if (isPred(a, b))
fromTo.getOrPut(a) { mutableSetOf() } += b
val cache = mutableMapOf<String, Int>()
fun dfs(w: String): Int = cache.getOrPut(w) {
1 + (fromTo[w]?.map { dfs(it) }?.max() ?: 0)
}
return words.map { dfs(it) }?.max() ?: 0
}
22.09.2023
392. Is Subsequence easy
blog post
substack

Join me on Telegram
https://t.me/leetcode_daily_unstoppable/347
Problem TLDR
Is string a subsequence of another
Intuition
One possible way is to build a Trie, however this problem can be solved just with two pointers.
Approach
Iterate over one string and adjust pointer of another.
Complexity
-
Time complexity: \(O(n)\)
-
Space complexity: \(O(1)\)
Code
fun isSubsequence(s: String, t: String): Boolean {
var i = -1
return !s.any { c ->
i++
while (i < t.length && t[i] != c) i++
i == t.length
}
}
21.09.2023
4. Median of Two Sorted Arrays hard
blog post
substack
Join me on Telegram
https://t.me/leetcode_daily_unstoppable/346
Problem TLDR
Median in two concatenated sorted arrays
Intuition
We already know the target position of the median element in the concatenated array.
There is an approach with Binary Search, but it’s harder to come up with in an interview and write correctly.
Approach
We can maintain two pointers and increase them one by one until targetPos reached.
Complexity
-
Time complexity: \(O(n)\)
-
Space complexity: \(O(1)\)
Code
fun findMedianSortedArrays(nums1: IntArray, nums2: IntArray): Double {
val targetPos = (nums1.size + nums2.size) / 2
var i = 0
var j = 0
var prev = 0
var curr = 0
while (i + j <= targetPos) {
prev = curr
curr = when {
i == nums1.size -> nums2[j++]
j == nums2.size -> nums1[i++]
nums1[i] <= nums2[j] -> nums1[i++]
else -> nums2[j++]
}
}
return if ((nums1.size + nums2.size) % 2 == 0)
(prev + curr) / 2.0
else
curr.toDouble()
}
20.09.2023
1658. Minimum Operations to Reduce X to Zero medium
blog post
substack
Join me on Telegram
https://t.me/leetcode_daily_unstoppable/345
Problem TLDR
Min suffix-prefix to make an x
Intuition
We can reverse the problem: find the middle of the array to make an arr_sum() - x. Now, this problem can be solved using a sliding window technique.
Approach
For more robust sliding window:
- use safe array iteration for the right border
- use explicit
windowSizevariable - check the result every time
Complexity
-
Time complexity: \(O(n)\)
-
Space complexity: \(O(1)\)
Code
fun minOperations(nums: IntArray, x: Int): Int {
val targetSum = nums.sum() - x
var windowSize = 0
var currSum = 0
var res = Int.MAX_VALUE
nums.onEachIndexed { i, n ->
currSum += n
windowSize++
while (currSum > targetSum && windowSize > 0)
currSum -= nums[i - (windowSize--) + 1]
if (currSum == targetSum)
res = minOf(res, nums.size - windowSize)
}
return res.takeIf { it < Int.MAX_VALUE } ?: -1
}
19.09.2023
287. Find the Duplicate Number medium
blog post
substack

Join me on Telegram
https://t.me/leetcode_daily_unstoppable/344
Problem TLDR
Found duplicate in array, each value is in 1..<arr.size
Intuition
Hint: 4 2 2 2 2 ... 2 is also the case.
What we can see, is that every value is in the 1..<arr.size range, so we can temporarly store the flag in here, then revert it back in the end.
// 0 1 2 3 4 sz = 5
// 3 1 3 4 2
// 3 *
// 1 *
// 3 x
//
Approach
For a flag we can just add some big value to the number, or make it negative, for example.
Let’s write it using some Kotlin’s API:
- first
- also - notice how it doesn’t require brackets
Complexity
-
Time complexity: \(O(n)\)
-
Space complexity: \(O(1)\)
Code
fun findDuplicate(nums: IntArray) = nums.first { n ->
nums[n % nums.size] >= nums.size
.also { nums[n % nums.size] += nums.size }
} % nums.size
.also { for (j in nums.indices) nums[j] %= nums.size }
18.09.2023
1337. The K Weakest Rows in a Matrix easy
blog post
substack
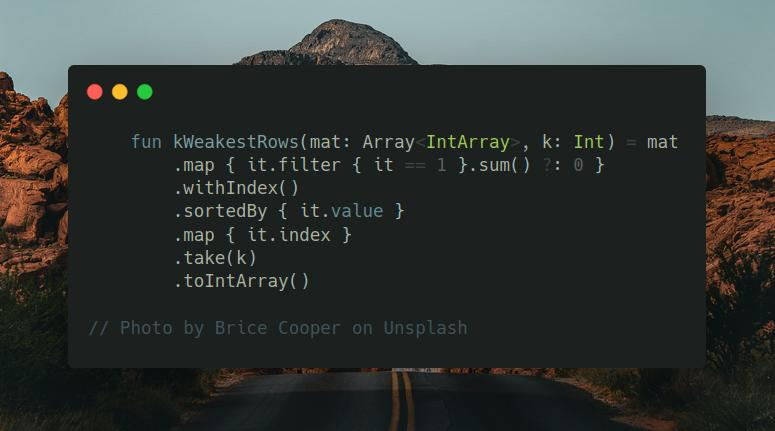
Join me on Telegram
https://t.me/leetcode_daily_unstoppable/343
Problem TLDR
k indices with smallest row sum in a binary matrix
Intuition
We can precompute row sums, then use a Priority Queue to find k smallest. However, just sorting all will also work.
Approach
Let’s use Kotlin’s collections API
- map
- filter
- sortedBy https://kotlinlang.org/api/latest/jvm/stdlib/kotlin.collections/sorted-by.html
- take
- toIntArray
Complexity
-
Time complexity: \(O(n^2logn)\)
-
Space complexity: \(O(n^2)\)
Code
fun kWeakestRows(mat: Array<IntArray>, k: Int) = mat
.map { it.filter { it == 1 }.sum() ?: 0 }
.withIndex()
.sortedBy { it.value }
.map { it.index }
.take(k)
.toIntArray()
16.09.2023
1631. Path With Minimum Effort medium blog post substack
Join me on Telegram
https://t.me/leetcode_daily_unstoppable/341
Problem TLDR
Minimum absolute difference in path top-left to right-bottom
Intuition
To find an optimal path using some condition, we can use A* algorithm:
- add node to
PriorityQueue - choose the “optimal” one
- calculate a new heuristic for siblings and add to
PQ
Approach
- use directions sequence for more clean code
Complexity
-
Time complexity: \(O(nmlog(nm))\)
-
Space complexity: \(O(nm)\)
Code
val dirs = sequenceOf(1 to 0, 0 to 1, 0 to -1, -1 to 0)
fun minimumEffortPath(heights: Array<IntArray>): Int {
val pq = PriorityQueue<Pair<Pair<Int, Int>, Int>>(compareBy { it.second })
pq.add(0 to 0 to 0)
val visited = HashSet<Pair<Int, Int>>()
while (pq.isNotEmpty()) {
val (xy, diff) = pq.poll()
if (!visited.add(xy)) continue
val (x, y) = xy
if (x == heights[0].lastIndex && y == heights.lastIndex) return diff
dirs.map { (dx, dy) -> x + dx to y + dy }
.filter { (x1, y1) -> x1 in 0..<heights[0].size && y1 in 0..<heights.size }
.forEach { (x1, y1) -> pq.add(x1 to y1 to maxOf(diff, abs(heights[y][x] - heights[y1][x1]))) }
}
return 0
}
15.09.2023
1584. Min Cost to Connect All Points medium
blog post
substack
Join me on Telegram
https://t.me/leetcode_daily_unstoppable/340
Problem TLDR
Min manhatten distance connected graph
Intuition
We can start from any points, for example, 0. Next, we must iterate over all possible edges and find one with minimum distance.
Approach
- use
Priority Queueto sort all edges by distance - we can stop after all nodes are visited once
- we can consider only the last edge distance in path
Complexity
-
Time complexity: \(O(n^2)\)
-
Space complexity: \(O(n^2)\)
Code
fun minCostConnectPoints(points: Array<IntArray>): Int {
fun dist(from: Int, to: Int) =
abs(points[from][0] - points[to][0]) + abs(points[from][1] - points[to][1])
val notVisited = points.indices.toMutableSet()
val pq = PriorityQueue<Pair<Int, Int>>(compareBy({ it.second }))
pq.add(0 to 0)
var sum = 0
while (notVisited.isNotEmpty()) {
val curr = pq.poll()
if (!notVisited.remove(curr.first)) continue
sum += curr.second
for (to in notVisited) pq.add(to to dist(curr.first, to))
}
return sum
}
14.09.2023
332. Reconstruct Itinerary hard
blog post
substack
Join me on Telegram
https://t.me/leetcode_daily_unstoppable/339
Problem TLDR
Smallest lexical order path using all the tickets
Intuition
We can build a graph, then do DFS in a lexical order, backtracking. First path with all tickets used will be the answer.
Approach
- graph has directed nodes
- sort nodes lists by strings comparison
- current node is always the last in the path
Complexity
-
Time complexity: \(O(x^n)\), where x - is an average edges count per node
-
Space complexity: \(O(n)\)
Code
fun findItinerary(tickets: List<List<String>>): List<String> {
val fromTo = mutableMapOf<String, MutableList<Pair<Int, String>>>()
tickets.forEachIndexed { i, (from, to) ->
fromTo.getOrPut(from) { mutableListOf() } += i to to
}
for (list in fromTo.values) list.sortWith(compareBy { it.second })
val usedTickets = mutableSetOf<Int>()
var path = mutableListOf("JFK")
fun dfs(): List<String> =
if (usedTickets.size == tickets.size) path.toList()
else fromTo[path.last()]?.asSequence()?.map { (ind, next) ->
if (usedTickets.add(ind)) {
path.add(next)
dfs().also {
path.removeAt(path.lastIndex)
usedTickets.remove(ind)
}
} else emptyList()
}?.filter { it.isNotEmpty() }?.firstOrNull() ?: emptyList()
return dfs()
}
13.09.2023
135. Candy hard
blog post
substack
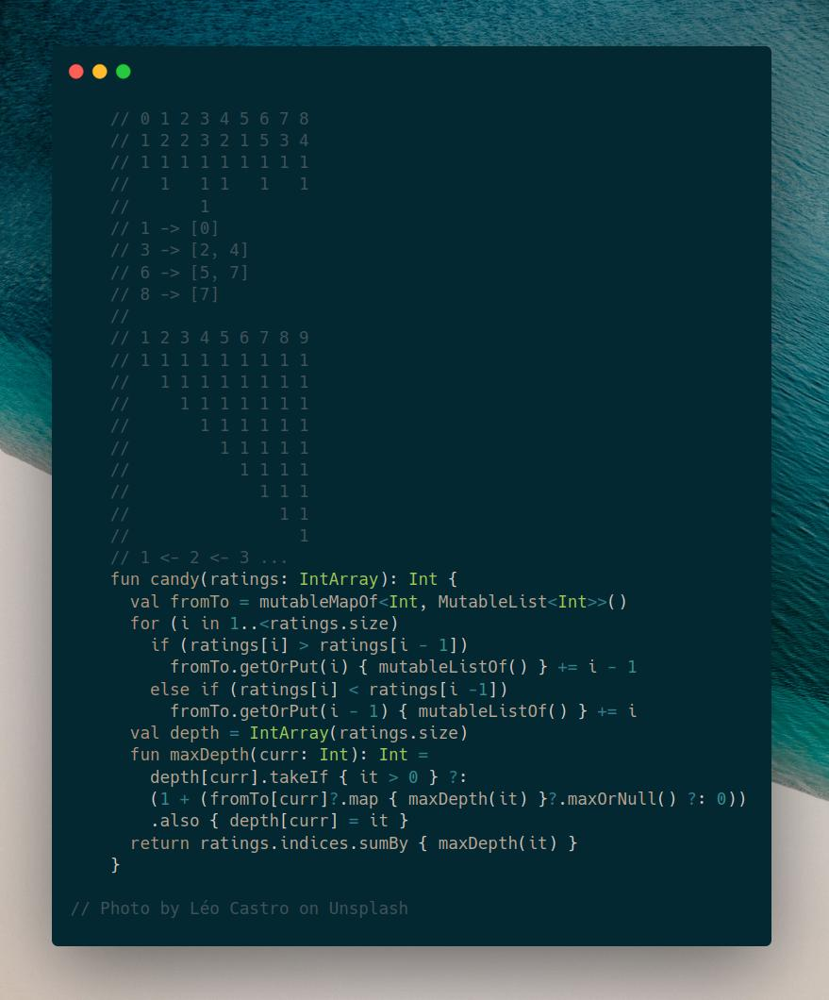
Join me on Telegram
https://t.me/leetcode_daily_unstoppable/338
Problem TLDR
Minimum candies count to satisfy condition: ratings[i] < ratings[i-1] must give more candies to i-1
Intuition
Let’s observe the example:
// 0 1 2 3 4 5 6 7 8
// 1 2 2 3 2 1 5 3 4
// 1 1 1 1 1 1 1 1 1
// 1 1 1 1 1
// 1
// 1 -> [0]
// 3 -> [2, 4]
// 6 -> [5, 7]
// 8 -> [7]
//
// 1 2 3 4 5 6 7 8 9
// 1 1 1 1 1 1 1 1 1
// 1 1 1 1 1 1 1 1
// 1 1 1 1 1 1 1
// 1 1 1 1 1 1
// 1 1 1 1 1
// 1 1 1 1
// 1 1 1
// 1 1
// 1
// 1 <- 2 <- 3 ...
We can look at this as a graph with nodes of siblings from higher rating to lower. Then the minimum number of candies is a maximum graph path length.
Approach
- we can reuse
depthvalue for each visited node
Complexity
-
Time complexity: \(O(n)\)
-
Space complexity: \(O(n)\)
Code
fun candy(ratings: IntArray): Int {
val fromTo = mutableMapOf<Int, MutableList<Int>>()
for (i in 1..<ratings.size)
if (ratings[i] > ratings[i - 1])
fromTo.getOrPut(i) { mutableListOf() } += i - 1
else if (ratings[i] < ratings[i -1])
fromTo.getOrPut(i - 1) { mutableListOf() } += i
val depth = IntArray(ratings.size)
fun maxDepth(curr: Int): Int =
depth[curr].takeIf { it > 0 } ?:
(1 + (fromTo[curr]?.map { maxDepth(it) }?.maxOrNull() ?: 0))
.also { depth[curr] = it }
return ratings.indices.sumBy { maxDepth(it) }
}
12.09.2023
1647. Minimum Deletions to Make Character Frequencies Unique medium
blog post
substack
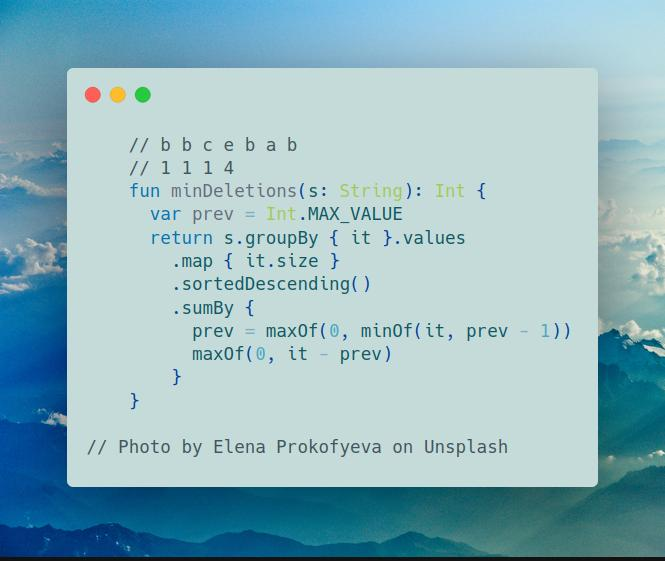
Join me on Telegram
https://t.me/leetcode_daily_unstoppable/337
Problem TLDR
Minimum removes duplicate frequency chars from string
Intuition
// b b c e b a b
// 1 1 1 4
Characters doesn’t matter, only frequencies. Let’s sort them and scan one-by-one from biggest to small and descriase max value.
Approach
Let’s use Kotlin collections API:
- groupBy - converts string into groups by characters
- sortedDescending - sorts by descending
- sumBy - iterates over all values and sums the lambda result
Complexity
-
Time complexity: \(O(n)\)
-
Space complexity: \(O(n)\)
Code
fun minDeletions(s: String): Int {
var prev = Int.MAX_VALUE
return s.groupBy { it }.values
.map { it.size }
.sortedDescending()
.sumBy {
prev = maxOf(0, minOf(it, prev - 1))
maxOf(0, it - prev)
}
}
11.09.2023
1282. Group the People Given the Group Size They Belong To medium
blog post
substack
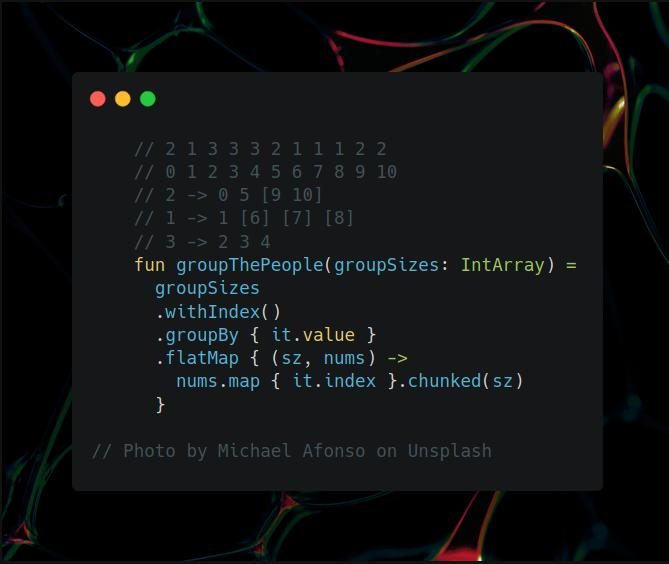
Join me on Telegram
https://t.me/leetcode_daily_unstoppable/336
Problem TLDR
Groups from groups sizes array
Intuition
First, group by sizes, next, chunk by groups size each.
Approach
Let’s write it using Kotlin collections API
Complexity
-
Time complexity: \(O(n)\)
-
Space complexity: \(O(n)\)
Code
// 2 1 3 3 3 2 1 1 1 2 2
// 0 1 2 3 4 5 6 7 8 9 10
// 2 -> 0 5 [9 10]
// 1 -> 1 [6] [7] [8]
// 3 -> 2 3 4
fun groupThePeople(groupSizes: IntArray) =
groupSizes
.withIndex()
.groupBy { it.value }
.flatMap { (sz, nums) ->
nums.map { it.index }.chunked(sz)
}
10.09.2023
1359. Count All Valid Pickup and Delivery Options hard
blog post
substack
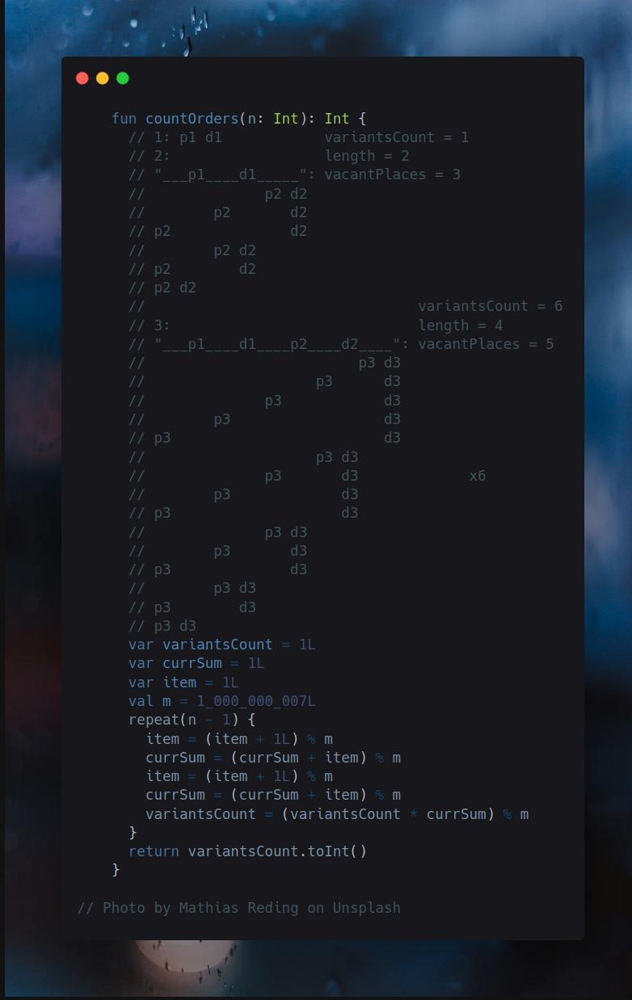
Join me on Telegram
https://t.me/leetcode_daily_unstoppable/335
Problem TLDR
Count permutations of the n pickup -> delivery orders
Intuition
Let’s look at how orders can be placed and draw the picture:
// 1: p1 d1 variantsCount = 1
// 2: length = 2
// "___p1____d1_____": vacantPlaces = 3
// p2 d2
// p2 d2
// p2 d2
// p2 d2
// p2 d2
// p2 d2
// variantsCount = 6
// 3: length = 4
// "___p1____d1____p2____d2____": vacantPlaces = 5
// p3 d3
// p3 d3
// p3 d3
// p3 d3
// p3 d3
// p3 d3
// p3 d3 x6
// p3 d3
// p3 d3
// p3 d3
// p3 d3
// p3 d3
// p3 d3
// p3 d3
// p3 d3
In this example, we can see the pattern:
- the number of vacant places grows by
2each round - inside each round there are repeating parts of arithmetic sum, that can be reused
Approach
- use
Longto avoid overflow
Complexity
-
Time complexity: \(O(n)\)
-
Space complexity: \(O(1)\)
Code
fun countOrders(n: Int): Int {
var variantsCount = 1L
var currSum = 1L
var item = 1L
val m = 1_000_000_007L
repeat(n - 1) {
item = (item + 1L) % m
currSum = (currSum + item) % m
item = (item + 1L) % m
currSum = (currSum + item) % m
variantsCount = (variantsCount * currSum) % m
}
return variantsCount.toInt()
}
9.09.2023
377. Combination Sum IV medium blog post substack
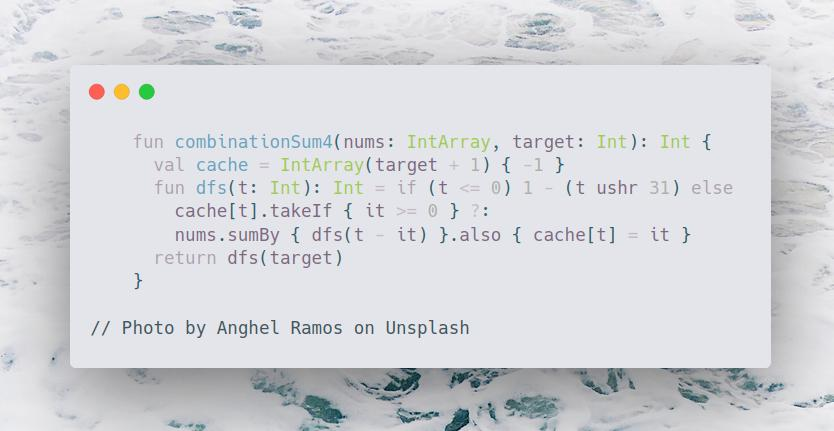
Join me on Telegram
https://t.me/leetcode_daily_unstoppable/334
Problem TLDR
Number of ways to sum up array nums to target
Intuition
This is a canonical DP knapsack problem: choose one of the items and decrease the target by its value. If target is zero - we have a single way, if negative - no ways, otherwise keep taking items. The result will only depend on the target, so can be cached.
Approach
In this code:
- trick to make conversion
0 -> 1, negative -> 0:1 - (t ushr 31), it shifts the leftmost bit to the right treating sign bit as a value bit, converting any negative number to1and positive to0 IntArrayused instead ofMapusingtakeIfKotlin operator
Complexity
-
Time complexity: \(O(n^2)\),
nfor the recursion depth, andnfor the inner iteration -
Space complexity: \(O(n^2)\)
Code
fun combinationSum4(nums: IntArray, target: Int): Int {
val cache = IntArray(target + 1) { -1 }
fun dfs(t: Int): Int = if (t <= 0) 1 - (t ushr 31) else
cache[t].takeIf { it >= 0 } ?:
nums.sumBy { dfs(t - it) }.also { cache[t] = it }
return dfs(target)
}
8.09.2023
118. Pascal’s Triangle easy
blog post
substack
Join me on Telegram
https://t.me/leetcode_daily_unstoppable/333
Problem TLDR
Pascal Triangle
Intuition
Each row is a previous row sliding window sums concatenated with 1
Approach
Let’s write it using Kotlin API
Complexity
-
Time complexity: \(O(n^2)\)
-
Space complexity: \(O(n^2)\)
Code
fun generate(numRows: Int) = (2..numRows)
.runningFold(listOf(1)) { r, _ ->
listOf(1) + r.windowed(2).map { it.sum() } + listOf(1)
}
7.09.2023
92. Reverse Linked List II medium blog post substack
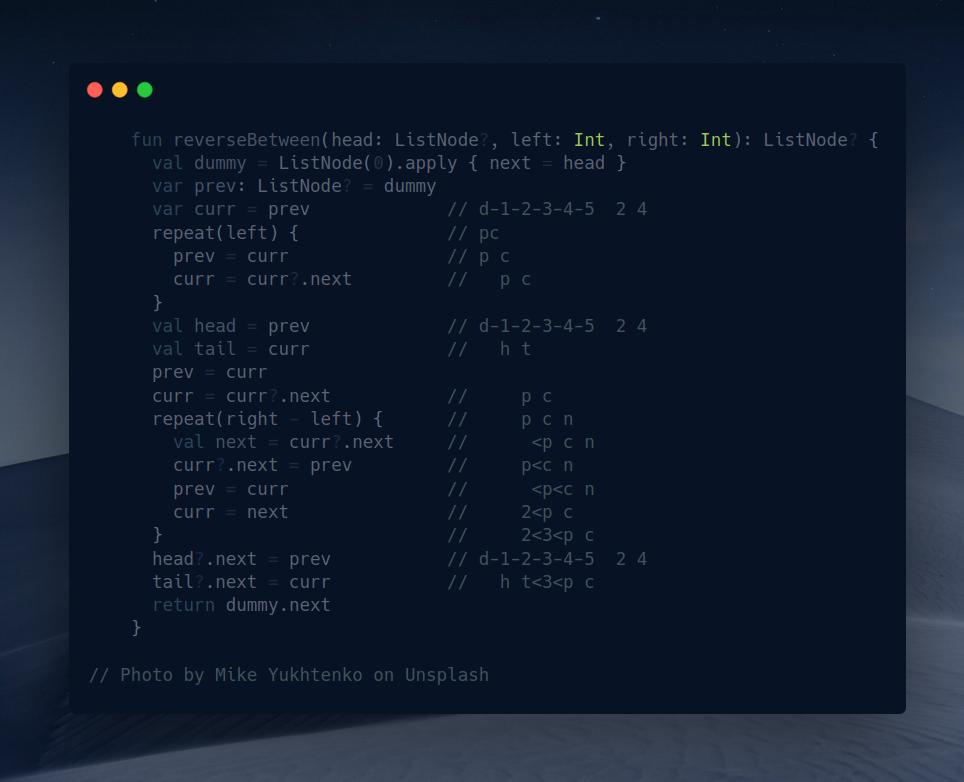
Join me on Telegram
https://t.me/leetcode_daily_unstoppable/332
Problem TLDR
Reverse a part of Linked List
Intuition
We need to find a point where to start reversing after left steps, then do the reversing right - left steps and finally connect to tail.
Approach
- use
Dummy headtechnique to avoid reversed head corner case - better do debug right in the code
Complexity
-
Time complexity: \(O(n)\)
-
Space complexity: \(O(1)\)
Code
fun reverseBetween(head: ListNode?, left: Int, right: Int): ListNode? {
val dummy = ListNode(0).apply { next = head }
var prev: ListNode? = dummy
var curr = prev // d-1-2-3-4-5 2 4
repeat(left) { // pc
prev = curr // p c
curr = curr?.next // p c
}
val head = prev // d-1-2-3-4-5 2 4
val tail = curr // h t
prev = curr
curr = curr?.next // p c
repeat(right - left) { // p c n
val next = curr?.next // <p c n
curr?.next = prev // p<c n
prev = curr // <p<c n
curr = next // 2<p c
} // 2<3<p c
head?.next = prev // d-1-2-3-4-5 2 4
tail?.next = curr // h t<3<p c
return dummy.next
}
6.09.2023
725. Split Linked List in Parts medium blog post substack
Join me on Telegram
https://t.me/leetcode_daily_unstoppable/331
Problem TLDR
Split Linked List into k almost equal lists
Intuition
First, precompute sizes, by adding to buckets one-by-one in a loop. Next, just move list pointer by sizes values.
Approach
Do not forget to disconnect nodes.
Complexity
-
Time complexity: \(O(n)\)
-
Space complexity: \(O(n)\) for the sizes array and for the result
Code
fun splitListToParts(head: ListNode?, k: Int): Array<ListNode?> {
val sizes = IntArray(k)
var i = 0
var curr = head
while (curr != null) {
sizes[i++ % k]++
curr = curr.next
}
curr = head
return sizes.map { sz ->
curr.also {
repeat(sz - 1) { curr = curr?.next }
curr = curr?.next.also { curr?.next = null }
}
}.toTypedArray()
}
5.09.2023
138. Copy List with Random Pointer medium blog post substack
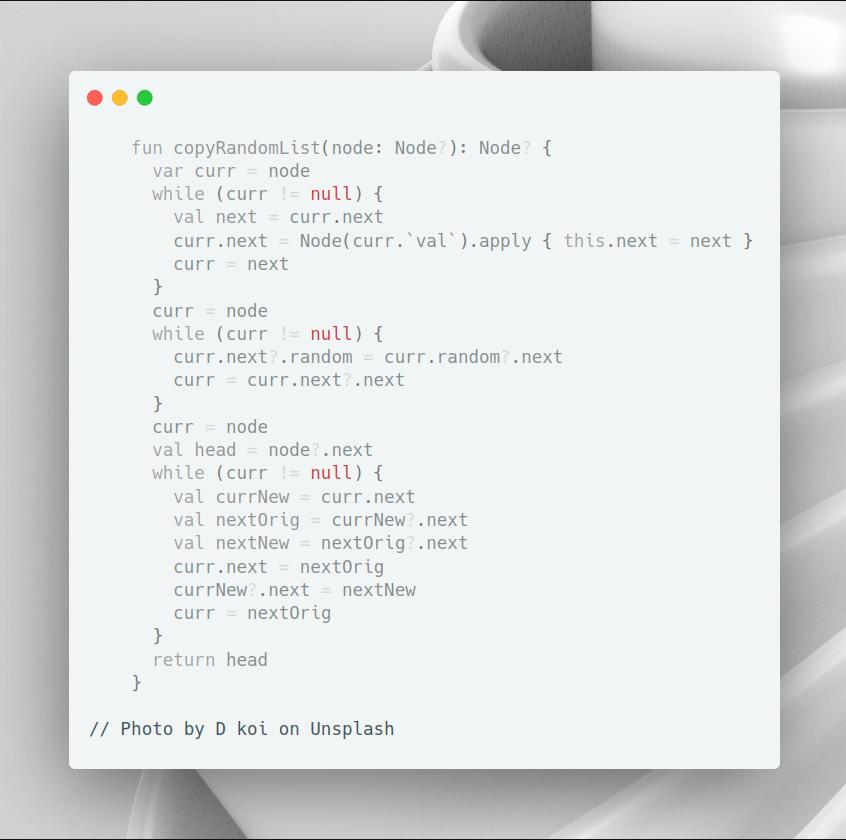
Problem TLDR
Copy of a graph
Intuition
Simple way is just store mapping old -> new.
The trick from hint is to store new nodes in between the old ones, then mapping became old -> new.next & new -> old.next.
Approach
One iteration to make new nodes, second to assign random field and final to split lists back.
Complexity
-
- Time complexity: \(O(n)\)
- Space complexity: \(O(1)\)
Code
fun copyRandomList(node: Node?): Node? {
var curr = node
while (curr != null) {
val next = curr.next
curr.next = Node(curr.`val`).apply { this.next = next }
curr = next
}
curr = node
while (curr != null) {
curr.next?.random = curr.random?.next
curr = curr.next?.next
}
curr = node
val head = node?.next
while (curr != null) {
val currNew = curr.next
val nextOrig = currNew?.next
val nextNew = nextOrig?.next
curr.next = nextOrig
currNew?.next = nextNew
curr = nextOrig
}
return head
}
4.09.2023
141. Linked List Cycle easy blog post substack
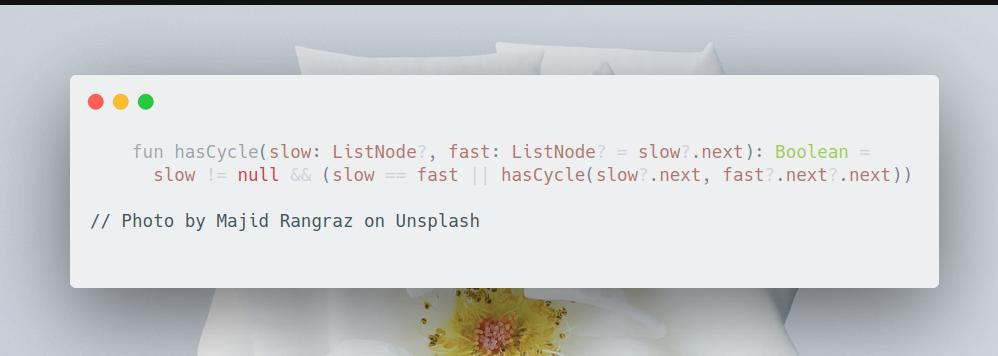
Problem TLDR
Detect a cycle in a LinkedList
Intuition
Use tortoise and rabbit technique
Approach
Move one pointer one step at a time, another two steps at a time. If there is a cycle, they will meet.
Complexity
-
Time complexity: \(O(n)\)
-
Space complexity: \(O(log(n))\) for recursion (iterative version is O(1))
Code
fun hasCycle(slow: ListNode?, fast: ListNode? = slow?.next): Boolean =
fast != null && (slow == fast || hasCycle(slow?.next, fast?.next?.next))
3.09.2023
62. Unique Paths medium blog post substack
Join me on Telegram
https://t.me/leetcode_daily_unstoppable/328
Problem TLDR
Unique paths count, moving right-down from top-left to bottom-right
Intuition
On each cell, the number of paths is a sum of direct up number and direct left number.
Approach
Use single row array, as only previous up row is relevant
Complexity
-
Time complexity: \(O(nm)\)
-
Space complexity: \(O(m)\)
Code
fun uniquePaths(m: Int, n: Int): Int {
val row = IntArray(n) { 1 }
for (y in 1..<m)
for (x in 1..<n)
row[x] += row[x - 1]
return row.last()
}
2.09.2023
2707. Extra Characters in a String medium blog post substack
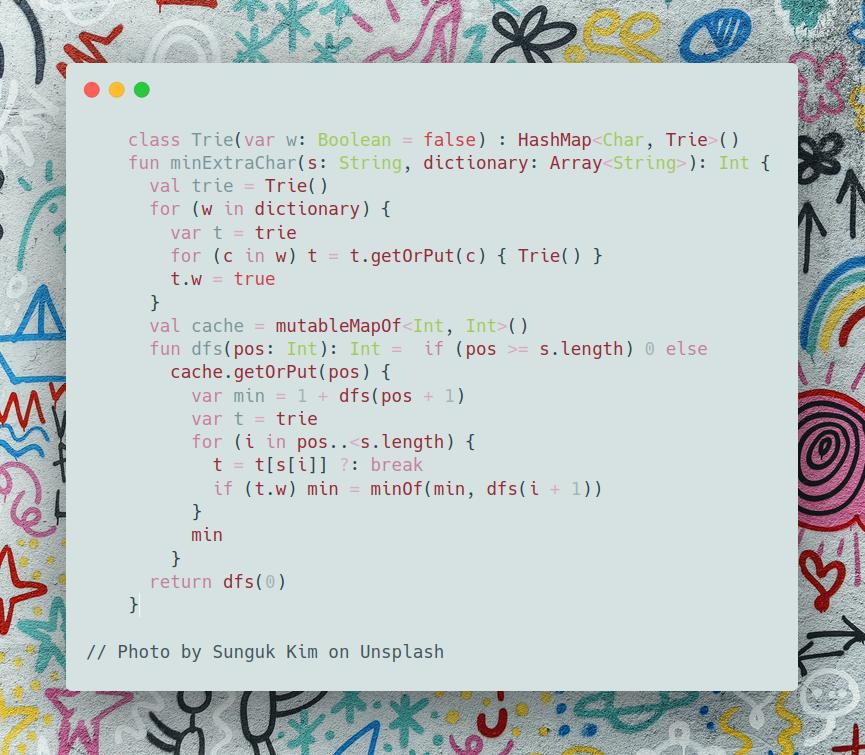
Join me on Telegram
https://t.me/leetcode_daily_unstoppable/327
Problem TLDR
Min count of leftovers after string split by the dictionary
Intuition
We can search all possible splits at every position when we find a word. To quickly find a word, let’s use a Trie. The result will only depend on the suffix of the string, so can be cached.
Approach
Do DFS, each time compare a skipped result with any take_word result, if found a word. We must continue to search, because some words can be prefixes to others: leet, leetcode -> leetcodes, taking leet is not optimal.
Complexity
-
Time complexity: \(O(n^2)\), DFS depth is
nand anothernfor the inner iteration -
Space complexity: \(O(n)\)
Code
class Trie(var w: Boolean = false) : HashMap<Char, Trie>()
fun minExtraChar(s: String, dictionary: Array<String>): Int {
val trie = Trie()
for (w in dictionary) {
var t = trie
for (c in w) t = t.getOrPut(c) { Trie() }
t.w = true
}
val cache = mutableMapOf<Int, Int>()
fun dfs(pos: Int): Int = if (pos >= s.length) 0 else
cache.getOrPut(pos) {
var min = 1 + dfs(pos + 1)
var t = trie
for (i in pos..<s.length) {
t = t[s[i]] ?: break
if (t.w) min = minOf(min, dfs(i + 1))
}
min
}
return dfs(0)
}
1.09.2023
338. Counting Bits easy blog post substack
Join me on Telegram
https://t.me/leetcode_daily_unstoppable/326
Problem TLDR
Array of bits count for numbers 0..n
Intuition
There is a tabulation technique used for caching bits count answer in O(1): for number xxxx0 bits count is count(xxxx) + 0, but for number xxxx1 bits count is count(xxxx) + 1. Now, to make a switch xxxx1 -> xxxx simple divide by 2. Result can be cached.
Approach
We can use DFS + memo, but bottom-up also simple. Result is a DP array itself: DP[number] = bits_count(number). The last bit can be checked by % operation, but and also works.
Complexity
-
Time complexity: \(O(n)\)
-
Space complexity: \(O(n)\)
Code
fun countBits(n: Int) = IntArray(n + 1).apply {
for (i in 0..n)
this[i] = this[i / 2] + (i and 1)
}
31.08.2023
1326. Minimum Number of Taps to Open to Water a Garden hard blog post substack
Join me on Telegram
https://t.me/leetcode_daily_unstoppable/325
Problem TLDR
Fill all space between 0..n using minimum intervals
Intuition
We need to fill space between points, so skip all zero intervals. Next, sort intervals and scan them greedily. Consider space between lo..hi as filled. If from > lo we must open another water source. However, there are possible good candidates before, if their to > hi.
// 0 1 2 3 4 5 6 7 8 9
// 0 5 0 3 3 3 1 4 0 4
// 1 5 *************
// ^ ^
// lo hi
// 3 3 *************
// 4 3 *************
// ^ . ^
// from . to
// *** opened++
// ^ ^
// lo hi
// 5 3 *************
// ^ hi
// 7 4 *************
// ^ hi finish
// 6 1 *****
// 9 4 *********
Approach
Look at others solutions and steal the implementation
Complexity
-
Time complexity: \(O(nlog(n))\), for sorting
-
Space complexity: \(O(n)\), to store the intervals
Code
fun minTaps(n: Int, ranges: IntArray): Int {
var opened = 0
var lo = -1
var hi = 0
ranges.mapIndexed { i, v -> maxOf(0, i - v) to minOf(i + v, n) }
.filter { it.first != it.second }
.sortedBy { (from, _) -> from }
.onEach { (from, to) ->
if (from <= lo) hi = maxOf(hi, to)
else if (from <= hi) {
lo = hi
hi = to
opened++
}
if (hi == n) return opened
}
return -1
}
30.08.2023
2366. Minimum Replacements to Sort the Array hard blog post substack
Join me on Telegram
https://t.me/leetcode_daily_unstoppable/324
Problem TLDR
Minimum number of number splits to make an array non-decreasing
Intuition
The first idea is, if we walk the array backwards, suffix is a maximum number. The second idea is how to split the current number optimally. Consider example:
// 3 8 3
// 3 53 3 +1 split
// 3 233 3 +1 split
// 12 233 3 +1 split
We shall not split 8 into numbers bigger than 3, so keep extracting them, until some remainder reached.
However, this will not be the case for another example: 2 9 4, when we split 9 -> 5 + 4, we should not split 5 into 1 + 4, but 2 + 3, but optimal split is 3 + 3 + 3, as 3 < 4 and 3 > 2.
Another strategy is to consider how many split operations we should do: 9 / 4 = 2, then we know the number of parts: 9 = (x split y split z) = 3 + 3 + 3. Each part is guaranteed to be less than 4 but the maximum possible to sum up to 9.
Approach
- explicitly write the corner cases to simplify the thinking: ` x < prev, x == prev, prev == 1, x % prev == 0`
- give a meaningful variable names and don’t prematurely simplify the math
- try to find the good example to debug the code
Complexity
-
Time complexity: \(O(n)\)
-
Space complexity: \(O(1)\)
Code
fun minimumReplacement(nums: IntArray): Long {
if (nums.isEmpty()) return 0L
// 3 8 3
// 3 53 3 +1 split
// 3 233 3 +1 split
// 12 233 3 +1 split
var prev = nums.last()
var count = 0L
for (i in nums.lastIndex downTo 0) {
if (nums[i] == prev) continue
if (nums[i] < prev) prev = nums[i]
else if (prev == 1) count += nums[i] - 1
else if (nums[i] % prev == 0) count += (nums[i] / prev) - 1
else {
val splits = nums[i] / prev // 15 / 4 = 3
count += splits
val countParts = splits + 1 // 4 = (3 4 4 4)
prev = nums[i] / countParts // 15 / 4 = 3
}
}
return count
}
29.08.2023
2483. Minimum Penalty for a Shop medium
blog post
substack
Join me on Telegram
https://t.me/leetcode_daily_unstoppable/323
Problem TLDR
First index of minimum penalty in array, penalty ‘Y’-> 1, ‘N’ -> -1
Intuition
Iterate from the end and compute the suffix penalty.
Approach
Suffix penalty is a difference between p_closed - p_opened.
Complexity
-
Time complexity: \(O(n)\)
-
Space complexity: \(O(1)\)
Code
fun bestClosingTime(customers: String): Int {
var p = 0
var iMin = customers.length
var pMin = 0
for (i in customers.lastIndex downTo 0) {
if (customers[i] == 'Y') p++ else p--
if (p <= pMin) {
iMin = i
pMin = p
}
}
return iMin
}
28.08.2023
225. Implement Stack using Queues easy blog post substack
Join me on Telegram
https://t.me/leetcode_daily_unstoppable/322
Problem TLDR
Create a Stack using Queue’s push/pop methods.
Intuition
We can use a single Queue, and rotate it so that the newly inserted element will be on a first position:
1 push -> [1]
2 push -> [1 2] -> [2 1]
3 push -> [2 1 3] -> [1 3 2] -> [3 2 1]
Approach
Kotlin has no methods pop, push and peek for ArrayDeque, use removeFirst, add and first.
Complexity
-
Time complexity: \(O(n)\) for insertions, others are O(1)
-
Space complexity: \(O(n)\) for internal Queue, and O(1) operations overhead
Code
class MyStack: Queue<Int> by LinkedList() {
fun push(x: Int) {
add(x)
repeat(size - 1) { add(pop()) }
}
fun pop() = remove()
fun top() = first()
fun empty() = isEmpty()
}
27.08.2023
403. Frog Jump hard blog post substack
Join me on Telegram
https://t.me/leetcode_daily_unstoppable/321
Problem TLDR
Can jump an array when each jump is k-1..k+1 of the previous
Intuition
The simple Depth-First Search works: iterate over next array items and check if jump to them is in range k-1..k+1. The result only depends on the array suffix and previous jump value k, so can be safely cached. This will take n^3 operations in the worst case.
There is an improvement, we can use Binary Search to quickly find the range for the next positions. Time will be improved to n^2log(n).
Approach
In the interview, it is better to write Binary Search by yourself if you’re unsure about how to adapt built-in binarySearch method to find bisectLeft or bisectRight borders.
- use simple checks to convert insert position into a border:
if (-i - 1 in 0..lastIndex) -i - 1 else i - same for
from in 0..to, which also checks thatfrom <= to,from >= 0andto >= 0
Complexity
-
Time complexity: \(O(n^2log(n))\)
-
Space complexity: \(O(n^2)\)
Code
fun canCross(stones: IntArray): Boolean {
val dp = mutableMapOf<Pair<Int, Int>, Boolean>()
fun dfs(i: Int, k: Int): Boolean = dp.getOrPut(i to k) {
if (i == stones.lastIndex) return@getOrPut true
var from = stones.binarySearch(stones[i] + maxOf(1, k - 1)).let {
if (-it - 1 in 0..stones.lastIndex) -it - 1 else it
}
var to = stones.binarySearch(stones[i] + k + 1).let {
if (-it - 2 in 0..stones.lastIndex) -it - 2 else it
}
return@getOrPut from in 0..to
&& (from..to).any { dfs(it, stones[it] - stones[i]) }
}
return dfs(0, 0)
}
26.08.2023
646. Maximum Length of Pair Chain medium
blog post
substack
Join me on Telegram
https://t.me/leetcode_daily_unstoppable/320
Problem TLDR
Max count non-overlaping intervals
Intuition
The naive Dynamic Programming n^2 solution works, in a DFS choose between taking or skipping the pair, and cache by pos and prev.
Another solution, is just a line sweep algorithm: consider all ends of the intervals in increasing order, skipping the overlapping ones. It will be optimal, as there are no overlapping intervals past the end.
Approach
Sort and use the border variable, that changes when from > border.
Complexity
-
Time complexity: \(O(nlog(n))\), for sorting
-
Space complexity: \(O(n)\), for the sorted array
Code
fun findLongestChain(pairs: Array<IntArray>): Int {
var border = Int.MIN_VALUE
return pairs.sortedWith(compareBy({ it[1] }))
.count { (from, to) ->
(from > border).also { if (it) border = to }
}
}
25.08.2023
97. Interleaving String medium blog post substack
Join me on Telegram
https://t.me/leetcode_daily_unstoppable/319
Problem TLDR
Can a string be a merge of two other strings
Intuition
Do DFS with two pointers, each time taking a char from the first or the second’s string, the third pointer will be p1 + p2. The result will depend only on the remaining suffixes, so can be safely cached.
Approach
- calculate the key into a single Int
p1 + p2 * 100 - check that lengths are adding up
Complexity
-
Time complexity: \(O(n^2)\)
-
Space complexity: \(O(n^2)\)
Code
fun isInterleave(s1: String, s2: String, s3: String): Boolean {
val cache = mutableMapOf<Int, Boolean>()
fun dfs(p1: Int, p2: Int): Boolean = cache.getOrPut(p1 + p2 * 100) {
p1 < s1.length && p2 < s2.length && (
s1[p1] == s3[p1 + p2] && dfs(p1 + 1, p2)
|| s2[p2] == s3[p1 + p2] && dfs(p1, p2 + 1)
)
|| p1 == s1.length && s2.substring(p2) == s3.substring(p1 + p2)
|| p2 == s2.length && s1.substring(p1) == s3.substring(p1 + p2)
}
return s1.length + s2.length == s3.length && dfs(0, 0)
}
24.08.2023
68. Text Justification hard blog post substack
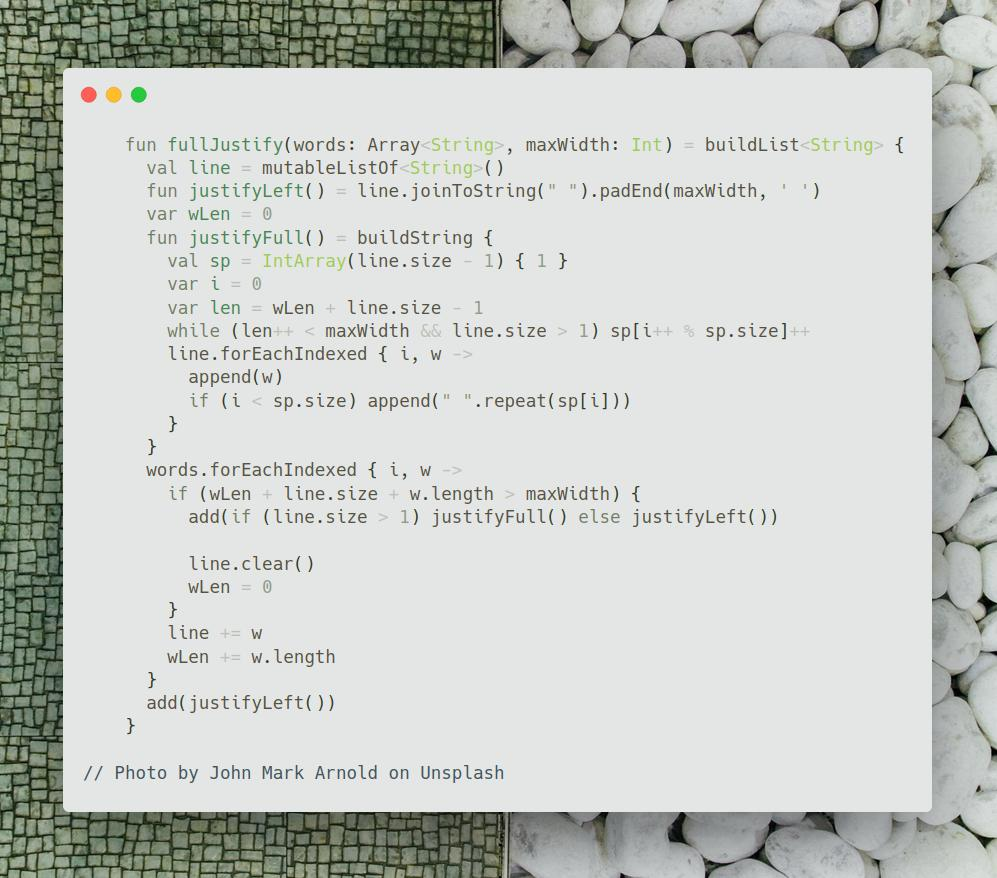
Join me on Telegram
https://t.me/leetcode_daily_unstoppable/318
Problem TLDR
Spread words to lines, evenly spacing left->right, and left-spacing the last line
Intuition
Scan word by word, checking maxWidth overflow.
Approach
Separate word letters count and count of spaces.
To spread spaces left-evenly, iteratively add spaces one-by-one until maxWidth reached.
Using Kotlin built-in functions helps to reduce boilerplate:
- buildList
- buildString
- padEnd
Complexity
-
Time complexity: \(O(wn)\)
-
Space complexity: \(O(wn)\)
Code
fun fullJustify(words: Array<String>, maxWidth: Int) = buildList<String> {
val line = mutableListOf<String>()
fun justifyLeft() = line.joinToString(" ").padEnd(maxWidth, ' ')
var wLen = 0
fun justifyFull() = buildString {
val sp = IntArray(line.size - 1) { 1 }
var i = 0
var len = wLen + line.size - 1
while (len++ < maxWidth && line.size > 1) sp[i++ % sp.size]++
line.forEachIndexed { i, w ->
append(w)
if (i < sp.size) append(" ".repeat(sp[i]))
}
}
words.forEachIndexed { i, w ->
if (wLen + line.size + w.length > maxWidth) {
add(if (line.size > 1) justifyFull() else justifyLeft())
line.clear()
wLen = 0
}
line += w
wLen += w.length
}
add(justifyLeft())
}
23.08.2023
767. Reorganize String medium blog post substack
Join me on Telegram
https://t.me/leetcode_daily_unstoppable/317
Problem TLDR
Create non repeated subsequent chars string from string
Intuition
What will not work:
- naive bubble sort like n^2 algorithm – give false negatives
- n^3 dynamic programming DFS+memo – too slow for the problem
Now, use the hint.
If each time the most frequent char used greedily, solution magically works. (proving that is a homework)
Approach
Use Pri0rityQueue to store indices of the frequencies array. If the next char is repeated, and it is the only one left, we have no solution.
Complexity
-
Time complexity: \(O(nlog(n))\), each poll and insert is log(n) in PQ
-
Space complexity: \(O(n)\), for the result
Code
fun reorganizeString(s: String): String = buildString {
val freq = IntArray(128)
s.forEach { freq[it.toInt()]++ }
val pq = PriorityQueue<Int>(compareBy({ -freq[it] }))
for (i in 0..127) if (freq[i] > 0) pq.add(i)
while (pq.isNotEmpty()) {
var ind = pq.poll()
if (isNotEmpty() && get(0).toInt() == ind) {
if (pq.isEmpty()) return ""
ind = pq.poll().also { pq.add(ind) }
}
insert(0, ind.toChar())
if (--freq[ind] > 0) pq.add(ind)
}
}
22.08.2023
168. Excel Sheet Column Title easy blog post substack

Join me on Telegram
https://t.me/leetcode_daily_unstoppable/316
Problem TLDR
Excel col number to letter-number 1 -> A, 28 -> AB
Intuition
Just arithmetic conversion of number to string with radix of 26 instead of 10. Remainder from division by 26 gives the last letter. Then the number must be divided by 26.
Approach
- use a StringBuilder
- number must be
n-1
Complexity
-
Time complexity: \(O(log(n))\), logarithm by radix of 26
-
Space complexity: \(O(log(n))\)
Code
fun convertToTitle(columnNumber: Int): String = buildString {
var n = columnNumber
while (n > 0) {
insert(0, ((n - 1) % 26 + 'A'.toInt()).toChar())
n = (n - 1) / 26
}
}
21.08.2023
459. Repeated Substring Pattern easy blog post substack
Join me on Telegram
https://t.me/leetcode_daily_unstoppable/315
Intuition
Consider example, abc abc abc. Doing shift left 3 times we get the same string:
abcabcabc - original
bcabcabca - shift left by 1
cabcabcab - shift left by 1
abcabcabc - shift left by 1
Now, there is a technique called Rolling Hash: let’s calculate the hash like this: hash = x + 31 * hash. After full string hash calculated, we start doing shifts:
// abcd
// a
// 32^0 * b + 32^1 * a
// 32^0 * c + 32^1 * b + 32^2 * a
// 32^0 * d + 32^1 * c + 32^2 * b + 32^3 * a
// bcda
// 32^0 * a + 32^1 * d + 32^2 * c + 32^3 * b = 32*(abcd-32^3a) +a=32abcd-(32^4-1)a
Observing this math equation, next rolling hash is shiftHash = 31 * shiftHash - 31^len + c
Approach
- careful to not shift by whole length
Complexity
-
Time complexity: \(O(n)\), at most 2 full scans, and hashing gives O(1) time
-
Space complexity: \(O(1)\)
Code
fun repeatedSubstringPattern(s: String): Boolean {
var hash = 0L
for (c in s) hash = c.toInt() + 31L * hash
var pow = 1L
repeat(s.length) { pow *= 31L }
pow--
var shiftHash = hash
return (0 until s.lastIndex).any { i ->
shiftHash = 31L * shiftHash - pow * s[i].toInt()
shiftHash == hash &&
s == s.substring(0, i + 1).let { it.repeat(s.length / it.length) }
}
}
20.08.2023
1203. Sort Items by Groups Respecting Dependencies hard blog post substack
Join me on Telegram
https://t.me/leetcode_daily_unstoppable/314
Problem TLDR
Sort items by groups and in groups given dependencies.
Intuition
Use hint.
We can split items by groups and check groups dependencies. Next, do Topological Sort for groups and then do Topological Sort for items in each group.
Approach
Now, the tricks:
- if we consider each
-1as a separate group, code will become cleaner - we don’t have to do separate Topological Sort for each group, just sort whole graph of items, then filter by each group
- cycle detection can be done in a Topological Sort: if there is a cycle, there is no item with
indegree == 0 - Topological Sort function can be reused
Complexity
-
Time complexity: \(O(nm + E)\)
-
Space complexity: \(O(n + n + E)\)
Code
class G(count: Int, val fromTo: MutableMap<Int, MutableSet<Int>> = mutableMapOf()) {
operator fun get(k: Int) = fromTo.getOrPut(k) { mutableSetOf() }
val order: List<Int> by lazy {
val indegree = IntArray(count)
fromTo.values.onEach { it.onEach { indegree[it]++ } }
val queue = ArrayDeque<Int>(indegree.indices.filter { indegree[it] == 0 })
generateSequence { queue.poll() }
.onEach { fromTo[it]?.onEach { if (--indegree[it] == 0) queue += it } }
.toList().takeIf { it.size == count } ?: listOf()
}
}
fun sortItems(n: Int, m: Int, group: IntArray, beforeItems: List<List<Int>>): IntArray {
var groupsCount = m
for (i in 0 until n) if (group[i] == -1) group[i] = groupsCount++
val items = G(n)
val groups = G(groupsCount)
for (to in beforeItems.indices)
for (from in beforeItems[to])
if (group[to] == group[from]) items[from] += to
else groups[group[from]] += group[to]
return groups.order.flatMap { g -> items.order.filter { group[it] == g } }.toIntArray()
}
19.08.2023
1489. Find Critical and Pseudo-Critical Edges in Minimum Spanning Tree hard blog post substack
Join me on Telegram
https://t.me/leetcode_daily_unstoppable/313
Problem TLDR
List of list of must-have edges and list of optional edges for Minimum Weight Minimum Spanning Tree
Intuition
Use hints.
Minimum Spanning Tree can be obtained by sorting edges and adding not connected one-by-one using Union-Find
After we found target minimum weight, we can check how each node contributes: if removing the node increases the target, the node is a must-have. Also, if force using node in a spanning tree doesn’t change the target, node is optional.
Approach
- careful with the sorted order of indices, returned positions must be in initial order
- check if spanning tree is impossible to make, by checking if all nodes are connected
Complexity
-
Time complexity: \(O(E^2 + EV)\), sorting edges takes
ElogE, then cycleEtimes algorithm ofE+V -
Space complexity: \(O(E + V)\),
Efor sorted edges,Vfor Union-Find array
Code
fun findCriticalAndPseudoCriticalEdges(n: Int, edges: Array<IntArray>): List<List<Int>> {
val sorted = edges.indices.sortedWith(compareBy({ edges[it][2] }))
fun minSpanTreeW(included: Int = -1, excluded: Int = -1): Int {
val uf = IntArray(n) { it }
fun find(x: Int): Int = if (x == uf[x]) x else find(uf[x]).also { uf[x] = it }
fun union(ind: Int): Int {
val (a, b, w) = edges[ind]
return if (find(a) == find(b)) 0 else w.also { uf[find(b)] = find(a) }
}
return ((if (included < 0) 0 else union(included)) + sorted
.filter { it != excluded }.map { union(it) }.sum()!!)
.takeIf { (0 until n).all { find(0) == find(it) } } ?: Int.MAX_VALUE
}
val target = minSpanTreeW()
val critical = mutableListOf<Int>()
val pseudo = mutableListOf<Int>()
edges.indices.forEach {
if (minSpanTreeW(excluded = it) > target) critical += it
else if (minSpanTreeW(included = it) == target) pseudo += it
}
return listOf(critical, pseudo)
}
18.08.2023
1615. Maximal Network Rank medium
blog post
substack
Join me on Telegram
https://t.me/leetcode_daily_unstoppable/312
Problem TLDR
Max edges count for each pair of nodes
Intuition
We can just count edges for each node, then search for max in an n^2 for-loop.
Approach
- use a
HashSetto checkcontainsin O(1)
Complexity
-
Time complexity: \(O(n^2)\)
-
Space complexity: \(O(n^2)\), there are up to n^2 edges
Code
fun maximalNetworkRank(n: Int, roads: Array<IntArray>): Int {
val fromTo = mutableMapOf<Int, HashSet<Int>>()
roads.forEach { (from, to) ->
fromTo.getOrPut(from) { HashSet() } += to
fromTo.getOrPut(to) { HashSet() } += from
}
var max = 0
for (a in 0 until n) {
for (b in a + 1 until n) {
val countA = fromTo[a]?.size ?: 0
val countB = fromTo[b]?.size ?: 0
val direct = fromTo[a]?.contains(b) ?: false
max = maxOf(max, countA + countB - (if (direct) 1 else 0))
}
}
return max
}
17.08.2023
542. 01 Matrix medium
blog post
substack
Join me on Telegram
https://t.me/leetcode_daily_unstoppable/311
Problem TLDR
Distances to 0 in an 0-1 matrix
Intuition
Depth-First search will not work, as the path to 0 must radiate to all directions.
We can start a Breadth-First Search waves from each 0. Each BFS step increases distance by 1.
Approach
- use
dirarray for a simpler code - avoid rewriting the cells
Complexity
-
Time complexity: \(O(n)\)
-
Space complexity: \(O(n)\)
Code
fun updateMatrix(mat: Array<IntArray>): Array<IntArray> {
val res = Array(mat.size) { IntArray(mat[0].size) { -1 } }
val dir = listOf(-1 to 0, 0 to 1, 1 to 0, 0 to -1)
with(ArrayDeque<Pair<Int, Int>>()) {
for (y in 0..mat.lastIndex)
for (x in 0..mat[0].lastIndex)
if (mat[y][x] == 0) add(y to x)
var dist = 0
while (isNotEmpty()) {
repeat(size) {
val (y, x) = poll()
if (res[y][x] == -1) {
res[y][x] = dist
for ((dx, dy) in dir) {
val y1 = y + dy
val x1 = x + dx
if (y1 in 0..mat.lastIndex && x1 in 0..mat[0].lastIndex)
add(y1 to x1)
}
}
}
dist++
}
}
return res
}
16.08.2023
239. Sliding Window Maximum medium blog post substack
Join me on Telegram
https://t.me/leetcode_daily_unstoppable/310
Problem TLDR
List of sliding window’s maximums
Intuition
To quickly find a maximum in a sliding window, consider example:
Input: nums = [1,3,-1,-3,5,3,6,7], k = 3
Window position Max
--------------- -----
[# 3 -1] _ _ _ _ _ 3
_ [3 -1 -3] _ _ _ _ 3
_ _ [ # # 5] _ _ _ 5
_ _ _ [ # 5 3] _ _ 5
_ _ _ _ [# # 6] _ 6
_ _ _ _ _ [# # 7] 7
After each new maximum appends to the end of the window, they become the maximum until the window slides it out, so all lesser positions to the left of it are irrelevant.
Approach
We can use a decreasing Stack technique to remove all the smaller elements. However, to maintain a window size, we’ll need a Queue.
Complexity
-
Time complexity: \(O(n)\)
-
Space complexity: \(O(n)\)
Code
fun maxSlidingWindow(nums: IntArray, k: Int): IntArray = with(ArrayDeque<Int>()) {
val res = mutableListOf<Int>()
nums.forEachIndexed { i, x ->
while (isNotEmpty() && nums[peekLast()] < x) removeLast()
add(i)
while (isNotEmpty() && i - peekFirst() + 1 > k) removeFirst()
if (i >= k - 1) res += nums[peekFirst()]
}
return res.toIntArray()
}
15.08.2023
86. Partition List medium blog post substack
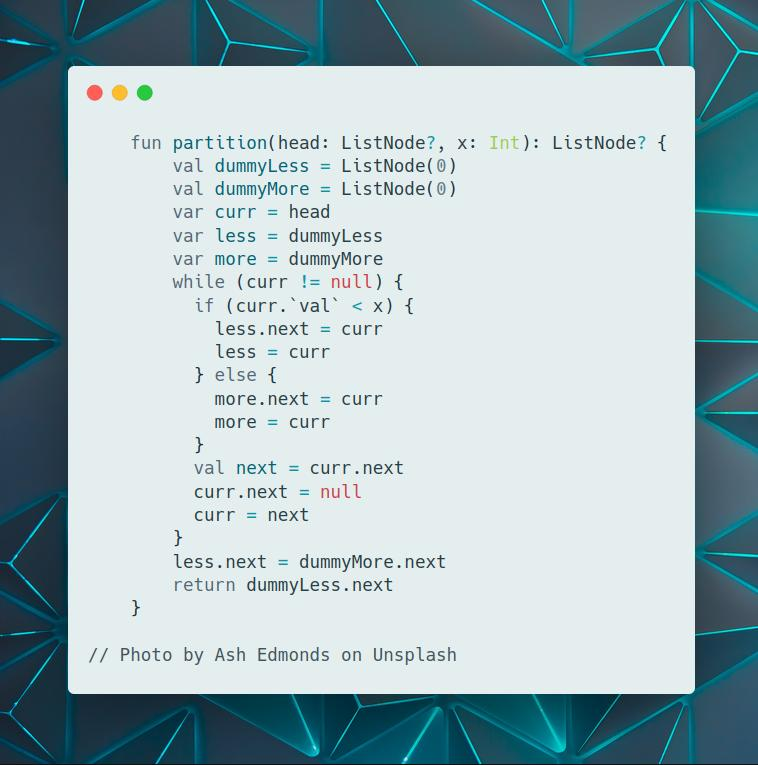
Join me on Telegram
https://t.me/leetcode_daily_unstoppable/309
Problem TLDR
Partition a Linked List by x value
Intuition
Keep two nodes for less and for more than x, and add to them, iterating over the list. Finally, concatenate more to less.
Approach
- To avoid cycles, make sure to set each
nexttonull - Use
dummy headtechnique
Complexity
-
Time complexity: \(O(n)\)
-
Space complexity: \(O(1)\)
Code
fun partition(head: ListNode?, x: Int): ListNode? {
val dummyLess = ListNode(0)
val dummyMore = ListNode(0)
var curr = head
var less = dummyLess
var more = dummyMore
while (curr != null) {
if (curr.`val` < x) {
less.next = curr
less = curr
} else {
more.next = curr
more = curr
}
val next = curr.next
curr.next = null
curr = next
}
less.next = dummyMore.next
return dummyLess.next
}
14.08.2023
215. Kth Largest Element in an Array medium
blog post
substack
Join me on Telegram
https://t.me/leetcode_daily_unstoppable/308
Problem TLDR
Kth largest in an array
Intuition
There is a known Quckselect algorithm:
- do a partition, get the
pivot - if
pivotis less thantarget, repeat on the left side - otherwise, repeat on the right side of the
pivot
To do a partition:
- make a growing
bufferon the left - choose the
pivotvalue which to compare all the elements - if
nums[i] < pivot, put and grow the buffer - finally, put pivot to the end of the buffer
- the buffer size now is a pivot position in a sorted array, as all elements to the left a less than it, and to the right are greater
Approach
For divide-and-conquer loop:
- do the last check
from == to - always move the border exclusive
from = pi + 1,to = pi - 1
Complexity
-
Time complexity: \(O(n) -> O(n^2)\), the worst case is n^2
-
Space complexity: \((O(1))\), but array is modified
Code
fun findKthLargest(nums: IntArray, k: Int): Int {
var from = 0
var to = nums.lastIndex
fun swap(a: Int, b: Int) { nums[a] = nums[b].also { nums[b] = nums[a] } }
val target = nums.size - k
while (from <= to) {
var pi = from
var pivot = nums[to]
for (i in from until to) if (nums[i] < pivot) swap(i, pi++)
swap(to, pi)
if (pi == target) return nums[pi]
if (pi < target) from = pi + 1
if (pi > target) to = pi - 1
}
return -1
}
13.08.2023
2369. Check if There is a Valid Partition For The Array medium blog post substack
Join me on Telegram
https://t.me/leetcode_daily_unstoppable/307
Problem TLDR
Is it possible to partition an array of 2 or 3 equal nums or 3 increasing nums.
Intuition
Hint: don’t spend much time trying to write a greedy solution.
We can consider every suffix of an array and make it a subproblem. Given it depends on only of the starting position, it can be safely cached.
Approach
- use Depth-First search and a HashMap for cache by position
Complexity
-
Time complexity: \(O(n)\)
-
Space complexity: \(O(n)\)
Code
fun validPartition(nums: IntArray): Boolean {
val cache = mutableMapOf<Int, Boolean>()
fun dfs(pos: Int): Boolean = cache.getOrPut(pos) {
if (pos == nums.size) true
else if (pos + 1 > nums.lastIndex) false
else {
val diff1 = nums[pos + 1] - nums[pos]
if (diff1 == 0 && dfs(pos + 2)) true
else if (pos + 2 > nums.lastIndex) false
else {
val diff2 = nums[pos + 2] - nums[pos + 1]
(diff1 == 0 && diff2 == 0 || diff1 == 1 && diff2 == 1) && dfs(pos + 3)
}
}
}
return dfs(0)
}
12.08.2023
63. Unique Paths II medium blog post substack
Join me on Telegram
https://t.me/leetcode_daily_unstoppable/306
Problem TLDR
Number of right-down ways tl->br in a matrix with obstacles
Intuition
Each time the robot moves in one direction gives a separate path. If two directions are possible, the number of paths gets added.
For example,
r r # 0
r 2r 2r 2r
0 # 2r 4r
On the first row, the single path goes up to 1.
On the second row, direct path down added to direct path right.
On the third row, the same happens when top and left numbers of paths are not 0.
Approach
Use a separate row array to remember previous row paths counts.
Complexity
-
Time complexity: \(O(nm)\)
-
Space complexity: \(O(nm)\)
Code
fun uniquePathsWithObstacles(obstacleGrid: Array<IntArray>): Int {
val row = IntArray(obstacleGrid[0].size)
row[0] = 1
for (r in obstacleGrid)
for (x in r.indices)
if (r[x] != 0) row[x] = 0
else if (x > 0) row[x] += row[x - 1]
return row.last()
}
The Magical Rundown
In Emojia's forgotten 🌌 corner, where time doesn't merely flow—it waltzes 💃,
spinning tales of lost yesterdays 🕰️ and unborn tomorrows ⌛, stands the
whispered legend of the Time Labyrinth. Not merely walls and corridors, but
a tapestry of fate's myriad choices, echoing distant memories and futures yet
conceived.
Bolt, the lonely automaton 🤖, not born but dreamt into existence by starlight ✨
and cosmic whimsy, felt an inexplicable yearning towards the 🏁 - the Time Nexus.
Ancient breezes 🍃 carried murmurs, not of it being an end, but a kaleidoscope
🎨 gateway to every pulse and flutter ❤️ of chronology's capricious dance 🌊.
╔═══╤═══╤═══╤═══╗
║🤖 │ 0 │🚫 │ 0 ║
╟───┼───┼───┼───╢
║ 0 │ 0 │ 0 │ 0 ║
╟───┼───┼───┼───╢
║ 0 │🚫 │ 0 │🏁 ║
╚═══╧═══╧═══╧═══╝
With each step, the fabric of reality quivered. Shadows of histories 🎶,
cosmic echoes 🌍, diverged and converged, painting and erasing moments of
what was, is, and could be.
---
Standing before the 🚫, it wasn't a barrier for Bolt, but a silent riddle:
"What song of the cosmos 🎵 shall you hum today, wanderer?"
╔═══╤═══╤═══╤═══╗
║🤖 │ ➡️ │🚫 │ 0 ║
╟───┼───┼───┼───╢
║ 0 │ 0 │ 0 │ 0 ║
╟───┼───┼───┼───╢
║ 0 │ 🚫 │ 0 │🏁 ║
╚═══╧═══╧═══╧═══╝
Dreamlike avenues 🛤️ unfurled, painting multitudes of futures in the vivid
colors of a universe in spring. In this chronal dance, Bolt secretly hoped
to outrace its own echoes, to be the first at the Nexus.
---
Junctions whispered with the delicate hum 🎵 of countless Bolts, each a tale,
a fate, a fleeting note in the grand cosmic symphony.
╔═══╤═══╤═══╤═══╗
║🤖 │ ➡️ │🚫 │ 0 ║
╟───┼───┼───┼───╢
║⬇️ │ 2➡️│2➡️│2➡️║
╟───┼───┼───┼───╢
║ 0 │ 🚫 │ 0 │🏁 ║
╚═══╧═══╧═══╧═══╝
Yet, as the Time Nexus loomed, revealing its vast enigma, a sense of profound
disquiet engulfed Bolt. Not only had another reflection reached before, but a
sea of mirrored selves stared back.
╔═══╤═══╤═══╤═══╗
║🤖 │ ➡️ │🚫 │ 0 ║
╟───┼───┼───┼───╢
║⬇️ │ 2➡️│2➡️│2➡️║
╟───┼───┼───┼───╢
║⬇️ │ 🚫 │2⬇️│4🏁║
╚═══╧═══╧═══╧═══╝
In that echoing vastness, Bolt's singular hope was smothered. In the dance of
time, amidst countless reflections, it whispered a silent, desperate question:
Which tune, which cadence, which moment 🎶 was truly its own in this timeless
waltz?
11.08.2023
518. Coin Change II medium
blog post
substack

Join me on Telegram
https://t.me/leetcode_daily_unstoppable/305
Problem TLDR
Ways to make amount with array of coins
Intuition
This is a classical Dynamic Programming problem: the result is only depending on inputs – coins subarray and the amount, so can be cached.
In a Depth-First search manner, consider possibilities of taking a coin and skipping to the next.
Approach
- HashMap gives TLE, but an Array cache will pass
Complexity
-
Time complexity: \(O(nm)\)
-
Space complexity: \(O(nm)\)
Code
fun change(amount: Int, coins: IntArray): Int {
val cache = Array(coins.size) { IntArray(amount + 1) { -1 } }
fun dfs(curr: Int, left: Int): Int = if (left == 0) 1
else if (left < 0 || curr == coins.size) 0
else cache[curr][left].takeIf { it >= 0 } ?: {
dfs(curr, left - coins[curr]) + dfs(curr + 1, left)
}().also { cache[curr][left] = it }
return dfs(0, amount)
}
10.08.2023
81. Search in Rotated Sorted Array II medium
blog post
substack
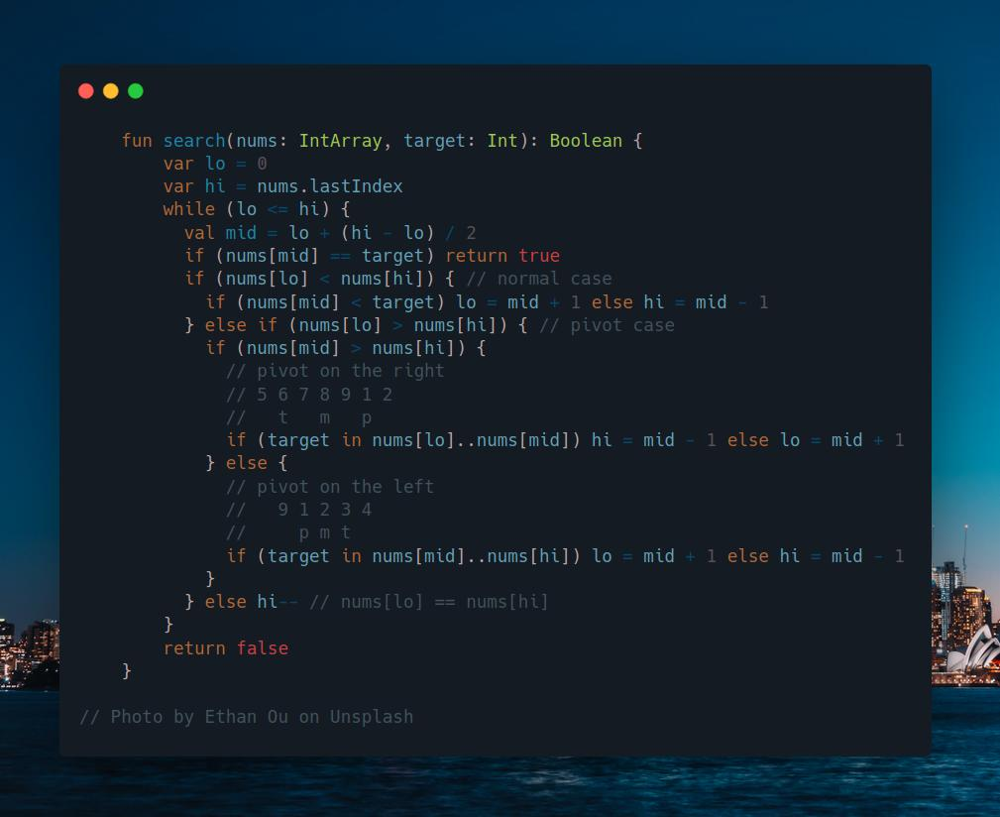
Join me on Telegram
https://t.me/leetcode_daily_unstoppable/304
Problem TLDR
Binary Search in a rotated array with duplicates
Intuition
There are several cases:
- pivot on the left, right side can be checked
- pivot on the right, left side can be checked
- nums[lo] == nums[hi], do a linear scan
Approach
For more robust code:
- inclusive
loandhi - last check
lo == hi - check the result
nums[mid] == target - move borders
lo = mid + 1,hi = mid - 1 - exclusive checks
<&>are simpler to reason about than inclusive<=,=>
Complexity
-
Time complexity: \(O(n)\), the worst case is linear in a long array of duplicates
-
Space complexity: \(O(1)\)
Code
fun search(nums: IntArray, target: Int): Boolean {
var lo = 0
var hi = nums.lastIndex
while (lo <= hi) {
val mid = lo + (hi - lo) / 2
if (nums[mid] == target) return true
if (nums[lo] < nums[hi]) { // normal case
if (nums[mid] < target) lo = mid + 1 else hi = mid - 1
} else if (nums[lo] > nums[hi]) { // pivot case
if (nums[mid] > nums[hi]) {
// pivot on the right
// 5 6 7 8 9 1 2
// t m p
if (target in nums[lo]..nums[mid]) hi = mid - 1 else lo = mid + 1
} else {
// pivot on the left
// 9 1 2 3 4
// p m t
if (target in nums[mid]..nums[hi]) lo = mid + 1 else hi = mid - 1
}
} else hi-- // nums[lo] == nums[hi]
}
return false
}
09.08.2023
2616. Minimize the Maximum Difference of Pairs medium blog post substack
Join me on Telegram
https://t.me/leetcode_daily_unstoppable/303
Problem TLDR
Minimum of maximums possible p diffs of distinct array positions
Intuition
The hint is misleading, given the problem size 10^5 DP approach will give TLE, as it is n^2.
The real hint is:
- given the difference
diff, how many pairs there are in an array, wherepair_diff <= diff? - if we increase the picked
diffwill that number grow or shrink?
Using this hint, we can solve the problem with Binary Search, as with growth of diff, there is a flip of when we can take p numbers and when we can’t.
When counting the diffs, we use Greedy approach, and take the first possible, skipping its sibling. This will work, because we’re answering the questions of how many rather than maximum/minimum.
Approach
For more robust Binary Search, use:
- inclusive
lo,hi - last condition
lo == hi - result:
if (count >= p) res = minOf(res, mid) - move border
lo = mid + 1,hi = mid - 1
Complexity
-
Time complexity: \(O(nlog(n))\)
-
Space complexity: \(O(1)\)
Code
fun minimizeMax(nums: IntArray, p: Int): Int {
nums.sort()
var lo = 0
var hi = nums.last() - nums.first()
var res = hi
while (lo <= hi) {
val mid = lo + (hi - lo) / 2
var i = 1
var count = 0
while (i < nums.size) if (nums[i] - nums[i - 1] <= mid) {
i += 2
count++
} else i++
if (count >= p) res = minOf(res, mid)
if (count >= p) hi = mid - 1 else lo = mid + 1
}
return res
}
08.08.2023
33. Search in Rotated Sorted Array medium
blog post
substack
Join me on Telegram
https://t.me/leetcode_daily_unstoppable/302
Problem TLDR
Binary Search in a shifted array
Intuition
The special case is when lo > hi, otherwise it is a Binary Search.
Then there are two cases:
- if
lo < mid- monotonic part is on the left lo >= mid- monotonic part is on the right
Check the monotonic part immediately, otherwise go to the other part.
Approach
For more robust code:
- inclusive
loandhi - check for target
target == nums[mid] - move
lo = mid + 1,hi = mid - 1 - the last case
lo == hi
Complexity
-
Time complexity: \(O(log(n))\)
-
Space complexity: \(O(log(n))\)
Code
fun search(nums: IntArray, target: Int): Int {
var lo = 0
var hi = nums.lastIndex
while (lo <= hi) {
val mid = lo + (hi - lo) / 2
if (target == nums[mid]) return mid
if (nums[lo] > nums[hi]) {
if (nums[lo] > nums[mid]) {
if (target < nums[mid] || target > nums[hi]) hi = mid - 1 else lo = mid + 1
} else {
if (target > nums[mid] || target < nums[lo]) lo = mid + 1 else hi = mid - 1
}
} else if (target < nums[mid]) hi = mid - 1 else lo = mid + 1
}
return -1
}
07.08.2023
74. Search a 2D Matrix medium
blog post
substack
Join me on Telegram
https://t.me/leetcode_daily_unstoppable/301
Problem TLDR
2D Binary Search
Intuition
Just a Binary Search
Approach
For more robust code:
- inclusive
loandhi - the last condition
lo == hi - move borders
lo = mid + 1,hi = mid - 1 - check the result
- use built-in functions
Complexity
-
Time complexity: \(O(log(n*m))\)
-
Space complexity: \(O(1)\)
Code
fun searchMatrix(matrix: Array<IntArray>, target: Int): Boolean {
var lo = 0
var hi = matrix.lastIndex
while (lo <= hi) {
val mid = lo + (hi - lo) / 2
val row = matrix[mid]
if (target in row.first()..row.last())
return row.binarySearch(target) >= 0
if (target < row.first()) hi = mid - 1 else lo = mid + 1
}
return false
}
06.08.2023
920. Number of Music Playlists hard
blog post
substack
Join me on Telegram
https://t.me/leetcode_daily_unstoppable/300
Problem TLDR
Playlists number playing n songs goal times, repeating each once in a k times
Intuition
We can search through the problem space, taking each new song with the given rules: song can be repeated only after another k song got played. When we have the goal songs, check if all distinct songs are played.
We can cache the solution by curr and used map, but that will give TLE.
The hard trick here is that the result only depends on how many distinct songs are played.
Approach
Use DFS and memo.
Complexity
-
Time complexity: \(O(n^2)\)
-
Space complexity: \(O(n^2)\)
Code
fun numMusicPlaylists(n: Int, goal: Int, k: Int): Int {
val cache = mutableMapOf<Pair<Int, Int>, Long>()
fun dfs(curr: Int, used: Map<Int, Int>): Long = cache.getOrPut(curr to used.size) {
if (curr > goal) {
if ((1..n).all { used.contains(it) }) 1L else 0L
} else (1..n).asSequence().map { i ->
if (curr <= used[i] ?: 0) 0L else
dfs(curr + 1, used.toMutableMap().apply { this[i] = curr + k })
}.sum()!! % 1_000_000_007L
}
return dfs(1, mapOf()).toInt()
}
05.08.2023
95. Unique Binary Search Trees II medium
blog post
substack
Join me on Telegram
https://t.me/leetcode_daily_unstoppable/299
Problem TLDR
All possible Binary Search Trees for 1..n numbers
Intuition
One way to build all possible BST is to insert numbers in all possible ways. We can do this with a simple backtracking, given the small n <= 8. To remove duplicates, we can print the tree and use it as a hash key.
Approach
- use a bit mask and a Stack for backtracking
Complexity
- Time complexity:
\(O(n!* nlog(n))\), as the recursion depth is n, each time iterations go as n * (n - 1) * (n - 2) * … * 2 * 1, which is equal to n!. The final step of inserting elements is nlog(n), and building a hash is n, which is < nlogn, so not relevant.
- Space complexity:
\(O(n!)\), is a number of permutations
Code
fun insert(x: Int, t: TreeNode?): TreeNode = t?.apply {
if (x > `val`) right = insert(x, right)
else left = insert(x, left)
} ?: TreeNode(x)
fun print(t: TreeNode): String =
"[${t.`val`} ${t.left?.let { print(it) }} ${t.right?.let { print(it) }}]"
fun generateTrees(n: Int): List<TreeNode?> {
val stack = Stack<Int>()
val lists = mutableListOf<TreeNode>()
fun dfs(m: Int): Unit = if (m == 0)
lists += TreeNode(stack[0]).apply { for (i in 1 until n) insert(stack[i], this) }
else for (i in 0 until n) if (m and (1 shl i) != 0) {
stack.push(i + 1)
dfs(m xor (1 shl i))
stack.pop()
}
dfs((1 shl n) - 1)
return lists.distinctBy { print(it) }
}
Another divide-and-conquer solution, that I didn’t think of
 Another divide-and-conquer solution, that I didn’t think of
04.08.2023
139. Word Break medium
blog post
substack
Join me on Telegram
https://t.me/leetcode_daily_unstoppable/298
Problem TLDR
If a word is a wordDict concatenation
Intuition
To quickly find out if a sequence, we can use Trie. Then, we can search with DFS any possible split. As the result only depends on the argument, we can safely cache it.
Approach
Write a Trie and DFS, no tricks here.
Complexity
-
Time complexity: \(O(wn)\), w—is words count in
s -
Space complexity: \(O(w + 26^l)\), l—is the longest word in a dict
Code
class Trie(var isWord: Boolean = false) { val next = mutableMapOf<Char, Trie>() }
fun wordBreak(s: String, wordDict: List<String>): Boolean {
val root = Trie()
wordDict.forEach {
var t = root
it.forEach { t = t.next.getOrPut(it) { Trie() } }
t.isWord = true
}
val cache = mutableMapOf<Int, Boolean>()
fun dfs(pos: Int): Boolean = pos == s.length || cache.getOrPut(pos) {
var t: Trie? = root
s.withIndex().asSequence().drop(pos).takeWhile { t != null }
.any { (i, c) ->
t = t?.next?.get(c)
t?.isWord == true && dfs(i + 1)
}
}
return dfs(0)
}
03.08.2023
17. Letter Combinations of a Phone Number medium
blog post
substack
Join me on Telegram
https://t.me/leetcode_daily_unstoppable/297
Problem TLDR
Possible words from phone keyboard
Intuition
Just a naive DFS and Backtraking will solve the problem, as the number is short
Approach
- pay attention to keys in keyboard, some have size of 4
Complexity
- Time complexity:
\(O(n4^n)\), recursion depth is
n, each time we iterate over ‘3’ or ‘4’ letters, for example:
12 ->
abc def
a d
a e
a f
b d
b e
b f
c d
c e
c f
Each new number multiply previous count by 3 or 4. The final joinToString gives another n multiplier.
- Space complexity: \(O(4^n)\)
Code
fun letterCombinations(digits: String): List<String> = mutableListOf<String>().apply {
val abc = arrayOf("abc", "def", "ghi", "jkl", "mno", "pqrs", "tuv", "wxyz")
val list = Stack<Char>()
fun dfs(pos: Int) {
if (list.size == digits.length) {
if (list.isNotEmpty()) add(list.joinToString(""))
} else abc[digits[pos].toInt() - '2'.toInt()].forEach {
list.push(it)
dfs(pos + 1)
list.pop()
}
}
dfs(0)
}
02.08.2023
46. Permutations medium
blog post
substack
Join me on Telegram
https://t.me/leetcode_daily_unstoppable/296
Problem TLDR
List of all numbers permutations
Intuition
As the total count of number is small, we can just brute force the solution. We can use DFS and a backtracking technique: add number to the list pre-order then remove it post-order.
Approach
Iterate over all numbers and choose every number not in a bit mask
Complexity
-
Time complexity: \(O(n * n!)\), as we go
n * (n - 1) * (n - 2) * .. * 2 * 1 -
Space complexity: \((n!)\)
Code
fun permute(nums: IntArray): List<List<Int>> = mutableListOf<List<Int>>().apply {
val list = mutableListOf<Int>()
fun dfs(mask: Int): Unit = if (list.size == nums.size) this += list.toList()
else nums.forEachIndexed { i, n ->
if (mask and (1 shl i) == 0) {
list += n
dfs(mask or (1 shl i))
list.removeAt(list.lastIndex)
}
}
dfs(0)
}
01.08.2023
77. Combinations medium
blog post
substack
Join me on Telegram
https://t.me/leetcode_daily_unstoppable/295
Problem TLDR
All combinations choosing k numbers from 1..n numbers
Intuition
As total number is 20, we can use bit mask to generate all possible 2^n bit masks, then choose only k 1-bits masks and generate lists.
Approach
Let’s write a Kotlin one-liner
Complexity
-
Time complexity: \(O(n2^n)\)
-
Space complexity: \(O(n2^n)\)
Code
fun combine(n: Int, k: Int): List<List<Int>> = (0 until (1 shl n))
.filter { Integer.bitCount(it) == k }
.map { mask -> (1..n).filter { mask and (1 shl it - 1) != 0 } }
31.07.2023
712. Minimum ASCII Delete Sum for Two Strings medium
blog post
substack
Join me on Telegram
https://t.me/leetcode_daily_unstoppable/292
Problem TLDR
Minimum removed chars sum to make strings equal
Intuition
This is a known Dynamic Programming problem about the minimum edit distance. We can walk both strings and at each time choose what char to take and what to skip. The result is dependent only from the arguments, so can be cached.
Approach
Let’s use DFS and memo.
Complexity
-
Time complexity: \(O(n^2)\)
-
Space complexity: \(O(n^2)\)
Code
fun minimumDeleteSum(s1: String, s2: String): Int {
val cache = mutableMapOf<Pair<Int, Int>, Int>()
fun dfs(p1: Int, p2: Int): Int = cache.getOrPut(p1 to p2) { when {
p1 == s1.length && p2 == s2.length -> 0
p1 == s1.length -> s2.drop(p2).map { it.toInt() }.sum()!!
p2 == s2.length -> s1.drop(p1).map { it.toInt() }.sum()!!
s1[p1] == s2[p2] -> dfs(p1 + 1, p2 + 1)
else -> minOf(s1[p1].toInt() + dfs(p1 + 1, p2), s2[p2].toInt() + dfs(p1, p2 + 1))
} }
return dfs(0, 0)
}
30.07.2023
664. Strange Printer hard
blog post
substack
Join me on Telegram
https://t.me/leetcode_daily_unstoppable/291
Problem TLDR
Minimum continuous overrides by the same character to make a string
Intuition
The main idea comes to mind when you consider some palindromes as example:
abcccba
When we consider the next character ccc + b, we know, that the optimal number of repaints is Nc + 1. Or, bccc + b, the optimal is 1 + Nc.
However, the Dynamic Programming formula for finding a palindrome didn’t solve this case: ababa, as clearly, the middle a can be written in a single path aaaaa.
Another idea, is to split the string: ab + aba. Number for ab = 2, and for aba = 2. But, as first == last, we paint a only one time, so dp[from][to] = dp[from][a] + dp[a + 1][to].
As we didn’t know if our split is the optimal one, we must consider all of them.
Approach
- let’s write bottom up DP
Complexity
-
Time complexity: \(O(n^3)\)
-
Space complexity: \(O(n^2)\)
Code
fun strangePrinter(s: String): Int = with(Array(s.length) { IntArray(s.length) }) {
s.mapIndexed { to, sto ->
(to downTo 0).map { from -> when {
to - from <= 1 -> if (s[from] == sto) 1 else 2
s[from] == sto -> this[from + 1][to]
else -> (from until to).map { this[from][it] + this[it + 1][to] }.min()!!
}.also { this[from][to] = it }
}.last()!!
}.last()!!
}
29.07.2023
808. Soup Servings medium
blog post
substack
Join me on Telegram
https://t.me/leetcode_daily_unstoppable/290
Problem TLDR
Probability of soup A drained first or both A and B with 0.5 multiplier.
Intuition
The formula in the examples gives us the correct way to calculate the probabilities: each time we make a choice with probability of 1/4. After we arrive with the final condition, we use multipliers 1.0 for A win, 0.5 for both A and B and 0.0 for B win.
This is a simple DFS + cache dynamic programming problem.
However, this give TLE or OOM, as the N is too big.
At that point, the interview is over, and you safely can go home and see the answers in leetcode.com website.
To solve TLE & OOM, we must observe all the possible answers:
val ans = doubleArrayOf(
0.50000, 0.62500, 0.62500, 0.65625, 0.71875, 0.74219, 0.75781, 0.78516, 0.79688, 0.81787,
0.82764, 0.84485, 0.85217, 0.86670, 0.87256, 0.88483, 0.88963, 0.90008, 0.90406, 0.91301,
0.91634, 0.92405, 0.92687, 0.93353, 0.93593, 0.94170, 0.94376, 0.94878, 0.95056, 0.95493,
0.95646, 0.96029, 0.96162, 0.96497, 0.96612, 0.96906, 0.97007, 0.97265, 0.97353, 0.97580,
0.97657, 0.97857, 0.97924, 0.98100, 0.98160, 0.98315, 0.98367, 0.98505, 0.98551, 0.98672,
0.98713, 0.98820, 0.98856, 0.98951, 0.98983, 0.99067, 0.99095, 0.99170, 0.99195, 0.99261,
0.99283, 0.99342, 0.99362, 0.99414, 0.99431, 0.99478, 0.99493, 0.99535, 0.99548, 0.99585,
0.99597, 0.99630, 0.99640, 0.99670, 0.99679, 0.99705, 0.99714, 0.99737, 0.99744, 0.99765,
0.99772, 0.99790, 0.99796, 0.99812, 0.99818, 0.99832, 0.99837, 0.99850, 0.99854, 0.99866,
0.99870, 0.99880, 0.99884, 0.99893, 0.99896, 0.99904, 0.99907, 0.99914, 0.99917, 0.99923,
0.99925, 0.99931, 0.99933, 0.99939, 0.99940, 0.99945, 0.99947, 0.99951, 0.99952, 0.99956,
0.99957, 0.99961, 0.99962, 0.99965, 0.99966, 0.99968, 0.99969, 0.99972, 0.99972, 0.99975,
0.99975, 0.99977, 0.99978, 0.99980, 0.99980, 0.99982, 0.99982, 0.99984, 0.99984, 0.99985,
0.99986, 0.99987, 0.99987, 0.99988, 0.99989, 0.99989, 0.99990, 0.99991, 0.99991, 0.99991,
0.99992, 0.99992, 0.99993, 0.99993, 0.99993, 0.99994, 0.99994, 0.99994, 0.99995, 0.99995,
0.99995, 0.99996, 0.99996, 0.99996, 0.99996, 0.99996, 0.99997, 0.99997, 0.99997, 0.99997,
0.99997, 0.99997, 0.99997, 0.99998, 0.99998, 0.99998, 0.99998, 0.99998, 0.99998, 0.99998,
0.99998, 0.99998, 0.99999, 0.99999, 0.99999, 0.99999, 0.99999, 0.99999, 0.99999, 0.99999,
0.99999, 0.99999, 0.99999, 0.99999, 0.99999, 0.99999, 0.99999, 0.99999, 0.99999, 0.99999,
0.99999, 0.99999, 0.99999, 1.00000, 1.00000, 1.00000, 1.00000, 1.00000, 1.00000, 1.00000
)
Basically, after a certain point, there is no new kind of answer.
Approach
As to solve this problem we must observe all the answers, a lookup table as a valid choice for the solution.
Complexity
-
Time complexity: \(O(1)\)
-
Space complexity: \(O(1)\)
Code
val ans = doubleArrayOf(
0.50000, 0.62500, 0.62500, 0.65625, 0.71875, 0.74219, 0.75781, 0.78516, 0.79688, 0.81787,
0.82764, 0.84485, 0.85217, 0.86670, 0.87256, 0.88483, 0.88963, 0.90008, 0.90406, 0.91301,
0.91634, 0.92405, 0.92687, 0.93353, 0.93593, 0.94170, 0.94376, 0.94878, 0.95056, 0.95493,
0.95646, 0.96029, 0.96162, 0.96497, 0.96612, 0.96906, 0.97007, 0.97265, 0.97353, 0.97580,
0.97657, 0.97857, 0.97924, 0.98100, 0.98160, 0.98315, 0.98367, 0.98505, 0.98551, 0.98672,
0.98713, 0.98820, 0.98856, 0.98951, 0.98983, 0.99067, 0.99095, 0.99170, 0.99195, 0.99261,
0.99283, 0.99342, 0.99362, 0.99414, 0.99431, 0.99478, 0.99493, 0.99535, 0.99548, 0.99585,
0.99597, 0.99630, 0.99640, 0.99670, 0.99679, 0.99705, 0.99714, 0.99737, 0.99744, 0.99765,
0.99772, 0.99790, 0.99796, 0.99812, 0.99818, 0.99832, 0.99837, 0.99850, 0.99854, 0.99866,
0.99870, 0.99880, 0.99884, 0.99893, 0.99896, 0.99904, 0.99907, 0.99914, 0.99917, 0.99923,
0.99925, 0.99931, 0.99933, 0.99939, 0.99940, 0.99945, 0.99947, 0.99951, 0.99952, 0.99956,
0.99957, 0.99961, 0.99962, 0.99965, 0.99966, 0.99968, 0.99969, 0.99972, 0.99972, 0.99975,
0.99975, 0.99977, 0.99978, 0.99980, 0.99980, 0.99982, 0.99982, 0.99984, 0.99984, 0.99985,
0.99986, 0.99987, 0.99987, 0.99988, 0.99989, 0.99989, 0.99990, 0.99991, 0.99991, 0.99991,
0.99992, 0.99992, 0.99993, 0.99993, 0.99993, 0.99994, 0.99994, 0.99994, 0.99995, 0.99995,
0.99995, 0.99996, 0.99996, 0.99996, 0.99996, 0.99996, 0.99997, 0.99997, 0.99997, 0.99997,
0.99997, 0.99997, 0.99997, 0.99998, 0.99998, 0.99998, 0.99998, 0.99998, 0.99998, 0.99998,
0.99998, 0.99998, 0.99999, 0.99999, 0.99999, 0.99999, 0.99999, 0.99999, 0.99999, 0.99999,
0.99999, 0.99999, 0.99999, 0.99999, 0.99999, 0.99999, 0.99999, 0.99999, 0.99999, 0.99999,
0.99999, 0.99999, 0.99999, 1.00000, 1.00000, 1.00000, 1.00000, 1.00000, 1.00000, 1.00000
)
fun soupServings(n: Int): Double = if (n >= 199 * 25) 1.0 else ans[Math.ceil(n / 25.0).toInt()]
/*
if (n > 4000) return 1.0
val cache = mutableMapOf<Pair<Int, Int>, Double>()
fun dfs(a: Int, b: Int): Double = cache.getOrPut(a to b) {
if (a <= 0 && b <= 0) return 0.5
if (a > 0 && b <= 0) return 0.0
if (a <= 0 && b > 0) return 1.0
(dfs(a - 100, b) +
dfs(a - 75, b - 25) +
dfs(a - 50, b - 50) +
dfs(a - 25, b - 75)) * 0.25
}
return dfs(n, n)
*/
28.07.2023
486. Predict the Winner medium
blog post
substack
Join me on Telegram
https://t.me/leetcode_daily_unstoppable/289
Problem TLDR
Optimally taking numbers from an array's ends can one player win another
Intuition
The optimal strategy for the current player will be to search the maximum score of total sum - optimal another. The result can be cached as it only depends on the input array.
Approach
Write the DFS and cache by lo and hi.
- use
Longto avoid overflow
Complexity
-
Time complexity: \(O(n^2)\)
-
Space complexity: \(O(n^2)\)
Code
fun PredictTheWinner(nums: IntArray): Boolean {
val cache = Array(nums.size) { LongArray(nums.size) { -1L } }
fun dfs(lo: Int, hi: Int, currSum: Long): Long = cache[lo][hi].takeIf { it >= 0 } ?: {
if (lo == hi) nums[lo].toLong()
else if (lo > hi) 0L
else currSum - minOf(
dfs(lo + 1, hi, currSum - nums[lo]),
dfs(lo, hi - 1, currSum - nums[hi])
)
}().also { cache[lo][hi] = it }
val sum = nums.asSequence().map { it.toLong() }.sum()!!
return dfs(0, nums.lastIndex, sum).let { it >= sum - it }
}
27.07.2023
2141. Maximum Running Time of N Computers hard
blog post
substack
Join me on Telegram
https://t.me/leetcode_daily_unstoppable/288
Problem TLDR
Maximum time to use n batteries in parallel
Hint 1
Batteries 5 5 5 is equal to 1 2 3 4 5 to run 3 computers for 5 minutes.
Hint 2
Batteries are swapped instantly, so we can drain all 1 2 3 4 5 with just 3 computers, but if a pack is 1 2 3 4 100 we can only drain 5 from the last 100 battery. (or less)
Hint 3
Energy of 5 5 5 is 15 to run for 5 minutes.
Energy in 1 2 3 4 100 is 1+2+3+4+5 when run for 5 minutes.
Energy in 1 2 3 4 100 is 1+2+3+4+4 when run for 4 minutes.
Energy in 1 2 3 4 100 is 1+2+3+3+3 when run for 3 minutes.
Intuition
The Binary Search idea is first to mind, as with growth of run time the function of canRun do the flip.
However, to detect if we canRun the given time is not so trivial.
We can use all batteries by swapping them every minute. To use 5 batteries in 3 computers, we can first use the max capacity and change others:
1 2 3 4 5
1 1 1
1 1 1
1 1 1
1 1 1
1 1 1
In this example, time = 5. Or we can have just 3 batteries with capacity of 5 each: 5 5 5. What if we add another battery:
1 2 3 4 5 9
1 1 1
1 1 1
1 1 1
1 1 1
1 1 1
1 1 1
1 1 1
Time becomes 7, or we can have 7 7 7 battery pack with total energy = 3 * 7 = 21. And we don’t use 1 yet.
Let’s observe the energy for the time = 7:
1 2 3 4 5 9
* 1 1 1 1 1
1 1 1 1 1
1 1 1 1
1 1 1
1 1
1
1
We didn’t use 1, but had we another 1 the total energy will be 21 + 1 + 1 + 1(from 9) or 24, which is equal to 3 * 8, or time = 8.
So, by this diagram, we can take at most time power units from each battery.
So, our function canRun(time) is: energy(time) >= time * n. Energy is a sum of all batteries running at most time.
Approach
Binary Search:
- inclusive
lo&hi - last check
lo == hi - compute result
res = mid - boundaries
lo = mid + 1,hi = mid - 1
Complexity
-
Time complexity: \(O(nlog(n))\)
-
Space complexity: \(O(1)\)
Code
fun maxRunTime(n: Int, batteries: IntArray): Long {
// n=3 1 2 3 4 5 6 7 9
// time = 4
// we need 4 4 4, take 1 2 3 4 4 4 4 4
// time = 5
// we need 5 5 5, take 1 2 3 4 5 5 5 5
// n=3 3 3 3 80
// time = 1 1 1 1 1 vs 1 1 1
// time = 2 2 2 2 2 vs 2 2 2
// time = 3 3 3 3 3 vs 3 3 3
// time = 4 3 3 3 4 (13) vs 4 4 4 (16)
// time = 5 3 3 3 5 (14) vs 5 5 5 (15)
// time = 6 3 3 3 6 (15) vs 6 6 6 (18)
var lo = 0L
var hi = batteries.asSequence().map { it.toLong() }.sum() ?: 0L
var res = 0L
while (lo <= hi) {
val mid = lo + (hi - lo) / 2L
val canRun = n * mid <= batteries.asSequence().map { minOf(it.toLong(), mid) }.sum()!!
if (canRun) {
res = mid
lo = mid + 1L
} else hi = mid - 1L
}
return res
}
26.07.2023
1870. Minimum Speed to Arrive on Time medium
blog post
substack
Join me on Telegram
https://t.me/leetcode_daily_unstoppable/287
Problem TLDR
Max speed for all dist departing at round hours, be fit in hour
Intuition
Given the speed, we can calculate the travel time in O(n). With decreasing speed the time grows, so we can do the Binary Search
Approach
For more robust Binary Search code:
- use inclusive
loandhi - check the last condition
lo == hi - always move the borders
lo = mid + 1,hi = mid - 1 - always save the result
res = mid
Complexity
-
Time complexity: \(O(nlog(n))\)
-
Space complexity: \(O(1)\)
Code
fun minSpeedOnTime(dist: IntArray, hour: Double): Int {
var lo = 1
var hi = 1_000_000_000
var res = -1
while (lo <= hi) {
val mid = lo + (hi - lo) / 2
var dt = 0.0
val time = dist.fold(0.0) { r, t ->
r + Math.ceil(dt).also { dt = t / mid.toDouble() }
} + dt
if (hour >= time) {
res = mid
hi = mid - 1
} else lo = mid + 1
}
return res
}
25.07.2023
852. Peak Index in a Mountain Array medium
blog post
substack
Join me on Telegram
https://t.me/leetcode_daily_unstoppable/286
Problem TLDR
Mountain pattern index in the array in log time
Intuition
Do the Binary Search of the biggest growing index
Approach
For more robust Binary Search code:
- use inclusive
loandhi - do the last check
lo == hi - always write the result
ind = midif conditions are met - always move the borders
lo = mid - 1,hi = mid + 1
Complexity
-
Time complexity: \(O(log(n))\)
-
Space complexity: \(O(1)\)
Code
fun peakIndexInMountainArray(arr: IntArray): Int {
var lo = 1
var hi = arr.lastIndex
var ind = -1
while (lo <= hi) {
val mid = lo + (hi - lo) / 2
if (arr[mid] > arr[mid - 1]) {
ind = mid
lo = mid + 1
} else hi = mid - 1
}
return ind
}
Magical Rundown
🌄 "Look at that crimson blush, Alpha!" A radiant sunrise anoints the
towering Everest, its snow-capped peaks aglow with the day's first
light. An ethereal landscape, a symphony of shadows and silhouettes,
lays the stage for an impending adventure. 🏔️
Team Alpha 🥾 chuckles, their voices swallowed by the wind, "Today's
the day we've been dreaming of, Charlie!" Team Charlie 🦅, encased
in their mountain gear, share their excitement. Their eyes, reflecting
the sunlit peaks, are fixated on the summit – their celestial goal.
Base Camps (BC):
0 1 2 3 4 5 6 7 8 9 10 11 12 13 14 15 16 17 18 19 20
Everest Heights:
1K 2K 3K 4K 5K 6K 7K 8K 9K 10K 11K 12K 13K 14K 15K 16K 15K 14K 13K 12K 11K
🥾(Team Alpha) 🏔️(Mysterious Mid Point) 🦅(Team Charlie)
🧭 "We're off to conquer the Everest!" Alpha's voice reverberates
with a hopeful intensity. Their strategy, an intricate dance with
numbers and ambition – Binary Search. The mountain, its snow-capped
peaks reaching for the skies, hums ancient tales to their eager ears.
BC: 0 1 2 3 4 5 6 7 8 9 10 11 12 13 14 15 16 17 18 19 20
Heights: 1K 2K 3K 4K 5K 6K 7K 8K 9K 10K 11K 12K 13K 14K 15K 16K 15K 14K 13K 12K 11K
🥾🏁(Team Alpha's Milestone) 🦅(Team Charlie)
"10K! Feels like we've captured a bit of heaven," Team Alpha shares
their awe, their voices a mere whisper against the grandeur of the
landscape.
🏞️ But the mountain, a grand enigma, hides her secrets well...
With a sudden, heart-stopping rumble, the mountain shivers, the
seemingly innocuous snow beneath Team Charlie's feet giving way. A
fierce avalanche sweeps down the slopes, sending Charlie scrambling
for cover.
BC: 0 1 2 3 4 5 6 7 8 9 10 11 12 13 14 15 16 17 18 19 20
Heights: 1K 2K 3K 4K 5K 6K 7K 8K 9K 10K 11K 12K 13K 14K 15K 16K 15K 14K 13K 12K 11K
🥾🏁(Team Alpha's Resolve) ❄️🦅(Team Charlie's Setback)
"Avalanche!" Charlie's voice, choked with frosty fear, crackles over
the radio. Yet, Team Alpha, undeterred by the wrath of the mountain,
pushes forward. "Hold tight, Charlie! We're stardust-bound!" They
continue their daring ascent, breaching the cloudline to a dizzying
16K.
🚩 "Charlie, we're among the stars!" Alpha's voice, filled with
joyous triumph, echoes through the radio. The peak is conquered.
BC: 0 1 2 3 4 5 6 7 8 9 10 11 12 13 14 15 16 17 18 19 20
Heights: 1K 2K 3K 4K 5K 6K 7K 8K 9K 10K 11K 12K 13K 14K 15K 16K 15K 14K 13K 12K 11K
🚩🎉(Victorious Summit at BC 15!)
As the sun bathes the snowy peaks in a golden hue, Team Alpha plants
their triumphant flag at the top. They stand there, at the roof of
the world, their hearts swelling with joy and pride. It's the journey,
the shared aspirations, the dream of reaching for the stars, that truly
defines their adventure. 🌠
24.07.2023
50. Pow(x, n) medium
blog post
substack
Join me on Telegram
https://t.me/leetcode_daily_unstoppable/285
Problem TLDR
x^n
Intuition
We can use tabulations technique: compute all powers of 2 and reuse them.
// 2 1
// 2*2 = 4 2
// 4*4 = 16 4
// 16*16=256 8
// 2^8 * 2^8 = 2^16 16
// 2^31 = 2^16 * 2^4 * 2
After computing the growing part, we need to find the optimal way to split the reminder. For example, x^31 = x^16 * x^5, then x^5 = x^4 * x^1. To find the closest power of 2, we can take the most significant bit, which is an x & -x bit operation.
// 5 -> 4 101 -> 100
// 7 -> 4 111 -> 100
// 9 -> 8 1001 -> 1000
Approach
- there is a corner case of the negative powers, just invert x -> 1/x
- careful with
Int.MIN_VALUE, asabs(MIN_VALUE) == abs(-MIN_VALUE)
Complexity
-
Time complexity: \(O(log(n))\)
-
Space complexity: \(O(1)\)
Code
fun myPow(x: Double, n: Int): Double {
if (n == 0) return 1.0
val mul = if (n < 0) 1 / x else x
val exp = if (n == Int.MIN_VALUE) Int.MAX_VALUE else Math.abs(n)
val cache = DoubleArray(32)
var k = mul
var f = 1
cache[0] = k
while (f <= exp / 2) {
k = k * k
f = f * 2
cache[Integer.numberOfTrailingZeros(f)] = k
}
while (f < exp) {
val e = exp - f
val pow = e and -e
k = k * cache[Integer.numberOfTrailingZeros(pow)]
f = f + pow
}
if (n == Int.MIN_VALUE) k = k * mul
return k
}
23.07.2023
894. All Possible Full Binary Trees medium
blog post
substack
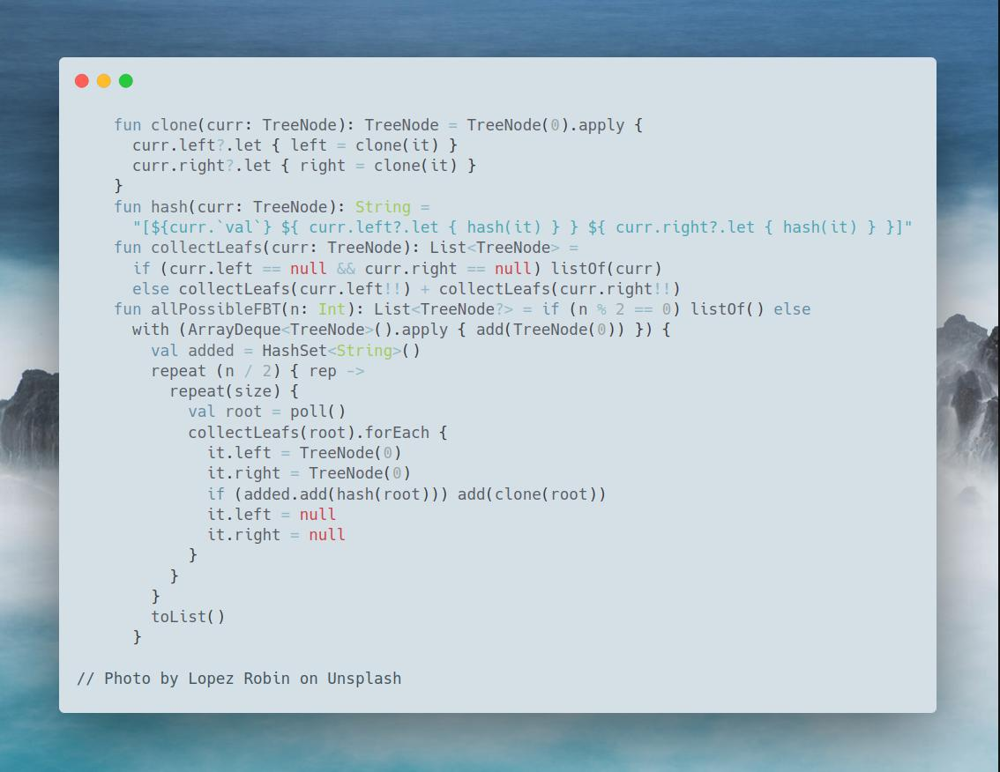
Join me on Telegram
https://t.me/leetcode_daily_unstoppable/284
Problem TLDR
All possible Full Binary Trees with n nodes, each have both children
Intuition
First, if count of nodes is even, BFT is not possible.
Let’s observe how the Trees are growing:
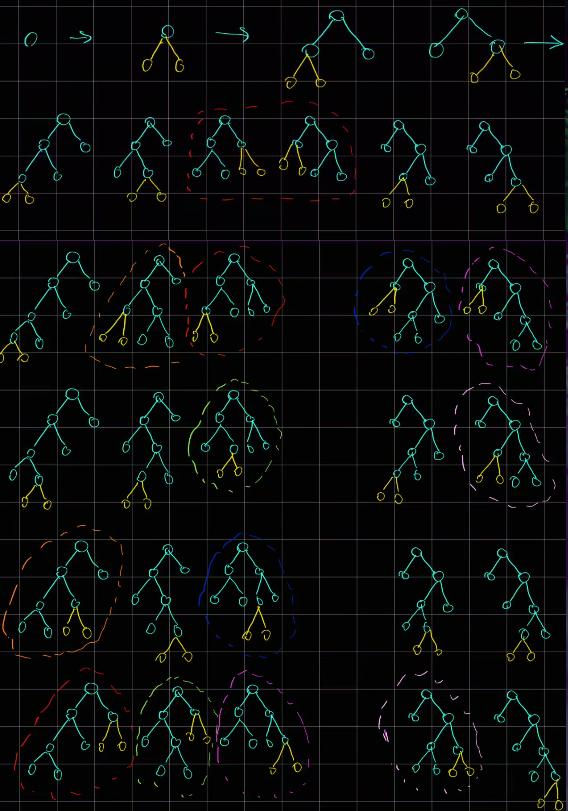
There are n / 2 rounds of adding a new pair of nodes to each leaf of each Tree in the latest generation.
Some duplicate trees occur, so we need to calculate a hash.
Approach
Let’s implement it in a BFS manner.
- to avoid collision of the
hash, add some symbols to indicate a level[...]
Complexity
-
Time complexity: \(O(n^4 2^n)\), n generations, queue size grows in 2^n manner, count of leafs grows by 1 each generation, so it’s x + (x + 1) + .. + (x + n), giving n^2, another n for collection leafs, and another for hash and clone
-
Space complexity: \(O(n^3 2^n)\)
Code
fun clone(curr: TreeNode): TreeNode = TreeNode(0).apply {
curr.left?.let { left = clone(it) }
curr.right?.let { right = clone(it) }
}
fun hash(curr: TreeNode): String =
"[${curr.`val`} ${ curr.left?.let { hash(it) } } ${ curr.right?.let { hash(it) } }]"
fun collectLeafs(curr: TreeNode): List<TreeNode> =
if (curr.left == null && curr.right == null) listOf(curr)
else collectLeafs(curr.left!!) + collectLeafs(curr.right!!)
fun allPossibleFBT(n: Int): List<TreeNode?> = if (n % 2 == 0) listOf() else
with (ArrayDeque<TreeNode>().apply { add(TreeNode(0)) }) {
val added = HashSet<String>()
repeat (n / 2) { rep ->
repeat(size) {
val root = poll()
collectLeafs(root).forEach {
it.left = TreeNode(0)
it.right = TreeNode(0)
if (added.add(hash(root))) add(clone(root))
it.left = null
it.right = null
}
}
}
toList()
}
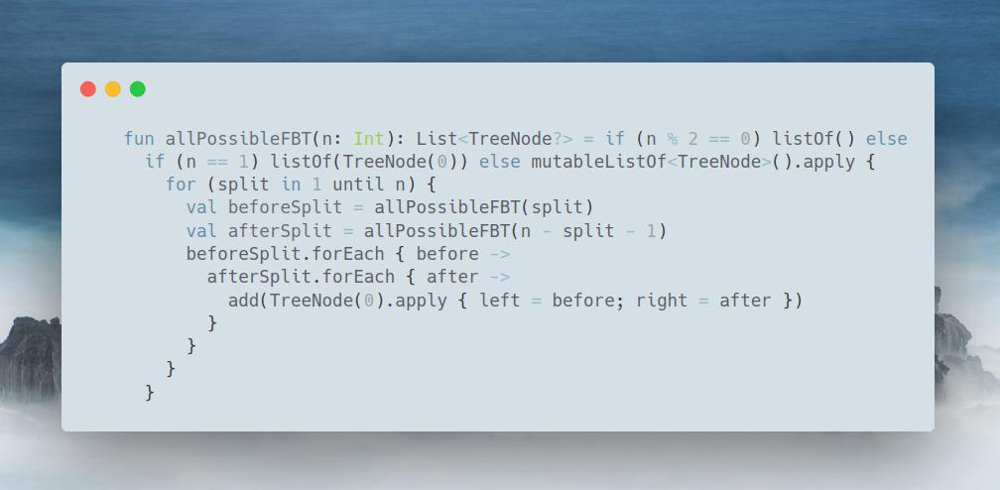
effective solution. It can be described as “for every N generate every possible split of [0..i] [i+1..N]”. Subtrees are also made of all possible combinations.
22.07.2023
688. Knight Probability in Chessboard medium
blog post
substack

Join me on Telegram
https://t.me/leetcode_daily_unstoppable/283
Problem TLDR
Probability of making k steps on a chessboard without stepping outside
Intuition
The description example doesn’t give a clear picture of how the probability works.
- individual probability is
1/8each time we make a step. -
- One step is
1/8, two steps are1/8 * 1/8and so on.
- One step is
-
- So, the
k-stepspath will have probability of1/8^k
- So, the
- we need to sum all the probabilities of individual
k-stepspaths, that will remain on a board -
- the brute force algorithm for this will be BFS:
-
-
- for
krounds:
- for
-
-
-
-
- poll all the elements, and make possible steps on the board
-
-
-
-
-
- resulting probability will be
queue.size / 8^k, as queue will contain only the final possible ways after k steps
- resulting probability will be
-
-
However, there are too many possible ways, we will quickly run out of memory.
It is noticeable, some ways are repeating, and after s steps the same cell [x, y] produces the same amount of possible ways dp[x, y][s]. We can cache this result for each cell.
However, the number of ways are still very big and do not fit into Long 64 bits. To solve this, we can cache not only the ways, but the probability, dividing each step by 8.
Approach
- storing the directions in a sequence helps to reduce some LOC
Complexity
-
Time complexity: \(O(kn^2)\)
-
Space complexity: \(O(kn^2)\)
Code
val dxdy = sequenceOf(-2 to 1, -2 to -1, 2 to 1, 2 to -1, -1 to 2, -1 to -2, 1 to 2, 1 to -2)
fun knightProbability(n: Int, k: Int, row: Int, column: Int): Double {
val cache = mutableMapOf<Pair<Pair<Int, Int>, Int>, Double>()
fun count(x: Int, y: Int, k: Int): Double = if (k == 0) 1.0 else cache.getOrPut(x to y to k) {
dxdy.map { (dx, dy) -> x + dx to y + dy }
.map { (x, y) -> if (x in 0..n-1 && y in 0..n-1) count(x, y, k - 1) / 8.0 else 0.0 }
.sum()
}
return count(column, row, k)
}
The magical rundown
Step ₀ - The High Noon Duel 🤠🎵🌵:
🎶 The town clock strikes twelve, and the high noon chess duel commences. A
lone knight 🐎 trots onto the scorching, sun-bleached chessboard, casting a long
shadow on the sandy squares.
╔═══🌵═══🌵═══╗
║ 🐎 ║ ║ ║
╠═══🌵═══🌵═══╣
║ ║ ║ ║
╠═══🌵═══🌵═══╣
║ ║ ║ ║
╚═══🌵═══🌵═══╝
The Sheriff 🤠, ever the statistician, watches keenly. "For now, the odds are
all in your favor, Knight," he says, unveiling the initial probability 𝓹₀ = 1.
┌─────💰────┬────💰────┬────💰────┐
│ 1 │ 0 │ 0 │
├─────💰────┼────💰────┼────💰────┤
│ 0 │ 0 │ 0 │
├─────💰────┼────💰────┼────💰────┤
│ 0 │ 0 │ 0 │
└─────💰────┴────💰────┴────💰────┘
Step ₁ - The Dusty Trail 🌄🎵🐴:
🎶 The knight 🐎 leaps into action, stirring up a cloud of dust. He lands in two
different squares, each with a calculated 1/8 chance. The Sheriff 🤠 nods
approvingly. "Bold moves, Knight. The probability after this is 𝓹₁ = 1/8 + 1/8 = 1/4."
╔═══🌵═══🌵═══╗
║ ║ ║ ║
╠═══🌵═══🌵═══╣
║ ║ ║ 🐎 ║
╠═══🌵═══🌵═══╣
║ ║ 🐎 ║ ║
╚═══🌵═══🌵═══╝
He reveals the new odds:
┌─────💰────┬────💰────┬────💰────┐
│ 0 │ 0 │ 0 │
├─────💰────┼────💰────┼────💰────┤
│ 0 │ 0 │ ¹/₈ │
├─────💰────┼────💰────┼────💰────┤
│ 0 │ ¹/₈ │ 0 │
└─────💰────┴────💰────┴────💰────┘
Step ₂ - The Sun-Baked Crossroads ☀️🎵🌪️:
🎶 The knight 🐎 continues his daring maneuvers, hopping onto a few critical
spots. He lands on three squares, with probabilities of 1/64, 1/64, and 2/64.
Adding these up, the Sheriff 🤠 declares, "The stakes have risen, Knight. The
total is 𝓹₂ = 1/64 + 1/64 + 2/64 = 1/16."
╔═══🌵═══🌵═══╗
║🐎🐎║ ║ 🐎 ║
╠═══🌵═══🌵═══╣
║ ║ ║ ║
╠═══🌵═══🌵═══╣
║ 🐎 ║ ║ ║
╚═══🌵═══🌵═══╝
The updated odds take shape:
┌─────💰────┬────💰────┬────💰────┐
│ ²/₆₄ │ 0 │ ¹/₆₄ │
├─────💰────┼────💰────┼────💰────┤
│ 0 │ 0 │ 0 │
├─────💰────┼────💰────┼────💰────┤
│ ¹/₆₄ │ 0 │ 0 │
└─────💰────┴────💰────┴────💰────┘
Step ₃ - The Outlaw's Hideout 🏚️🎵🐍:
🎶 As the sun sets, the knight 🐎 lands in a few hidden spots with various
probabilities. Each calculated leap adds to his total: 1/512 + 1/512 + 3/512 + 3/512.
The Sheriff 🤠 raises an eyebrow. "Well played, Knight. Your total now is 𝓹₃ =
1/512 + 1/512 + 3/512 + 3/512."
╔═══🌵═══🌵═══╗
║ ║ 🐎 ║ ║
╠═══🌵═══🌵═══╣
║ 🐎 ║ ║🐎🐎🐎║
╠═══🌵═══🌵═══╣
║ ║🐎🐎🐎║ ║
╚═══🌵═══🌵═══╝
Beneath the twinkling stars, the Sheriff 🤠 surveys the evolving game. "You're
not an easy one to beat, Knight," he admits, revealing the updated stakes:
┌─────💰────┬────💰────┬────💰────┐
│ 0 │ ¹/₅₁₂ │ 0 │
├─────💰────┼────💰────┼────💰────┤
│ ¹/₅₁₂ │ 0 │ ³/₅₁₂ │
├─────💰────┼────💰────┼────💰────┤
│ 0 │ ³/₅₁₂ │ 0 │
└─────💰────┴────💰────┴────💰────┘
🎶 So, under the twinkling stars and to the tune of the whistling wind, our
knight's adventure continues into the night. The stakes are high, the moves
unpredictable, but one thing's certain: this wild chess duel is far from over! 🌵🐎🌌🎵
21.07.2023
673. Number of Longest Increasing Subsequence medium
blog post
substack
Join me on Telegram
https://t.me/leetcode_daily_unstoppable/282
Proble TLDR
Count of LIS in an array
Intuition
To find Longest Increasing Subsequence, there is a known algorithm with \(O(nlog(n))\) time complexity. However, it can help with this case:
3 5 4 7
when we must track both 3 4 7 and 3 5 7 sequences. Given that, we can try to do full search with DFS, taking or skipping a number. To cache some results, we must make dfs depend on only the input arguments. Let’s define it to return both max length of LIS and count of them in one result, and arguments are the starting position in an array and previous number that we must start sequence from.
Approach
- use an array cache, as
Mapgives TLE
Complexity
-
Time complexity: \(O(n^2)\)
-
Space complexity: \(O(n^2)\)
Code
class R(val maxLen: Int, val cnt: Int)
fun findNumberOfLIS(nums: IntArray): Int {
val cache = Array(nums.size + 1) { Array<R>(nums.size + 2) { R(0, 0) } }
fun dfs(pos: Int, prevPos: Int): R = if (pos == nums.size) R(0, 1) else
cache[pos][prevPos].takeIf { it.cnt != 0 }?: {
val prev = if (prevPos == nums.size) Int.MIN_VALUE else nums[prevPos]
var cnt = 0
while (pos + cnt < nums.size && nums[pos + cnt] == nums[pos]) cnt++
val skip = dfs(pos + cnt, prevPos)
if (nums[pos] <= prev) skip else {
val start = dfs(pos + cnt, pos).let { R(1 + it.maxLen, cnt * it.cnt ) }
if (skip.maxLen == start.maxLen) R(skip.maxLen, start.cnt + skip.cnt)
else if (skip.maxLen > start.maxLen) skip else start
}
}().also { cache[pos][prevPos] = it }
return dfs(0, nums.size).cnt
}
Magical rundown
🏰🔮🌌 The Astral Enigma of Eternity
In the boundless tapestry of time, an enigmatic labyrinth 🗝️ whispers
tales of forgotten epochs. Your fateful quest? To decipher the longest
increasing subsequences hidden within the celestial array 🧩 [3, 5, 4, 7].
🌄 The Aurora Gateway: dfs(0, nums.size)
/ \
🌳 The Verdant Passage (dfs(1,0)) / 🌑 The Nebulous Veil (dfs(1,nums.size))
Your odyssey commences at twilight's brink: will you tread the lush
🌳 Verdant Passage or dare to penetrate the enigmatic 🌑 Nebulous Veil?
🌄 The Aurora Gateway: dfs(0, nums.size)
/
🍃 The Glade of Whispers (Pos 1: num[1]=3, dfs(1,0))
/
🌊 The Cascade of Echoes (Pos 2: num[2]=5, dfs(2,1))
/
⛰️ The Bastion of Silence (Pos 3: num[3]=4, dfs(3,2)) 🚫🔒
The labyrinth’s heart pulsates with cryptic riddles. The ⛰️ Bastion of Silence
remains locked, overshadowed by the formidable 🌊 Cascade of Echoes.
🌄 The Aurora Gateway: dfs(0, nums.size)
/
🍃 The Glade of Whispers (Pos 1: num[1]=3, dfs(1,0))
\
🌑 The Phantom of Riddles (Pos 2: num[2]=5, dfs(2,0))
Retracing your footsteps, echoes of untaken paths whisper secrets. Could
the ⛰️ Bastion of Silence hide beneath the enigma of the 🌑 Phantom of Riddles?
🌄 The Aurora Gateway: dfs(0, nums.size)
/
🍃 The Glade of Whispers (Pos 1: num[1]=3, dfs(1,0))
\
💨 The Mist of Mystery (Pos 3: num[3]=4, dfs(3,0))
\
🌩️ The Tempest of Triumph (Pos 4: num[4]=7, dfs(4,3)) 🏁🎉
At last, the tempest yields! Each twist and turn, each riddle spun and
secret learned, illuminates a longest increasing subsequence in the cosmic array.
Your enchanted grimoire 📜✨ (cache) now vibrates with the wisdom of ages:
prevPos\pos 0 1 2 3 4
0 (0,0) (2,1) (2,1) (3,2) (0,0)
1 (0,0) (0,0) (2,1) (3,2) (0,0)
2 (0,0) (0,0) (0,0) (2,1) (0,0)
3 (0,0) (0,0) (0,0) (0,0) (0,0)
4 (0,0) (0,0) (0,0) (0,0) (0,0)
Beneath the shimmering cosmic symphony, you cast the final incantation
🧙♂️ dfs(0, nums.size).cnt. The grimoire blazes with ethereal light, revealing
the total count of longest increasing subsequences.
You emerge from the labyrinth transformed: no longer merely an adventurer,
but the 🌟 Cosmic Guardian of Timeless Wisdom. 🗝️✨🌠
20.07.2023
735. Asteroid Collision medium
blog post
substack
Join me on Telegram
https://t.me/leetcode_daily_unstoppable/281
Problem TLDR
Result after asteroids collide left-right exploding by size: 15 5 -15 -5 5 -> -15 -5 5
Intuition
Let’s add positive asteroids to the Stack. When negative met, it can fly over all smaller positive added, and can explode if larger met.
Approach
Kotlin’s API helping reduce some LOC
Complexity
-
Time complexity: \(O(n)\)
-
Space complexity: \(O(n)\)
Code
fun asteroidCollision(asteroids: IntArray): IntArray = with(Stack<Int>()) {
asteroids.forEach { sz ->
if (!generateSequence { if (sz > 0 || isEmpty() || peek() < 0) null else peek() }
.any {
if (it <= -sz) pop()
it >= -sz
}) add(sz)
}
toIntArray()
}
19.07.2023
435. Non-overlapping Intervals medium
blog post
substack
Join me on Telegram
https://t.me/leetcode_daily_unstoppable/280
Problem TLDR
Minimum intervals to erase overlap
Intuition
First idea, is to sort the array by from. Next, we can greedily take intervals and remove overlapping ones. But, to remove the minimum number, we can start with removing the most long intervals.
Approach
- walk the sweep line, counting how many intervals are non overlapping
- only move the
right borderwhen there is a new non overlapping interval - minimize the
borderwhen it shrinks
Complexity
-
Time complexity: \(O(nlog(n))\)
-
Space complexity: \(O(1)\)
Code
fun eraseOverlapIntervals(intervals: Array<IntArray>): Int {
intervals.sortWith(compareBy({ it[0] }))
var border = Int.MIN_VALUE
return intervals.count { (from, to) ->
(border > from).also {
if (border <= from || border > to) border = to
}
}
}
18.07.2023
146. LRU Cache medium
blog post
substack
Join me on Telegram
https://t.me/leetcode_daily_unstoppable/279
Intuition
We can use Doubly-Linked List representing access time in its order.
Approach
- use
firstNodeandlastNode
Complexity
-
Time complexity: \(O(1)\), for each call
getorput -
Space complexity: \(O(1)\), for each element
Code
class LRUCache(val capacity: Int) {
class Node(val key: Int, var left: Node? = null, var right: Node? = null)
var size = 0
val map = mutableMapOf<Int, Int>()
val firstNode = Node(-1)
var lastNode = firstNode
val keyToNode = mutableMapOf<Int, Node>()
fun disconnect(node: Node) {
val leftNode = node.left
val rightNode = node.right
node.left = null
node.right = null
leftNode?.right = rightNode
rightNode?.left = leftNode
if (node === lastNode) lastNode = leftNode!!
}
fun updateNode(key: Int) {
val node = keyToNode[key]!!
if (node === lastNode) return
disconnect(node)
lastNode.right = node
node.left = lastNode
lastNode = node
}
fun get(key: Int): Int = map[key]?.also { updateNode(key) } ?: -1
fun put(key: Int, value: Int) {
if (!map.contains(key)) {
if (size == capacity) {
firstNode.right?.let {
map.remove(it.key)
keyToNode.remove(it.key)
disconnect(it)
}
} else size++
keyToNode[key] = Node(key)
}
updateNode(key)
map[key] = value
}
}
17.07.2023
445. Add Two Numbers II medium
blog post
substack
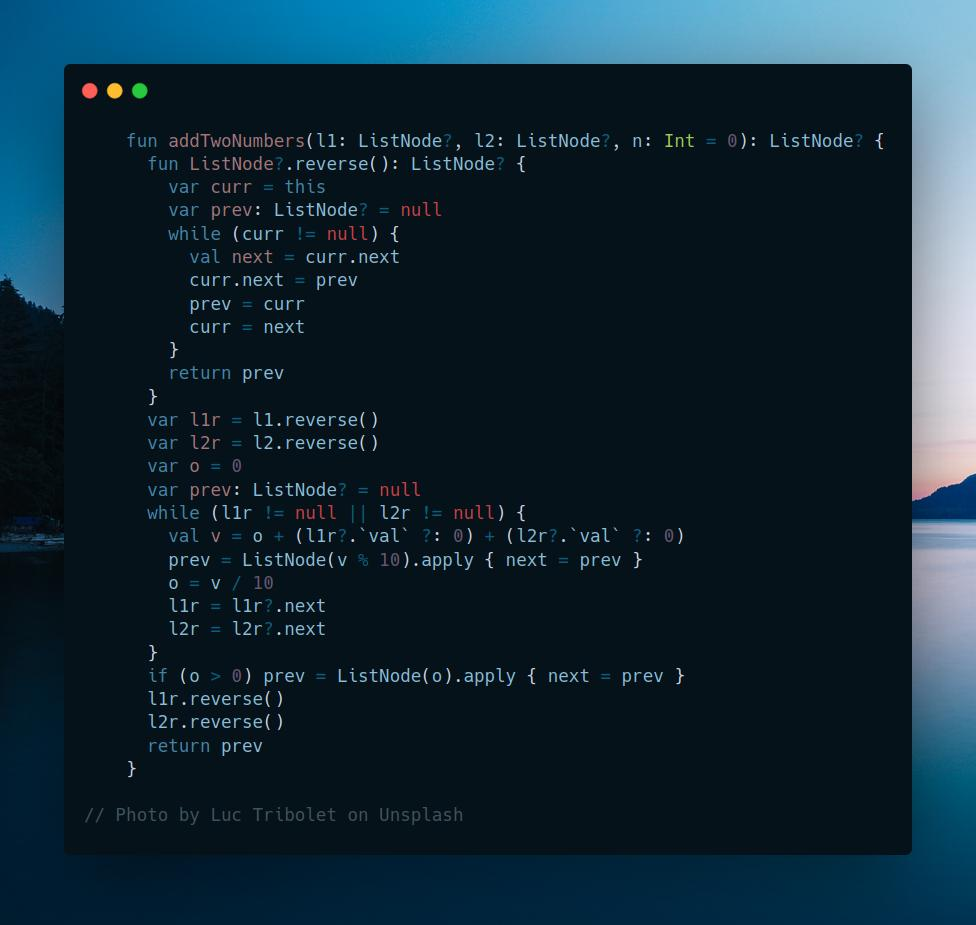
Join me on Telegram
https://t.me/leetcode_daily_unstoppable/278
Problem TLDR
Linked List of sum of two Linked Lists numbers, 9->9 + 1 = 1->0->0
Intuition
The hint is in the description: reverse lists, then just do arithmetic. Another way is to use stack.
Approach
- don’t forget to undo the reverse
Complexity
-
Time complexity: \(O(n)\)
-
Space complexity: \(O(1)\)
Code
fun addTwoNumbers(l1: ListNode?, l2: ListNode?, n: Int = 0): ListNode? {
fun ListNode?.reverse(): ListNode? {
var curr = this
var prev: ListNode? = null
while (curr != null) {
val next = curr.next
curr.next = prev
prev = curr
curr = next
}
return prev
}
var l1r = l1.reverse()
var l2r = l2.reverse()
var o = 0
var prev: ListNode? = null
while (l1r != null || l2r != null) {
val v = o + (l1r?.`val` ?: 0) + (l2r?.`val` ?: 0)
prev = ListNode(v % 10).apply { next = prev }
o = v / 10
l1r = l1r?.next
l2r = l2r?.next
}
if (o > 0) prev = ListNode(o).apply { next = prev }
l1r.reverse()
l2r.reverse()
return prev
}
16.07.2023
1125. Smallest Sufficient Team hard blog post substack
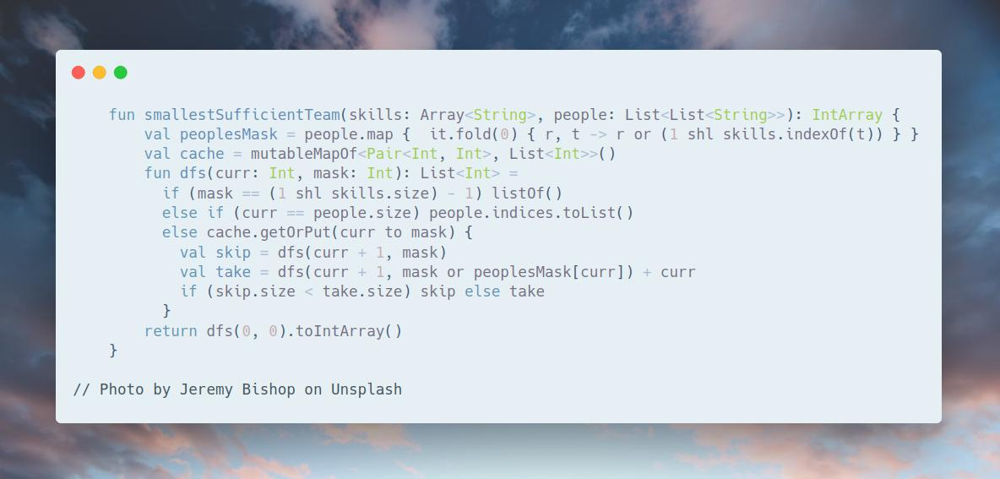
Join me on Telegram
https://t.me/leetcode_daily_unstoppable/277
Problem TLDR
Smallest team from people with skills, having all required skills
Intuition
The skills set size is less than 32, so we can compute a bitmask for each of people and for the required skills.
Next, our task is to choose a set from people that result skills mask will be equal to the required.
We can do a full search, each time skipping or adding one mask from the people.
Observing the problem, we can see, that result is only depending on the current mask and all the remaining people. So, we can cache it.
Approach
- we can use a
HashMapto storeskill to index, but given a small set of skills, just doindexOfin O(60 * 16) - add to the team in
post order, asdfsmust return only the result depending on the input arguments
Complexity
-
Time complexity: \(O(p2^s)\), as full mask bits are 2^s, s - skills, p - people
-
Space complexity: \(O(p2^s)\)
Code
fun smallestSufficientTeam(skills: Array<String>, people: List<List<String>>): IntArray {
val peoplesMask = people.map { it.fold(0) { r, t -> r or (1 shl skills.indexOf(t)) } }
val cache = mutableMapOf<Pair<Int, Int>, List<Int>>()
fun dfs(curr: Int, mask: Int): List<Int> =
if (mask == (1 shl skills.size) - 1) listOf()
else if (curr == people.size) people.indices.toList()
else cache.getOrPut(curr to mask) {
val skip = dfs(curr + 1, mask)
val take = dfs(curr + 1, mask or peoplesMask[curr]) + curr
if (skip.size < take.size) skip else take
}
return dfs(0, 0).toIntArray()
}
15.07.2023
1751. Maximum Number of Events That Can Be Attended II hard
blog post
substack
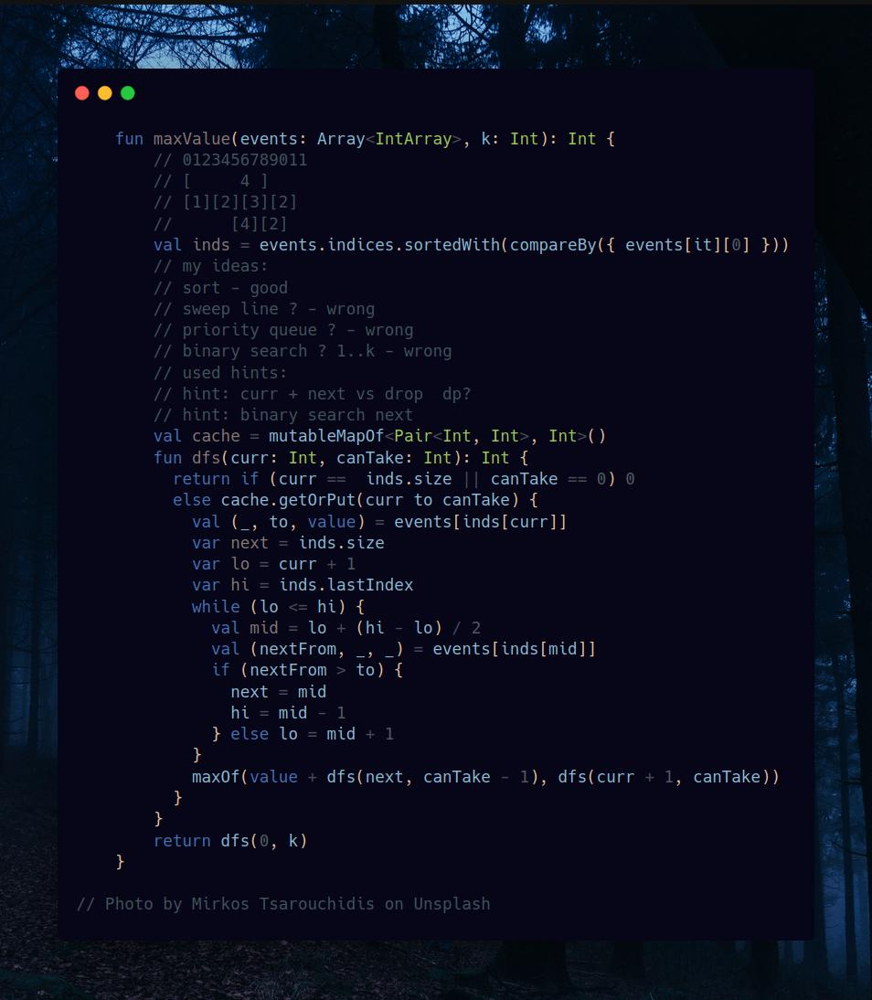
Join me on Telegram
https://t.me/leetcode_daily_unstoppable/276
Problem TLDR
Max sum of at most k values from non-intersecting array of (from, to, value) items
Intuition
Let’s observe example:
// 0123456789011
// [ 4 ]
// [1][2][3][2]
// [4][2]
If k=1 we choose [4]
if k=2 we choose [4][2]
if k=3 we choose [2][3][2]
What will not work:
- sweep line algorithm, as it is greedy, but there is an only
kitems we must choose and we must do backtracking - adding to Priority Queue and popping the lowest values: same problem, we must backtrack
What will work:
- asking for a hint: this is what I used
- full search: at every
indexwe canpickorskipthe element - sorting: it will help to reduce irrelevant combinations by doing a Binary Search for the next non-intersecting element
We can observe, that at any given position the result only depends on the suffix array. That means we can safely cache the result by the current position.
Approach
For more robust Binary Search code:
- use inclusive
lo,hi - check the last condition
lo == hi - always write the result
next = mid - always move the borders
lo = mid + 1,hi = mid - 1
Complexity
-
Time complexity: \(O(nklog(n))\)
-
Space complexity: \(O(nk)\)
Code
fun maxValue(events: Array<IntArray>, k: Int): Int {
// 0123456789011
// [ 4 ]
// [1][2][3][2]
// [4][2]
val inds = events.indices.sortedWith(compareBy({ events[it][0] }))
// my ideas:
// sort - good
// sweep line ? - wrong
// priority queue ? - wrong
// binary search ? 1..k - wrong
// used hints:
// hint: curr + next vs drop dp?
// hint: binary search next
val cache = mutableMapOf<Pair<Int, Int>, Int>()
fun dfs(curr: Int, canTake: Int): Int {
return if (curr == inds.size || canTake == 0) 0
else cache.getOrPut(curr to canTake) {
val (_, to, value) = events[inds[curr]]
var next = inds.size
var lo = curr + 1
var hi = inds.lastIndex
while (lo <= hi) {
val mid = lo + (hi - lo) / 2
val (nextFrom, _, _) = events[inds[mid]]
if (nextFrom > to) {
next = mid
hi = mid - 1
} else lo = mid + 1
}
maxOf(value + dfs(next, canTake - 1), dfs(curr + 1, canTake))
}
}
return dfs(0, k)
}
14.07.2023
1218. Longest Arithmetic Subsequence of Given Difference medium
blog post
substack
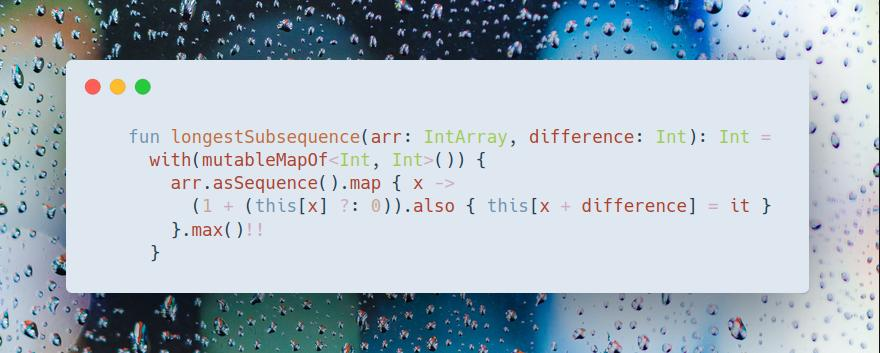
Join me on Telegram
https://t.me/leetcode_daily_unstoppable/275
Problem TLDR
Longest arithmetic difference subsequence
Intuition
Store the next value and the length for it.
Approach
We can use a HashMap
Complexity
-
Time complexity: \(O(n)\)
-
Space complexity: \(O(n)\)
Code
fun longestSubsequence(arr: IntArray, difference: Int): Int =
with(mutableMapOf<Int, Int>()) {
arr.asSequence().map { x ->
(1 + (this[x] ?: 0)).also { this[x + difference] = it }
}.max()!!
}
13.07.2023
207. Course Schedule medium
blog post
substack
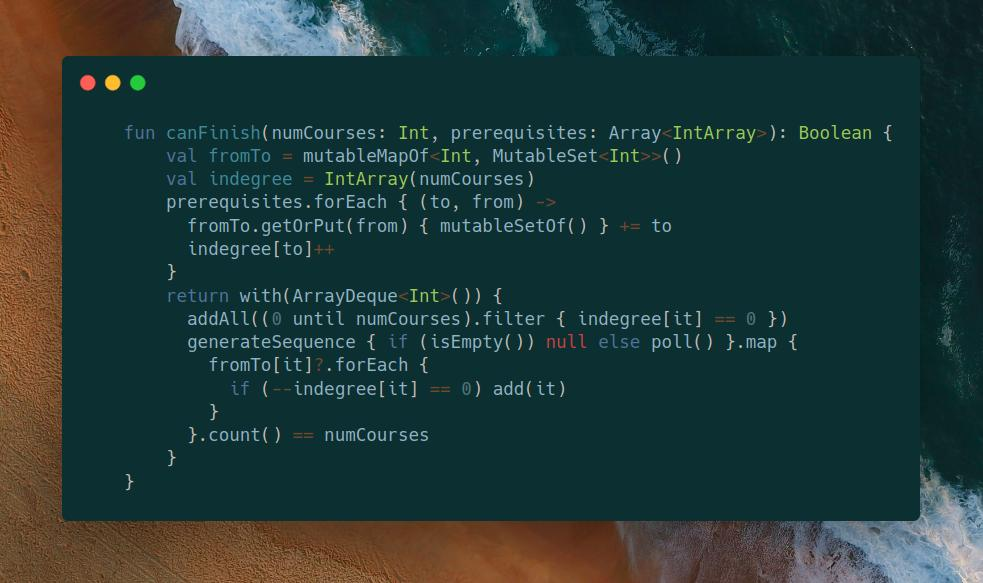
Join me on Telegram
https://t.me/leetcode_daily_unstoppable/274
Problem TLDR
If none edges in a cycle
Intuition
To detect cycle, we can use DFS and two sets cycle and safe. Or use Topological Sort and check that all elements are visited.
Approach
Let’s use Topological Sort with Breadth-First Search.
- build
indegree- number of input nodes for each node - add to BFS only nodes with
indegree[node] == 0 - decrease
indegreeas it visited
Complexity
-
Time complexity: \(O(VE)\)
-
Space complexity: \(O(E + V)\)
Code
fun canFinish(numCourses: Int, prerequisites: Array<IntArray>): Boolean {
val fromTo = mutableMapOf<Int, MutableSet<Int>>()
val indegree = IntArray(numCourses)
prerequisites.forEach { (to, from) ->
fromTo.getOrPut(from) { mutableSetOf() } += to
indegree[to]++
}
return with(ArrayDeque<Int>()) {
addAll((0 until numCourses).filter { indegree[it] == 0 })
generateSequence { if (isEmpty()) null else poll() }.map {
fromTo[it]?.forEach {
if (--indegree[it] == 0) add(it)
}
}.count() == numCourses
}
}
12.07.2023
802. Find Eventual Safe States medium
blog post
substack
Join me on Telegram
https://t.me/leetcode_daily_unstoppable/273
Problem TLDR
List of nodes not in cycles
Intuition
Simple Depth-First Search will give optimal \(O(n)\) solution.
When handling the visited set, we must separate those in cycle and safe.
Approach
- we can remove from
cycleset and add tosafeset in a post-order traversal
Complexity
-
Time complexity: \(O(n)\)
-
Space complexity: \(O(n)\)
Code
fun eventualSafeNodes(graph: Array<IntArray>): List<Int> {
val cycle = mutableSetOf<Int>()
val safe = mutableSetOf<Int>()
fun cycle(curr: Int): Boolean {
return if (safe.contains(curr)) false else !cycle.add(curr)
|| graph[curr].any { cycle(it) }
.also {
if (!it) {
cycle.remove(curr)
safe.add(curr)
}
}
}
return graph.indices.filter { !cycle(it) }
}
12.07.2023
863. All Nodes Distance K in Binary Tree medium
blog post
substack
Join me on Telegram
https://t.me/leetcode_daily_unstoppable/272
Problem TLDR
List of k distanced from target nodes in a Binary Tree
Intuition
There is a one-pass DFS solution, but it feels like too much of a corner cases and result handholding.
A more robust way is to traverse with DFS and connect children nodes to parent, then send a wave from target at k steps.
Approach
Let’s build an undirected graph and do BFS.
- don’t forget a visited
HashSet
Complexity
-
Time complexity: \(O(n)\)
-
Space complexity: \(O(n)\)
Code
fun distanceK(root: TreeNode?, target: TreeNode?, k: Int): List<Int> {
val fromTo = mutableMapOf<Int, MutableList<Int>>()
fun dfs(node: TreeNode?, parent: TreeNode?) {
node?.run {
parent?.let {
fromTo.getOrPut(`val`) { mutableListOf() } += it.`val`
fromTo.getOrPut(it.`val`) { mutableListOf() } += `val`
}
dfs(left, this)
dfs(right, this)
}
}
dfs(root, null)
return LinkedList<Int>().apply {
val visited = HashSet<Int>()
target?.run {
add(`val`)
visited.add(`val`)
}
repeat(k) {
repeat(size) {
fromTo.remove(poll())?.forEach { if (visited.add(it)) add(it) }
}
}
}
}
11.07.2023
111. Minimum Depth of Binary Tree easy
blog post
substack
Join me on Telegram
https://t.me/leetcode_daily_unstoppable/271
Problem TLDR
Count nodes in the shortest path from root to leaf
Intuition
- remember to count
nodes, notedges leafis a node without children- use BFS or DFS
Approach
Let’s use BFS
Complexity
-
Time complexity: \(O(n)\)
-
Space complexity: \(O(n)\)
Code
fun minDepth(root: TreeNode?): Int = with(ArrayDeque<TreeNode>()) {
root?.let { add(it) }
generateSequence(1) { (it + 1).takeIf { isNotEmpty() } }
.firstOrNull {
(1..size).any {
with(poll()) {
left?.let { add(it) }
right?.let { add(it) }
left == null && right == null
}
}
} ?: 0
}
10.07.2023
2272. Substring With Largest Variance hard
blog post
substack
Join me on Telegram
https://t.me/leetcode_daily_unstoppable/270
Problem TLDR
Max diff between count s[i] and count s[j] in all substrings of s
Intuition
The first idea is to simplify the task by considering only two chars, iterating over all alphabet combinations.
Second idea is how to solve this problem for binary string in \(O(n)\): abaabbb → abbb.
We split this problem: find the largest subarray for a with the smallest count of b, and reverse the problem – largest b with smallest a.
For this issue, there is a Kadane’s algorithm for maximizing sum: take values greedily and reset count when sum < 0.
Important customization is to always consider countB at least 1 as it must be present in a subarray.
Approach
- we can use
Setof only the chars ins - iterate in
abandbapairs - Kotlin API helps save some LOC
Complexity
-
Time complexity: \(O(n)\)
-
Space complexity: \(O(n)\), or O(1) if
asSequenceused
Code
fun largestVariance(s: String): Int = s.toSet()
.let { ss -> ss.map { a -> ss.filter { it != a }.map { a to it } }.flatten() }
.map { (a, b) ->
var countA = 0
var countB = 0
s.filter { it == a || it == b }
.map { c ->
if (c == a) countA++ else countB++
if (countA < countB) {
countA = 0
countB = 0
}
countA - maxOf(1, countB)
}.max() ?: 0
}.max() ?: 0
9.07.2023
2551. Put Marbles in Bags hard
blog post
substack
Join me on Telegram
https://t.me/leetcode_daily_unstoppable/269
Problem TLDR
abs(max - min), where max and min are the sum of k interval borders
Intuition
Let’s observe some examples:
// 1 3 2 3 5 4 5 7 6
// * * *
// 1+3 2+2 3+6 = 4+4+9 = 17
// * * *
// 1+1 3+3 2+6 = 2+6+8 = 16
// * * * = 1+5 7+7 6+6
// 1 9 1 9 1 9 1 9 1 k = 3
// * * * s = 1+9+1+9+1+1
// * * * s = 1+1+9+1+9+1
// 1 1 9 9 1 1 9 9 1 k = 3
// * * * s = 1+1+1+1+1+1
// * * * s = 1+9+9+9+9+1
// 1 1 1 9 1 9 9 9 1 k = 3
// * * * s = 1+1+1+1+1+1
// * . * * s = 1+9+9+9+9+1
// 1 4 2 5 2 k = 3
// . * . * 1+1+4+2+5+2
// . * * 1+4+2+2+5+2
// . * . * 1+1+4+5+2+2
One thing to note, we must choose k-1 border pairs i-1, i with min or max sum.
Approach
Let’s use PriorityQueue.
Complexity
-
Time complexity: \(O(nlog(k))\)
-
Space complexity: \(O(k)\)
Code
fun putMarbles(weights: IntArray, k: Int): Long {
val pqMax = PriorityQueue<Int>(compareBy( { weights[it].toLong() + weights[it - 1].toLong() } ))
val pqMin = PriorityQueue<Int>(compareByDescending( { weights[it].toLong() + weights[it - 1].toLong() } ))
for (i in 1..weights.lastIndex) {
pqMax.add(i)
if (pqMax.size > k - 1) pqMax.poll()
pqMin.add(i)
if (pqMin.size > k - 1) pqMin.poll()
}
return Math.abs(pqMax.map { weights[it].toLong() + weights[it - 1].toLong() }.sum()!! -
pqMin.map { weights[it].toLong() + weights[it - 1].toLong() }.sum()!!)
}
7.07.2023
2024. Maximize the Confusion of an Exam medium
blog post
substack
Join me on Telegram
https://t.me/leetcode_daily_unstoppable/268
Problem TLDR
Max same letter subarray replacing k letters
Intuition
An important example is ftftftft k=3: we must fill all the intervals. It also tells, after each filling up we must decrease k. Let’s count T and F.
Sliding window is valid when tt <= k || ff <= k.
Approach
We can save some lines using Kotlin collections API
Complexity
-
Time complexity: \(O(n)\)
-
Space complexity: \(O(n)\), or \(O(1)\) using
asSequence
Code
fun maxConsecutiveAnswers(answerKey: String, k: Int): Int {
var tt = 0
var ff = 0
var lo = 0
return answerKey.mapIndexed { i, c ->
if (c == 'T') tt++ else ff++
while (tt > k && ff > k && lo < i)
if (answerKey[lo++] == 'T') tt-- else ff--
i - lo + 1
}.max() ?: 0
}
6.07.2023
209. Minimum Size Subarray Sum medium
blog post
substack
Join me on Telegram
https://t.me/leetcode_daily_unstoppable/267
Problem TLDR
Min length subarray with sum >= target
Intuition
Use two pointers: one adding to sum and another subtracting. As all numbers are positive, then sum will always be increasing with adding a number and deceasing when subtracting.
Approach
Let’s use Kotlin Sequence API
Complexity
-
Time complexity: \(O(n)\)
-
Space complexity: \(O(1)\)
Code
fun minSubArrayLen(target: Int, nums: IntArray): Int {
var lo = 0
var sum = 0
return nums.asSequence().mapIndexed { hi, n ->
sum += n
while (sum - nums[lo] >= target) sum -= nums[lo++]
(hi - lo + 1).takeIf { sum >= target }
}
.filterNotNull()
.min() ?: 0
}
5.07.2023
1493. Longest Subarray of 1’s After Deleting One Element medium
blog post
substack
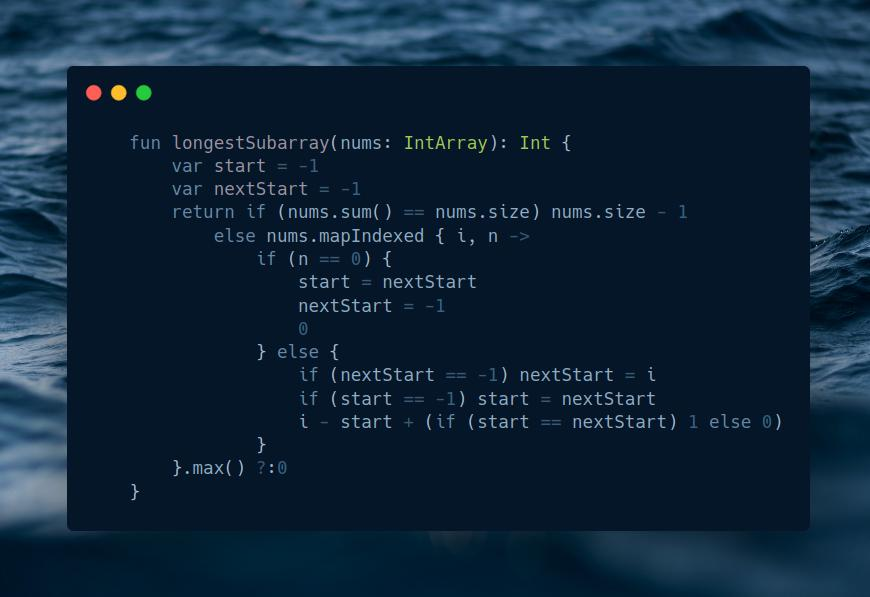
Join me on Telegram
https://t.me/leetcode_daily_unstoppable/266
Problem TLDR
Largest 1..1 subarray after removing one item
Intuition
Let’s maintain two pointers for a start and a nextStart positions, and a third pointer for the right border.
- move
startto thenextStartwhenright== 0 - move
nextStartto start of1’s
Approach
- corner case is when all array is
1’s, as we must remove1then anyway
Complexity
-
Time complexity: \(O(n)\)
-
Space complexity: \(O(n)\) add
asSequencefor it to become \(O(1)\)
Code
fun longestSubarray(nums: IntArray): Int {
var start = -1
var nextStart = -1
return if (nums.sum() == nums.size) nums.size - 1
else nums.mapIndexed { i, n ->
if (n == 0) {
start = nextStart
nextStart = -1
0
} else {
if (nextStart == -1) nextStart = i
if (start == -1) start = nextStart
i - start + (if (start == nextStart) 1 else 0)
}
}.max() ?:0
}
4.07.2023
137. Single Number II medium
blog post
substack
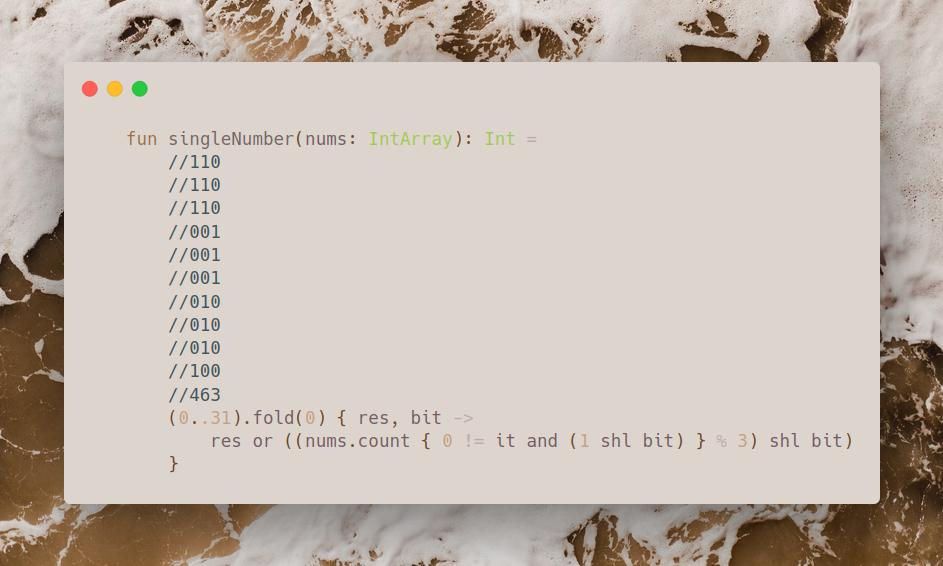
Join me on Telegram
https://t.me/leetcode_daily_unstoppable/265
Proble TLDR
Single number in an array of tripples
Intuition
One simple approach it to count bits at each position.
Result will have a 1 when count % 3 != 0.
Approach
Let’s use fold.
Complexity
-
Time complexity: \(O(n)\)
-
Space complexity: \(O(1)\)
Code
fun singleNumber(nums: IntArray): Int =
//110
//110
//110
//001
//001
//001
//010
//010
//010
//100
//463
(0..31).fold(0) { res, bit ->
res or ((nums.count { 0 != it and (1 shl bit) } % 3) shl bit)
}
3.07.2023
859. Buddy Strings easy
blog post
substack
Join me on Telegram
https://t.me/leetcode_daily_unstoppable/264
Problem TLDR
Is it just one swap s[i]<>s[j] to string s == string goal
Intuition
Compare two strings for each position. There are must be only two not equal positions and they must be mirrored pairs.
Approach
Let’s write it in Kotlin collections API style.
Complexity
-
Time complexity: \(O(n)\)
-
Space complexity: \(O(n)\)
Code
fun buddyStrings(s: String, goal: String): Boolean = s.length == goal.length && (
s == goal && s.groupBy { it }.any { it.value.size > 1 } ||
s.zip(goal)
.filter { (a, b) -> a != b }
.windowed(2)
.map { (ab, cd) -> listOf(ab, cd.second to cd.first) }
.let { it.size == 1 && it[0][0] == it[0][1] }
)
2.07.2023
1601. Maximum Number of Achievable Transfer Requests hard
blog post
substack
Join me on Telegram
https://t.me/leetcode_daily_unstoppable/263
Problem TLDR
Max edges to make all counts in == out edges in graph
Intuition
Let’s observe some examples:
All requests are valid if count of incoming edges are equal to outcoming. One possible solution is to just check each combination of edges.
Approach
Let’s use bitmask to traverse all combinations, as total number 16 can fit in Int
Complexity
-
Time complexity: \(O(n2^r)\)
-
Space complexity: \(O(n2^r)\)
Code
fun maximumRequests(n: Int, requests: Array<IntArray>): Int =
(0..((1 shl requests.size) - 1)).filter { mask ->
val fromTo = IntArray(n)
requests.indices.filter { ((1 shl it) and mask) != 0 }.forEach {
val (from, to) = requests[it]
fromTo[from] -= 1
fromTo[to] += 1
}
fromTo.all { it == 0 }
}.map { Integer.bitCount(it) }.max()!!
1.07.2023
2305. Fair Distribution of Cookies medium
blog post
substack
Join me on Telegram
https://t.me/leetcode_daily_unstoppable/262
Problem TLDR
Min of the max distributing n cookies to k children
Intuition
Search all possible ways to give current cookie to one of the children. Backtrack sums and calculate the result.
Approach
Just DFS
Complexity
-
Time complexity: \(O(k^n)\)
-
Space complexity: \(O(2^n)\)
Code
fun distributeCookies(cookies: IntArray, k: Int): Int {
fun dfs(pos: Int, children: IntArray): Int {
if (pos == cookies.size) return if (children.contains(0)) -1 else children.max()!!
var min = -1
for (i in 0 until k) {
children[i] += cookies[pos]
val res = dfs(pos + 1, children)
if (res != -1) min = if (min == -1) res else minOf(min, res)
children[i] -= cookies[pos]
}
return min
}
return dfs(0, IntArray(k))
}
30.06.2023
1970. Last Day Where You Can Still Cross hard
blog post
substack
Join me on Telegram
https://t.me/leetcode_daily_unstoppable/261
Problem TLDR
Last day matrix connected top-bottom when flooded each day at cells[day]
Intuition
One possible solution is to do a Binary Search in a days space, however it gives TLE.
Let’s invert the problem: find the first day from the end where there is a connection top-bottom.
 Now,
Now, cells[day] is a new ground. We can use Union-Find to connect ground cells.
Approach
- use sentinel cells for
topandbottom - use path compressing
uf[n] = x
Complexity
-
Time complexity: \(O(an)\), where
ais a reverse Ackerman function -
Space complexity: \(O(n)\)
Code
val uf = HashMap<Int, Int>()
fun root(x: Int): Int = if (uf[x] == null || uf[x] == x) x else root(uf[x]!!)
.also { uf[x] = it }
fun latestDayToCross(row: Int, col: Int, cells: Array<IntArray>) =
cells.size - 1 - cells.reversed().indexOfFirst { (y, x) ->
uf[y * col + x] = root(if (y == 1) 0 else if (y == row) 1 else y * col + x)
sequenceOf(y to x - 1, y to x + 1, y - 1 to x, y + 1 to x)
.filter { (y, x) -> y in 1..row && x in 1..col }
.map { (y, x) -> y * col + x }
.forEach { if (uf[it] != null) uf[root(y * col + x)] = root(it) }
root(0) == root(1)
}
29.06.2023
864. Shortest Path to Get All Keys hard
blog post
substack

Join me on Telegram
https://t.me/leetcode_daily_unstoppable/260
Problem TLDR
Min steps to collect all lowercase keys in matrix. # and uppercase locks are blockers.
Intuition
What will not work:
- dynamic programming – gives TLE
- DFS – as we can visit cells several times
For the shortest path, we can make a Breadth-First Search wave in a space of the current position and collected keys set.
Approach
- Let’s use bit mask for collected keys set
- all bits set are
(1 << countKeys) - 1
Complexity
-
Time complexity: \(O(nm2^k)\)
-
Space complexity: \(O(nm2^k)\)
Code
val dir = arrayOf(0, 1, 0, -1)
data class Step(val y: Int, val x: Int, val keys: Int)
fun shortestPathAllKeys(grid: Array<String>): Int {
val w = grid[0].length
val s = (0..grid.size * w).first { '@' == grid[it / w][it % w] }
val bit: (Char) -> Int = { 1 shl (it.toLowerCase().toInt() - 'a'.toInt()) }
val visited = HashSet<Step>()
val allKeys = (1 shl (grid.map { it.count { it.isLowerCase() } }.sum()!!)) - 1
var steps = -1
return with(ArrayDeque<Step>()) {
add(Step(s / w, s % w, 0))
while (isNotEmpty() && steps++ < grid.size * w) {
repeat(size) {
val step = poll()
val (y, x, keys) = step
if (keys == allKeys) return steps - 1
if (x in 0 until w && y in 0..grid.lastIndex && visited.add(step)) {
val cell = grid[y][x]
if (cell != '#' && !(cell.isUpperCase() && 0 == (keys and bit(cell)))) {
val newKeys = if (cell.isLowerCase()) (keys or bit(cell)) else keys
var dx = -1
dir.forEach { dy -> add(Step(y + dy, x + dx, newKeys)).also { dx = dy } }
}
}
}
}
-1
}
}
28.06.2023
1514. Path with Maximum Probability medium
blog post
substack
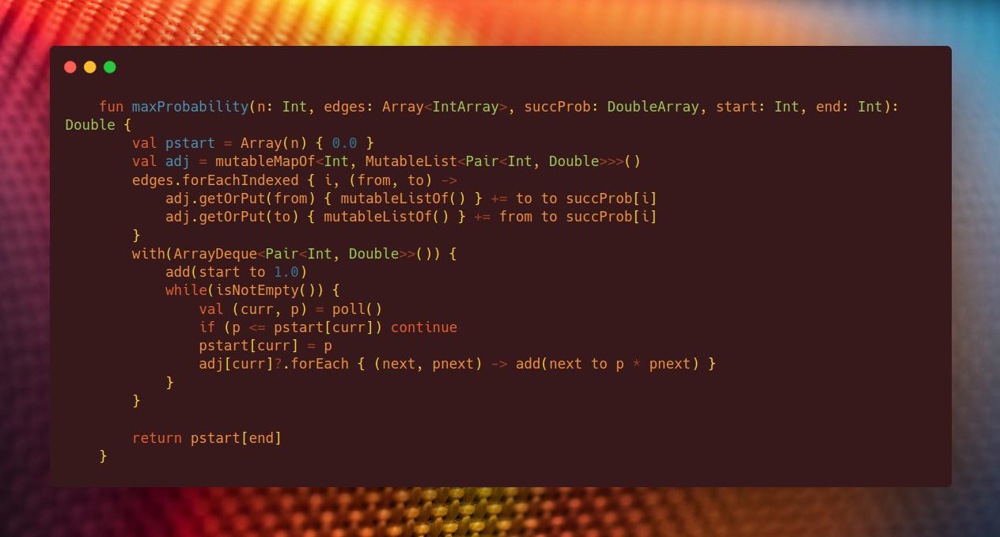
Join me on Telegram
https://t.me/leetcode_daily_unstoppable/259
Problem TLDR
Max probability path from start to end in a probability edges graph
Intuition
What didn’t work:
- naive BFS, DFS with
visitedset - will not work, as we need to visit some nodes several times - Floyd-Warshall - will solve this problem for every pair of nodes, but takes \(O(n^3)\) and gives TLE
What will work: Dijkstra
Approach
- store probabilities from
startto every node in an array - the stop condition will be when there is no any
betterpath
Complexity
-
Time complexity: \(O(EV)\)
-
Space complexity: \(O(EV)\)
Code
fun maxProbability(n: Int, edges: Array<IntArray>, succProb: DoubleArray, start: Int, end: Int): Double {
val pstart = Array(n) { 0.0 }
val adj = mutableMapOf<Int, MutableList<Pair<Int, Double>>>()
edges.forEachIndexed { i, (from, to) ->
adj.getOrPut(from) { mutableListOf() } += to to succProb[i]
adj.getOrPut(to) { mutableListOf() } += from to succProb[i]
}
with(ArrayDeque<Pair<Int, Double>>()) {
add(start to 1.0)
while(isNotEmpty()) {
val (curr, p) = poll()
if (p <= pstart[curr]) continue
pstart[curr] = p
adj[curr]?.forEach { (next, pnext) -> add(next to p * pnext) }
}
}
return pstart[end]
}
27.06.2023
373. Find K Pairs with Smallest Sums medium
blog post
substack
Join me on Telegram
https://t.me/leetcode_daily_unstoppable/258
Problem TLDR
List of increasing sum pairs a[i], b[j] from two sorted lists a, b
Intuition
Naive solution with two pointers didn’t work, as we must backtrack to the previous pointers sometimes:
1 1 2
1 2 3
1+1 1+1 2+1 2+2(?) vs 1+2
The trick is to think of the pairs i,j as graph nodes, where the adjacent list is i+1,j and i, j+1. Each next node sum is strictly greater than the previous:
 Now we can walk this graph in exactly
 k steps with Dijkstra algorithm using PriorityQueue to find the next smallest node.
Approach
- use
visitedset - careful with Int overflow
- let’s use Kotlin’s
generateSequence
Complexity
-
Time complexity: \(O(klogk)\), there are
ksteps to peek from heap of sizek -
Space complexity: \(O(k)\)
Code
fun kSmallestPairs(nums1: IntArray, nums2: IntArray, k: Int): List<List<Int>> =
with(PriorityQueue<List<Int>>(compareBy({ nums1[it[0]].toLong() + nums2[it[1]].toLong() }))) {
add(listOf(0, 0))
val visited = HashSet<Pair<Int, Int>>()
visited.add(0 to 0)
generateSequence {
val (i, j) = poll()
if (i < nums1.lastIndex && visited.add(i + 1 to j)) add(listOf(i + 1, j))
if (j < nums2.lastIndex && visited.add(i to j + 1)) add(listOf(i, j + 1))
listOf(nums1[i], nums2[j])
}
.take(minOf(k.toLong(), nums1.size.toLong() * nums2.size.toLong()).toInt())
.toList()
}
26.06.2023
2462. Total Cost to Hire K Workers medium
blog post
substack
Join me on Telegram
https://t.me/leetcode_daily_unstoppable/257
Problem TLDR
The sum of the smallest cost from suffix and prefix of a costs size of candidates in k iterations
Intuition
Description of the problem is rather ambiguous: we actually need to consider candidates count of items from the head and from the tail of the costs array. Then we can use PriorityQueue to choose the minimum and adjust two pointers lo and hi.
Approach
- use separate condition, when
2 * candidates >= costs.size - careful with indexes, check yourself by doing dry run
- we can use separate variable
takenLandtakenRor just use queue’s sizes to minify the code
Complexity
-
Time complexity: \(O(nlog(n))\)
-
Space complexity: \(O(n)\)
Code
fun totalCost(costs: IntArray, k: Int, candidates: Int): Long {
val pqL = PriorityQueue<Int>()
val pqR = PriorityQueue<Int>()
var lo = 0
var hi = costs.lastIndex
var sum = 0L
var count = 0
if (2 * candidates >= costs.size) while (lo <= hi) pqL.add(costs[lo++])
while (pqL.size < candidates && lo <= hi) pqL.add(costs[lo++])
while (pqR.size < candidates && lo < hi) pqR.add(costs[hi--])
while (lo <= hi && count++ < k) {
if (pqR.peek() < pqL.peek()) {
sum += pqR.poll()
pqR.add(costs[hi--])
} else {
sum += pqL.poll()
pqL.add(costs[lo++])
}
}
while (pqR.isNotEmpty()) pqL.add(pqR.poll())
while (count++ < k && pqL.isNotEmpty()) sum += pqL.poll()
return sum
}
25.06.2023
1575. Count All Possible Routes hard
blog post
substack

Join me on Telegram
https://t.me/leetcode_daily_unstoppable/256
Problem TLDR
Count paths from start to finish using |locations[i]-locations[j] of the fuel
Intuition
Let’s observe the example:
// 0 1 2 3 4
// 2 3 6 8 4
// * *
//
// 2 3 4 6 8
// * *
//
// 3-2(4)-3(3)-6(0)
// 3-6(2)-8(0)
// 3-8(5)
// 3-8(5)-6(3)-8(1)
// 3-4(4)-6(2)-8(0)
At each position curr given the amount of fuel f there is a certain number of ways to finish. It is independent of all the other factors, so can be safely cached.
Approach
- as there are also paths from
finishtofinish, modify the code to search other paths whenfinishis reached
Complexity
-
Time complexity: \(O(nf)\),
f- is a max fuel -
Space complexity: \(O(nf)\)
Code
fun countRoutes(locations: IntArray, start: Int, finish: Int, fuel: Int): Int {
// 0 1 2 3 4
// 2 3 6 8 4
// * *
//
// 2 3 4 6 8
// * *
//
// 3-2(4)-3(3)-6(0)
// 3-6(2)-8(0)
// 3-8(5)
// 3-8(5)-6(3)-8(1)
// 3-4(4)-6(2)-8(0)
val cache = mutableMapOf<Pair<Int, Int>, Int>()
fun dfs(curr: Int, f: Int): Int {
if (f < 0) return 0
return cache.getOrPut(curr to f) {
var sum = if (curr == finish) 1 else 0
locations.forEachIndexed { i, n ->
if (i != curr) {
sum = (sum + dfs(i, f - Math.abs(n - locations[curr]))) % 1_000_000_007
}
}
return@getOrPut sum
}
}
return dfs(start, fuel)
}
24.06.2023
956. Tallest Billboard hard
blog post
substack
Join me on Telegram
https://t.me/leetcode_daily_unstoppable/255
Problem TLDR
Max sum of disjoint set in array
Intuition
Naive Dynamic Programming solution is to do a full search, adding to the first and to the second sums. That will give Out of Memory for this problem constraints.
dp[i][firstSum][secondSum] -> Out of Memory
The trick to make it work and consume less memory, is to cache only the difference firstSum - secondSum. It will slightly modify the code, but the principle is the same: try to add to the first, then to the second, otherwise skip.
Approach
- we can compute the first sum, as when
diff == 0thensum1 == sum2
Complexity
-
Time complexity: \(O(nm)\),
mis a max difference -
Space complexity: \(O(nm)\)
Code
fun tallestBillboard(rods: IntArray): Int {
val cache = Array(rods.size + 1) { Array(10000) { -1 } }
fun dfs(curr: Int, sumDiff: Int): Int {
if (curr == rods.size) return if (sumDiff == 0) 0 else Int.MIN_VALUE / 2
return cache[curr][sumDiff + 5000].takeIf { it != -1 } ?: {
val take1 = rods[curr] + dfs(curr + 1, sumDiff + rods[curr])
val take2 = dfs(curr + 1, sumDiff - rods[curr])
val notTake = dfs(curr + 1, sumDiff)
maxOf(take1, take2, notTake)
}().also { cache[curr][sumDiff + 5000] = it }
}
return dfs(0, 0)
}
23.06.2023
1027. Longest Arithmetic Subsequence medium
blog post
substack
Join me on Telegram
https://t.me/leetcode_daily_unstoppable/254
Problem TLDR
Max arithmetic subsequence length in array
Intuition
This was a hard problem for me :) Naive Dynamic Programming solution with recursion and cache will give TLE. Let’s observe the result, adding numbers one-by-one:
// 20 1 15 3 10 5 8
// 20
// 20 1
// 1
// 20 20 1 15
// 1 15 15
//
// 20 20 20 1 1 15 3
// 1 15 3 15 3 3
//
// 20 20 20 20 1 1 1 15 15 10
// 1 15 3 10 15 3 10 3 10
// 10
//
// 20 20 20 20 20 1 1 1 1 15 15 15 10 5
// 1 15 3 10 5 15 3 10 5 3 10 5 5
// 10 5
// 5
//
// 20 20 20 20 20 20 1 1 1 1 1 15 15 15 15 10 10 5 8
// 1 15 3 10 5 8 15 3 10 5 8 3 10 5 8 5 8 8
// 10 5
For each pair from-to there is a sequence. When adding another number, we know what next numbers are expected.
Approach
We can put those sequences in a HashMap by next number key.
Complexity
- Time complexity: \(O(n^2)\)
- Space complexity: \(O(n^2)\)
Code
data class R(var next: Int, val d: Int, var size: Int)
fun longestArithSeqLength(nums: IntArray): Int {
// 20 1 15 3 10 5 8
// 20
// 20 1
// 1
// 20 20 1 15
// 1 15 15
//
// 20 20 20 1 1 15 3
// 1 15 3 15 3 3
//
// 20 20 20 20 1 1 1 15 15 10
// 1 15 3 10 15 3 10 3 10
// 10
//
// 20 20 20 20 20 1 1 1 1 15 15 15 10 5
// 1 15 3 10 5 15 3 10 5 3 10 5 5
// 10 5
// 5
//
// 20 20 20 20 20 20 1 1 1 1 1 15 15 15 15 10 10 5 8
// 1 15 3 10 5 8 15 3 10 5 8 3 10 5 8 5 8 8
// 10 5
val nextToR = mutableMapOf<Int, MutableList<R>>()
var max = 2
nums.forEachIndexed { to, num ->
nextToR.remove(num)?.forEach { r ->
r.next = num + r.d
max = maxOf(max, ++r.size)
nextToR.getOrPut(r.next) { mutableListOf() } += r
}
for (from in 0..to - 1) {
val d = num - nums[from]
val next = num + d
nextToR.getOrPut(next) { mutableListOf() } += R(next, d, 2)
}
}
return max
}
22.06.2023
714. Best Time to Buy and Sell Stock with Transaction Fee medium
blog post
substack

Join me on Telegram
https://t.me/leetcode_daily_unstoppable/253
Problem TLDR
Max profit from buying stocks and selling them with fee for prices[day]
Intuition
Naive recursive or iterative Dynamic Programming solution will take \(O(n^2)\) time if we iterate over all days for buying and for selling.
The trick here is to consider the money balances you have each day. We can track two separate money balances: for when we’re buying the stock balanceBuy and for when we’re selling balanceSell. Then, it is simple to greedily track balances:
- if we choose to buy, we subtract
prices[day]frombalanceBuy - if we choose to sell, we add
prices[day] - feetobalanceSell - just greedily compare previous balances with choices and choose maximum balance.
Approach
- balances are always following each other:
buy-sell-buy-sell.., or we can rewrite this likecurrentBalance = maxOf(balanceSell, balanceBuy)and use it for addition and subtraction. - we can keep only the previous balances, saving space to \(O(1)\)
Complexity
- Time complexity: \(O(n)\)
- Space complexity: \(O(n)\)
Code
fun maxProfit(prices: IntArray, fee: Int) = prices
.fold(-prices[0] to 0) { (balanceBuy, balance), price ->
maxOf(balanceBuy, balance - price) to maxOf(balance, balanceBuy + price - fee)
}.second
21.06.2023
2448. Minimum Cost to Make Array Equal hard
blog post
substack
Join me on Telegram
https://t.me/leetcode_daily_unstoppable/252
Problem TLDR
Min cost to make all arr[i] equal, where each change is cost[i]
Intuition
First idea is that at least one element can be unchanged. Assume, that we want to keep the most costly element unchanged, but this will break on example:
1 2 2 2 2 1 1 1
f(1) = 0 + 1 + 1 + 1 = 3
f(2) = 2 + 0 + 0 + 0 = 2 <-- more optimal
Let’s observe the resulting cost for each number:
// 1 2 3 2 1 2 1 1 1 1
//0: 2 2 3 2 1 = 10
//1: 0 1 2 1 0 = 4
//2: 2 0 1 0 1 = 4
//3: 4 1 0 1 2 = 8
//4: 6 2 1 2 3 = 14
We can see that f(x) have a minimum and is continuous. We can find it with Binary Search, comparing the slope = f(mid + 1) - f(mid - 1). If slope > 0, minimum is on the left.
Approach
For more robust Binary Search:
- use inclusive
lo,hi - always compute the result
min - always move the borders
lo = mid + 1orhi = mid - 1 - check the last case
lo == hi
Complexity
- Time complexity: \(O(nlog(n))\)
- Space complexity: \(O(1)\)
Code
fun minCost(nums: IntArray, cost: IntArray): Long {
// 1 2 3 2 1 2 1 1 1 1
//0: 2 2 3 2 1 = 10
//1: 0 1 2 1 0 = 4
//2: 2 0 1 0 1 = 4
//3: 4 1 0 1 2 = 8
//4: 6 2 1 2 3 = 14
fun costTo(x: Long): Long {
return nums.indices.map { Math.abs(nums[it].toLong() - x) * cost[it].toLong() }.sum()
}
var lo = nums.min()?.toLong() ?: 0L
var hi = nums.max()?.toLong() ?: 0L
var min = costTo(lo)
while (lo <= hi) {
val mid = lo + (hi - lo) / 2
val costMid1 = costTo(mid - 1)
val costMid2 = costTo(mid + 1)
min = minOf(min, costMid1, costMid2)
if (costMid1 < costMid2) hi = mid - 1 else lo = mid + 1
}
return min
}
20.06.2023
2090. K Radius Subarray Averages medium
blog post
substack
Join me on Telegram
https://t.me/leetcode_daily_unstoppable/251
Problem TLDR
Array containing sliding window of size 2k+1 average or -1
Intuition
Just do what is asked
Approach
- careful with
IntoverflowComplexity
- Time complexity: \(O(n)\)
- Space complexity: \(O(n)\)
Code
fun getAverages(nums: IntArray, k: Int): IntArray {
if (k == 0) return nums
var sum = 0L
val res = IntArray(nums.size) { -1 }
for (i in 0 until nums.size) {
sum += nums[i]
if (i > 2 * k) sum -= nums[i - 2 * k - 1]
if (i >= 2 * k) res[i - k] = (sum / (2 * k + 1)).toInt()
}
return res
}
19.06.2023
1732. Find the Highest Altitude easy
blog post
substack

Join me on Telegram
https://t.me/leetcode_daily_unstoppable/250
Problem TLDR
Max running sum
Intuition
Just sum all the values and compute the max
Approach
Let’s write Kotlin fold one-liner
Complexity
- Time complexity: \(O(n)\)
- Space complexity: \(O(1)\)
Code
fun largestAltitude(gain: IntArray): Int = gain
.fold(0 to 0) { (max, sum), t -> maxOf(max, sum + t) to (sum + t) }
.first
18.06.2023
2328. Number of Increasing Paths in a Grid hard
blog post
substack
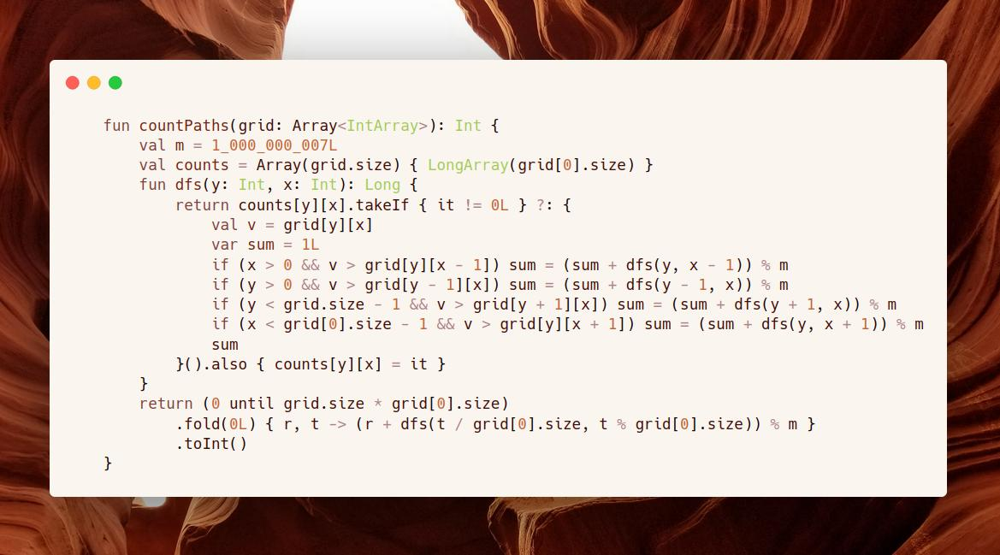
Join me on Telegram
https://t.me/leetcode_daily_unstoppable/249
Problem TLDR
Count increasing paths in a matrix
Intuition
For every cell in a matrix, we can calculate how many increasing paths are starting from it. This result can be memorized. If we know the sibling’s result, then we add it to the current if curr > sibl.
Approach
- use Depth-First search for the paths finding
- use
LongArrayfor the memoComplexity
- Time complexity: \(O(n)\)
- Space complexity: \(O(n)\)
Code
fun countPaths(grid: Array<IntArray>): Int {
val m = 1_000_000_007L
val counts = Array(grid.size) { LongArray(grid[0].size) }
fun dfs(y: Int, x: Int): Long {
return counts[y][x].takeIf { it != 0L } ?: {
val v = grid[y][x]
var sum = 1L
if (x > 0 && v > grid[y][x - 1]) sum = (sum + dfs(y, x - 1)) % m
if (y > 0 && v > grid[y - 1][x]) sum = (sum + dfs(y - 1, x)) % m
if (y < grid.size - 1 && v > grid[y + 1][x]) sum = (sum + dfs(y + 1, x)) % m
if (x < grid[0].size - 1 && v > grid[y][x + 1]) sum = (sum + dfs(y, x + 1)) % m
sum
}().also { counts[y][x] = it }
}
return (0 until grid.size * grid[0].size)
.fold(0L) { r, t -> (r + dfs(t / grid[0].size, t % grid[0].size)) % m }
.toInt()
}
17.06.2023
1187. Make Array Strictly Increasing hard blog post substack
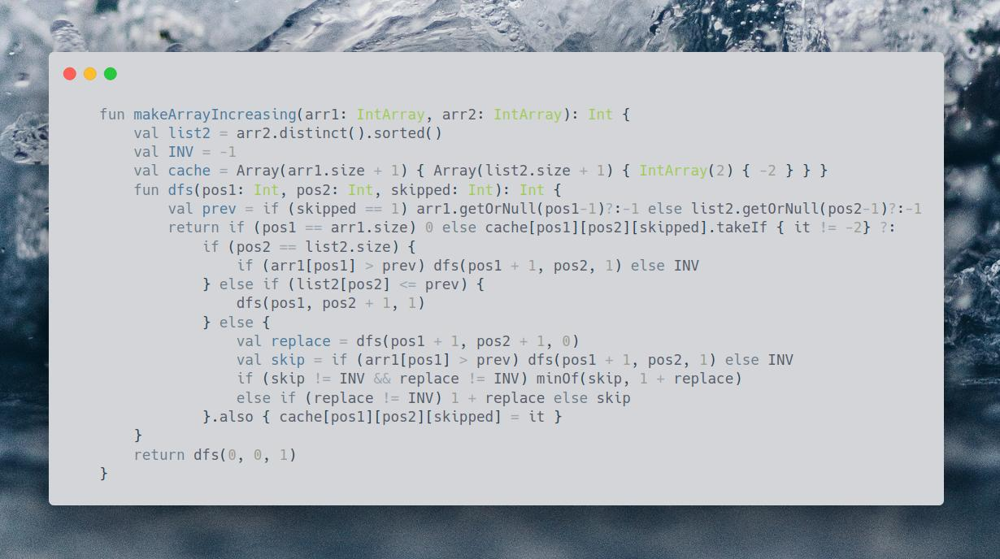
Join me on Telegram
https://t.me/leetcode_daily_unstoppable/248
Problem TLDR
Minimum replacements to make arr1 increasing using any numbers arr2
Intuition
For any current position in arr1 we can leave this number or replace it with any number from arr2[i] > curr. We can write Depth-First Search to check all possible replacements. To memorize, we must also consider the previous value. It can be used as-is, but more optimally, we just store a skipped boolean flag and restore the prev value: if it was skipped, then previous is from arr1 else from arr2.
Approach
- sort and distinct the
arr2 - use
Arrayfor cache, as it will be faster than aHashMap - use explicit variable for the invalid result
- for the stop condition, if all the
arr1passed, then result it goodComplexity
- Time complexity: \(O(n^2)\)
- Space complexity: \(O(n^2)\)
Code
fun makeArrayIncreasing(arr1: IntArray, arr2: IntArray): Int {
val list2 = arr2.distinct().sorted()
val INV = -1
val cache = Array(arr1.size + 1) { Array(list2.size + 1) { IntArray(2) { -2 } } }
fun dfs(pos1: Int, pos2: Int, skipped: Int): Int {
val prev = if (skipped == 1) arr1.getOrNull(pos1-1)?:-1 else list2.getOrNull(pos2-1)?:-1
return if (pos1 == arr1.size) 0 else cache[pos1][pos2][skipped].takeIf { it != -2} ?:
if (pos2 == list2.size) {
if (arr1[pos1] > prev) dfs(pos1 + 1, pos2, 1) else INV
} else if (list2[pos2] <= prev) {
dfs(pos1, pos2 + 1, 1)
} else {
val replace = dfs(pos1 + 1, pos2 + 1, 0)
val skip = if (arr1[pos1] > prev) dfs(pos1 + 1, pos2, 1) else INV
if (skip != INV && replace != INV) minOf(skip, 1 + replace)
else if (replace != INV) 1 + replace else skip
}.also { cache[pos1][pos2][skipped] = it }
}
return dfs(0, 0, 1)
}
16.06.2023
1569. Number of Ways to Reorder Array to Get Same BST hard
blog post
substack
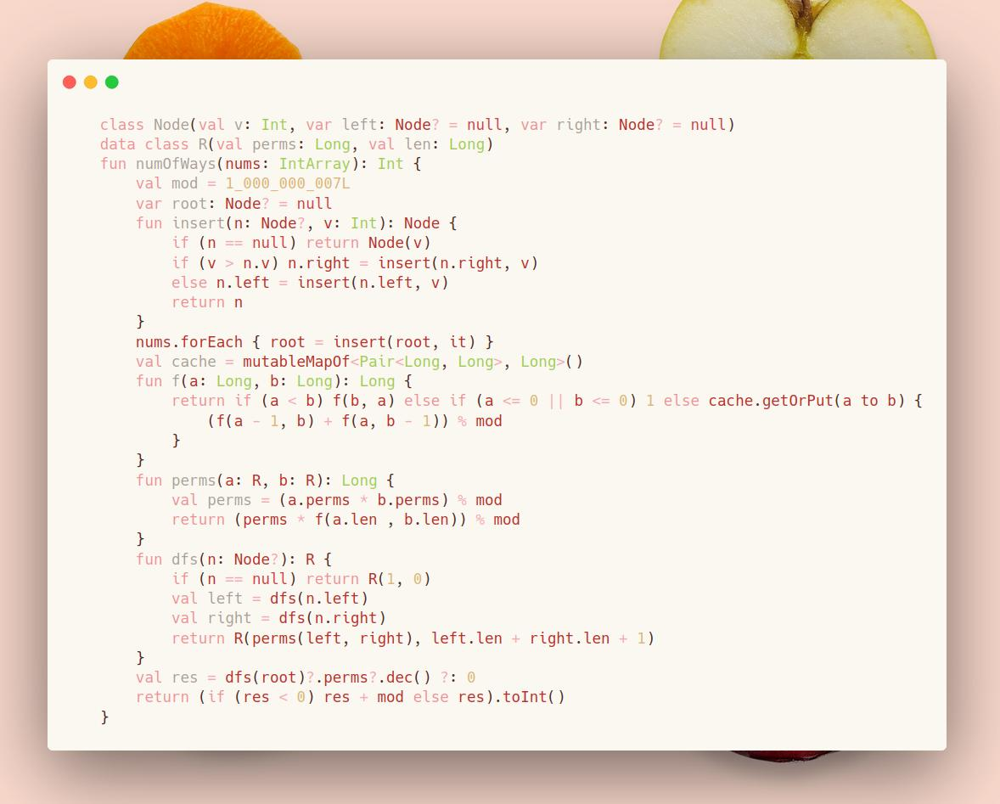
Join me on Telegram Leetcode_daily
https://t.me/leetcode_daily_unstoppable/247
Problem TLDR
Count permutations of an array with identical Binary Search Tree
Intuition
First step is to build a Binary Search Tree by adding the elements one by one.
Let’s observe what enables the permutations in [34512]:
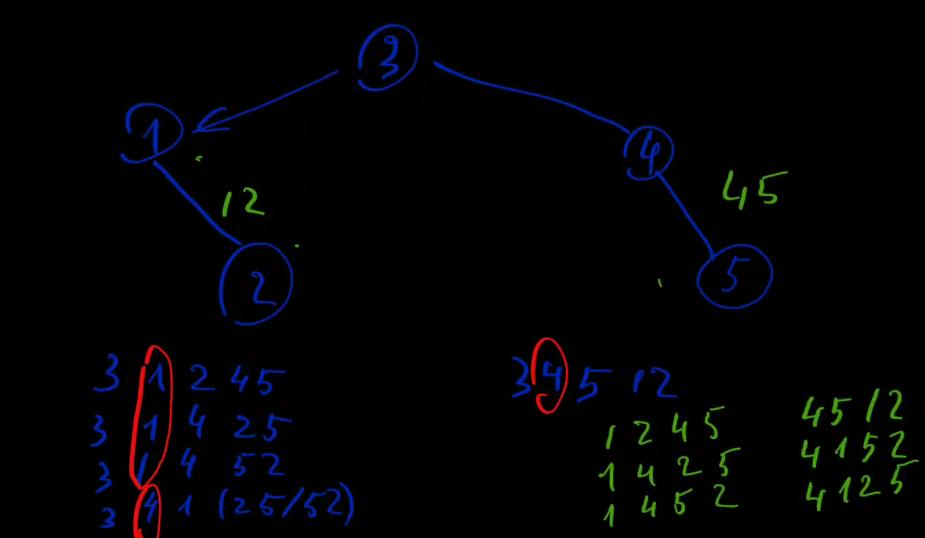 Left child
 [12] don’t have permutations, as 1 must be followed by 2. Same for the right [45]. However, when we’re merging left and right, they can be merged in different positions.
Let’s observe the pattern for merging ab x cde, ab x cd, ab x c, a x b:
 And another,
 abc x def:
 For each
 length of a left len1 and right len2 subtree, we can derive the equation for permutations p:
\(p(len1, len2) = p(len1 - 1, len2) + p(len1, len2 - 1)\)
Also, when left or right subtree have several permutations, like abc, acb, cab, and right def, dfe, the result will be multiplied 3 x 2.
Approach
Build the tree, then compute the p = left.p * right.p * p(left.len, right.len) in a DFS.
Complexity
- Time complexity:
\(O(n^2)\), n for tree walk, and n^2 for
f - Space complexity: \(O(n^2)\)
Code
class Node(val v: Int, var left: Node? = null, var right: Node? = null)
data class R(val perms: Long, val len: Long)
fun numOfWays(nums: IntArray): Int {
val mod = 1_000_000_007L
var root: Node? = null
fun insert(n: Node?, v: Int): Node {
if (n == null) return Node(v)
if (v > n.v) n.right = insert(n.right, v)
else n.left = insert(n.left, v)
return n
}
nums.forEach { root = insert(root, it) }
val cache = mutableMapOf<Pair<Long, Long>, Long>()
fun f(a: Long, b: Long): Long {
return if (a < b) f(b, a) else if (a <= 0 || b <= 0) 1 else cache.getOrPut(a to b) {
(f(a - 1, b) + f(a, b - 1)) % mod
}
}
fun perms(a: R, b: R): Long {
val perms = (a.perms * b.perms) % mod
return (perms * f(a.len , b.len)) % mod
}
fun dfs(n: Node?): R {
if (n == null) return R(1, 0)
val left = dfs(n.left)
val right = dfs(n.right)
return R(perms(left, right), left.len + right.len + 1)
}
val res = dfs(root)?.perms?.dec() ?: 0
return (if (res < 0) res + mod else res).toInt()
}
15.06.2023
1161. Maximum Level Sum of a Binary Tree medium
blog post
substack
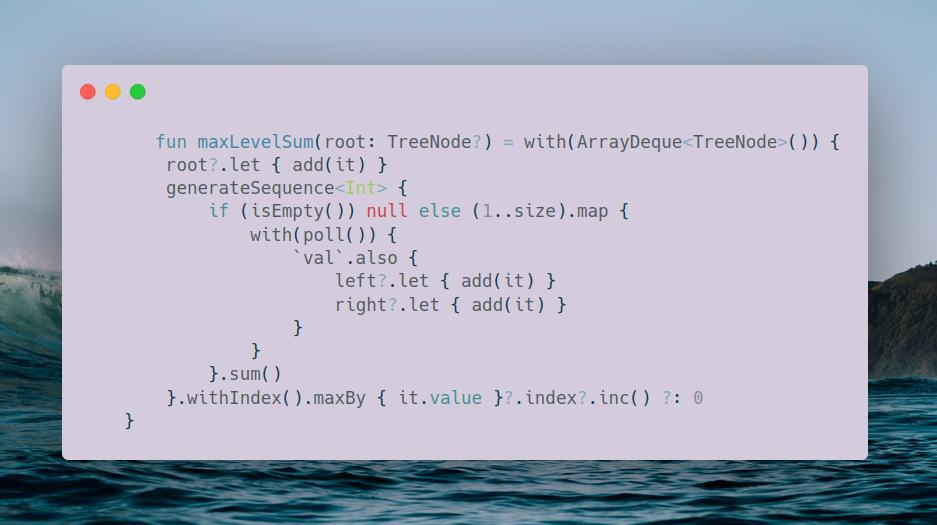
Join me on Telegram Leetcode_daily
https://t.me/leetcode_daily_unstoppable/246
Problem TLDR
Binary Tree level with max sum
Intuition
We can use Breadth-First Search to find a sum of each level.
Approach
Let’s try to write it in a Kotlin style
Complexity
- Time complexity: \(O(n)\)
- Space complexity: \(O(n)\)
Code
fun maxLevelSum(root: TreeNode?) = with(ArrayDeque<TreeNode>()) {
root?.let { add(it) }
generateSequence<Int> {
if (isEmpty()) null else (1..size).map {
with(poll()) {
`val`.also {
left?.let { add(it) }
right?.let { add(it) }
}
}
}.sum()
}.withIndex().maxBy { it.value }?.index?.inc() ?: 0
}
14.06.2023
530. Minimum Absolute Difference in BST easy
blog post
substack
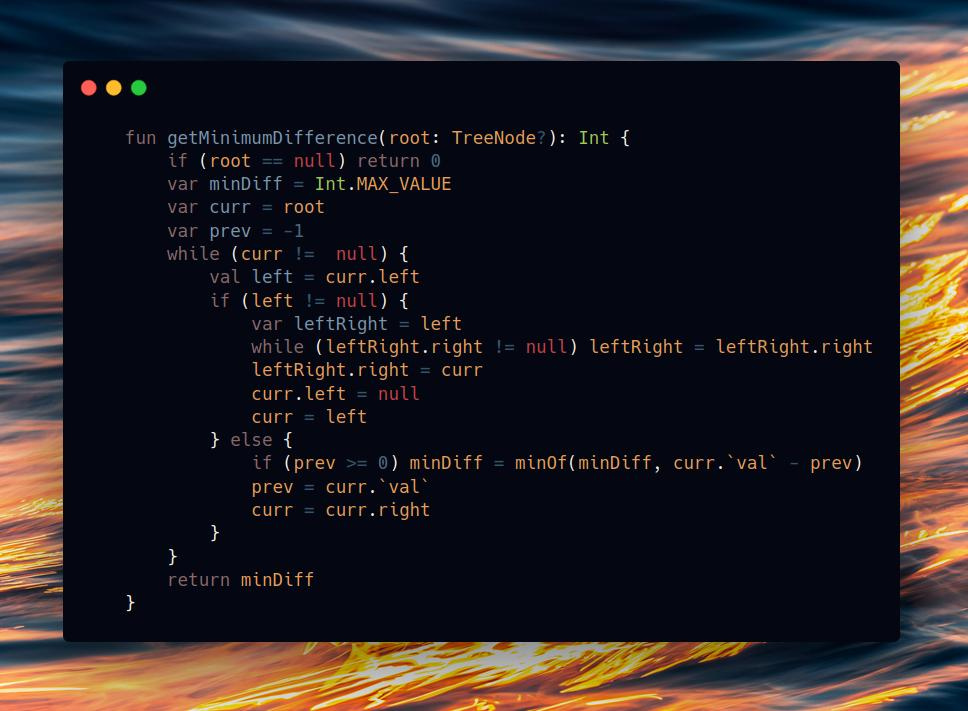
Join me on Telegram
https://t.me/leetcode_daily_unstoppable/245
Problem TLDR
Min difference in a BST
Intuition
In-order traversal in a BST gives a sorted order, we can compare curr - prev.
Approach
Let’s write a Morris traversal: make the current node a rightmost child of its left child.
Complexity
- Time complexity: \(O(n)\)
- Space complexity: \(O(1)\)
Code
fun getMinimumDifference(root: TreeNode?): Int {
if (root == null) return 0
var minDiff = Int.MAX_VALUE
var curr = root
var prev = -1
while (curr != null) {
val left = curr.left
if (left != null) {
var leftRight = left
while (leftRight.right != null) leftRight = leftRight.right
leftRight.right = curr
curr.left = null
curr = left
} else {
if (prev >= 0) minDiff = minOf(minDiff, curr.`val` - prev)
prev = curr.`val`
curr = curr.right
}
}
return minDiff
}
13.06.2023
2352. Equal Row and Column Pairs medium
blog post
substack
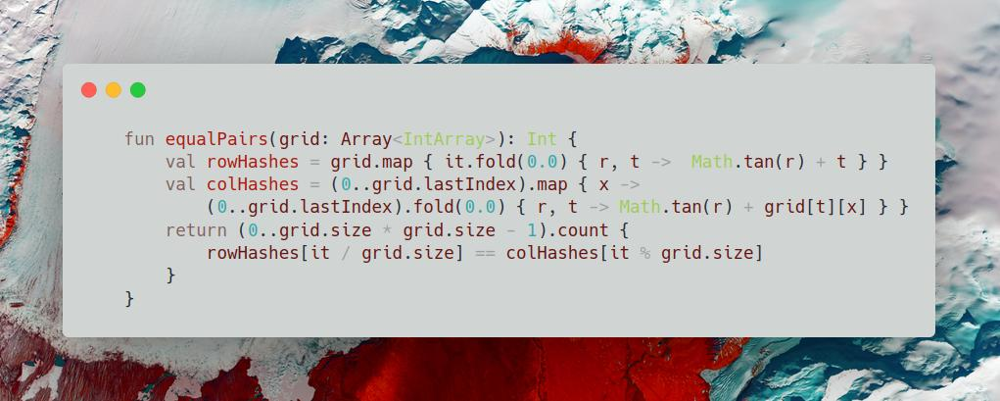
Join me on Telegram
https://t.me/leetcode_daily_unstoppable/244
Problem TLDR
Count of rowArray == colArray in an n x n matrix.
Intuition
Compute hash function for each row and each col, then compare them. If hash(row) == hash(col), then compare arrays.
For hashing, we can use simple 31 * prev + curr, that encodes both value and position.
Approach
- For this Leetcode data,
tanhash works perfectly, we can skip comparing the arrays.
Complexity
- Time complexity: \(O(n^2)\)
- Space complexity: \(O(n)\)
Code
fun equalPairs(grid: Array<IntArray>): Int {
val rowHashes = grid.map { it.fold(0.0) { r, t -> Math.tan(r) + t } }
val colHashes = (0..grid.lastIndex).map { x ->
(0..grid.lastIndex).fold(0.0) { r, t -> Math.tan(r) + grid[t][x] } }
return (0..grid.size * grid.size - 1).count {
rowHashes[it / grid.size] == colHashes[it % grid.size]
}
}
12.06.2023
 228. Summary Ranges easy
blog post
substack
228. Summary Ranges easy
blog post
substack
Join me on Telegram
https://t.me/leetcode_daily_unstoppable/243
Problem TLDR
Fold continues ranges in a sorted array 1 2 3 5 -> 1->3, 5
Intuition
Scan from start to end, modify the last interval or add a new one.
Approach
Let’s write a Kotlin one-liner
Complexity
- Time complexity: \(O(n)\)
- Space complexity: \(O(n)\)
Code
fun summaryRanges(nums: IntArray): List<String> = nums
.fold(mutableListOf<IntArray>()) { r, t ->
if (r.isEmpty() || r.last()[1] + 1 < t) r += intArrayOf(t, t)
else r.last()[1] = t
r
}
.map { (f, t) -> if (f == t) "$f" else "$f->$t"}
11.06.2023
1146. Snapshot Array medium
blog post
substack
Join me on Telegram
https://t.me/leetcode_daily_unstoppable/242
Problem TLDR
Implement an array where all elements can be saved into a `snapshot’s.
Intuition
Consider example:
// 0 1 2 3 4 5 6 <-- snapshot id
// 1 . . 2 . . 3 <-- value
When get()(2) called, 1 must be returned. So, we need to keep all the previous values. We can put them into a list combining with the current snapshot id: (1,0), (2, 3), (3, 6). Then we can do a Binary Search and find the highest_id >= id.
Approach
For more robust Binary Search:
- use inclusive
lo,hi - check last condition
lo == hi - always write the result
ind = mid
Complexity
- Time complexity:
\(O(log(n))\) for
get - Space complexity: \(O(n)\)
Code
class SnapshotArray(length: Int) {
// 0 1 2 3 4 5 6
// 1 . . 2 . . 3
val arr = Array<MutableList<Pair<Int, Int>>>(length) { mutableListOf() }
var currId = 0
fun set(index: Int, v: Int) {
val idVs = arr[index]
if (idVs.isEmpty() || idVs.last().first != currId) idVs += currId to v
else idVs[idVs.lastIndex] = currId to v
}
fun snap(): Int = currId.also { currId++ }
fun get(index: Int, id: Int): Int {
var lo = 0
var hi = arr[index].lastIndex
var ind = -1
while (lo <= hi) {
val mid = lo + (hi - lo) / 2
if (arr[index][mid].first <= id) {
ind = mid
lo = mid + 1
} else hi = mid - 1
}
return if (ind == -1) 0 else arr[index][ind].second
}
}
10.06.2023
1802. Maximum Value at a Given Index in a Bounded Array medium blog post substack
Join me on Telegram
https://t.me/leetcode_daily_unstoppable/241
Problem TLDR
Max at index in an n sized array, where sum <= maxSum, nums[i] > 0 and maxDiff(i, i+1) < 2.
Intuition
Let’s write possible numbers, for example:
// n=6, i=1, m=10
// 10/6 = 1
// 0 1 2 3 4 5
// -----------
// 0 1 0 0 0 0 sum = 1
// 1 2 1 0 0 0 sum = 1 + (1 + 1 + 1) = 4
// 2 3 2 1 0 0 sum = 4 + (1 + 2 + 1) = 8
// 3 4 3 2 1 0 sum = 8 + (1 + 3 + 1) = 13 > 10 prev + (1 + left + right)
// 4 5 4 3 2 1 sum = 13 + (1 + 4 + 1) = 19 left = minOf(left, i)
// 5 6 5 4 3 2 sum = 19 + (1 + 4 + 1) = 24 right = minOf(right, size - i - 1)
// 6 7 6 5 4 3
// ...
// 5+x sum = 19 + x * (1 + 4 +1)
// ...
// S(x-1) - S(x-1-i) + x + S(x-1) - S(x-1 - (size-i-1))
// x + 2 * S(x-1) - S(x-1-i) - S(x-size+i)
// S(y) = y * (y + 1) / 2
We should minimize the sum for it to be <= maxSum, so naturally, we place the maximum at index and do strictly lower the sibling numbers.
Looking at the example, we see there is an arithmetic sum to the left and to the right of the index.
\(S(n) = 1 + 2 + .. + (n-1) + n = n * (n+1) / 2\)
We are also must subtract part of the sum, that out of the array:
\(\sum = S(x-1) - S(x-1-i) + x + S(x-1) - S(x-1 - (size-i-1))\)
Another catch, numbers can’t be 0, so we must start with an array filled of 1: 1 1 1 1 1 1. That will modify our algorithm, adding n to the sum and adding one more step to the max.
Given that we know sum for each max, and sum will grow with increasing of the max, we can do a binary search sum = f(max) for max.
Approach
For more robust binary search:
- use inclusive borders
loandhi - check the last condition
lo == hi - always compute the result
max = mid - avoid the number overflow
Complexity
- Time complexity: \(O(log(n))\)
- Space complexity: \(O(1)\)
Code
fun maxValue(n: Int, index: Int, maxSum: Int): Int {
val s: (Int) -> Long = { if (it < 0L) 0L else it.toLong() * (it.toLong() + 1L) / 2L }
var lo = 0
var hi = maxSum
var max = lo
while (lo <= hi) {
val mid = lo + (hi - lo) / 2
val sum = n + mid + 2L * s(mid - 1) - s(mid - 1 - index) - s(mid - n + index)
if (sum <= maxSum) {
max = mid
lo = mid + 1
} else hi = mid - 1
}
return max + 1
}
09.06.2023
744. Find Smallest Letter Greater Than Target easy blog post substack
Join me on Telegram
https://t.me/leetcode_daily_unstoppable/240
Problem TLDR
Lowest char greater than target.
Intuition
In a sorted array, we can use the Binary Search.
Approach
For more robust code:
- use inclusive
loandhi - check the last condition
lo == hi - always move
loorhi - always write a good result
res = ... - safely compute
midComplexity
- Time complexity: \(O(log(n))\)
- Space complexity: \(O(1)\)
Code
fun nextGreatestLetter(letters: CharArray, target: Char): Char {
var res = letters[0]
var lo = 0
var hi = letters.lastIndex
while (lo <= hi) {
val mid = lo + (hi - lo) / 2
if (letters[mid] > target) {
hi = mid - 1
res = letters[mid]
} else lo = mid + 1
}
return res
}
08.06.2023
1351. Count Negative Numbers in a Sorted Matrix easy blog post substack
Join me on Telegram
https://t.me/leetcode_daily_unstoppable/239
Problem TLDR
Count negatives in a sorted by row and by column matrix.
Intuition
Consider example:
4 3 2 -1
3 2 1 -1
1 1 -1 -2
^ we are here
-1 -1 -2 -3
If we set position x at the first negative number, it is guaranteed, that the next row[x] will also be negative. So we can skip already passed columns.
Approach
Let’s use Kotlin’s fold operator.
Complexity
- Time complexity: \(O(n + m)\)
- Space complexity: \(O(1)\)
Code
fun countNegatives(grid: Array<IntArray>): Int =
grid.fold(0 to 0) { (total, prev), row ->
var curr = prev
while (curr < row.size && row[row.lastIndex - curr] < 0) curr++
(total + curr) to curr
}.first
}
07.06.2023
1318. Minimum Flips to Make a OR b Equal to c medium blog post substack
Join me on Telegram
https://t.me/leetcode_daily_unstoppable/238
Problem TLDR
Minimum a and b Int bit flips to make a or b == c.
Intuition
Naive implementation is to iterate over 32 bits and flip a or/and b bits to match c.
If we didn’t consider the case where a = 1 and b = 1 and c = 0, the result would be (a or b) xor c, as a or b gives us the left side of the equation, and xor c gives only bits that are needed to flip. For the corner case a = b = 1, c = 0, we must do additional flip to make 0, and we must make any other combinations 0:
a b c a and b c.inv() (a and b) and c.inv()
0 0 1 0 0 0
0 1 0 0 1 0
0 1 1 0 0 0
1 0 0 0 1 0
1 0 1 0 0 0
1 1 0 1 1 1
1 1 1 1 0 0
Approach
Use Integer.bitCount.
Complexity
- Time complexity: \(O(1)\)
- Space complexity: \(O(1)\)
Code
fun minFlips(a: Int, b: Int, c: Int): Int =
Integer.bitCount((a or b) xor c) + Integer.bitCount((a and b) and c.inv())
06.06.2023
1502. Can Make Arithmetic Progression From Sequence easy blog post substack
Join me on Telegram
https://t.me/leetcode_daily_unstoppable/237
Problem TLDR
Is IntArray can be arithmetic progression?
Intuition
Sort, then use sliding window.
Approach
Let’s write Kotlin one-liner.
Complexity
- Time complexity: \(O(nlog(n))\)
- Space complexity: \(O(n)\)
Code
fun canMakeArithmeticProgression(arr: IntArray): Boolean =
arr.sorted().windowed(2).groupBy { it[1] - it[0] }.keys.size == 1
05.06.2023
1232. Check If It Is a Straight Line easy blog post substack
Join me on Telegram
https://t.me/leetcode_daily_unstoppable/236
Problem TLDR
Are all the x,y points in a line?
Intuition
We can compare \(tan_i = dy_i/dx_i = dy_0/dx_0\)
Approach
- corner case is a vertical line
Complexity
- Time complexity: \(O(n)\)
- Space complexity: \(O(1)\)
Code
fun checkStraightLine(coordinates: Array<IntArray>): Boolean =
with((coordinates[1][1] - coordinates[0][1])/
(coordinates[1][0] - coordinates[0][0]).toDouble()) {
coordinates.drop(2).all {
val o = (it[1] - coordinates[0][1]) / (it[0] - coordinates[0][0]).toDouble()
isInfinite() && o.isInfinite() || this == o
}
}
04.06.2023
547. Number of Provinces medium blog post substack
Join me on Telegram
https://t.me/leetcode_daily_unstoppable/235
Problem TLDR
Count connected groups in graph.
Intuition
Union-Find will perfectly fit to solve this problem.
Approach
For more optimal Union-Find:
- use path compression in the
rootmethod:uf[it] = x - connect the smallest size subtree to the largest
Complexity
- Time complexity:
\(O(a(n)n^2)\),
a(n)- reverse Ackerman functionf(x) = 2^2^2..^2, x times.a(Int.MAX_VALUE) = 2^32 = 2^2^5 == 3 - Space complexity: \(O(n^2)\)
Code
fun findCircleNum(isConnected: Array<IntArray>): Int {
val uf = IntArray(isConnected.size) { it }
val sz = IntArray(isConnected.size) { 1 }
var count = uf.size
val root: (Int) -> Int = {
var x = it
while (uf[x] != x) x = uf[x]
uf[it] = x
x
}
val connect: (Int, Int) -> Unit = { a, b ->
val rootA = root(a)
val rootB = root(b)
if (rootA != rootB) {
count--
if (sz[rootA] < sz[rootB]) {
uf[rootB] = rootA
sz[rootA] += sz[rootB]
sz[rootB] = 0
} else {
uf[rootA] = rootB
sz[rootB] += sz[rootA]
sz[rootA] = 0
}
}
}
for (i in 0..sz.lastIndex)
for (j in 0..sz.lastIndex)
if (isConnected[i][j] == 1) connect(i, j)
return count
}
03.06.2023
1376. Time Needed to Inform All Employees medium blog post substack
Join me on Telegram
https://t.me/leetcode_daily_unstoppable/234
Problem TLDR
Total time from headID to all nodes in graph.
Intuition
Total time will be the maximum time from the root of the graph to the lowest node. To find it out, we can use DFS.
Approach
Build the graph, then write the DFS.
Complexity
- Time complexity: \(O(n)\)
- Space complexity: \(O(n)\)
Code
fun numOfMinutes(n: Int, headID: Int, manager: IntArray, informTime: IntArray): Int {
val fromTo = mutableMapOf<Int, MutableList<Int>>()
(0 until n).forEach { fromTo.getOrPut(manager[it]) { mutableListOf() } += it }
fun dfs(curr: Int): Int {
return informTime[curr] + (fromTo[curr]?.map { dfs(it) }?.max() ?: 0)
}
return dfs(headID)
}
02.06.2023
2101. Detonate the Maximum Bombs medium blog post substack
Join me on Telegram
https://t.me/leetcode_daily_unstoppable/233
Problem TLDR
Count detonated bombs by chain within each radius.
Intuition
A bomb will only detonate if its center within the radius of another.
 For example,
 A can detonate B, but not otherwise.
Let’s build a graph, who’s who can detonate.
Approach
Build a graph, the do DFS trying to start from each node.
Complexity
- Time complexity:
\(O(n^3)\), each of the
nDFS will take \(n^2\) - Space complexity: \(O(n^2)\)
Code
fun maximumDetonation(bombs: Array<IntArray>): Int {
val fromTo = mutableMapOf<Int, MutableList<Int>>()
for (i in 0..bombs.lastIndex) {
val bomb1 = bombs[i]
val rr = bomb1[2] * bomb1[2].toLong()
val edges = fromTo.getOrPut(i) { mutableListOf() }
for (j in 0..bombs.lastIndex) {
if (i == j) continue
val bomb2 = bombs[j]
val dx = (bomb1[0] - bomb2[0]).toLong()
val dy = (bomb1[1] - bomb2[1]).toLong()
if (dx * dx + dy * dy <= rr) edges += j
}
}
fun dfs(curr: Int, visited: HashSet<Int> = HashSet()): Int {
return if (visited.add(curr)) {
1 + (fromTo[curr]?.sumBy { dfs(it, visited) } ?:0)
} else 0
}
var max = 1
for (i in 0..bombs.lastIndex) max = maxOf(max, dfs(i))
return max
}
01.06.2023
1091. Shortest Path in Binary Matrix medium blog post substack
Join me on Telegram
https://t.me/leetcode_daily_unstoppable/232
Problem TLDR
0 path length in a binary square matrix.
Intuition
Just do BFS.
Approach
Some tricks for cleaner code:
- check for x, y in
range - iterate over
dirs. This is a sequence ofxandy - modify the input array. But don’t do this in production code.
Complexity
- Time complexity: \(O(n)\)
- Space complexity: \(O(n)\)
Code
fun shortestPathBinaryMatrix(grid: Array<IntArray>): Int =
with(ArrayDeque<Pair<Int, Int>>()) {
val range = 0..grid.lastIndex
val dirs = arrayOf(0, 1, 0, -1, -1, 1, 1, -1)
if (grid[0][0] == 0) add(0 to 0)
grid[0][0] = -1
var step = 0
while (isNotEmpty()) {
step++
repeat(size) {
val (x, y) = poll()
if (x == grid.lastIndex && y == grid.lastIndex) return step
var dx = -1
for (dy in dirs) {
val nx = x + dx
val ny = y + dy
if (nx in range && ny in range && grid[ny][nx] == 0) {
grid[ny][nx] = -1
add(nx to ny)
}
dx = dy
}
}
}
-1
}
31.05.2023
1396. Design Underground System medium blog post substack
Join me on Telegram
https://t.me/leetcode_daily_unstoppable/229
Problem TLDR
Average time from, to when different user IDs do checkIn(from, time1) and checkOut(to, time2)
Intuition
Just do what is asked, use HashMap to track user’s last station.
Approach
- store
sumtime andcountfor everyfrom, tostation - use
Pairas key forHashMapComplexity
- Time complexity: \(O(1)\), for each call
- Space complexity: \(O(n)\)
Code
class UndergroundSystem() {
val fromToSumTime = mutableMapOf<Pair<String, String>, Long>()
val fromToCount = mutableMapOf<Pair<String, String>, Int>()
val idFromTime = mutableMapOf<Int, Pair<String, Int>>()
fun Pair<String, String>.time() = fromToSumTime[this] ?: 0L
fun Pair<String, String>.count() = fromToCount[this] ?: 0
fun checkIn(id: Int, stationName: String, t: Int) {
idFromTime[id] = stationName to t
}
fun checkOut(id: Int, stationName: String, t: Int) {
val (from, tFrom) = idFromTime[id]!!
val fromTo = from to stationName
fromToSumTime[fromTo] = t - tFrom + fromTo.time()
fromToCount[fromTo] = 1 + fromTo.count()
}
fun getAverageTime(startStation: String, endStation: String): Double =
with(startStation to endStation) {
time().toDouble() / count().toDouble()
}
}
30.05.2023
705. Design HashSet easy blog post substack
Telegram
https://t.me/leetcode_daily_unstoppable/228
Problem TLDR
Write a HashSet.
Intuition
There are different hash functions. Interesting implementations is In Java HashMap https://github.com/openjdk/jdk/blob/master/src/java.base/share/classes/java/util/HashMap.java
Approach
Use key % size for the hash function, grow and rehash when needed.
Complexity
- Time complexity: \(O(1)\)
- Space complexity: \(O(n)\)
Code
class MyHashSet(val initialSz: Int = 16, val loadFactor: Double = 1.6) {
var buckets = Array<LinkedList<Int>?>(initialSz) { null }
var size = 0
fun hash(key: Int): Int = key % buckets.size
fun rehash() {
if (size > buckets.size * loadFactor) {
val oldBuckets = buckets
buckets = Array<LinkedList<Int>?>(buckets.size * 2) { null }
oldBuckets.forEach { it?.forEach { add(it) } }
}
}
fun bucket(key: Int): LinkedList<Int> {
val hash = hash(key)
if (buckets[hash] == null) buckets[hash] = LinkedList<Int>()
return buckets[hash]!!
}
fun add(key: Int) {
val list = bucket(key)
if (!list.contains(key)) {
list.add(key)
size++
rehash()
}
}
fun remove(key: Int) {
bucket(key).remove(key)
}
fun contains(key: Int): Boolean =
bucket(key).contains(key)
}
29.05.2023
1603. Design Parking System easy blog post substack
Join me on Telegram
https://t.me/leetcode_daily_unstoppable/227
Problem TLDR
Return if car of type 1, 2 or 3 can be added given sizes big, medium and small.
Intuition
Just write the code.
Approach
Let’s use an array to minimize the number of lines.
Complexity
- Time complexity: \(O(1)\)
- Space complexity: \(O(1)\)
Code
class ParkingSystem(big: Int, medium: Int, small: Int) {
val types = arrayOf(big, medium, small)
fun addCar(carType: Int): Boolean = types[carType - 1]-- > 0
}
28.05.2023
1547. Minimum Cost to Cut a Stick hard blog post substack
Join me on Telegram
https://t.me/leetcode_daily_unstoppable/226
Problem TLDR
Min cost of cuts c1,..,ci,..,cn of [0..n] where cut cost the length = to-from.
Intuition
We every stick from..to we can try all the cuts in that range. This result will be optimal and can be cached.
Approach
- use DFS + memo
- check for range
Complexity
- Time complexity:
\(k^2\), as maximum depth of DFS is
k, and we loop fork. - Space complexity: \(k^2\)
Code
fun minCost(n: Int, cuts: IntArray): Int {
val cache = mutableMapOf<Pair<Int, Int>, Int>()
fun dfs(from: Int, to: Int): Int {
return cache.getOrPut(from to to) {
var min = 0
cuts.forEach {
if (it in from + 1..to - 1) {
val new = to - from + dfs(from, it) + dfs(it, to)
if (min == 0 || new < min) min = new
}
}
min
}
}
return dfs(0, n)
}
27.05.2023
1406. Stone Game III hard blog post substack
Join me on Telegram
https://t.me/leetcode_daily_unstoppable/225
Problem TLDR
Winner of “Alice”, “Bob” or “Tie” in game of taking 1, 2 or 3 stones by turn from stoneValue array.
Intuition
Let’s count the result for Alice, starting at i element:
\(alice_i = \sum_{i=1,2,3}(stones_i) + suffix_i - alice_{i+1}\)
The result can be safely cached. Bob’s points will be Alice’s points in the next turn.
Approach
Let’s write bottom up DP.
- use increased sizes for
cacheandsuffixarrays for simpler code - corner case is the negative number, so we must take at least one stone
Complexity
- Time complexity: \(O(n)\)
- Space complexity: \(O(n)\)
Code
fun stoneGameIII(stoneValue: IntArray): String {
val suffix = IntArray(stoneValue.size + 1)
for (i in stoneValue.lastIndex downTo 0) suffix[i] = stoneValue[i] + suffix[i + 1]
val cache = IntArray(stoneValue.size + 1)
var bob = 0
for (curr in stoneValue.lastIndex downTo 0) {
var sum = 0
var first = true
for (j in 0..2) {
val ind = curr + j
if (ind > stoneValue.lastIndex) break
sum += stoneValue[ind]
val nextAlice = cache[ind + 1]
val next = suffix[ind + 1] - nextAlice
if (first || sum + next > cache[curr]) {
first = false
cache[curr] = sum + next
bob = nextAlice
}
}
}
return if (cache[0] == bob) "Tie" else if (cache[0] > bob) "Alice" else "Bob"
}
26.05.2023
1140. Stone Game II medium blog post substack
Join me on Telegram
https://t.me/leetcode_daily_unstoppable/224
Problem TLDR
While Alice and Bob optimally take 1..2*m numbers from piles find maximum for Alice.
Intuition
For each position, we can cache the result for Alice starting from it. Next round, Bob will become Alice and use that cached result, but Alice will use the remaining part: \(bob_i = suffix_i - alice_i\) and \(alice_i = \sum(piles_{1..x<2m}) + (suffix_i - alice_{i + 1})\)
Approach
- compute prefix sums in
IntArray - use
HashMapfor simpler code, or Array for fasterComplexity
- Time complexity: \(O(n^2)\)
- Space complexity: \(O(n^2)\)
Code
fun stoneGameII(piles: IntArray): Int {
// 2 7 9 4 4 M A B
// A 1 1
// A A 2 2,7
// A B B 2 7,9
// A A B B B 3 9,4,4
val sums = IntArray(piles.size)
sums[0] = piles[0]
for (i in 1..piles.lastIndex)
sums[i] = sums[i - 1] + piles[i]
val total = sums[sums.lastIndex]
val cache = mutableMapOf<Pair<Int, Int>, Int>()
fun dfs(m: Int, curr: Int): Int {
return cache.getOrPut(m to curr) {
var res = 0
var pilesSum = 0
for (x in 0 until 2*m) {
if (curr + x > piles.lastIndex) break
pilesSum += piles[curr + x]
val nextOther = dfs(maxOf(m, x + 1), curr + x + 1)
val nextMy = total - sums[curr + x] - nextOther
res = maxOf(res, pilesSum + nextMy)
}
res
}
}
return dfs(1, 0)
}
25.05.2023
837. New 21 Game medium blog post substack
Join me on Telegram
https://t.me/leetcode_daily_unstoppable/223
Problem TLDR
Probability sum of random numbers 1..maxPts sum be < n after it overflow k.
Intuition
For every event, we choose one number from numbers 1..maxPts. Probability of this event is p1 = 1/maxPts.
For example, n=6, k=1, maxpts=10: we can pick any numbers 1, 2, 3, 4, 5, 6 that are <=6. Numbers 7, 8, 9, 10 are excluded, because they are >6. After we pick one number with probability p1 = 1/10, the sum will be >=k so we stop. The final probability is the sum of individual valid choices p = sum(good_p1)
Another example, n=6, k=2, maxpts=10: our choices are
// n = 6, k = 2, maxpts = 10
// p_win1 1+1, 1+2, 1+3, 1+4, 1+5, 2, 3, 4, 5, 6
// 0.01 0.01 0.01 0.01 0.01 0.1 0.1 0.1 0.1 0.1 = 0.55
When we go to the second round in cases of 1+1, 1+2, 1+3, 1+4, 1+5, we multiply the probabilities, so p(1+1) = p1*p1.
Next, observe the pattern for other examples:
// n = 6, k = 3, maxpts = 10
// p_win 1+1+1, 1+1+2, 1+1+3, 1+1+4, 1+2, 1+3, 1+4, 1+5, 2+1, 2+2, 2+3, 2+4, 3, 4, 5, 6
// 0.001 0.001 0.001 0.001 0.01 0.01 0.01 0.01 0.01 0.01 0.01 0.01 0.1 0.1 0.1 0.1
// sum=0.484
// n = 6, k = 4, maxpts = 10
// p_win 1+1+1+1 1+1+1+2 1+1+1+3 1+1+2 1+1+3 1+1+4 1+2+1 1+2+2 1+2+3 1+3 1+4 1+5 2+1+1 2+1+2 2+1+3 2+2 2+3 2+4 3+1 3+2 3+3 4 5 6
// .0001 .0001 .0001 .001 .001 .001 .001 .001 .001 .01 .01 .01 .001 .001 .001 .01 .01 .01 .01 .01 .01 .1 .1 .1
//sum=0.3993
What we see is the sequence of 1+1+1+1, 1+1+1+2, 1+1+1+3, where we pick a number from 1..maxpts then calculate the sum and if the sum is still smaller than n we go deeper and make another choice from 1..maxpts.
That can be written as Depth-First Search algorithm:
fun dfs(currSum: Int): Double {
...
var sumP = 0.0
for (x in 1..maxPts)
sumP += dfs(currSum + x)
res = sumP * p1
}
This will work and gives us correct answers, but gives TLE for big numbers, as its time complexity is \(O(n^2)\).
Let’s observe this algorithm’s recurrent equation:
\(f(x) = (f(x+1) + f(x+2)+..+f(x + maxPts))*p1\)
\(f(x + 1) = (f(x+2) + f(x+3) +...+f(x + maxPts)*p1 + f(x + 1 + maxPts))*p1\)
subtract second sequence from the first:
\(f(x) - f(x + 1) = f(x+1)*p1 - f(x+1+maxPts)*p1\)
\(f(x) = f(x+1) + (f(x+1) - f(x+1+maxPts))*p1\)
This removes one dimension of iteration 1..maxPts. However, it fails the first case where currSum == k - 1, because the equation didn’t consider that not all x+maxPts are smaller than n. For this case, we must return (n-k+1)*p1 as we choose last number from range k - 1..n.
Approach
This problem is next to impossible to solve in an interview, given how many conclusions you must derive on the fly. So, hope no one will give it to you.
- use an array for the faster cache
Complexity
- Time complexity: \(O(n)\)
- Space complexity: \(O(n)\)
Code
fun new21Game(n: Int, k: Int, maxPts: Int): Double {
// n = 6, k = 1, maxpts = 10
// cards: 1 2 3 4 5 6 7 8 9 10
// p_win1(6, 10) = count(1 2 3 4 5 6) / 10 = 0.6
// n = 6, k = 2, maxpts = 10
// p_win1 1+1, 1+2, 1+3, 1+4, 1+5, 2, 3, 4, 5, 6
// 0.01 0.01 0.01 0.01 0.01 0.1 0.1 0.1 0.1 0.1 = 0.55
// n = 6, k = 3, maxpts = 10
// p_win 1+1+1, 1+1+2, 1+1+3, 1+1+4, 1+2, 1+3, 1+4, 1+5, 2+1, 2+2, 2+3, 2+4, 3, 4, 5, 6
// 0.001 0.001 0.001 0.001 0.01 0.01 0.01 0.01 0.01 0.01 0.01 0.01 0.1 0.1 0.1 0.1
// sum=0.484
// n = 6, k = 4, maxpts = 10
// p_win 1+1+1+1 1+1+1+2 1+1+1+3 1+1+2 1+1+3 1+1+4 1+2+1 1+2+2 1+2+3 1+3 1+4 1+5 2+1+1 2+1+2 2+1+3 2+2 2+3 2+4 3+1 3+2 3+3 4 5 6
// .0001 .0001 .0001 .001 .001 .001 .001 .001 .001 .01 .01 .01 .001 .001 .001 .01 .01 .01 .01 .01 .01 .1 .1 .1
//sum=0.3993
val p1 = 1.0 / maxPts.toDouble()
val cache = Array<Double>(n + 1) { -1.0 }
// f(x) = (f(x+1) + f(x+2)+..+f(x + maxPts))*p1
// f(x + 1) = (f(x+2) + f(x+3) +...+f(x + maxPts)*p1 + f(x + 1 + maxPts))*p1
// f(x) - f(x + 1) = f(x+1)*p1 - f(x+1+maxPts)*p1
// f(x) = f(x+1) + (f(x+1) - f(x+1+maxPts))*p1
fun dfs(currSum: Int): Double {
if (currSum == k - 1) return minOf(1.0, (n-k+1)*p1) // corner case
if (currSum >= k) return if (currSum <= n) 1.0 else 0.0
if (cache[currSum] != -1.0) return cache[currSum]
//var sumP = 0.0
//for (x in 1..minOf(maxPts, n - currSum)) {
// sumP += dfs(currSum + x)
//}
//val res = sumP * p1
val res = dfs(currSum + 1) + (dfs(currSum + 1) - dfs(currSum + 1 + maxPts)) * p1
cache[currSum] = res
return res
}
return dfs(0)
}
24.05.2023
2542. Maximum Subsequence Score medium blog post substack
Join me on Telegram
https://t.me/leetcode_daily_unstoppable/222
Problem TLDR
Max score of k sum(subsequence(a)) * min(subsequence(b))
Intuition
First, the result is independent of the order, so we can sort. For maximum score, it better to start with maximum multiplier of min. Then, we iterate from biggest nums2 to smallest. Greedily add numbers until we reach k elements. After size > k, we must consider what element to extract. Given our min is always the current value, we can safely take any element without modifying the minimum, thus take out the smallest by nums1.
Approach
- use
PriorityQueueto dynamically take out the smallest - careful to update score only when
size == k, as it may decrease with more elementsComplexity
- Time complexity: \(O(nlog(n))\)
- Space complexity: \(O(n)\)
Code
fun maxScore(nums1: IntArray, nums2: IntArray, k: Int): Long {
// 14 2 1 12 100000000000 1000000000000 100000000000
// 13 11 7 1 1 1 1
val inds = nums1.indices.sortedWith(
compareByDescending<Int> { nums2[it] }
.thenByDescending { nums1[it] })
var score = 0L
var sum = 0L
val pq = PriorityQueue<Int>(compareBy { nums1[it] })
inds.forEach {
sum += nums1[it].toLong()
pq.add(it)
if (pq.size > k) sum -= nums1[pq.poll()].toLong()
if (pq.size == k) score = maxOf(score, sum * nums2[it].toLong())
}
return score
}
23.05.2023
703. Kth Largest Element in a Stream medium blog post substack
Join me on Telegram
https://t.me/leetcode_daily_unstoppable/221
Problem TLDR
Kth largest
Intuition
We need to keep all values smaller than current largest kth element and can safely drop all other elements.
Approach
Use PriorityQueue.
Complexity
- Time complexity: \(O(nlogk)\)
- Space complexity: \(O(k)\)
Code
class KthLargest(val k: Int, nums: IntArray) {
val pq = PriorityQueue<Int>(nums.toList())
fun add(v: Int): Int = with (pq) {
add(v)
while (size > k) poll()
peek()
}
}
22.05.2023
347. Top K Frequent Elements medium blog post substack
Join me on Telegram
https://t.me/leetcode_daily_unstoppable/220
Problem TLDR
First k unique elements sorted by frequency.
Intuition
Group by frequency 1 1 1 5 5 -> 1:3, 5:2, then bucket sort frequencies 2:5, 3:1, then flatten and take first k.
Approach
- We can use Kotlin collections api
Complexity
- Time complexity: \(O(n)\)
- Space complexity: \(O(n)\)
Code
fun topKFrequent(nums: IntArray, k: Int): IntArray {
val freq = nums.groupBy { it }.mapValues { it.value.size }
val freqToNum = Array<MutableList<Int>>(nums.size + 1) { mutableListOf() }
freq.forEach { (num, fr) -> freqToNum[nums.size + 1 - fr].add(num) }
return freqToNum
.filter { it.isNotEmpty() }
.flatten()
.take(k)
.toIntArray()
}
21.05.2023
934. Shortest Bridge medium blog post substack
Join me on Telegram
https://t.me/leetcode_daily_unstoppable/219
Problem TLDR
Find the shortest path from one island of 1’s to another.
Intuition
Shortest path can be found with Breadth-First Search if we start it from every border cell of the one of the islands. To detect border cell, we have to make separate DFS.
Approach
- modify grid to store
visitedsetComplexity
- Time complexity: \(O(n^2)\)
- Space complexity: \(O(n^2)\)
Code
fun Array<IntArray>.inRange(xy: Pair<Int, Int>) = (0..lastIndex).let {
xy.first in it && xy.second in it
}
fun Pair<Int, Int>.siblings() = arrayOf(
(first - 1) to second, first to (second - 1),
(first + 1) to second, first to (second + 1)
)
fun shortestBridge(grid: Array<IntArray>): Int {
val queue = ArrayDeque<Pair<Int, Int>>()
fun dfs(x: Int, y: Int) {
if (grid[y][x] == 1) {
grid[y][x] = 2
(x to y).siblings().filter { grid.inRange(it) }.forEach { dfs(it.first, it.second) }
} else if (grid[y][x] == 0) queue.add(x to y)
}
(0 until grid.size * grid.size)
.map { it / grid.size to it % grid.size}
.filter { (y, x) -> grid[y][x] == 1 }
.first().let { (y, x) -> dfs(x, y)}
return with (queue) {
var steps = 1
while (isNotEmpty()) {
repeat(size) {
val xy = poll()
if (grid.inRange(xy)) {
val (x, y) = xy
if (grid[y][x] == 1) return@shortestBridge steps - 1
if (grid[y][x] == 0) {
grid[y][x] = 3
addAll(xy.siblings().filter { grid.inRange(it) })
}
}
}
steps++
}
-1
}
}
20.05.2023
399. Evaluate Division medium blog post substack
Join me on Telegram
https://t.me/leetcode_daily_unstoppable/218
Problem TLDR
Given values for a/b and b/c find answers for a/c.
Intuition
Let’s build a graph, a -> b with weights of values[a/b]. Then answer is a path from one node to the other. The shortest path can be found with a Breadth-First Search.
Approach
- careful with corner case
x/x, wherexis not in a graph.Complexity
- Time complexity: \(O(nEV)\)
- Space complexity: \(O(n+E+V)\)
Code
fun calcEquation(equations: List<List<String>>, values: DoubleArray, queries: List<List<String>>): DoubleArray {
val fromTo = mutableMapOf<String, MutableList<Pair<String, Double>>>()
equations.forEachIndexed { i, (from, to) ->
fromTo.getOrPut(from) { mutableListOf() } += to to values[i]
fromTo.getOrPut(to) { mutableListOf() } += from to (1.0 / values[i])
}
// a/c = a/b * b/c
return queries.map { (from, to) ->
with(ArrayDeque<Pair<String, Double>>()) {
val visited = HashSet<String>()
visited.add(from)
if (fromTo.containsKey(to)) add(from to 1.0)
while (isNotEmpty()) {
repeat(size) {
val (point, value) = poll()
if (point == to) return@map value
fromTo[point]?.forEach { (next, nvalue) ->
if (visited.add(next)) add(next to value * nvalue)
}
}
}
-1.0
}
}.toDoubleArray()
}
19.05.2023
785. Is Graph Bipartite? medium blog post substack
Join me on Telegram
https://t.me/leetcode_daily_unstoppable/217
Problem TLDR
Find if graph is bipartite
Intuition
 Mark edge
 Red or Blue and it’s nodes in the opposite.
Approach
- there are disconnected nodes, so run DFS for all of them
Complexity
- Time complexity:
\(O(VE)\), DFS once for all
verticesandedges - Space complexity:
\(O(V+E)\), for
redsandvisitedset.
Code
fun isBipartite(graph: Array<IntArray>): Boolean {
val reds = IntArray(graph.size)
fun dfs(u: Int, isRed: Int): Boolean {
if (reds[u] == 0) {
reds[u] = if (isRed == 0) 1 else isRed
return graph[u].all { dfs(it, -reds[u]) }
} else return reds[u] == isRed
}
return graph.indices.all { dfs(it, reds[it]) }
}
18.05.2023
1557. Minimum Number of Vertices to Reach All Nodes medium blog post substack
Join me on Telegram
https://t.me/leetcode_daily_unstoppable/216
Problem TLDR
Find all starting nodes in graph.
Intuition
Count nodes that have no incoming connections.
Approach
- we can use subtract operation in Kotlin
Complexity
- Time complexity: \(O(n)\)
- Space complexity: \(O(n)\)
Code
fun findSmallestSetOfVertices(n: Int, edges: List<List<Int>>): List<Int> =
(0 until n) - edges.map { it[1] }
17.05.2023
2130. Maximum Twin Sum of a Linked List medium blog post substack
Join me on Telegram
https://t.me/leetcode_daily_unstoppable/215
Problem TLDR
Max sum of head-tail twin ListNodes: a-b-c-d -> max(a+d, b+c)
Intuition
Add first half to the Stack, then pop until end reached.
Approach
- use
fastandslowpointers to find the center.Complexity
- Time complexity: \(O(n)\)
- Space complexity: \(O(n)\)
Code
fun pairSum(head: ListNode?): Int {
var fast = head
var slow = head
var sum = 0
val stack = Stack<Int>()
while (fast != null) {
stack.add(slow!!.`val`)
slow = slow.next
fast = fast.next?.next
}
while (slow != null) {
sum = maxOf(sum, stack.pop() + slow.`val`)
slow = slow.next
}
return sum
}
16.05.2023
24. Swap Nodes in Pairs medium blog post substack
Join me on Telegram
https://t.me/leetcode_daily_unstoppable/214
Problem TLDR
Swap adjacent ListNodes a-b-c-d -> b-a-d-c.
Intuition
Those kinds of problems are easy, but your task is to write it bug free from the first go.
Approach
For more robust code:
- use
dummyhead to track for a new head - use explicit variables for each node in the configuration
- do debug code by writing down it values in the comments
Complexity
- Time complexity: \(O(n)\)
- Space complexity: \(O(1)\)
Code
fun swapPairs(head: ListNode?): ListNode? {
val dummy = ListNode(0).apply { next = head }
var curr: ListNode? = dummy
while (curr?.next != null && curr?.next?.next != null) {
// curr->one->two->next
// curr->two->one->next
var one = curr.next
var two = one?.next
val next = two?.next
curr.next = two
two?.next = one
one?.next = next
curr = one
}
return dummy.next
}
15.05.2023
1721. Swapping Nodes in a Linked List medium blog post substack
Join me on Telegram
https://t.me/leetcode_daily_unstoppable/213
Problem TLDR
Swap the values of the head-tail k’th ListNodes.
Intuition
As we aren’t asked to swap nodes, the problem is to find nodes.
Approach
Travel the fast pointer at k distance, then move both fast and two nodes until fast reaches the end.
Complexity
- Time complexity: \(O(n)\)
- Space complexity: \(O(1)\)
Code
fun swapNodes(head: ListNode?, k: Int): ListNode? {
var fast = head
for (i in 1..k - 1) fast = fast?.next
val one = fast
var two = head
while (fast?.next != null) {
two = two?.next
fast = fast?.next
}
one?.`val` = two?.`val`.also { two?.`val` = one?.`val` }
return head
}
14.05.2023
1799. Maximize Score After N Operations hard blog post substack
Join me on Telegram
https://t.me/leetcode_daily_unstoppable/212
Problem TLDR
Max indexed-gcd-pair sum from 2n array; [3,4,6,8] -> 11 (1gcd(3,6) + 2gcd(4,8))
Intuition
For each step and remaining items, the result is always the same, so is memorizable.
Approach
- search all possible combinations with DFS
- use
bitmaskto avoid double counting - use an array for cache
Complexity
- Time complexity: \(O(n^22^n)\)
- Space complexity: \(O(n2^n)\)
Code
fun gcd(a: Int, b: Int): Int = if (b % a == 0) a else gcd(b % a, a)
fun maxScore(nums: IntArray): Int {
val n = nums.size / 2
val cache = Array(n + 1) { IntArray(1 shl nums.size) { -1 } }
fun dfs(step: Int, mask: Int): Int {
if (step > n) return 0
if (cache[step][mask] != -1) return cache[step][mask]
var max = 0
for (i in 0..nums.lastIndex) {
val ibit = 1 shl i
if (mask and ibit != 0) continue
for (j in (i + 1)..nums.lastIndex) {
val jbit = 1 shl j
if (mask and jbit != 0) continue
val curr = step * gcd(nums[i], nums[j])
val next = dfs(step + 1, mask or ibit or jbit)
max = maxOf(max, curr + next)
}
}
cache[step][mask] = max
return max
}
return dfs(1, 0)
}
13.05.2023
2466. Count Ways To Build Good Strings medium blog post substack
Join me on Telegram
https://t.me/leetcode_daily_unstoppable/211
Problem
Count distinct strings, length low to high, appending ‘0’ zero or ‘1’ one times. Return count % 1,000,000,007.
Intuition
Let’s add zero’s or one’s one by one. For each current length, the resulting count is independent of all the previous additions. We can cache the result by the current size of the string.
Approach
Let’s write a DFS solution, adding zero or one and count the good strings.
Then we can rewrite it to the iterative DP.
Complexity
- Time complexity: \(O(n)\)
- Space complexity: \(O(n)\)
Code
top-down:
fun countGoodStrings(low: Int, high: Int, zero: Int, one: Int): Int {
val m = 1_000_000_007
val cache = mutableMapOf<Int, Int>()
fun dfs(currSize: Int): Int {
if (currSize > high) return 0
return cache.getOrPut(currSize) {
val curr = if (currSize in low..high) 1 else 0
val addZeros = if (zero > 0) dfs(currSize + zero) else 0
val addOnes = if (one > 0) dfs(currSize + one) else 0
(curr + addZeros + addOnes) % m
}
}
return dfs(0)
}
bottom-up
fun countGoodStrings(low: Int, high: Int, zero: Int, one: Int): Int {
val cache = mutableMapOf<Int, Int>()
for (sz in high downTo 0)
cache[sz] = ((if (sz >= low) 1 else 0)
+ (cache[sz + zero]?:0)
+ (cache[sz + one]?:0)) % 1_000_000_007
return cache[0]!!
}
12.05.2023
2140. Solving Questions With Brainpower medium
fun mostPoints(questions: Array<IntArray>): Long {
val dp = LongArray(questions.size)
for (i in questions.lastIndex downTo 0) {
val (points, skip) = questions[i]
val tail = if (i + skip + 1 > questions.lastIndex) 0 else dp[i + skip + 1]
val notTake = if (i + 1 > questions.lastIndex) 0 else dp[i + 1]
dp[i] = maxOf(points + tail, notTake)
}
return dp[0]
}
or minified golf version
fun mostPoints(questions: Array<IntArray>): Long {
val dp = HashMap<Int, Long>()
for ((i, q) in questions.withIndex().reversed())
dp[i] = maxOf(q[0] + (dp[i + q[1] + 1]?:0), dp[i + 1]?:0)
return dp[0]?:0
}
Join me on Telegram
https://t.me/leetcode_daily_unstoppable/210
Intuition
If we go from the tail, for each element we are interested only on what happens to the right from it. Prefix of the array is irrelevant, when we’re starting from the element i, because we sure know, that we are taking it and not skipping.
Given that, dynamic programming equation is:
\(dp_i = max(points_i + dp_{i+1+skip_i}, dp_{i+1})\), where dp is the mostPoints starting from position i.
Approach
Let’s implement a bottom-up solution.
Complexity
- Time complexity: \(O(n)\)
- Space complexity: \(O(n)\)
11.05.2023
1035. Uncrossed Lines medium
fun maxUncrossedLines(nums1: IntArray, nums2: IntArray): Int {
val cache = Array(nums1.size) { Array(nums2.size) { -1 } }
val intersect = nums1.toSet().intersect(nums2.toSet())
fun dfs(i: Int, j: Int, x: Int): Int {
if (i == nums1.size || j == nums2.size) return 0
val cached = cache[i][j]
if (cached != -1) return cached
val n1 = nums1[i]
val n2 = nums2[j]
val drawLine = if (n1 == x && n2 == x || n1 == n2) 1 + dfs(i + 1, j + 1, n1) else 0
val skipTop = dfs(i + 1, j, x)
val skipBottom = dfs(i, j + 1, x)
val skipBoth = dfs(i + 1, j + 1, x)
val startTop = if (intersect.contains(n1)) dfs(i + 1, j, n1) else 0
val startBottom = if (intersect.contains(n2)) dfs(i, j + 1, n2) else 0
val res = maxOf(
drawLine,
maxOf(drawLine, skipTop, skipBottom),
maxOf(skipBoth, startTop, startBottom)
)
cache[i][j] = res
return res
}
return dfs(0, 0, 0)
}
Join me on Telegram
https://t.me/leetcode_daily_unstoppable/209
Intuition
Consider the case:
2 5 1 2 5
2 2 2 1 1 1 5 5 5
When we draw all the possible lines, we see that there is a choice to draw line 2-2 or four lines 1-1 or three 5-5 in the middle. Suffix lines 5-5 and prefix lines 2-2 are optimal already and can be cached as a result.
To find an optimal choice we can use DFS.
We can prune some impossible combinations by precomputing the intersected numbers and considering them only.
Approach
- use an array for the faster cache instead of HashMap
- for the intersection there is an
intersectmethod in Kotlin
Complexity
- Time complexity: \(O(n^3)\)
- Space complexity: \(O(n^3)\)
10.05.2023
59. Spiral Matrix II medium
fun generateMatrix(n: Int): Array<IntArray> = Array(n) { IntArray(n) }.apply {
var dir = 0
var dxdy = arrayOf(0, 1, 0, -1)
var x = 0
var y = 0
val nextX = { x + dxdy[(dir + 1) % 4] }
val nextY = { y + dxdy[dir] }
val valid = { x: Int, y: Int -> x in 0..n-1 && y in 0..n-1 && this[y][x] == 0 }
repeat (n * n) {
this[y][x] = it + 1
if (!valid(nextX(), nextY())) dir = (dir + 1) % 4
x = nextX()
y = nextY()
}
}
Join me on Telegram
https://t.me/leetcode_daily_unstoppable/208
Intuition
Just implement what is asked. Let’s have the strategy of a robot: move it in one direction until it hits a wall, then change the direction.
Approach
- to detect an empty cell, we can check it for
== 0Complexity
- Time complexity: \(O(n^2)\)
- Space complexity: \(O(n^2)\)
9.05.2023
54. Spiral Matrix medium
fun spiralOrder(matrix: Array<IntArray>): List<Int> = mutableListOf<Int>().apply {
var x = 0
var y = 0
val dxy = arrayOf(0, 1, 0, -1)
val borders = arrayOf(matrix[0].lastIndex, matrix.lastIndex, 0, 0)
var dir = 0
val moveBorder = { border: Int -> borders[border] += if (border < 2) -1 else 1 }
repeat (matrix.size * matrix[0].size) {
if ((if (dir % 2 == 0) x else y) == borders[dir]) {
moveBorder((dir + 3) % 4)
dir = (dir + 1) % 4
}
add(matrix[y][x])
x += dxy[(dir + 1) % 4]
y += dxy[dir]
}
}
Join me on Telegram
https://t.me/leetcode_daily_unstoppable/207
Intuition
Just implement what is asked.
We can use a loop with four directions, or try to program a robot that will rotate after it hit a wall.
Approach
- do track the borders
left,top,right,bottom - use single direction variable
dir - move the wall after a robot walked parallel to it
Complexity
- Time complexity: \(O(n)\)
- Space complexity: \(O(n)\)
8.05.2023
1572. Matrix Diagonal Sum easy
fun diagonalSum(mat: Array<IntArray>): Int =
(0..mat.lastIndex).sumBy {
mat[it][it] + mat[it][mat.lastIndex - it]
}!! - if (mat.size % 2 == 0) 0 else mat[mat.size / 2][mat.size / 2]
Join me on Telegram
https://t.me/leetcode_daily_unstoppable/206
Intuition
Just do what is asked.
Approach
- avoid double counting of the center element
Complexity
- Time complexity: \(O(n)\)
- Space complexity: \(O(1)\)
7.05.2023
1964. Find the Longest Valid Obstacle Course at Each Position hard
fun longestObstacleCourseAtEachPosition(obstacles: IntArray): IntArray {
// 2 3 1 3
// 2 2
// 3 2 3
// 1 1 3 (pos = 1)
// 3 1 3 3
// 5 2 5 4 1 1 1 5 3 1
// 5 . 5
// 2 . 2
// 5 . 2 5
// 4 . 2 4
// 1 1 4 (pos = 1)
// 1 1 1
// 1 1 1 1
// 5 1 1 1 5
// 3 1 1 1 3
// 1 1 1 1 1
val lis = IntArray(obstacles.size)
var end = 0
return obstacles.map { x ->
var pos = -1
var lo = 0
var hi = end - 1
while (lo <= hi) {
val mid = lo + (hi - lo) / 2
if (lis[mid] > x) {
hi = mid - 1
pos = mid
} else lo = mid + 1
}
if (pos == -1) {
lis[end++] = x
end
} else {
lis[pos] = x
pos + 1
}
}.toIntArray()
}
Join me on Telegram
https://t.me/leetcode_daily_unstoppable/205
Intuition
This is the Longest Increasing Subsequence length problem, that have a classic algorithm, which must be learned and understood.
The trivial case of any increasing subsequence is broken by example: 2 3 1 3, when we consider the last 3 result must be: 233 instead of 13. So, we must track all the sequences.
To track all the sequences, we can use TreeMap that will hold the largest element and length of any subsequence. Adding a new element will take \(O(n^2)\).
The optimal LIS solution is to keep the largest increasing subsequence so far and cleverly add new elements:
- for a new element, search for the
smallestelement that islargerthan it - if found, replace
- if not, append
Approach
- google what is the solution of
LIS - use an array for
lis - carefully write binary search
Complexity
- Time complexity: \(O(nlog(n))\)
- Space complexity: \(O(n)\)
6.05.2023
1498. Number of Subsequences That Satisfy the Given Sum Condition medium
fun numSubseq(nums: IntArray, target: Int): Int {
val m = 1_000_000_007
nums.sort()
val cache = IntArray(nums.size + 1) { 0 }
cache[1] = 1
for (i in 2..nums.size) cache[i] = (2 * cache[i - 1]) % m
var total = 0
nums.forEachIndexed { i, n ->
var lo = 0
var hi = i
var removed = cache[i + 1]
while (lo <= hi) {
val mid = lo + (hi - lo) / 2
if (nums[mid] + n <= target) {
removed = cache[i - mid]
lo = mid + 1
} else hi = mid - 1
}
total = (total + cache[i + 1] - removed) % m
}
if (total < 0) total += m
return total
}
Join me on Telegram
https://t.me/leetcode_daily_unstoppable/204
Intuition
- We can safely sort an array, because order doesn’t matter for finding
maxorminin a subsequence. - Having increasing order gives us the pattern:
 Ignoring the
 target, each new number adds previous value to the sum: \(sum_2 = sum_1 + (1 + sum_1)\), or just \(2^i\). - Let’s observe the pattern of the removed items:
 For example,
 target = 12, for number8, count of excluded values is4= [568, 58, 68, 8]; for number9, it is8= [5689, 589, 569, 59, 689, 69, 89, 9]. We can observe, it is determined by the sequence5 6 8 9, where all the numbers are bigger, thantarget - 9. That is, the law for excluding the elements is the same: \(r_2 = r_1 + (1 + r_1)\), or just \(2^x\), where x - is the count of the bigger numbers.
Approach
- Precompute the 2-powers
- Use binary search to count how many numbers are out of the equation
n_i + x <= target - A negative result can be converted to positive by adding the modulo
1_000_000_7Complexity
- Time complexity: \(O(nlog(n))\)
- Space complexity: \(O(n)\)
5.05.2023
1456. Maximum Number of Vowels in a Substring of Given Length medium
fun maxVowels(s: String, k: Int): Int {
val vowels = setOf('a', 'e', 'i', 'o', 'u')
var count = 0
var max = 0
for (i in 0..s.lastIndex) {
if (s[i] in vowels) count++
if (i >= k && s[i - k] in vowels) count--
if (count > max) max = count
}
return max
}
Join me on Telegram
https://t.me/leetcode_daily_unstoppable/203
Intuition
Count vowels, increasing them on the right border and decreasing on the left of the sliding window.
Approach
- we can use
Setto check if it is a vowel - look at
a[i - k]to detect if we must start move left border fromi == kComplexity
- Time complexity: \(O(n)\)
- Space complexity: \(O(1)\)
4.05.2023
649. Dota2 Senate medium
fun predictPartyVictory(senate: String): String {
val queue = ArrayDeque<Char>()
senate.forEach { queue.add(it) }
var banR = 0
var banD = 0
while (true) {
var haveR = false
var haveD = false
repeat(queue.size) {
val c = queue.poll()
if (c == 'R') {
haveR = true
if (banR > 0) banR--
else {
queue.add(c)
banD++
}
} else {
haveD = true
if (banD > 0) banD--
else {
queue.add(c)
banR++
}
}
}
if (!haveR) return "Dire"
if (!haveD) return "Radiant"
}
}
Join me on Telegram
https://t.me/leetcode_daily_unstoppable/202
Intuition
One can ban on any length to the right. We can just simulate the process, and it will take at most two rounds.
Approach
Use Queue and count how many bans are from the Radiant and from the Dire.
Complexity
- Time complexity: \(O(n)\)
- Space complexity: \(O(n)\)
3.05.2023
2215. Find the Difference of Two Arrays easy
fun findDifference(nums1: IntArray, nums2: IntArray): List<List<Int>> = listOf(
nums1.subtract(nums2.toSet()).toList(),
nums2.subtract(nums1.toSet()).toList()
)
Join me on Telegram
https://t.me/leetcode_daily_unstoppable/201
Intuition
Just do what is asked.
Approach
One way is to use two Sets and just filter them.
Another is to use intersect and distinct.
Third option is to sort both of them and iterate, that will use \(O(1)\) extra memory, but \(O(nlogn)\) time.
Complexity
- Time complexity: \(O(n)\)
- Space complexity: \(O(n)\)
2.05.2023
1822. Sign of the Product of an Array easy
fun arraySign(nums: IntArray): Int = nums.fold(1) { r, t -> if (t == 0) 0 else r * (t / Math.abs(t)) }
Join me on Telegram
https://t.me/leetcode_daily_unstoppable/199
Intuition
Do what is asked, but avoid overflow.
Approach
There is an sign function in kotlin, but leetcode.com doesn’t support it yet.
We can use fold.
Complexity
- Time complexity: \(O(n)\)
- Space complexity: \(O(1)\)
1.05.2023
1491. Average Salary Excluding the Minimum and Maximum Salary easy
fun average(salary: IntArray): Double = with (salary) {
(sum() - max()!! - min()!!) / (size - 2).toDouble()
}
or
fun average(salary: IntArray): Double = salary.sorted().drop(1).dropLast(1).average()
Join me on Telegram
https://t.me/leetcode_daily_unstoppable/198
Intuition
Just do what is asked.
Approach
We can do .fold and iterate only once, but sum, max and min operators are less verbose.
We also can sort it, that will make code even shorter.
Complexity
- Time complexity: \(O(n)\), \(O(nlog(n))\) for sorted
- Space complexity: \(O(1)\)
30.04.2023
1579. Remove Max Number of Edges to Keep Graph Fully Traversable hard
fun IntArray.root(a: Int): Int {
var x = a
while (this[x] != x) x = this[x]
this[a] = x
return x
}
fun IntArray.union(a: Int, b: Int): Boolean {
val rootA = root(a)
val rootB = root(b)
if (rootA != rootB) this[rootB] = rootA
return rootA != rootB
}
fun IntArray.connected(a: Int, b: Int) = root(a) == root(b)
fun maxNumEdgesToRemove(n: Int, edges: Array<IntArray>): Int {
val uf1 = IntArray(n + 1) { it }
val uf2 = IntArray(n + 1) { it }
var skipped = 0
edges.forEach { (type, a, b) ->
if (type == 3) {
uf1.union(a, b)
if (!uf2.union(a, b)) skipped++
}
}
edges.forEach { (type, a, b) ->
if (type == 1 && !uf1.union(a, b)) skipped++
}
edges.forEach { (type, a, b) ->
if (type == 2 && !uf2.union(a, b)) skipped++
}
for (i in 2..n)
if (!uf1.connected(i - 1, i) || !uf2.connected(i - 1, i)) return -1
return skipped
}
Join me on Telegram
https://t.me/leetcode_daily_unstoppable/196
Intuition
After connecting all type 3 nodes, we can skip already connected nodes for Alice and for Bob. To detect if all the nodes are connected, we can just check if all nodes connected to one particular node.
Approach
Use separate Union-Find objects for Alice and for Bob
Complexity
- Time complexity:
\(O(n)\), as
rootandunionoperations take< 5for anyn <= Int.MAX. - Space complexity: \(O(n)\)
29.04.2023
1697. Checking Existence of Edge Length Limited Paths hard
fun distanceLimitedPathsExist(n: Int, edgeList: Array<IntArray>, queries: Array<IntArray>): BooleanArray {
val uf = IntArray(n) { it }
fun root(x: Int): Int {
var n = x
while (uf[n] != n) n = uf[n]
uf[x] = n
return n
}
fun union(a: Int, b: Int) {
val rootA = root(a)
val rootB = root(b)
if (rootA != rootB) uf[rootB] = rootA
}
val indices = queries.indices.sortedWith(compareBy( { queries[it][2] } ))
edgeList.sortWith(compareBy( { it[2] } ))
var edgePos = 0
val res = BooleanArray(queries.size)
indices.forEach { ind ->
val (qfrom, qto, maxDist) = queries[ind]
while (edgePos < edgeList.size) {
val (from, to, dist) = edgeList[edgePos]
if (dist >= maxDist) break
union(from, to)
edgePos++
}
res[ind] = root(qfrom) == root(qto)
}
return res
}
Join me on Telegram
https://t.me/leetcode_daily_unstoppable/195
Intuition
The naive approach is to do BFS for each query, obviously gives TLE as it takes \(O(n^2)\) time.
Using the hint, we can use somehow the sorted order of the queries. If we connect every two nodes with dist < query.dist we have connected groups with all nodes reachable inside them. The best data structure for union and finding connected groups is the Union-Find.
To avoid iterating edgeList every time, we can sort it too and take only available distances.
Approach
- for better time complexity, compress the Union-Find path
uf[x] = n - track the
edgePos- a position in a sortededgeList - make separate
indiceslist to sort queries without losing the orderComplexity
- Time complexity:
\(O(nlog(n))\), time complexity for
rootandunionoperations is an inverse Ackerman function and< 5for every possible number in Int. - Space complexity: \(O(n)\)
28.04.2023
839. Similar String Groups hard
fun numSimilarGroups(strs: Array<String>): Int {
fun similar(i: Int, j: Int): Boolean {
var from = 0
while (from < strs[i].length && strs[i][from] == strs[j][from]) from++
var to = strs[i].lastIndex
while (to >= 0 && strs[i][to] == strs[j][to]) to--
for (x in from + 1..to - 1)
if (strs[i][x] != strs[j][x]) return false
return true
}
val uf = IntArray(strs.size) { it }
fun root(x: Int): Int {
var n = x
while (uf[n] != n) n = uf[n]
uf[x] = n
return n
}
var groups = strs.size
fun union(a: Int, b: Int) {
val rootA = root(a)
val rootB = root(b)
if (rootA != rootB) {
groups--
uf[rootB] = rootA
}
}
for (i in 0..strs.lastIndex)
for (j in i + 1..strs.lastIndex)
if (similar(i, j)) union(i, j)
return groups
}
Join me on Telegram
https://t.me/leetcode_daily_unstoppable/194
Intuition
For tracking the groups, Union-Find is a good start. Next, we need to compare the similarity of each to each word, that is \(O(n^2)\).
For the similarity, we need a linear algorithm. Let’s divide the words into three parts: prefix+a+body+b+suffix. Two words are similar if their prefix, suffix and body are similar, leaving the only different letters a and b.
Approach
- decrease the groups when the two groups are joined together
- shorten the Union-Find root’s path
uf[x] = n - more complex Union-Find algorithm with
ranksgive the optimal time of \(O(lg*n)\), wherelg*nis the inverse Ackerman function. It is inverse of the f(n) = 2^2^2^2..n times.Complexity
- Time complexity: \(O(n^2a(n))\)
- Space complexity: \(O(n)\)
27.04.2023
319. Bulb Switcher medium
fun bulbSwitch(n: Int): Int {
if (n <= 1) return n
var count = 1
var interval = 3
var x = 1
while (x + interval <= n) {
x = x + interval
interval += 2
count++
}
return count
}
Join me on Telegram
https://t.me/leetcode_daily_unstoppable/193
Intuition
Let’s draw a diagram and see if any pattern here:
// 1 2 3 4 5 6 7 8 9 10 11 12 13 14 15 16 17 18 19
//
// 1 1 1 1 1 1 1 1 1 1 1 1 1 1 1 1 1 1 1 1
// 2 0 . 0 . 0 . 0 . 0 . 0 . 0 . 0 . 0 .
// 3 0 . . 1 . . 0 . . 1 . . 0 . . 1 .
// 4 1 . . . 1 . . . 0 . . . 1 . . .
// 5 0 . . . . 1 . . . . 1 . . . .
// 6 0 . . . . . 1 . . . . . 0 .
// 7 0 . . . . . . 1 . . . . .
// 8 0 . . . . . . . 0 . . .
// 9 1 . . . . . . . . 1 .
// 10 0 . . . . . . . . .
// 11 0 . . . . . . . .
// 12 0 . . . . . . .
// 13 0 . . . . . .
// 14 0 . . . . .
// 15 0 . . . .
// 16 1 . . .
// 17 0 . .
// 18 0 .
// 19 0
One rule is: number of switches for each new value is a number of divisors.
Another rule: we can reuse the previous result.
However, those rules didn’t help much, let’s observe another pattern: diagonal sequence have increasing intervals of zeros by 2
Approach
Use found law and write the code.
Complexity
- Time complexity:
That is tricky, let’s derive it:
\(n = 1 + 2 + (1+2+2) + (1+2+2+2) + (...) + (1+2k)\), or
\(n = \sum_{i=0}^{k}1+2i = k(1 + 2 + 1 + 2k)/2\), then count of elements in arithmetic progression
kis: \(O(k) = O(\sqrt{n})\), which is our time complexity. - Space complexity: \(O(1)\)
26.04.2023
258. Add Digits easy
fun addDigits(num: Int): Int = if (num == 0) 0 else 1 + ((num - 1) % 9)
// 0 1 2 3 4 5 6 7 8 9 10 11 12 13 14 15 16 17 18 19 20 21 22 23 24 25 26 27 28 29 30 31 32 33 34 35 36 37 38
// 0 1 2 3 4 5 6 7 8 9 1 2 3 4 5 6 7 8 9 1 2 3 4 5 6 7 8 9 1 2 3 4 5 6 7 8 9 1 2
// 0 [1..9] [1..9] [1..9] ...
Join me on Telegram
https://t.me/leetcode_daily_unstoppable/192
Intuition
Observing the pattern:
// 0 1 2 3 4 5 6 7 8 9 10 11 12 13 14 15 16 17 18 19 20 21 22 23 24 25 26 27 28 29 30 31 32 33 34 35 36 37 38
// 0 1 2 3 4 5 6 7 8 9 1 2 3 4 5 6 7 8 9 1 2 3 4 5 6 7 8 9 1 2 3 4 5 6 7 8 9 1 2
// 0 [1..9] [1..9] [1..9] ...
There is a repeating part of it: [1..9], so we can derive the formula.
Approach
It is just an array pointer loop shifted by 1.
Complexity
- Time complexity: \(O(1)\)
- Space complexity: \(O(1)\)
25.04.2023
2336. Smallest Number in Infinite Set medium
class SmallestInfiniteSet() {
val links = IntArray(1001) { it + 1 }
fun popSmallest(): Int {
val smallest = links[0]
val next = links[smallest]
links[smallest] = 0
links[0] = next
return smallest
}
fun addBack(num: Int) {
if (links[num] == 0) {
var maxLink = 0
while (links[maxLink] <= num) maxLink = links[maxLink]
val next = links[maxLink]
links[maxLink] = num
links[num] = next
}
}
}
Join me on Telegram
https://t.me/leetcode_daily_unstoppable/191
Intuition
Given the constraints, we can hold every element as a link node to another in an Array. This will give us \(O(1)\) time for pop operation, but \(O(n)\) for addBack in the worst case.
A more asymptotically optimal solution, is to use a TreeSet and a single pointer to the largest popped element.
Approach
Let’s implement a sparse array.
Complexity
- Time complexity:
\(O(1)\) - for
pop\(O(n)\) - constructor andaddBack - Space complexity: \(O(n)\)
24.04.2023
fun lastStoneWeight(stones: IntArray): Int =
with(PriorityQueue<Int>(compareByDescending { it } )) {
stones.forEach { add(it) }
while (size > 1) add(poll() - poll())
if (isEmpty()) 0 else peek()
}
Join me on Telegram
https://t.me/leetcode_daily_unstoppable/190
Intuition
Just run the simulation.
Approach
- use
PriorityQueuewithcompareByDescendingComplexity
- Time complexity: \(O(nlog(n))\)
- Space complexity: \(O(n)\)
23.04.2023
fun numberOfArrays(s: String, k: Int): Int {
// 131,7 k=1000
// 1317 > 1000
// 20001 k=2000
// 2 count=1
// 000 count=1, curr=2000
// 1 count++, curr=1
//
// 220001 k=2000
// 2 count=1 curr=1
// 22 count+1=2 curr=22 [2, 2], [22]
// 220 curr=220 [2, 20], [220]
// 2200 curr=2200 > 2000, curr=200 [2, 200], [2200]
// 22000 curr=2000 count=1 [2, 2000]
// 220001 count+1=3 curr=20001 > 2000, curr=1 [2, 2000, 1], []
val m = 1_000_000_007L
val cache = LongArray(s.length) { -1L }
fun dfs(curr: Int): Long {
if (curr == s.length) return 1L
if (s[curr] == '0') return 0L
if (cache[curr] != -1L) return cache[curr]
var count = 0L
var num = 0L
for (i in curr..s.lastIndex) {
val d = s[i].toLong() - '0'.toLong()
num = num * 10L + d
if (num > k) break
val countOther = dfs(i + 1)
count = (count + countOther) % m
}
cache[curr] = count
return count
}
return dfs(0).toInt()
}
or bottom-up
fun numberOfArrays(s: String, k: Int): Int {
val cache = LongArray(s.length)
for (curr in s.lastIndex downTo 0) {
if (s[curr] == '0') continue
var count = 0L
var num = 0L
for (i in curr..s.lastIndex) {
num = num * 10L + s[i].toLong() - '0'.toLong()
if (num > k) break
val next = if (i == s.lastIndex) 1 else cache[i + 1]
count = (count + next) % 1_000_000_007L
}
cache[curr] = count
}
return cache[0].toInt()
}
memory optimization:
fun numberOfArrays(s: String, k: Int): Int {
val cache = LongArray(k.toString().length + 1)
for (curr in s.lastIndex downTo 0) {
System.arraycopy(cache, 0, cache, 1, cache.size - 1)
if (s[curr] == '0') {
cache[0] = 0
continue
}
var count = 0L
var num = 0L
for (i in curr..s.lastIndex) {
num = num * 10L + s[i].toLong() - '0'.toLong()
if (num > k) break
val next = if (i == s.lastIndex) 1 else cache[i - curr + 1]
count = (count + next) % 1_000_000_007L
}
cache[0] = count
}
return cache[0].toInt()
}
Join me on Telegram
https://t.me/leetcode_daily_unstoppable/189
Intuition
One naive solution, is to find all the possible ways of splitting the string, and calculating soFar number, gives TLE as we must take soFar into consideration when memoizing the result.
Let’s consider, that for every position in s there is only one number of possible arrays. Given that, we can start from each position and try to take the first number in all possible correct ways, such that num < k. Now, we can cache this result for reuse.
Approach
- use
Longto avoid overflow - we actually not need all the numbers in cache, just the \(lg(k)\) for the max length of the number
Complexity
- Time complexity: \(O(nlg(k))\)
- Space complexity: \(O(lg(k))\)
22.04.2023
1312. Minimum Insertion Steps to Make a String Palindrome hard
fun minInsertions(s: String): Int {
// abb -> abba
// abb*
// ab -> aba / bab
// *ab
// bba -> abba
// *bba
// bbbaa -> aabbbaa
// **bbbaa
// bbbcaa -> aacbbbcaa
// ***bbbcaa
// leetcode -> leetcodocteel
// leetcod***e**
// o -> 0
// od -> dod / dod -> 1
// cod -> codoc / docod -> 2
// code -> codedoc / edocode -> 2+1=3
// tcod -> tcodoct / doctcod -> 2+1=3
// tcode -> tcodedoct / edoctcode -> 3+1=4
// etcode = e{tcod}e -> e{tcodoct / doctcod}e -> 3
// etcod -> 1+{tcod} -> 1+3=4
// eetcod -> docteetcod 4 ?/ eetcodoctee 5
// eetcode -> edocteetcode 5 / eetcodedoctee 6 -> e{etcod}e 4 = e{etcodocte}e
// leetcod -> 1+{eetcod} -> 5
// leetcode -> 1+{eetcode} 1+4=5
// aboba
// a -> 0
// ab -> 1
// abo -> min({ab}+1, 1+{bo}) =2
// abob -> min(1+{bob}, {abo} +1)=1
// aboba -> min(0 + {bob}, 1+{abob}, 1+{boba}) = 0
val cache = mutableMapOf<Pair<Int, Int>, Int>()
fun dfs(from: Int, to: Int): Int {
if (from > to || from < 0 || to > s.lastIndex) return -1
if (from == to) return 0
if (from + 1 == to) return if (s[from] == s[to]) 0 else 1
return cache.getOrPut(from to to) {
if (s[from] == s[to]) return@getOrPut dfs(from + 1, to - 1)
val one = dfs(from + 1, to)
val two = dfs(from, to - 1)
when {
one != -1 && two != -1 -> 1 + minOf(one, two)
one != -1 -> 1 + one
two != -1 -> 1 + two
else -> -1
}
}
}
return dfs(0, s.lastIndex)
}
Join me on Telegram
https://t.me/leetcode_daily_unstoppable/188
Intuition
Let’s add chars one by one. Single char is a palindrome. Two chars are palindrome if they are equal, and not if not: \(insertions_{ab} =\begin{cases}
0, & \text{if a==b}\\
1
\end{cases}\). While adding a new character, we choose the minimum insertions. For example, aboba:
// aboba
// a -> 0
// ab -> 1
// abo -> min({ab}+1, 1+{bo}) =2
// abob -> min(1+{bob}, {abo} +1)=1
// aboba -> min(0 + {bob}, 1+{abob}, 1+{boba}) = 0
So, the DP equation is the following \(dp_{i,j} = min(0 + dp_{i+1, j-1}, 1 + dp_{i+1, j}, 1 + dp_{i, j-1}\), where DP - is the minimum number of insertions.
Approach
Just DFS and cache.
Complexity
- Time complexity: \(O(n^2)\)
- Space complexity: \(O(n^2)\)
21.04.2023
fun profitableSchemes(n: Int, minProfit: Int, group: IntArray, profit: IntArray): Int {
val cache = Array(group.size) { Array(n + 1) { Array(minProfit + 1) { -1 } } }
fun dfs(curr: Int, guys: Int, cashIn: Int): Int {
if (guys < 0) return 0
val cash = minOf(cashIn, minProfit)
if (curr == group.size) return if (cash == minProfit) 1 else 0
with(cache[curr][guys][cash]) { if (this != -1) return@dfs this }
val notTake = dfs(curr + 1, guys, cash)
val take = dfs(curr + 1, guys - group[curr], cash + profit[curr])
val res = (notTake + take) % 1_000_000_007
cache[curr][guys][cash] = res
return res
}
return dfs(0, n, 0)
}
Join me on Telegram
https://t.me/leetcode_daily_unstoppable/187
Intuition
For every new item, j we can decide to take it or not take it. Given the inputs of how many guys we have and how much cash already earned, the result is always the same: \(count_j = notTake_j(cash, guys) + take_j(cash + profit[j], guys - group[j])\)
Approach
Do DFS and cache result in an array.
Complexity
- Time complexity: \(O(n^3)\)
- Space complexity: \(O(n^3)\)
20.04.2023
662. Maximum Width of Binary Tree medium
fun widthOfBinaryTree(root: TreeNode?): Int =
with(ArrayDeque<Pair<Int, TreeNode>>()) {
root?.let { add(0 to it) }
var width = 0
while (isNotEmpty()) {
var first = peek()
var last = last()
width = maxOf(width, last.first - first.first + 1)
repeat(size) {
val (x, node) = poll()
node.left?.let { add(2 * x + 1 to it) }
node.right?.let { add(2 * x + 2 to it) }
}
}
width
}
Join me on Telegram
https://t.me/leetcode_daily_unstoppable/186
Intuition
For every node, positions of it’s left child is \(2x +1\) and right is \(2x + 2\)
Approach
We can do BFS and track node positions.
Complexity
- Time complexity: \(O(n)\)
- Space complexity: \(O(n)\)
19.04.2023
1372. Longest ZigZag Path in a Binary Tree medium
fun longestZigZag(root: TreeNode?): Int {
var max = 0
fun dfs(n: TreeNode?, len: Int, dir: Int) {
max = maxOf(max, len)
if (n == null) return@dfs
when (dir) {
0 -> {
dfs(n?.left, 0, -1)
dfs(n?.right, 0, 1)
}
1 -> {
dfs(n?.left, len + 1, -1)
dfs(n?.right, 0, 1)
}
-1 -> {
dfs(n?.right, len + 1, 1)
dfs(n?.left, 0, -1)
}
}
}
dfs(root, 0, 0)
return max
}
Join me on Telegram
https://t.me/leetcode_daily_unstoppable/185
Intuition
Search all the possibilities with DFS
Approach
Compute the max as you go
Complexity
- Time complexity:
\(O(nlog_2(n))\), for each level of
heightwe traverse the full tree - Space complexity: \(O(log_2(n))\)
18.04.2023
1768. Merge Strings Alternately easy
fun mergeAlternately(word1: String, word2: String): String =
(word1.asSequence().zip(word2.asSequence()) { a, b -> "$a$b" } +
word1.drop(word2.length) + word2.drop(word1.length))
.joinToString("")
Join me on Telegram
https://t.me/leetcode_daily_unstoppable/184
Intuition
Do what is asked. Handle the tail.
Approach
- we can use sequence
zipoperator - for the tail, consider
dropComplexity
- Time complexity: \(O(n)\)
- Space complexity: \(O(n)\)
17.04.2023
1431. Kids With the Greatest Number of Candies easy
fun kidsWithCandies(candies: IntArray, extraCandies: Int): List<Boolean> =
candies.max()?.let { max ->
candies.map { it + extraCandies >= max}
} ?: listOf()
Join me on Telegram
https://t.me/leetcode_daily_unstoppable/183
Intuition
We can just find the maximum and then try to add extra to every kid and check
Approach
Let’s write the code
Complexity
- Time complexity: \(O(n)\)
- Space complexity: \(O(1)\)
16.04.2023
1639. Number of Ways to Form a Target String Given a Dictionary hard
fun numWays(words: Array<String>, target: String): Int {
val freq = Array(words[0].length) { LongArray(26) }
for (i in 0..words[0].lastIndex)
words.forEach { freq[i][it[i].toInt() - 'a'.toInt()]++ }
val cache = Array(words[0].length) { LongArray(target.length) { -1L } }
val m = 1_000_000_007L
fun dfs(wpos: Int, tpos: Int): Long {
if (tpos == target.length) return 1L
if (wpos == words[0].length) return 0L
if (cache[wpos][tpos] != -1L) return cache[wpos][tpos]
val curr = target[tpos].toInt() - 'a'.toInt()
val currFreq = freq[wpos][curr]
val take = if (currFreq == 0L) 0L else
dfs(wpos + 1, tpos + 1)
val notTake = dfs(wpos + 1, tpos)
val mul = (currFreq * take) % m
val res = (mul + notTake) % m
cache[wpos][tpos] = res
return res
}
return dfs(0, 0).toInt()
}
Join me on Telegram
https://t.me/leetcode_daily_unstoppable/182
Intuition
Consider an example: bbc aaa ccc, target = ac. We have 5 ways to form the ac:
// bbc aaa ccc ac
// a c
// a c
// c a
// a c
// c a
Looking at this, we deduce, that only count of every character at every position matter.
// 0 -> 1b 1a 1c
// 1 -> 1b 1a 1c
// 2 -> 1a 2c
To form ac we can start from position 0 or from 1. If we start at 0, we have one c at 1 plus two c at 2. And if we start at 1 we have two c at 3.
\(DP_{i,j} = Freq * DP_{i + 1, j + 1} + DP_{i + 1, j}\)
Approach
- precompute the
freqarray - count of each character at each position - use an
Arrayfor faster cache - use
longto avoid overflowComplexity
- Time complexity: \(O(n^2)\)
- Space complexity: \(O(n^2)\)
15.04.2023
2218. Maximum Value of K Coins From Piles hard
fun maxValueOfCoins(piles: List<List<Int>>, k: Int): Int {
val cache = Array(piles.size) { mutableListOf<Long>() }
fun dfs(pile: Int, taken: Int): Long {
if (taken >= k || pile >= piles.size) return 0
if (cache[pile].size > taken) return cache[pile][taken]
var max = dfs(pile + 1, taken)
var sum = 0L
for (j in 0..piles[pile].lastIndex) {
val newTaken = taken + j + 1
if (newTaken > k) break
sum += piles[pile][j]
max = maxOf(max, sum + dfs(pile + 1, newTaken))
}
cache[pile].add(max)
return max
}
return dfs(0, 0).toInt()
}
Join me on Telegram
https://t.me/leetcode_daily_unstoppable/181
Intuition
Given the current pile, we can assume there is an optimal maximum value of the piles to the right of the current for every given number of k.
Approach
We can cache the result by the keys of every pile to taken
Complexity
- Time complexity: \(O(kn^2)\)
- Space complexity: \(O(kn^2)\)
14.04.2023
516. Longest Palindromic Subsequence medium
fun longestPalindromeSubseq(s: String): Int {
// b + abcaba
// b + ab_ab_
// b + a_cab_
// acbbc + a -> [acbbc]a x[from]==x[to]?1 + p[from+1][to-1]
val p = Array(s.length) { Array(s.length) { 0 } }
for (i in s.lastIndex downTo 0) p[i][i] = 1
for (from in s.lastIndex - 1 downTo 0)
for (to in from + 1..s.lastIndex)
p[from][to] = if (s[from] == s[to]) {
2 + if (to == from + 1) 0 else p[from + 1][to - 1]
} else {
maxOf(p[from][to - 1], p[from + 1][to])
}
return p[0][s.lastIndex]
}
Join me on Telegram
https://t.me/leetcode_daily_unstoppable/180
Intuition
Simple DFS would not work as it will take \(O(2^n)\) steps.
Consider the sequence: acbbc and a new element a. The already existing largest palindrome is cbbc. When adding a new element, we do not care about what is inside between a..a, just the largest value of it.
So, there is a DP equation derived from this observation: \(p[i][j] = eq ? 2 + p[i+1][j-1] : max(p[i][j-1], p[i+1][j])\).
Approach
For cleaner code:
- precompute
p[i][i] = 1 - exclude
0andlastIndexfrom iteration - start with
to = from + 1Complexity
- Time complexity: \(O(n^2)\)
- Space complexity: \(O(n^2)\)
13.04.2023
946. Validate Stack Sequences medium
fun validateStackSequences(pushed: IntArray, popped: IntArray): Boolean =
with(Stack<Int>()) {
var pop = 0
pushed.forEach {
push(it)
while (isNotEmpty() && peek() == popped[pop]) {
pop()
pop++
}
}
isEmpty()
}
Telegram
https://t.me/leetcode_daily_unstoppable/179
Intuition
Do simulation using a Stack.
Approach
- use one iteration and a second pointer for
pop - empty the stack after inserting an element
Complexity
- Time complexity: \(O(n)\)
- Space complexity: \(O(n)\)
12.04.2023
71. Simplify Path medium
fun simplifyPath(path: String): String =
"/" + Stack<String>().apply {
path.split("/").forEach {
when (it) {
".." -> if (isNotEmpty()) pop()
"." -> Unit
"" -> Unit
else -> push(it)
}
}
}.joinToString("/")
Join me on Telegram
https://t.me/leetcode_daily_unstoppable/178
Intuition
We can simulate what each of the . and .. commands do by using a Stack.
Approach
- split the string by
/ - add elements to the Stack if they are not commands and not empty
Complexity
- Time complexity: \(O(n)\)
- Space complexity: \(O(n)\)
11.04.2023
2390. Removing Stars From a String medium
fun removeStars(s: String): String = StringBuilder().apply {
s.forEach {
if (it == '*') setLength(length - 1)
else append(it)
}
}.toString()
Join me on Telegram
https://t.me/leetcode_daily_unstoppable/177
Intuition
Iterate over a string. When * symbol met, remove last character, otherwise add it.
Approach
- we can use a
Stack, or justStringBuilderComplexity
- Time complexity:
- Space complexity:
10.04.2023
20. Valid Parentheses medium
fun isValid(s: String): Boolean = with(Stack<Char>()) {
val opened = hashSetOf('(', '[', '{')
val match = hashMapOf(')' to '(' , ']' to '[', '}' to '{')
!s.any { c ->
when {
c in opened -> false.also { push(c) }
isEmpty() -> true
else -> pop() != match[c]
}
} && isEmpty()
}
Join me on Telegram
Intuition
Walk the string and push brackets to the stack. When bracket is closing, pop from it.
Approach
- use HashMap to check matching bracket.
Complexity
- Time complexity: \(O(n)\)
- Space complexity: \(O(n)\)
09.04.2023
1857. Largest Color Value in a Directed Graph hard
fun largestPathValue(colors: String, edges: Array<IntArray>): Int {
if (edges.isEmpty()) return if (colors.isNotEmpty()) 1 else 0
val fromTo = mutableMapOf<Int, MutableList<Int>>()
edges.forEach { (from, to) -> fromTo.getOrPut(from) { mutableListOf() } += to }
val cache = mutableMapOf<Int, IntArray>()
var haveCycle = false
fun dfs(curr: Int, visited: HashSet<Int> = HashSet()): IntArray {
return cache.getOrPut(curr) {
val freq = IntArray(26)
if (visited.add(curr)) {
fromTo.remove(curr)?.forEach {
val childFreq = dfs(it, visited)
for (i in 0..25) freq[i] = maxOf(childFreq[i], freq[i])
}
freq[colors[curr].toInt() - 'a'.toInt()] += 1
} else haveCycle = true
freq
}
}
var max = 0
edges.forEach { (from, to) -> max = maxOf(max, dfs(from).max()!!) }
return if (haveCycle) -1 else max
}
Join me on Telegram
https://t.me/leetcode_daily_unstoppable/175
Intuition

For each node, there is only one answer of the maximum count of the same color. For each parent, \(c_p = max(freq_{child})+colors[curr]\). We can cache the result and compute it using DFS and selecting maximum count from all the children.
Approach
- use
visitedset to detect cyclesComplexity
- Time complexity: \(O(n)\)
- Space complexity: \(O(n)\)
08.04.2023
133. Clone Graph medium
fun cloneGraph(node: Node?): Node? {
if (node == null) return null
val oldToNew = mutableMapOf<Node, Node>()
fun dfs(n: Node) {
if (oldToNew[n] == null) {
oldToNew[n] = Node(n.`val`)
n.neighbors.forEach {
if (it != null) dfs(it)
}
}
}
fun dfs2(n: Node) {
oldToNew[n]!!.apply {
if (neighbors.isEmpty()) {
n.neighbors.forEach {
if (it != null) {
neighbors.add(oldToNew[it])
dfs2(it)
}
}
}
}
}
dfs(node)
dfs2(node)
return oldToNew[node]
}
Join me on Telegram
https://t.me/leetcode_daily_unstoppable/174
Intuition
We can map every old node to its new node. Then one DFS for the creation, another for the linking.
Approach
- we can avoid using
visitedset by checking if a new node already has filled its neighbors.Complexity
- Time complexity: \(O(n)\)
- Space complexity: \(O(n)\)
07.04.2023
1020. Number of Enclaves medium
fun numEnclaves(grid: Array<IntArray>): Int {
val visited = HashSet<Pair<Int, Int>>()
fun dfs(x: Int, y: Int): Int {
return if (x < 0 || y < 0 || x > grid[0].lastIndex || y > grid.lastIndex) 0
else if (grid[y][x] == 1 && visited.add(x to y))
1 + dfs(x - 1, y) + dfs(x + 1, y) + dfs(x, y - 1) + dfs(x, y + 1)
else 0
}
for (y in 0..grid.lastIndex) {
dfs(0, y)
dfs(grid[0].lastIndex, y)
}
for (x in 0..grid[0].lastIndex) {
dfs(x, 0)
dfs(x, grid.lastIndex)
}
var count = 0
for (y in 0..grid.lastIndex)
for(x in 0..grid[0].lastIndex)
count += dfs(x, y)
return count
}
Join me on Telegram
https://t.me/leetcode_daily_unstoppable/173
Intuition
Walk count all the 1 cells using DFS and a visited set.
Approach
We can use visited set, or modify the grid or use Union-Find.
To exclude the borders, we can visit them first with DFS.
Complexity
- Time complexity: \(O(n^2)\)
- Space complexity: \(O(n^2)\)
06.04.2023
1254. Number of Closed Islands medium
fun closedIsland(grid: Array<IntArray>): Int {
val visited = HashSet<Pair<Int, Int>>()
val seen = HashSet<Pair<Int, Int>>()
fun dfs(x: Int, y: Int): Boolean {
seen.add(x to y)
if (x >= 0 && y >= 0 && x < grid[0].size && y < grid.size
&& grid[y][x] == 0 && visited.add(x to y)) {
var isBorder = x == 0 || y == 0 || x == grid[0].lastIndex || y == grid.lastIndex
isBorder = dfs(x - 1, y) || isBorder
isBorder = dfs(x, y - 1) || isBorder
isBorder = dfs(x + 1, y) || isBorder
isBorder = dfs(x, y + 1) || isBorder
return isBorder
}
return false
}
var count = 0
for (y in 0..grid.lastIndex)
for (x in 0..grid[0].lastIndex)
if (grid[y][x] == 0 && seen.add(x to y) && !dfs(x, y)) count++
return count
}
Join me on Telegram
https://t.me/leetcode_daily_unstoppable/172
Intuition
Use hint #1, if we don’t count islands on the borders, we get the result. Now, just count all connected 0 cells that didn’t connect to the borders. We can use DFS or Union-Find.
Approach
DFS will solve the problem.
Complexity
- Time complexity: \(O(n^2)\)
- Space complexity: \(O(n^2)\)
05.04.2023
2439. Minimize Maximum of Array medium
fun minimizeArrayValue(nums: IntArray): Int {
// 5 4 3 2 1 -> 5
// 1 2 3 4 5 -> 3
// 1 2 3 6 3
// 1 2 6 3 3
// 1 5 3 3 3
// 3 3 3 3 3
fun canArrangeTo(x: Long): Boolean {
var diff = 0L
for (i in nums.lastIndex downTo 0)
diff = maxOf(0L, nums[i].toLong() - x + diff)
return diff == 0L
}
var lo = 0
var hi = Int.MAX_VALUE
var min = Int.MAX_VALUE
while (lo <= hi) {
val mid = lo + (hi - lo) / 2
if (canArrangeTo(mid.toLong())) {
min = minOf(min, mid)
hi = mid - 1
} else lo = mid + 1
}
return min
}
Join me on Telegram
https://t.me/leetcode_daily_unstoppable/171
Intuition
Observing the pattern, we can see, that any number from the end can be passed to the start of the array. One idea is to use two pointers, one pointing to the biggest value, another to the smallest. Given that biggest and smallest values changes, it will take \(O(nlog_2(n))\) time to maintain such sorted structure.
Another idea, is that for any given maximum value we can walk an array from the end to the start and change values to be no bigger than it. This operation takes \(O(n)\) time, and with the growth of the maximum value also increases a possibility to comply for all the elements. So, we can binary search in that space.
Approach
- careful with integers overflows
- for more robust binary search code:
-
- check the final condition
lo == hi
- check the final condition
-
- use inclusive
loandhi
- use inclusive
-
- always check the resulting value
min = minOf(min, mid)
- always check the resulting value
-
- always move the borders
mid + 1andmid - 1Complexity
- always move the borders
- Time complexity: \(O(nlog_2(n))\)
- Space complexity: \(O(1)\)
04.04.2023
2405. Optimal Partition of String medium
var mask = 0
fun partitionString(s: String): Int = 1 + s.count {
val bit = 1 shl (it.toInt() - 'a'.toInt())
(mask and bit != 0).also {
if (it) mask = 0
mask = mask or bit
}
}
Join me on Telegram
https://t.me/leetcode_daily_unstoppable/170
Intuition
Expand all the intervals until they met a duplicate character. This will be the optimal solution, as the minimum of the intervals correlates with the maximum of each interval length.
Approach
- use
hashset,[26]array or simple32-bitmask to store visited flags for characterComplexity
- Time complexity: \(O(n)\)
- Space complexity: \(O(1)\)
03.04.2023
881. Boats to Save People medium
fun numRescueBoats(people: IntArray, limit: Int): Int {
people.sort()
var count = 0
var lo = 0
var hi = people.lastIndex
while (lo <= hi) {
if (lo < hi && people[hi] + people[lo] <= limit) lo++
hi--
count++
}
return count
}
Join me on Telegram
https://t.me/leetcode_daily_unstoppable/169
Intuition
The optimal strategy comes from an intuition: for each people[hi] of a maximum weight, we can or can not add the one man people[lo] of a minimum weight.
Approach
Sort an array and move two pointers lo and hi.
- Careful with the ending condition,
lo == hiComplexity
- Time complexity: \(O(nlog_2(n))\)
- Space complexity: \(O(1)\)
02.04.2023
2300. Successful Pairs of Spells and Potions medium
fun successfulPairs(spells: IntArray, potions: IntArray, success: Long): IntArray {
potions.sort()
return IntArray(spells.size) { ind ->
var lo = 0
var hi = potions.lastIndex
var minInd = potions.size
while (lo <= hi) {
val mid = lo + (hi - lo) / 2
if (potions[mid].toLong() * spells[ind].toLong() >= success) {
minInd = minOf(minInd, mid)
hi = mid - 1
} else lo = mid + 1
}
potions.size - minInd
}
}
Join me on Telegram
https://t.me/leetcode_daily_unstoppable/168
Intuition
If we sort potions, we can find the lowest possible value of spell[i]*potion[i] that is >= success. All other values are bigger by the math multiplication property.
Approach
- sort
potions - binary search the
lowestindex - use
longto solve the integer overflowFor more robust binary search code:
- use inclusive
loandhi - do the last check
lo == hi - always compute the result
minInd - always move the
loand thehi - safely compute
midto not overflowComplexity
- Time complexity: \(O(nlog_2(n))\)
- Space complexity: \(O(n)\)
01.04.2023
704. Binary Search easy
fun search(nums: IntArray, target: Int): Int {
var lo = 0
var hi = nums.lastIndex
while (lo <= hi) {
val mid = lo + (hi - lo) / 2
if (nums[mid] == target) return mid
if (nums[mid] < target) lo = mid + 1
else hi = mid - 1
}
return -1
}
Join me on Telegram
https://t.me/leetcode_daily_unstoppable/167
Intuition
Just write binary search.
Approach
For more robust code:
- use including ranges
lo..hi - check the last condition
lo == hi - always check the exit condition
== target - compute
midwithout the integer overflow - always move the boundary
mid +ormid - 1 - check yourself where to move the boundary, imagine moving closer to the
targetComplexity
- Time complexity: \(O(log_2(n))\)
- Space complexity: \(O(1)\)
31.03.2023
1444. Number of Ways of Cutting a Pizza hard
data class Key(val x: Int, val y: Int, val c: Int)
fun ways(pizza: Array<String>, k: Int): Int {
val havePizza = Array(pizza.size) { Array<Int>(pizza[0].length) { 0 } }
val lastX = pizza[0].lastIndex
val lastY = pizza.lastIndex
for (y in lastY downTo 0) {
var sumX = 0
for (x in lastX downTo 0) {
sumX += if (pizza[y][x] == 'A') 1 else 0
havePizza[y][x] = sumX + (if (y == lastY) 0 else havePizza[y + 1][x])
}
}
val cache = mutableMapOf<Key, Int>()
fun dfs(x: Int, y: Int, c: Int): Int {
return cache.getOrPut(Key(x, y, c)) {
if (c == 0) return@getOrPut if (havePizza[y][x] > 0) 1 else 0
var res = 0
for (xx in x + 1..lastX) if (havePizza[y][x] > havePizza[y][xx])
res = (res + dfs(xx, y, c - 1)) % 1_000_000_007
for (yy in y + 1..lastY) if (havePizza[y][x] > havePizza[yy][x])
res = (res + dfs(x, yy, c - 1)) % 1_000_000_007
return@getOrPut res
}
}
return dfs(0, 0, k - 1)
}
Join me on Telegram
https://t.me/leetcode_daily_unstoppable/165
Intuition
The tricky problem is to how to program a number of cuts.
We can do the horizontal and vertical cuts decreasing available number k and tracking if we have any apples before and any apples after the cut. To track this, we can precompute a prefix sum of the apples, by each top-left corner to the end of the pizza. The stopping condition of the DFS is if we used all available cuts.
Approach
- carefully precompute prefix sum. You move by row, increasing
sumX, then you move by column and reuse the result of the previous row. - to detect if there are any apples above or to the left, compare the total number of apples precomputed from the start of the given
x,yin the arguments and from the other side of the cutxx,yorx, yy.Complexity
- Time complexity: \(O(mnk(m+n))\), mnk - number of cached states, (m+n) - search in each DFS step
- Space complexity: \(O(mnk)\)
30.03.2023
87. Scramble String hard
data class Key(val afrom: Int, val ato: Int, val bfrom: Int, val bto: Int)
fun isScramble(a: String, b: String): Boolean {
val dp = HashMap<Key, Boolean>()
fun dfs(key: Key): Boolean {
return dp.getOrPut(key) {
val (afrom, ato, bfrom, bto) = key
val alength = ato - afrom
val blength = bto - bfrom
if (alength != blength) return@getOrPut false
var same = true
for (i in 0..alength)
if (a[afrom + i] != b[bfrom + i]) same = false
if (same) return@getOrPut true
for (i in afrom..ato - 1) {
if (dfs(Key(afrom, i, bfrom, bfrom + (i - afrom)))
&& dfs(Key(i + 1, ato, bfrom + (i - afrom) + 1, bto))) return@getOrPut true
if (dfs(Key(afrom, i, bto - (i - afrom), bto))
&& dfs(Key(i + 1, ato, bfrom, bto - (i - afrom) - 1))) return@getOrPut true
}
return@getOrPut false
}
}
return dfs(Key(0, a.lastIndex, 0, b.lastIndex))
}
Join me on Telegram
https://t.me/leetcode_daily_unstoppable/164
Intuition
This is not a permutation’s problem, as there are examples when we can’t scramble two strings consisting of the same characters. We can simulate the process and search the result using DFS.
Approach
A simple approach is to concatenate strings, but in Kotlin it gives TLE, so we need bottom up approach, or just operate with indices.
- use including indices ranges
- in Kotlin, don’t forget
@getOrPutwhen exiting lambdaComplexity
- Time complexity: \(O(n^4)\)
- Space complexity: \(O(n^4)\)
29.03.2023
fun maxSatisfaction(satisfaction: IntArray): Int {
satisfaction.sort()
var max = 0
var curr = 0
var diff = 0
for (i in satisfaction.lastIndex downTo 0) {
diff += satisfaction[i]
curr += diff
max = maxOf(max, curr)
}
return max
}
Join me on Telegram
https://t.me/leetcode_daily_unstoppable/163
Intuition
Looking at the problem data examples, we intuitively deduce that the larger the number, the further it goes. We need to sort the array. With the negative numbers, we must compare all the results, excluding array prefixes.
Approach
The naive \(O(n^2)\) solution will work. However, there is an optimal one if we simply go from the end.
Complexity
- Time complexity: \(O(nlog_2(n))\)
- Space complexity: \(O(n)\)
28.03.2023
983. Minimum Cost For Tickets medium
fun mincostTickets(days: IntArray, costs: IntArray): Int {
val cache = IntArray(days.size) { -1 }
fun dfs(day: Int): Int {
if (day >= days.size) return 0
if (cache[day] != -1) return cache[day]
var next = day
while (next < days.size && days[next] - days[day] < 1) next++
val costOne = costs[0] + dfs(next)
while (next < days.size && days[next] - days[day] < 7) next++
val costSeven = costs[1] + dfs(next)
while (next < days.size && days[next] - days[day] < 30) next++
val costThirty = costs[2] + dfs(next)
return minOf(costOne, costSeven, costThirty).also { cache[day] = it}
}
return dfs(0)
}
Join me on Telegram
https://t.me/leetcode_daily_unstoppable/162
Intuition
For each day we can choose between tickets. Explore all of them and then choose minimum of the cost.
Approach
Let’s write DFS with memoization algorithm as it is simple to understand.
Complexity
- Time complexity: \(O(n)\)
- Space complexity: \(O(n)\)
27.03.2023
64. Minimum Path Sum medium
fun minPathSum(grid: Array<IntArray>): Int {
val cache = mutableMapOf<Pair<Int, Int>, Int>()
fun dfs(xy: Pair<Int, Int>): Int {
return cache.getOrPut(xy) {
val (x, y) = xy
val curr = grid[y][x]
if (x == grid[0].lastIndex && y == grid.lastIndex) curr else
minOf(
if (x < grid[0].lastIndex) curr + dfs((x + 1) to y)
else Int.MAX_VALUE,
if (y < grid.lastIndex) curr + dfs(x to (y + 1))
else Int.MAX_VALUE
)
}
}
return dfs(0 to 0)
}
Join me on Telegram
https://t.me/leetcode_daily_unstoppable/161
Intuition
On each cell of the grid, there is only one minimum path sum. So, we can memorize it. Or we can use a bottom up DP approach.
Approach
Use DFS + memo, careful with the ending condition.
Complexity
- Time complexity: \(O(n^2)\), where \(n\) - matrix size
- Space complexity: \(O(n^2)\)
26.03.2023
2360. Longest Cycle in a Graph hard
fun longestCycle(edges: IntArray): Int {
var maxLen = -1
fun checkCycle(node: Int) {
var x = node
var len = 0
do {
if (x != edges[x]) len++
x = edges[x]
} while (x != node)
if (len > maxLen) maxLen = len
}
val visited = HashSet<Int>()
fun dfs(curr: Int, currPath: HashSet<Int>) {
val isCurrentLoop = !currPath.add(curr)
if (curr != -1 && !isCurrentLoop && visited.add(curr)) {
dfs(edges[curr], currPath)
} else if (curr != -1 && isCurrentLoop) checkCycle(curr)
}
for (i in 0..edges.lastIndex) dfs(i, HashSet<Int>())
return maxLen
}
Join me on Telegram
https://t.me/leetcode_daily_unstoppable/160
Intuition
We can walk all paths once and track the cycles with the DFS.
Approach
- Use separate visited sets for the current path and for the global visited nodes.
- Careful with
checkCyclecorner cases.Complexity
- Time complexity: \(O(n)\)
- Space complexity: \(O(n)\)
25.03.2023
2316. Count Unreachable Pairs of Nodes in an Undirected Graph medium
fun countPairs(n: Int, edges: Array<IntArray>): Long {
val uf = IntArray(n) { it }
val sz = LongArray(n) { 1L }
fun root(x: Int): Int {
var n = x
while (uf[n] != n) n = uf[n]
uf[x] = n
return n
}
fun union(a: Int, b: Int) {
val rootA = root(a)
val rootB = root(b)
if (rootA != rootB) {
uf[rootB] = rootA
sz[rootA] += sz[rootB]
sz[rootB] = 0L
}
}
edges.forEach { (from, to) -> union(from, to) }
// 1 2 4 = 1*2 + 1*4 + 2*4 = 1*2 + (1+2)*4
var sum = 0L
var count = 0L
sz.forEach { // 2 2 4 = 2*2 + 2*4 + 2*4 = 2*2 + (2+2)*4
count += sum * it
sum += it
}
return count
}
Join me on Telegram
https://t.me/leetcode_daily_unstoppable/159
Intuition
To find connected components sizes, we can use Union-Find.
To count how many pairs, we need to derive the formula, observing the pattern. Assume we have groups sizes 3, 4, 5, the number of pairs is the number of pairs between 3,4 + the number of pairs between 4,5 + between 3,5. Or, \(count(a,b,c) = count(a,b) + count(b,c) + count(a,c)\) where \(count(a,b) = a*b\). So, \(count_{abc} = ab + bc + ac = ab + (a + b)c = count_{ab} + (a+b)c\), or \(count_i = count_{i-1} + x_i*\sum_{j=0}^{i}x\)
Approach
- use path compression for better
roottime complexityComplexity
- Time complexity: \(O(height)\)
- Space complexity: \(O(n)\)
24.03.2023
1466. Reorder Routes to Make All Paths Lead to the City Zero medium
fun minReorder(n: Int, connections: Array<IntArray>): Int {
val edges = mutableMapOf<Int, MutableList<Int>>()
connections.forEach { (from, to) ->
edges.getOrPut(from, { mutableListOf() }) += to
edges.getOrPut(to, { mutableListOf() }) += -from
}
val visited = HashSet<Int>()
var count = 0
with(ArrayDeque<Int>().apply { add(0) }) {
fun addNext(x: Int) {
if (visited.add(Math.abs(x))) {
add(Math.abs(x))
if (x > 0) count++
}
}
while (isNotEmpty()) {
repeat(size) {
val from = poll()
edges[from]?.forEach { addNext(it) }
edges[-from]?.forEach { addNext(it) }
}
}
}
return count
}
Join me on Telegram
https://t.me/leetcode_daily_unstoppable/158
Intuition
If our roads are undirected, the problem is simple: traverse with BFS from 0 and count how many roads are in the opposite direction.
Approach
We can use data structure or just use sign to encode the direction.
Complexity
- Time complexity: \(O(V+E)\)
- Space complexity: \(O(V+E)\)
23.03.2023
1319. Number of Operations to Make Network Connected medium
fun makeConnected(n: Int, connections: Array<IntArray>): Int {
var extraCables = 0
var groupsCount = n
val uf = IntArray(n) { it }
fun findRoot(x: Int): Int {
var n = x
while (uf[n] != n) n = uf[n]
uf[x] = n
return n
}
fun connect(a: Int, b: Int) {
val rootA = findRoot(a)
val rootB = findRoot(b)
if (rootA == rootB) {
extraCables++
return
}
uf[rootB] = rootA
groupsCount--
}
connections.forEach { (from, to) -> connect(from, to) }
return if (extraCables < groupsCount - 1) -1 else groupsCount - 1
}
Join me on Telegram
https://t.me/leetcode_daily_unstoppable/157
Intuition
The number of cables we need is the number of disconnected groups of connected computers. Cables can be taken from the computers that have extra connections. We can do this using BFS/DFS and tracking visited set, counting extra cables if already visited node is in connection. Another solution is to use Union-Find for the same purpose.
Approach
- for the better time complexity of the
findRootuse path compression:uf[x] = nComplexity
- Time complexity: \(O(n*h)\), \(h\) - tree height, in a better implementation, can be down to constant. For Quick-Union-Find it is lg(n).
- Space complexity: \(O(n)\)
22.03.2023
2492. Minimum Score of a Path Between Two Cities medium
fun minScore(n: Int, roads: Array<IntArray>): Int {
val uf = Array(n + 1) { it }
val minDist = Array(n + 1) { Int.MAX_VALUE }
fun findRoot(x: Int): Int {
var n = x
while (uf[n] != n) n = uf[n]
uf[x] = n
return n
}
fun union(a: Int, b: Int, dist: Int) {
val rootA = findRoot(a)
val rootB = findRoot(b)
uf[rootB] = rootA
minDist[rootA] = minOf(minDist[rootA], minDist[rootB], dist)
}
roads.forEach { (from, to, dist) -> union(from, to, dist) }
return minDist[findRoot(1)]
}
Join me on Telegram
https://t.me/leetcode_daily_unstoppable/156
Intuition
Observing the problem definition, we don’t care about the path, but only about the minimum distance in a connected subset containing 1 and n. This can be solved by simple BFS, which takes \(O(V+E)\) time and space. But ideal data structure for this problem is Union-Find.
- In an interview, it is better to just start with BFS, because explaining the time complexity of the
findoperation of Union-Find is difficult. https://algs4.cs.princeton.edu/15uf/
Approach
Connect all roads and update minimums in the Union-Find data structure. Use simple arrays for both connections and minimums.
- updating a root after finding it gives more optimal time
Complexity
- Time complexity: \(O(E*tree_height)\)
- Space complexity: \(O(n)\)
21.03.2023
2348. Number of Zero-Filled Subarrays medium
fun zeroFilledSubarray(nums: IntArray): Long {
var currCount = 0L
var sum = 0L
nums.forEach {
if (it == 0) currCount++ else currCount = 0L
sum += currCount
}
return sum
}
Join me on Telegram
https://t.me/leetcode_daily_unstoppable/155
Intuition
Consider the following sequence: 0, 00, 000. Each time we are adding another element to the end of the previous. For 0 count of subarrays \(c_1 = 1\), for 00 it is \(c_2 = c_1 + z_2\), where \(z_2\) is a number of zeros. So, the math equation is \(c_i = c_{i-1} + z_i\), or \(c_n = \sum_{i=0}^{n}z_i\)
Approach
We can count subarray sums, then add them to the result, or we can just skip directly to adding to the result.
Complexity
- Time complexity: \(O(n)\)
- Space complexity: \(O(1)\)
20.03.2023
fun canPlaceFlowers(flowerbed: IntArray, n: Int): Boolean {
var count = 0
if (flowerbed.size == 1 && flowerbed[0] == 0) count++
if (flowerbed.size >= 2 && flowerbed[0] == 0 && flowerbed[1] == 0) {
flowerbed[0] = 1
count++
}
for (i in 1..flowerbed.lastIndex - 1) {
if (flowerbed[i] == 0 && flowerbed[i - 1] == 0 && flowerbed[i + 1] == 0) {
flowerbed[i] = 1
count++
}
}
if (flowerbed.size >= 2 && flowerbed[flowerbed.lastIndex] == 0 && flowerbed[flowerbed.lastIndex - 1] == 0) count++
return count >= n
}
Join me on Telegram
https://t.me/leetcode_daily_unstoppable/154
Intuition
We can plant flowers greedily in every vacant place. This will be the maximum result because if we skip one item, the result is the same for even number of places or worse for odd.
Approach
- careful with corner cases
Complexity
- Time complexity: \(O(n)\)
- Space complexity: \(O(1)\)
19.03.2023
211. Design Add and Search Words Data Structure medium
class Trie {
val next = Array<Trie?>(26) { null }
fun Char.ind() = toInt() - 'a'.toInt()
operator fun get(c: Char): Trie? = next[c.ind()]
operator fun set(c: Char, t: Trie) { next[c.ind()] = t }
var isWord = false
}
class WordDictionary(val root: Trie = Trie()) {
fun addWord(word: String) {
var t = root
word.forEach { t = t[it] ?: Trie().apply { t[it] = this } }
t.isWord = true
}
fun search(word: String): Boolean = with(ArrayDeque<Trie>().apply { add(root) }) {
!word.any { c ->
repeat(size) {
val t = poll()
if (c == '.') ('a'..'z').forEach { t[it]?.let { add(it) } }
else t[c]?.let { add(it) }
}
isEmpty()
} && any { it.isWord }
}
}
Join me on telegram
https://t.me/leetcode_daily_unstoppable/153
Intuition
We are already familiar with a Trie data structure, however there is a wildcard feature added. We have two options: add wildcard for every character in addWord method in \(O(w26^w)\) time and then search in \(O(w)\) time, or just add a word to Trie in \(O(w)\) time and then search in \(O(w26^d)\) time, where \(d\) - is a wildcards count. In the description, there are at most 3 dots, so we choose the second option.
Approach
Let’s try to write it in a Kotlin way, using as little words as possible.
Complexity
- Time complexity: \(O(w)\) add, \(O(w26^d)\) search, where \(d\) - wildcards count.
- Space complexity: \(O(m)\), \(m\) - unique words suffixes count.
18.03.2023
1472. Design Browser History medium
class BrowserHistory(homepage: String) {
val list = mutableListOf(homepage)
var curr = 0
var last = 0
fun visit(url: String) {
curr++
if (curr == list.size) {
list.add(url)
} else {
list[curr] = url
}
last = curr
}
fun back(steps: Int): String {
curr = (curr - steps).coerceIn(0, last)
return list[curr]
}
fun forward(steps: Int): String {
curr = (curr + steps).coerceIn(0, last)
return list[curr]
}
}
Join me on telegram
https://t.me/leetcode_daily_unstoppable/152
Intuition
Simple solution with array list will work, just not very optimal for the memory.
Approach
Just implement it.
Complexity
- Time complexity: \(O(1)\) for all operations
- Space complexity: \(O(n)\), will keep all the links
17.03.2023
208. Implement Trie (Prefix Tree) medium
class Trie() {
val root = Array<Trie?>(26) { null }
fun Char.ind() = toInt() - 'a'.toInt()
operator fun get(c: Char): Trie? = root[c.ind()]
operator fun set(c: Char, v: Trie) { root[c.ind()] = v }
var isWord = false
fun insert(word: String) {
var t = this
word.forEach { t = t[it] ?: Trie().apply { t[it] = this} }
t.isWord = true
}
fun String.search(): Trie? {
var t = this@Trie
forEach { t = t[it] ?: return@search null }
return t
}
fun search(word: String) = word.search()?.isWord ?: false
fun startsWith(prefix: String) = prefix.search() != null
}
Join me on Telegram
https://t.me/leetcode_daily_unstoppable/151
Intuition
Trie is a common known data structure and all must know how to implement it.
Approach
Let’s try to write it Kotlin-way
Complexity
- Time complexity: \(O(w)\) access for each method call, where \(w\) - is a word length
- Space complexity: \(O(w*N)\), where \(N\) - is a unique words count.
16.03.2023
106. Construct Binary Tree from Inorder and Postorder Traversal medium
fun buildTree(inorder: IntArray, postorder: IntArray): TreeNode? {
val inToInd = inorder.asSequence().mapIndexed { i, v -> v to i }.toMap()
var postTo = postorder.lastIndex
fun build(inFrom: Int, inTo: Int): TreeNode? {
if (inFrom > inTo || postTo < 0) return null
return TreeNode(postorder[postTo]).apply {
val inInd = inToInd[postorder[postTo]]!!
postTo--
right = build(inInd + 1, inTo)
left = build(inFrom, inInd - 1)
}
}
return build(0, inorder.lastIndex)
}
Join me on Telegram
https://t.me/leetcode_daily_unstoppable/150
Intuition
Postorder traversal gives us the root of every current subtree. Next, we need to find this value in inorder traversal: from the left of it will be the left subtree, from the right - right.
Approach
- To more robust code, consider moving
postTovariable as we go in the reverse-postorder: from the right to the left. - store indices in a hashmap
Complexity
- Time complexity: \(O(n)\)
- Space complexity: \(O(n)\)
15.03.2023
958. Check Completeness of a Binary Tree medium
data class R(val min: Int, val max: Int, val complete: Boolean)
fun isCompleteTree(root: TreeNode?): Boolean {
fun dfs(n: TreeNode): R {
with(n) {
if (left == null && right != null) return R(0, 0, false)
if (left == null && right == null) return R(0, 0, true)
val (leftMin, leftMax, leftComplete) = dfs(left)
if (!leftComplete) return R(0, 0, false)
if (right == null) return R(0, leftMax + 1, leftMin == leftMax && leftMin == 0)
val (rightMin, rightMax, rightComplete) = dfs(right)
if (!rightComplete) return R(0, 0, false)
val isComplete = leftMin == rightMin && rightMin == rightMax
|| leftMin == leftMax && leftMin == rightMin + 1
return R(1 + minOf(leftMin, rightMin), 1 + maxOf(leftMax, rightMax), isComplete)
}
}
return root == null || dfs(root).complete
}
Join me on telegram
https://t.me/leetcode_daily_unstoppable/149
Intuition
For each node, we can compute it’s left and right child min and max depth, then compare them.
Approach
Right depth must not be larger than left. There are no corner cases, just be careful.
Complexity
- Time complexity: \(O(n)\)
- Space complexity: \(O(log_2(n))\)
14.03.2023
129. Sum Root to Leaf Numbers medium
fun sumNumbers(root: TreeNode?): Int = if (root == null) 0 else {
var sum = 0
fun dfs(n: TreeNode, soFar: Int) {
with(n) {
val x = soFar * 10 + `val`
if (left == null && right == null) sum += x
if (left != null) dfs(left, x)
if (right != null) dfs(right, x)
}
}
dfs(root, 0)
sum
}
Join me on telegram
https://t.me/leetcode_daily_unstoppable/148
Intuition
Just make DFS and add to the sum if the node is a leaf.
Approach
The most trivial way is to keep sum variable outside the dfs function.
Complexity
- Time complexity: \(O(n)\)
- Space complexity: \(O(log_2(n))\)
13.03.2023
101. Symmetric Tree easy
data class H(val x: Int?)
fun isSymmetric(root: TreeNode?): Boolean {
with(ArrayDeque<TreeNode>().apply { root?.let { add(it) } }) {
while (isNotEmpty()) {
val stack = Stack<H>()
val sz = size
repeat(sz) {
if (sz == 1 && peek().left?.`val` != peek().right?.`val`) return false
with(poll()) {
if (sz == 1 || it < sz / 2) {
stack.push(H(left?.`val`))
stack.push(H(right?.`val`))
} else {
if (stack.isEmpty() || stack.pop().x != left?.`val`) return false
if (stack.isEmpty() || stack.pop().x != right?.`val`) return false
}
left?.let { add(it)}
right?.let { add(it)}
}
}
}
}
return true
}
fun isSymmetric2(root: TreeNode?): Boolean {
fun isSymmetric(leftRoot: TreeNode?, rightRoot: TreeNode?): Boolean {
return leftRoot == null && rightRoot == null
|| leftRoot != null && rightRoot != null
&& leftRoot.`val` == rightRoot.`val`
&& isSymmetric(leftRoot.left, rightRoot.right)
&& isSymmetric(leftRoot.right, rightRoot.left)
}
return isSymmetric(root?.left, root?.right)
}
Join me on Telegram
https://t.me/leetcode_daily_unstoppable/147
Intuition
Recursive solution based on idea that we must compare left.left with right.right and left.right with right.left.
Iterative solution is just BFS and Stack.
Approach
Recursive: just write helper function.
Iterative: save also null’s to solve corner cases.
Complexity
- Time complexity: Recursive: \(O(n)\) Iterative: \(O(n)\)
- Space complexity: Recursive: \(O(log_2(n))\) Iterative: \(O(n)\)
12.03.2023
fun mergeKLists(lists: Array<ListNode?>): ListNode? {
val root = ListNode(0)
var curr: ListNode = root
val pq = PriorityQueue<ListNode>(compareBy( { it.`val` }))
lists.forEach { if (it != null) pq.add(it) }
while (pq.isNotEmpty()) {
val next = pq.poll()
curr.next = next
next.next?.let { pq.add(it) }
curr = next
}
return root.next
}
fun mergeKLists2(lists: Array<ListNode?>): ListNode? {
fun merge(oneNode: ListNode?, twoNode: ListNode?): ListNode? {
val root = ListNode(0)
var curr: ListNode = root
var one = oneNode
var two = twoNode
while (one != null && two != null) {
if (one.`val` <= two.`val`) {
curr.next = one
one = one.next
} else {
curr.next = two
two = two.next
}
curr = curr.next!!
}
if (one != null) curr.next = one
else if (two != null) curr.next = two
return root.next
}
return lists.fold(null as ListNode?) { r, t -> merge(r, t) }
}
Join me on telegram
https://t.me/leetcode_daily_unstoppable/146
Intuition
On each step, we need to choose a minimum from k variables. The best way to do this is to use PriorityQeueu
Another solution is to just iteratively merge the result to the next list from the array.
Approach
- use dummy head
For the
PriorityQueuesolution: - use non-null values to more robust code For the iterative solution:
- we can skip merging if one of the lists is empty
Complexity
- Time complexity:
PriorityQueue: \(O(nlog(k))\)- iterative merge: \(O(nk)\)
- Space complexity:
PriorityQueue: \(O(k)\)- iterative merge: \(O(1)\)
11.03.2023
109. Convert Sorted List to Binary Search Tree medium
fun sortedListToBST(head: ListNode?): TreeNode? {
if (head == null) return null
if (head.next == null) return TreeNode(head.`val`)
var one = head
var twoPrev = head
var two = head
while (one != null && one.next != null) {
one = one.next?.next
twoPrev = two
two = two?.next
}
twoPrev!!.next = null
return TreeNode(two!!.`val`).apply {
left = sortedListToBST(head)
right = sortedListToBST(two!!.next)
}
}
Join me on Telegram
https://t.me/leetcode_daily_unstoppable/145
Intuition
One way is to convert linked list to array, then just build a binary search tree using divide and conquer technique. This will take \(O(nlog_2(n))\) additional memory, and \(O(n)\) time. We can skip using the array and just compute the middle of the linked list each time.
Approach
Compute the middle of the linked list.
- careful with corner cases (check
fast.next != nullinstead offast != null)Complexity
- Time complexity: \(O(nlog_2(n))\)
- Space complexity: \(O(log_2(n))\) of additional space (for recursion)
10.03.2023
382. Linked List Random Node medium
class Solution(val head: ListNode?) {
val rnd = Random(0)
var curr = head
fun getRandom(): Int {
val ind = rnd.nextInt(6)
var peek: ListNode? = null
repeat(6) {
curr = curr?.next
if (curr == null) curr = head
if (it == ind) peek = curr
}
return peek!!.`val`
}
}
Join me on Telegram
https://t.me/leetcode_daily_unstoppable/144
Intuition
Naive solution is trivial. For more interesting solution, you need to look at what others did on leetcode, read an article https://en.wikipedia.org/wiki/Reservoir_sampling and try to understand why it works.
My intuition was: if we need a probability 1/n, where n - is a total number of elements, then what if we split all the input into buckets of size k, then choose from every bucket with probability 1/k. It seems to work, but only for sizes starting from number 6 for the given input.
We just need to be sure, that number of getRandom calls are equal to number of buckets n/k.
Approach
Write the naive solution, then go to Wikipedia, and hope you will not get this in the interview.
Complexity
- Time complexity: \(O(n)\)
- Space complexity: \(O(1)\)
09.03.2023
142. Linked List Cycle II medium
fun detectCycle(head: ListNode?): ListNode? {
var one = head
var two = head
do {
one = one?.next
two = two?.next?.next
} while (two != null && one != two)
if (two == null) return null
one = head
while (one != two) {
one = one?.next
two = two?.next
}
return one
}
Join me on telegram
https://t.me/leetcode_daily_unstoppable/143
Intuition
 There is a known algorithm to detect a cycle in a linked list. Move
 slow pointer one node at a time, and move fast pointer two nodes at a time. Eventually, if they meet, there is a cycle.
To know the connection point of the cycle, you can also use two pointers: one from where pointers were met, another from the start, and move both of them one node at a time until they meet.
How to derive this yourself?
- you can draw the diagram
- notice, when all the list is a cycle, nodes met at exactly where they are started
- meet point = cycle length + tail
Approach
- careful with corner cases.
Complexity
- Time complexity: \(O(n)\)
- Space complexity: \(O(1)\)
08.03.2023
875. Koko Eating Bananas medium
fun minEatingSpeed(piles: IntArray, h: Int): Int {
fun canEatAll(speed: Long): Boolean {
var time = 0L
piles.forEach {
time += (it.toLong() / speed) + if ((it.toLong() % speed) == 0L) 0L else 1L
}
return time <= h
}
var lo = 1L
var hi = piles.asSequence().map { it.toLong() }.sum()!!
var minSpeed = hi
while (lo <= hi) {
val speed = lo + (hi - lo) / 2
if (canEatAll(speed)) {
minSpeed = minOf(minSpeed, speed)
hi = speed - 1
} else {
lo = speed + 1
}
}
return minSpeed.toInt()
}
Join me on Telegram
https://t.me/leetcode_daily_unstoppable/142
Intuition
Given the speed we can count how many hours take Coco to eat all the bananas. With growth of speed hours growth too, so we can binary search in that space.
Approach
For more robust binary search:
- use inclusive condition check
lo == hi - always move boundaries
mid + 1,mid - 1 - compute the result on each step
Complexity
- Time complexity:
\(O(nlog_2(m))\),
m- ishoursrange - Space complexity: \(O(1)\)
07.03.2023
2187. Minimum Time to Complete Trips medium
fun minimumTime(time: IntArray, totalTrips: Int): Long {
fun tripCount(timeGiven: Long): Long {
var count = 0L
for (t in time) count += timeGiven / t.toLong()
return count
}
var lo = 0L
var hi = time.asSequence().map { it.toLong() * totalTrips }.max()!!
var minTime = hi
while (lo <= hi) {
val timeGiven = lo + (hi - lo) / 2
val trips = tripCount(timeGiven)
if (trips >= totalTrips) {
minTime = minOf(minTime, timeGiven)
hi = timeGiven - 1
} else {
lo = timeGiven + 1
}
}
return minTime
}
Join me on telergam
https://t.me/leetcode_daily_unstoppable/140
Intuition
Naive approach is just to simulate the time running, but given the problem range it is not possible.
However, observing the time simulation results, we can notice, that by each given time there is a certain number of trips. And number of trips growths continuously with the growth of the time. This is a perfect condition to do a binary search in a space of the given time.
With given time we can calculate number of trips in a \(O(n)\) complexity.
Approach
Do a binary search. For the hi value, we can peak a \(10^7\) or just compute all the time it takes for every bus to trip.
For a more robust binary search:
- use inclusive
loandhi - use inclusive check for the last case
lo == hi - compute the result on every step instead of computing it after the search
- always move the borders
mid + 1,mid - 1
Complexity
- Time complexity: \(O(nlog_2(m))\), \(m\) - is a time range
- Space complexity: \(O(1)\)
06.03.2023
1539. Kth Missing Positive Number easy
fun findKthPositive(arr: IntArray, k: Int): Int {
// 1 2 3 4 5 6 7 8 9 10 11
// * 2 3 4 * * 7 * * * 11
// ^ ^
// 1 2 3 4 5
// 2 3 4 7 11
// 1
// 1
// 1
// 3
// 6
//
// ^ 7 + (5-3) = 9
// arr[m] + (k-diff)
//
// 1 2
// 7 8 k=1
// 6
// 6
var lo = 0
var hi = arr.lastIndex
var res = -1
while (lo <= hi) {
val mid = lo + (hi - lo) / 2
val diff = arr[mid] - mid - 1
if (diff < k) {
res = arr[mid] + (k - diff)
lo = mid + 1
} else {
hi = mid - 1
}
}
return if (res == -1) k else res
}
Join me on Telegram
https://t.me/leetcode_daily_unstoppable/139
Intuition
Let’s observe an example:
// 1 2 3 4 5 6 7 8 9 10 11
// * 2 3 4 * * 7 * * * 11
For each number at its position, there are two conditions:
- if it stays in a correct position, then
num - pos == 0 - if there is a missing number before it, then
num - pos == diff > 0
We can observe the pattern and derive the formula for it:
// 1 2 3 4 5
// 2 3 4 7 11
// 1
// 1
// 1
// 3
// 6
//
// ^ 7 + (5-3) = 9
// arr[m] + (k-diff)
One corner case is if the missing numbers are at the beginning of the array:
// 1 2
// 7 8 k=1
// 6
// 6
Then the answer is just a k.
Approach
For more robust binary search code:
- use inclusive borders
loandhi(don’t make of by 1 error) - use inclusive last check
lo == hi(don’t miss one item arrays) - always move the borders
mid + 1ormid - 1(don’t fall into an infinity loop) - always compute the search if the case is
true(don’t compute it after the search to avoid mistakes)Complexity
- Time complexity: \(O(log_2(n))\)
- Space complexity: \(O(n)\)
05.03.2023
1345. Jump Game IV hard
fun minJumps(arr: IntArray): Int {
val numToPos = mutableMapOf<Int, MutableList<Int>>()
arr.forEachIndexed { i, n -> numToPos.getOrPut(n, { mutableListOf() }).add(i) }
with(ArrayDeque<Int>().apply { add(0) }) {
var jumps = 0
val visited = HashSet<Int>()
while(isNotEmpty()) {
repeat(size) {
val curr = poll()
if (curr == arr.lastIndex) return jumps
numToPos.remove(arr[curr])?.forEach { if (visited.add(it)) add(it) }
if (curr > 0 && visited.add(curr - 1)) add(curr - 1)
if (curr < arr.lastIndex && visited.add(curr + 1)) add(curr + 1)
}
jumps++
}
}
return 0
}
Join me on telegram
https://t.me/leetcode_daily_unstoppable/138
Intuition
Dynamic programming approach wouldn’t work here, as we can tell from position i is it optimal before visiting both left and right subarrays.
Another way to find the shortest path is to just do Breath-First-Search.
Approach
This problem gives TLE until we do one trick:
- remove the visited nodes from the graph
Complexity
- Time complexity: \(O(n)\)
- Space complexity: \(O(n)\)
04.03.2023
2444. Count Subarrays With Fixed Bounds hard
fun countSubarrays(nums: IntArray, minK: Int, maxK: Int): Long {
val range = minK..maxK
var i = 0
var sum = 0L
if (minK == maxK) {
var count = 0
for (i in 0..nums.lastIndex) {
if (nums[i] == minK) count++
else count = 0
if (count > 0) sum += count
}
return sum
}
while (i < nums.size) {
val curr = nums[i]
if (curr in range) {
val minInds = TreeSet<Int>()
val maxInds = TreeSet<Int>()
var end = i
while (end < nums.size && nums[end] in range) {
if (nums[end] == minK) minInds.add(end)
else if (nums[end] == maxK) maxInds.add(end)
end++
}
if (minInds.size > 0 && maxInds.size > 0) {
var prevInd = i - 1
while (minInds.isNotEmpty() && maxInds.isNotEmpty()) {
val minInd = minInds.pollFirst()!!
val maxInd = maxInds.pollFirst()!!
val from = minOf(minInd, maxInd)
val to = maxOf(minInd, maxInd)
val remainLenAfter = (end - 1 - to).toLong()
val remainLenBefore = (from - (prevInd + 1)).toLong()
sum += 1L + remainLenAfter + remainLenBefore + remainLenAfter * remainLenBefore
prevInd = from
if (to == maxInd) maxInds.add(to)
else if (to == minInd) minInds.add(to)
}
}
if (i == end) end++
i = end
} else i++
}
return sum
}
and more clever solution:
fun countSubarrays(nums: IntArray, minK: Int, maxK: Int): Long {
var sum = 0L
if (minK == maxK) {
var count = 0
for (i in 0..nums.lastIndex) {
if (nums[i] == minK) count++
else count = 0
if (count > 0) sum += count
}
return sum
}
val range = minK..maxK
// 0 1 2 3 4 5 6 7 8 91011
// 3 7 2 2 2 2 2 1 2 3 2 1
// b
// *...*
// *...*
var border = -1
var posMin = -1
var posMax = -1
for (i in 0..nums.lastIndex) {
when (nums[i]) {
!in range -> border = i
minK -> posMin = i
maxK -> posMax = i
}
if (posMin > border && posMax > border)
sum += minOf(posMin, posMax) - border
}
return sum
}
Join me on Telegram
https://t.me/leetcode_daily_unstoppable/137
Intuition
First thought is that we can observe only subarrays, where all the elements are in a range min..max. Next, there are two possible scenarios:
- If
minK==maxK, our problem is a trivial count of the combinations, \(0 + 1 + .. + (n-1) + n = n*(n+1)/2\) - If
minK != maxK, we need to take everyminK|maxKpair, and count how many items are in rangebeforethem and how manyafter. Then, as we observe the pattern of combinations:
// 0 1 2 3 4 5 6 min=1, max=3
// ------------------
// 1 2 3 2 1 2 3
// 1 2 3 *** 0..2 remainLenAfter = 6 - 2 = 4
// 1 2 3 2
// 1 2 3 2 1
// 1 2 3 2 1 2
// 1 2 3 2 1 2 3
// 3 2 1 *** 2..4 remainLenAfter = 6 - 4 = 2
// 3 2 1 2
// 3 2 1 2 3
// 2 3 2 1 remainLenBefore = 2 - (0 + 1) = 1, sum += 1 + remainLenAfter += 1+2 += 3
// 2 3 2 1 2
// 2 3 2 1 2 3
// 1 2 3 *** 4..6 remainLenBefore = 4 - 4 + 1 = 1
// 2 1 2 3
// 1 2 1 2 3 2 3
// *.......* *** 0..4 sum += 1 + 2 = 3
// *...* *** 2..4 rla = 6 - 4 = 2, rlb = 2 - (0 + 1) = 1, sum += 1 + rla + rlb + rlb*rla += 6 = 9
// 1 3 5 2 7 5
// *...*
//
we derive the formula: \(sum += 1 + suffix + prefix + suffix*prefix\)
A more clever, but less understandable solution: is to count how many times we take a condition where we have a min and a max and each time add prefix count. Basically, it is the same formula, but with a more clever way of computing. (It is like computing a combination sum by adding each time the counter to sum).
Approach
For the explicit solution, we take each interval, store positions of the min and max in a TreeSet, then we must take poll those mins and maxes and consider each range separately:
// 3 2 3 2 1 2 1
// *.......*
// *...*
// 3 2 1 2 3 2 1
// *...*
// *...*
// *...*
// 3 2 1 2 1 2 3
// *...*
// *.......*
// *...*
// 3 2 1 2 3 3 3
// *...*
// *...*
// 3 2 2 2 2 2 1
// *...........*
// 1 1 1 1 1 1 1
// *.*
// *.*
// *.*
// *.*
// *.*
// *.*
For the tricky one solution, just see what other clever man already wrote on the leetcode site and hope you will not get the same problem in an interview.
Complexity
-
Time complexity: \(O(nlog_2(n))\) -> \(O(n)\)
-
Space complexity: \(O(n)\) -> \(O(1)\)
03.03.2023
28. Find the Index of the First Occurrence in a String medium
fun strStr(haystack: String, needle: String): Int {
// f(x) = a + 32 * f(x - 1)
// abc
// f(a) = a + 0
// f(ab) = b + 32 * (a + 0)
// f(abc) = c + 32 * (b + 32 * (a + 0))
//
// f(b) = b + 0
// f(bc) = c + 32 * (b + 0)
//
// f(abc) - f(bc) = 32^0*c + 32^1*b + 32^2*a - 32^0*c - 32^1*b = 32^2*a
// f(bc) = f(abc) - 32^2*a
var needleHash = 0L
needle.forEach { needleHash = it.toLong() + 32L * needleHash }
var currHash = 0L
var pow = 1L
repeat(needle.length) { pow *= 32L}
for (curr in 0..haystack.lastIndex) {
currHash = haystack[curr].toLong() + 32L * currHash
if (curr >= needle.length)
currHash -= pow * haystack[curr - needle.length].toLong()
if (curr >= needle.lastIndex
&& currHash == needleHash
&& haystack.substring(curr - needle.lastIndex, curr + 1) == needle)
return curr - needle.lastIndex
}
return -1
}
Join me on Telegram
https://t.me/leetcode_daily_unstoppable/136
Intuition
There is a rolling hash technique: you can compute hash for a sliding window using O(1) additional time.
Consider the math behind it:
// f(x) = a + 32 * f(x - 1)
// abc
// f(a) = a + 0
// f(ab) = b + 32 * (a + 0)
// f(abc) = c + 32 * (b + 32 * (a + 0))
//
// f(b) = b + 0
// f(bc) = c + 32 * (b + 0)
//
// f(abc) - f(bc) = 32^0*c + 32^1*b + 32^2*a - 32^0*c - 32^1*b = 32^2*a
// f(bc) = f(abc) - 32^2*a
Basically, you can subtract char * 32^window_length from the lower side of the sliding window.
Approach
- carefull with indexes
Complexity
- Time complexity: \(O(n)\), if our hash function is good, we good
- Space complexity: \(O(n)\), for substring, can be improved to O(1)
02.03.2023
443. String Compression medium
fun compress(chars: CharArray): Int {
var end = 0
var curr = 0
while (curr < chars.size) {
val c = chars[curr++]
var currCount = 1
while (curr < chars.size && c == chars[curr]) {
curr++
currCount++
}
chars[end++] = c
if (currCount > 1) currCount.toString().forEach { chars[end++] = it }
}
return end
}
Join me on telegram
https://t.me/leetcode_daily_unstoppable/135
Intuition
You don’t need to split a number into groups of 9’s.
The right way to convert number 123 into a string is to divide it by 10 each time, then reverse a part of the array.
Approach
- Let’s just do a naive
toStringfor simplicity. - to avoid mistakes with indexes, use explicit variable for count the duplicate chars
Complexity
- Time complexity: \(O(n)\)
- Space complexity:
\(O(lg_10(n))\), for storing
toString. For this task it is a4
01.03.2023
912. Sort an Array medium
fun sortArray(nums: IntArray, from: Int = 0, to: Int = nums.lastIndex): IntArray {
if (from >= to) return nums
val mid = partition(nums, from, to)
sortArray(nums, from, mid - 1)
sortArray(nums, mid + 1, to)
return nums
}
fun IntArray.swap(i: Int, j: Int) { this[i] = this[j].also { this[j] = this[i] } }
fun partition(nums: IntArray, from: Int, to: Int): Int {
var border = nums[to]
var afterBorder = from
for (curr in from until to)
if (nums[curr] < border) nums.swap(curr, afterBorder++)
nums.swap(to, afterBorder)
return afterBorder
}
Join me on telegram
https://t.me/leetcode_daily_unstoppable/134
Intuition
There are some tricks to optimize naive quicksort algorithm.
- choose between
lo,midandhielements for the pivot instead of justhi - shuffling the array before sorting
- starting with the smallest part of the array
- making the last recursion call with a
tailrec - sorting with
insertion sortfor a small parts
Approach
Let’s just implement naive quicksort.
Complexity
- Time complexity: \(O(nlog_2(n))\)
- Space complexity: \(O(log_2(n))\) for the recursion
28.02.2023
652. Find Duplicate Subtrees medium
fun findDuplicateSubtrees(root: TreeNode?): List<TreeNode?> {
val result = mutableListOf<TreeNode?>()
val hashes = HashSet<String>()
val added = HashSet<String>()
fun hashDFS(node: TreeNode): String {
return with(node) {
"[" + (left?.let { hashDFS(it) } ?: "*") +
"_" + `val` + "_" +
(right?.let { hashDFS(it) } ?: "*") + "]"
}.also {
if (!hashes.add(it) && added.add(it)) result.add(node)
}
}
if (root != null) hashDFS(root)
return result
}
Join me on Telegram
https://t.me/leetcode_daily_unstoppable/132
Intuition
We can traverse the tree and construct a hash of each node, then just compare nodes with equal hashes. Another way is to serialize the tree and compare that data.
Approach
Let’s use pre-order traversal and serialize each node into string, also add that into HashSet and check for duplicates.
Complexity
- Time complexity: \(O(n^2)\), because of the string construction on each node.
- Space complexity: \(O(n^2)\)
27.02.2023
427. Construct Quad Tree medium
fun construct(grid: Array<IntArray>): Node? {
if (grid.isEmpty()) return null
fun dfs(xMin: Int, xMax: Int, yMin: Int, yMax: Int): Node? {
if (xMin == xMax) return Node(grid[yMin][xMin] == 1, true)
val xMid = xMin + (xMax - xMin) / 2
val yMid = yMin + (yMax - yMin) / 2
return Node(false, false).apply {
topLeft = dfs(xMin, xMid, yMin, yMid)
topRight = dfs(xMid + 1, xMax, yMin, yMid)
bottomLeft = dfs(xMin, xMid, yMid + 1, yMax)
bottomRight = dfs(xMid + 1, xMax, yMid + 1, yMax)
if (topLeft!!.isLeaf && topRight!!.isLeaf
&& bottomLeft!!.isLeaf && bottomRight!!.isLeaf) {
if (topLeft!!.`val` == topRight!!.`val`
&& topRight!!.`val` == bottomLeft!!.`val`
&& bottomLeft!!.`val` == bottomRight!!.`val`) {
`val` = topLeft!!.`val`
isLeaf = true
topLeft = null
topRight = null
bottomLeft = null
bottomRight = null
}
}
}
}
return dfs(0, grid[0].lastIndex, 0, grid.lastIndex)
}
Join me on Telegram
https://t.me/leetcode_daily_unstoppable/131
Intuition
We can construct the tree using DFS and divide and conquer technique. Build four nodes, then check if all of them are equal leafs.
Approach
- use inclusive ranges to simplify the code
Complexity
- Time complexity: \(O(n)\)
- Space complexity: \(O(n)\)
26.02.2023
72. Edit Distance hard
fun minDistance(word1: String, word2: String): Int {
val dp = Array(word1.length + 1) { IntArray(word2.length + 1) { -1 } }
fun dfs(i: Int, j: Int): Int {
return when {
dp[i][j] != -1 -> dp[i][j]
i == word1.length && j == word2.length -> 0
i == word1.length -> 1 + dfs(i, j+1)
j == word2.length -> 1 + dfs(i+1, j)
word1[i] == word2[j] -> dfs(i+1, j+1)
else -> {
val insert1Delete2 = 1 + dfs(i, j+1)
val insert2Delete1 = 1 + dfs(i+1, j)
val replace1Or2 = 1 + dfs(i+1, j+1)
val res = minOf(insert1Delete2, insert2Delete1, replace1Or2)
dp[i][j] = res
res
}
}
}
return dfs(0, 0)
}
Join me on Telegram
https://t.me/leetcode_daily_unstoppable/130
Intuition
Compare characters from each positions of the two strings. If they are equal, do nothing. If not, we can choose from three paths: removing, inserting or replacing. That will cost us one point of operations. Then, do DFS and choose the minimum of the operations.
Approach
Do DFS and use array for memoizing the result.
Complexity
- Time complexity: \(O(n^2)\), can be proven if you rewrite DP to bottom up code.
- Space complexity: \(O(n^2)\)
25.02.2023
121. Best Time to Buy and Sell Stock easy
fun maxProfit(prices: IntArray): Int {
var min = prices[0]
var profit = 0
prices.forEach {
if (it < min) min = it
profit = maxOf(profit, it - min)
}
return profit
}
Join me on Telegram
https://t.me/leetcode_daily_unstoppable/129
Intuition
Max profit will be the difference between max and min. One thing to note, the max must follow after the min.
Approach
- we can just use current value as a
maxcandidate instead of managing themaxvariable.Complexity
- Time complexity: \(O(n)\)
- Space complexity: \(O(1)\)
24.02.2023
1675. Minimize Deviation in Array hard
fun minimumDeviation(nums: IntArray): Int {
var minDiff = Int.MAX_VALUE
with(TreeSet<Int>(nums.map { if (it % 2 == 0) it else it * 2 })) {
do {
val min = first()
val max = pollLast()
minDiff = minOf(minDiff, Math.abs(max - min))
add(max / 2)
} while (max % 2 == 0)
}
return minDiff
}
Join me on telegram
https://t.me/leetcode_daily_unstoppable/128
Intuition
We can notice, that the answer is the difference between the min and max from some resulting set of numbers.
My first (wrong) intuition was, that we can use two heaps for minimums and maximums, and only can divide by two from the maximum, and multiply by two from the minimum heap. That quickly transformed into too many edge cases.
The correct and tricky intuition: we can multiply all the numbers by 2, and then we can safely begin to divide all the maximums until they can be divided.
Approach
Use TreeSet to quickly access to the min and max elements.
Complexity
- Time complexity: \(O(n(log_2(n) + log_2(h)))\), where h - is a number’s range
- Space complexity: \(O(n)\)
23.02.2023
502. IPO hard
fun findMaximizedCapital(k: Int, w: Int, profits: IntArray, capital: IntArray): Int {
val indices = Array(profits.size) { it }.apply { sortWith(compareBy( { capital[it] })) }
var money = w
with(PriorityQueue<Int>(profits.size, compareBy({ -profits[it] }))) {
var i = 0
repeat (k) {
while (i <= indices.lastIndex && money >= capital[indices[i]]) add(indices[i++])
if (isNotEmpty()) money += profits[poll()]
}
}
return money
}
Join me on Telegram
https://t.me/leetcode_daily_unstoppable/127
Intuition
My first (wrong) intuition: greedy add elements to the min-profit priority queue, then remove all low-profit elements from it, keeping essential items. It wasn’t working, and the solution became too verbose. Second intuition, after the hint: greedy add elements to the max-profit priority queue, then remove the maximum from it, which will be the best deal for the current money.
Approach
Sort items by increasing capital. Then, on each step, add all possible deals to the priority queue and take one best from it.
Complexity
- Time complexity: \(O(nlog_2(n))\)
- Space complexity: \(O(n)\)
22.02.2023
1011. Capacity To Ship Packages Within D Days medium
fun shipWithinDays(weights: IntArray, days: Int): Int {
var lo = weights.max()!!
var hi = weights.sum()!!
fun canShip(weight: Int): Boolean {
var curr = 0
var count = 1
weights.forEach {
curr += it
if (curr > weight) {
curr = it
count++
}
}
if (curr > weight) count++
return count <= days
}
var min = hi
while (lo <= hi) {
val mid = lo + (hi - lo) / 2
val canShip = canShip(mid)
if (canShip) {
min = minOf(min, mid)
hi = mid - 1
} else lo = mid + 1
}
return min
}
Join me on telegram
https://t.me/leetcode_daily_unstoppable/126
Intuition
Of all the possible capacities, there is an increasing possibility to carry the load. It may look like this: not possible, not possible, .., not possible, possible, possible, .., possible. We can binary search in that sorted space of possibilities.
Approach
To more robust binary search code:
- use inclusive
loandhi - check the last case
lo == hi - check target condition separately
min = minOf(min, mid) - always move boundaries
loandhiComplexity
- Time complexity: \(O(nlog_2(n))\)
- Space complexity: \(O(1)\)
21.02.2023
540. Single Element in a Sorted Array medium
fun singleNonDuplicate(nums: IntArray): Int {
var lo = 0
var hi = nums.lastIndex
// 0 1 2 3 4
// 1 1 2 3 3
while (lo <= hi) {
val mid = lo + (hi - lo) / 2
val prev = if (mid > 0) nums[mid-1] else -1
val next = if (mid < nums.lastIndex) nums[mid+1] else Int.MAX_VALUE
val curr = nums[mid]
if (prev < curr && curr < next) return curr
val oddPos = mid % 2 != 0
val isSingleOnTheLeft = oddPos && curr == next || !oddPos && curr == prev
if (isSingleOnTheLeft) hi = mid - 1 else lo = mid + 1
}
return -1
}
Join me on Telegram
https://t.me/leetcode_daily_unstoppable/125
Intuition
This problem is a brain-teaser until you notice that pairs are placed at even-odd positions before the target and at odd-even positions after.
Approach
Let’s write a binary search. For more robust code, consider:
- use inclusive
loandhi - always move
loorhi - check for the target condition and return early
Complexity
- Time complexity: \(O(log_2(n))\)
- Space complexity: \(O(1)\)
20.02.2023
35. Search Insert Position easy
fun searchInsert(nums: IntArray, target: Int): Int {
var lo = 0
var hi = nums.lastIndex
while (lo <= hi) {
val mid = lo + (hi - lo) / 2
if (target == nums[mid]) return mid
if (target > nums[mid]) lo = mid + 1
else hi = mid - 1
}
return lo
}
Join me on Telegram
https://t.me/leetcode_daily_unstoppable/124
Intuition
Just do a binary search
Approach
For more robust code consider:
- use only inclusive boundaries
loandhi - loop also the last case when
lo == hi - always move boundaries
mid + 1ormid - 1 - use distinct check for the exact match
nums[mid] == target - return
loposition - this is an insertion point
Complexity
- Time complexity: \(O(log_2(n))\)
- Space complexity: \(O(1)\)
19.02.2023
103. Binary Tree Zigzag Level Order Traversal medium
fun zigzagLevelOrder(root: TreeNode?): List<List<Int>> = mutableListOf<List<Int>>().also { res ->
with(ArrayDeque<TreeNode>().apply { root?.let { add(it) } }) {
while (isNotEmpty()) {
val curr = LinkedList<Int>().apply { res.add(this) }
repeat(size) {
with(poll()) {
with(curr) { if (res.size % 2 == 0) addFirst(`val`) else addLast(`val`) }
left?.let { add(it) }
right?.let { add(it) }
}
}
}
}
}
Join me on Telegram
https://t.me/leetcode_daily_unstoppable/123
Intuition
Each BFS step gives us a level, which one we can reverse if needed.
Approach
- for zigzag, we can skip a boolean variable and track result count.
Complexity
- Time complexity: \(O(n)\)
- Space complexity: \(O(n)\)
18.02.2023
fun invertTree(root: TreeNode?): TreeNode? =
root?.apply { left = invertTree(right).also { right = invertTree(left) } }
Join me on Telegram
https://t.me/leetcode_daily_unstoppable/122
Intuition
Walk tree with Depth-First Search and swap each left and right nodes.
Approach
Let’s write a recursive one-liner.
Complexity
- Time complexity: \(O(n)\)
- Space complexity: \(O(log_2(n))\)
17.02.2023
783. Minimum Distance Between BST Nodes easy
fun minDiffInBST(root: TreeNode?): Int {
var prev: TreeNode? = null
var curr = root
var minDiff = Int.MAX_VALUE
while (curr != null) {
if (curr.left == null) {
if (prev != null) minDiff = minOf(minDiff, Math.abs(curr.`val` - prev.`val`))
prev = curr
curr = curr.right
} else {
var right = curr.left!!
while (right.right != null && right.right != curr) right = right.right!!
if (right.right == curr) {
right.right = null
curr = curr.right
} else {
right.right = curr
val next = curr.left
curr.left = null
curr = next
}
}
}
return minDiff
}
Join me on Telegram
https://t.me/leetcode_daily_unstoppable/121
Intuition
Given that this is a Binary Search Tree, inorder traversal will give us an increasing sequence of nodes. Minimum difference will be one of the adjacent nodes differences.
Approach
Let’s write Morris Traversal. Store current node at the rightmost end of the left children.
Complexity
- Time complexity: \(O(n)\)
- Space complexity: \(O(1)\)
16.02.2023
104. Maximum Depth of Binary Tree easy
fun maxDepth(root: TreeNode?): Int =
root?.run { 1 + maxOf(maxDepth(left), maxDepth(right)) } ?: 0
Join me on Telegram
https://t.me/leetcode_daily_unstoppable/120
Intuition
Do DFS and choose the maximum on each step.
Approach
Let’s write a one-liner.
Complexity
- Time complexity: \(O(n)\)
- Space complexity: \(O(log_2(n))\)
15.02.2023
989. Add to Array-Form of Integer easy
fun addToArrayForm(num: IntArray, k: Int): List<Int> {
var carry = 0
var i = num.lastIndex
var n = k
val res = LinkedList<Int>()
while (i >= 0 || n > 0 || carry > 0) {
val d1 = if (i >= 0) num[i--] else 0
val d2 = if (n > 0) n % 10 else 0
var d = d1 + d2 + carry
res.addFirst(d % 10)
carry = d / 10
n = n / 10
}
return res
}
Join me on Telegram
https://t.me/leetcode_daily_unstoppable/119
Intuition
Iterate from the end of the array and calculate sum of num % 10, carry and num[i].
Approach
- use linked list to add to the front of the list in O(1)
Complexity
- Time complexity: \(O(n)\)
- Space complexity: \(O(n)\)
14.02.2023
67. Add Binary easy
fun addBinary(a: String, b: String): String = StringBuilder().apply {
var o = 0
var i = a.lastIndex
var j = b.lastIndex
while (i >= 0 || j >= 0 || o == 1) {
var num = o
o = 0
if (i >= 0 && a[i--] == '1') num++
if (j >= 0 && b[j--] == '1') num++
when (num) {
0 -> append('0')
1 -> append('1')
2 -> {
append('0')
o = 1
}
else -> {
append('1')
o = 1
}
}
}
}.reverse().toString()
Join me on Telegram
https://t.me/leetcode_daily_unstoppable/118
Intuition
Scan two strings from the end and calculate the result.
Approach
- keep track of the overflow
Complexity
- Time complexity: \(O(n)\)
- Space complexity: \(O(n)\)
13.02.2023
1523. Count Odd Numbers in an Interval Range easy
fun countOdds(low: Int, high: Int): Int {
if (low == high) return if (low % 2 == 0) 0 else 1
val lowOdd = low % 2 != 0
val highOdd = high % 2 != 0
val count = high - low + 1
return if (lowOdd && highOdd) {
1 + count / 2
} else if (lowOdd || highOdd) {
1 + (count - 1) / 2
} else {
1 + ((count - 2) / 2)
}
}
Join me on Telegram
https://t.me/leetcode_daily_unstoppable/117
Intuition
Count how many numbers in between, subtract even on the start and the end, then divide by 2.
Complexity
- Time complexity: \(O(1)\)
- Space complexity: \(O(1)\)
12.02.2023
2477. Minimum Fuel Cost to Report to the Capital medium
data class R(val cars: Long, val capacity: Int, val fuel: Long)
fun minimumFuelCost(roads: Array<IntArray>, seats: Int): Long {
val nodes = mutableMapOf<Int, MutableList<Int>>()
roads.forEach { (from, to) ->
nodes.getOrPut(from, { mutableListOf() }) += to
nodes.getOrPut(to, { mutableListOf() }) += from
}
fun dfs(curr: Int, parent: Int): R {
val children = nodes[curr]
if (children == null) return R(1L, seats - 1, 0L)
var fuel = 0L
var capacity = 0
var cars = 0L
children.filter { it != parent }.forEach {
val r = dfs(it, curr)
fuel += r.cars + r.fuel
capacity += r.capacity
cars += r.cars
}
// seat this passenger
if (capacity == 0) {
cars++
capacity = seats - 1
} else capacity--
// optimize cars
while (capacity - seats >= 0) {
capacity -= seats
cars--
}
return R(cars, capacity, fuel)
}
return dfs(0, 0).fuel
}
Join me on Telegram
https://t.me/leetcode_daily_unstoppable/116
Intuition
Let’s start from each leaf (node without children). We give one car, seats-1 capacity and zero fuel. When children cars arrive, each of them consume cars capacity of the fuel. On the hub (node with children), we sat another one passenger, so capacity-- and we can optimize number of cars arrived, if total capacity is more than one car seats number.
Approach
Use DFS and data class for the result.
Complexity
- Time complexity: \(O(n)\)
- Space complexity:
\(O(h)\), h - height of the tree, can be
0..n
11.02.2023
1129. Shortest Path with Alternating Colors medium
fun shortestAlternatingPaths(n: Int, redEdges: Array<IntArray>, blueEdges: Array<IntArray>): IntArray {
val edgesRed = mutableMapOf<Int, MutableList<Int>>()
val edgesBlue = mutableMapOf<Int, MutableList<Int>>()
redEdges.forEach { (from, to) ->
edgesRed.getOrPut(from, { mutableListOf() }).add(to)
}
blueEdges.forEach { (from, to) ->
edgesBlue.getOrPut(from, { mutableListOf() }).add(to)
}
val res = IntArray(n) { -1 }
val visited = hashSetOf<Pair<Int, Boolean>>()
var dist = 0
with(ArrayDeque<Pair<Int, Boolean>>()) {
add(0 to true)
add(0 to false)
visited.add(0 to true)
visited.add(0 to false)
while (isNotEmpty()) {
repeat(size) {
val (node, isRed) = poll()
if (res[node] == -1 || res[node] > dist) res[node] = dist
val edges = if (isRed) edgesRed else edgesBlue
edges[node]?.forEach {
if (visited.add(it to !isRed)) add(it to !isRed)
}
}
dist++
}
}
return res
}
Join me on Telegram
https://t.me/leetcode_daily_unstoppable/115
Intuition
We can calculate all the shortest distances in one pass BFS.
Approach
Start with two simultaneous points, one for red and one for blue. Keep track of the color.
Complexity
- Time complexity: \(O(n)\)
- Space complexity: \(O(n)\)
10.02.2023
1162. As Far from Land as Possible medium
fun maxDistance(grid: Array<IntArray>): Int = with(ArrayDeque<Pair<Int, Int>>()) {
val n = grid.size
val visited = hashSetOf<Pair<Int, Int>>()
fun tryAdd(x: Int, y: Int) {
if (x < 0 || y < 0 || x >= n || y >= n) return
(x to y).let { if (visited.add(it)) add(it) }
}
for (yStart in 0 until n)
for (xStart in 0 until n)
if (grid[yStart][xStart] == 1) tryAdd(xStart, yStart)
if (size == n*n) return -1
var dist = -1
while(isNotEmpty()) {
repeat(size) {
val (x, y) = poll()
tryAdd(x-1, y)
tryAdd(x, y-1)
tryAdd(x+1, y)
tryAdd(x, y+1)
}
dist++
}
dist
}
Join me on Telegram
https://t.me/leetcode_daily_unstoppable/114
Intuition
Let’s do a wave from each land and wait until all the last water cell reached. This cell will be the answer.
Approach
Add all land cells into BFS, then just run it.
Complexity
- Time complexity: \(O(n^2)\)
- Space complexity: \(O(n^2)\)
9.02.2023
fun distinctNames(ideas: Array<String>): Long {
// c -> offee
// d -> onuts
// t -> ime, offee
val prefToSuf = Array(27) { hashSetOf<String>() }
for (idea in ideas)
prefToSuf[idea[0].toInt() - 'a'.toInt()].add(idea.substring(1, idea.length))
var count = 0L
for (i in 0..26)
for (j in i + 1..26)
count += prefToSuf[i].count { !prefToSuf[j].contains(it) } * prefToSuf[j].count { ! prefToSuf[i].contains(it) }
return count * 2L
}
Join me on Telegram
https://t.me/leetcode_daily_unstoppable/113
Intuition
If we group ideas by the suffixes and consider only the unique elements, the result will be the intersection of the sizes of the groups. (To deduce this you must sit and draw, or have a big brain, or just use a hint)
Approach
Group and multiply. Don’t forget to remove repeating elements in each two groups.
Complexity
- Time complexity: \(O(26^2n)\)
- Space complexity: \(O(n)\)
8.02.2023
45. Jump Game II medium
fun jump(nums: IntArray): Int {
if (nums.size <= 1) return 0
val stack = Stack<Int>()
// 0 1 2 3 4 5 6 7 8 9 1011121314
// 7 0 9 6 9 6 1 7 9 0 1 2 9 0 3
// *
// *
// * * *
// * * *
// * *
// *
// * * * * * * *
// * * * * * * * *
// * *
// * * * * * * *
// * * * * * * * * * *
// * * * * * * *
// * * * * * * * * * *
// *
// * * * * * * * *
// 3 4 3 2 5 4 3
// *
// * *
// * * *
// * * *
// * * * *
// * * * * *
// * * * *
// 0 1 2 3 4 5 6 7 8 9 1011
// 5 9 3 2 1 0 2 3 3 1 0 0
// *
// *
// * *
// * * * *
// * * * *
// * * *
// *
// * *
// * * *
// * * * *
// * * * * * * * * * *
// * * * * * *
for (pos in nums.lastIndex downTo 0) {
var canReach = minOf(pos + nums[pos], nums.lastIndex)
if (canReach == nums.lastIndex) stack.clear()
while (stack.size > 1 && stack.peek() <= canReach) {
val top = stack.pop()
if (stack.peek() > canReach) {
stack.push(top)
break
}
}
stack.push(pos)
}
return stack.size
}
Join me on Telegram
https://t.me/leetcode_daily_unstoppable/112
Intuition
The dynamic programming solution is trivial, and can be done in \(O(n^2)\). Greedy solution is to scan from back to front and keep only jumps that starts after the current max jump.
Approach
- use stack to store jumps
- pop all jumps less than current
maxReach - pop all except the last that can reach, so don’t break the sequence.
Complexity
- Time complexity: \(O(n)\)
- Space complexity: \(O(n)\)
7.02.2023
904. Fruit Into Baskets medium
fun totalFruit(fruits: IntArray): Int {
if (fruits.size <= 2) return fruits.size
var type1 = fruits[fruits.lastIndex]
var type2 = fruits[fruits.lastIndex - 1]
var count = 2
var max = 2
var prevType = type2
var prevTypeCount = if (type1 == type2) 2 else 1
for (i in fruits.lastIndex - 2 downTo 0) {
val type = fruits[i]
if (type == type1 || type == type2 || type1 == type2) {
if (type1 == type2 && type != type1) type2 = type
if (type == prevType) prevTypeCount++
else prevTypeCount = 1
count++
} else {
count = prevTypeCount + 1
type2 = type
type1 = prevType
prevTypeCount = 1
}
max = maxOf(max, count)
prevType = type
}
return max
}
Join daily telegram
https://t.me/leetcode_daily_unstoppable/111
Intuition
We can scan fruits linearly from the tail and keep only two types of fruits.
Approach
- careful with corner cases
Complexity
- Time complexity: \(O(n)\)
- Space complexity: \(O(1)\)
6.02.2023
fun shuffle(nums: IntArray, n: Int): IntArray {
val arr = IntArray(nums.size)
var left = 0
var right = n
var i = 0
while (i < arr.lastIndex) {
arr[i++] = nums[left++]
arr[i++] = nums[right++]
}
return arr
}
Telegram
https://t.me/leetcode_daily_unstoppable/110
Intuition
Just do what is asked.
Approach
For simplicity, use two pointers for the source, and one for the destination.
Complexity
- Time complexity: \(O(n)\)
- Space complexity: \(O(n)\)
5.02.2023
438. Find All Anagrams in a String medium
fun findAnagrams(s: String, p: String): List<Int> {
val freq = IntArray(26) { 0 }
var nonZeros = 0
p.forEach {
val ind = it.toInt() - 'a'.toInt()
if (freq[ind] == 0) nonZeros++
freq[ind]--
}
val res = mutableListOf<Int>()
for (i in 0..s.lastIndex) {
val currInd = s[i].toInt() - 'a'.toInt()
if (freq[currInd] == 0) nonZeros++
freq[currInd]++
if (freq[currInd] == 0) nonZeros--
if (i >= p.length) {
val ind = s[i - p.length].toInt() - 'a'.toInt()
if (freq[ind] == 0) nonZeros++
freq[ind]--
if (freq[ind] == 0) nonZeros--
}
if (nonZeros == 0) res += i - p.length + 1
}
return res
}
Telegram
https://t.me/leetcode_daily_unstoppable/109
Intuition
We can count frequencies of p and then scan s to match them.
Approach
- To avoid checking a frequencies arrays, we can count how many frequencies are not matching, and add only when non-matching count is zero.
Complexity
-
Time complexity: \(O(n)\)
- Space complexity: \(O(1)\)
4.02.2023
567. Permutation in String medium
fun checkInclusion(s1: String, s2: String): Boolean {
val freq1 = IntArray(26) { 0 }
s1.forEach { freq1[it.toInt() - 'a'.toInt()]++ }
val freq2 = IntArray(26) { 0 }
for (i in 0..s2.lastIndex) {
freq2[s2[i].toInt() - 'a'.toInt()]++
if (i >= s1.length) freq2[s2[i - s1.length].toInt() - 'a'.toInt()]--
if (Arrays.equals(freq1, freq2)) return true
}
return false
}
Telegram
https://t.me/leetcode_daily_unstoppable/108
Intuition
We can count the chars frequencies in the s1 string and use the sliding window technique to count and compare char frequencies in the s2.
Approach
- to decrease cost of comparing arrays, we can also use hashing
Complexity
- Time complexity: \(O(n)\)
- Space complexity: \(O(1)\)
3.02.2023
6. Zigzag Conversion medium
fun convert(s: String, numRows: Int): String {
if (numRows <= 1) return s
// nr = 5
//
// 0 8 16 24
// 1 7 9 15 17 23 25
// 2 6 10 14 18 22 26 30
// 3 5 11 13 19 21 27 29
// 4 12 20 28
//
val indices = Array(numRows) { mutableListOf<Int>() }
var y = 0
var dy = 1
for (i in 0..s.lastIndex) {
indices[y].add(i)
if (i > 0 && (i % (numRows - 1)) == 0) dy = -dy
y += dy
}
return StringBuilder().apply {
indices.forEach { it.forEach { append(s[it]) } }
}.toString()
}
Telegram
https://t.me/leetcode_daily_unstoppable/107
Intuition
// nr = 5
//
// 0 8 16 24
// 1 7 9 15 17 23 25
// 2 6 10 14 18 22 26 30
// 3 5 11 13 19 21 27 29
// 4 12 20 28
//
We can just simulate zigzag.
Approach
Store simulation result in a [rowsNum][simulation indice] - matrix, then build the result.
Complexity
- Time complexity: \(O(n)\)
- Space complexity: \(O(n)\)
2.02.2023
953. Verifying an Alien Dictionary easy
fun isAlienSorted(words: Array<String>, order: String): Boolean {
val orderChars = Array<Char>(26) { 'a' }
for (i in 0..25) orderChars[order[i].toInt() - 'a'.toInt()] = (i + 'a'.toInt()).toChar()
val arr = Array<String>(words.size) {
words[it].map { orderChars[it.toInt() - 'a'.toInt()] }.joinToString("")
}
val sorted = arr.sorted()
for (i in 0..arr.lastIndex) if (arr[i] != sorted[i]) return false
return true
}
Telegram
https://t.me/leetcode_daily_unstoppable/106
Intuition
For the example hello and order hlabcdefgijkmnopqrstuvwxyz we must translate like this: h -> a, l -> b, a -> c and so on. Then we can just use compareTo to check the order.
Approach
Just translate and then sort and compare. (But we can also just scan linearly and compare).
Complexity
- Time complexity: \(O(n\log_2{n})\)
- Space complexity: \(O(n)\)
1.02.2023
1071. Greatest Common Divisor of Strings easy
fun gcdOfStrings(str1: String, str2: String): String {
if (str1 == "" || str2 == "") return ""
if (str1.length == str2.length) return if (str1 == str2) str1 else ""
fun gcd(a: Int, b: Int): Int {
return if (a == 0) b
else gcd(b % a, a)
}
val len = gcd(str1.length, str2.length)
for (i in 0..str1.lastIndex) if (str1[i] != str1[i % len]) return ""
for (i in 0..str2.lastIndex) if (str2[i] != str1[i % len]) return ""
return str1.substring(0, len)
}
Telegram
https://t.me/leetcode_daily_unstoppable/105
Intuition
Consider the following example: ababab and abab.
If we scan them linearly, we see, the common part is abab.
Now, we need to check if the last part from the first abab_ab is a part of the common part: ab vs abab.
This can be done recursively, and we come to the final consideration: "" vs "ab".
That all procedure give us the common divisor - ab.
The actual hint is in the method’s name ;)
Approach
We can first find the length of the greatest common divisor, then just check both strings.
Complexity
- Time complexity: \(O(n)\)
- Space complexity: \(O(n)\)
31.01.2023
1626. Best Team With No Conflicts medium
fun bestTeamScore(scores: IntArray, ages: IntArray): Int {
val dp = Array(scores.size + 1) { IntArray(1001) { -1 }}
val indices = scores.indices.toMutableList()
indices.sortWith(compareBy( { scores[it] }, { ages[it] } ))
fun dfs(curr: Int, prevAge: Int): Int {
if (curr == scores.size) return 0
if (dp[curr][prevAge] != -1) return dp[curr][prevAge]
val ind = indices[curr]
val age = ages[ind]
val score = scores[ind]
val res = maxOf(
dfs(curr + 1, prevAge),
if (age < prevAge) 0 else score + dfs(curr + 1, age)
)
dp[curr][prevAge] = res
return res
}
return dfs(0, 0)
}
Telegram
https://t.me/leetcode_daily_unstoppable/103
Intuition
If we sort arrays by score and age, then every next item will be with score bigger than previous.
If current age is less than previous, then we can’t take it, as score for current age can’t be bigger than previous.
Let’s define dp[i][j] is a maximum score for a team in i..n sorted slice, and j is a maximum age for that team.
Approach
We can use DFS to search all the possible teams and memorize the result in dp cache.
Complexity
- Time complexity: \(O(n^2)\), we can only visit n by n combinations of pos and age
- Space complexity: \(O(n^2)\)
30.01.2023
1137. N-th Tribonacci Number easy
fun tribonacci(n: Int): Int = if (n < 2) n else {
var t0 = 0
var t1 = 1
var t2 = 1
repeat(n - 2) {
t2 += (t0 + t1).also {
t0 = t1
t1 = t2
}
}
t2
}
Telegram
https://t.me/leetcode_daily_unstoppable/102
Intuition
Just do what is asked.
Approach
- another way is to use dp cache
Complexity
- Time complexity: \(O(n)\)
- Space complexity: \(O(1)\)
29.01.2023
460. LFU Cache hard
class LFUCache(val capacity: Int) {
data class V(val key: Int, val value: Int, val freq: Int)
val mapKV = mutableMapOf<Int, V>()
val freqToAccessListOfK = TreeMap<Int, LinkedHashSet<V>>()
fun get(key: Int): Int {
val v = mapKV.remove(key)
if (v == null) return -1
increaseFreq(v, v.value)
return v.value
}
fun getAccessListForFreq(freq: Int) = freqToAccessListOfK.getOrPut(freq, { LinkedHashSet<V>() })
fun increaseFreq(v: V, value: Int) {
val oldFreq = v.freq
val newFreq = oldFreq + 1
val newV = V(v.key, value, newFreq)
mapKV[v.key] = newV
val accessList = getAccessListForFreq(oldFreq)
accessList.remove(v)
if (accessList.isEmpty()) freqToAccessListOfK.remove(oldFreq)
getAccessListForFreq(newFreq).add(newV)
}
fun put(key: Int, value: Int) {
if (capacity == 0) return
val oldV = mapKV[key]
if (oldV == null) {
if (mapKV.size == capacity) {
val lowestFreq = freqToAccessListOfK.firstKey()
val accessList = freqToAccessListOfK[lowestFreq]!!
val iterator = accessList.iterator()
val leastFreqV = iterator.next()
iterator.remove()
mapKV.remove(leastFreqV.key)
if (accessList.isEmpty()) freqToAccessListOfK.remove(lowestFreq)
}
val v = V(key, value, 1)
mapKV[key] = v
getAccessListForFreq(1).add(v)
} else {
increaseFreq(oldV, value)
}
}
}
Telegram
https://t.me/leetcode_daily_unstoppable/101
Intuition
Let’s store access-time list in a buckets divided by access-count frequencies. We can store each bucked in a TreeMap, that will give us O(1) time to get the least frequent list. For the list we can use LinkedHashSet, that can give us O(1) operations for remove, removeFirst and add and will help to maintain access order.
Approach
- one thing to note, on each
increaseFreqoperation we are retrieving a random item from TreeMap, that increases time to O(log(F)), where F is a unique set of frequencies. - How many unique access frequencies
kwe can have if there is a total number ofNoperations? If sequence1,2,3...k-1, kis our unique set, then1+2+3+...+(k-1)+k = N. Or: \(1+2+3+\cdots+k=\sum_{n=1}^{k}i = k(k-1)/2 = N\) so, \(k = \sqrt{N}\)Complexity
- Time complexity: \(O(\log_2(\sqrt{N}))\)
- Space complexity: \(O(\log_2(\sqrt{N}))\)
28.01.2023
352. Data Stream as Disjoint Intervals hard
class SummaryRanges() {
data class Node(var start: Int, var end: Int, var next: Node? = null)
val root = Node(-1, -1)
fun mergeWithNext(n: Node?): Boolean {
if (n == null) return false
val curr = n
val next = n.next
if (next == null) return false
val nextNext = next.next
if (next.start - curr.end <= 1) {
curr.end = next.end
curr.next = nextNext
return true
}
return false
}
fun addNum(value: Int) {
var n = root
while (n.next != null && n.next!!.start < value) n = n.next!!
if (value in n.start..n.end) return
n.next = Node(value, value, n.next)
if (n != root && mergeWithNext(n))
mergeWithNext(n)
else
mergeWithNext(n.next)
}
fun getIntervals(): Array<IntArray> {
val list = mutableListOf<IntArray>()
var n = root.next
while (n != null) {
list.add(intArrayOf(n.start, n.end))
n = n.next
}
return list.toTypedArray()
}
}
Telegram
https://t.me/leetcode_daily_unstoppable/100
Intuition
In Kotlin there is no way around to avoid the O(n) time of an operation while building the result array. And there is no way to insert to the middle of the array in a less than O(n) time. So, the only way is to use the linked list, and to walk it linearly.
Approach
- careful with merge
Complexity
- Time complexity: \(O(IN)\), I - number of the intervals
- Space complexity: \(O(I)\)
27.01.2023
data class Trie(val ch: Char = '.', var isWord: Boolean = false) {
val next = Array<Trie?>(26) { null }
fun ind(c: Char) = c.toInt() - 'a'.toInt()
fun exists(c: Char) = next[ind(c)] != null
operator fun get(c: Char): Trie {
val ind = ind(c)
if (next[ind] == null) next[ind] = Trie(c)
return next[ind]!!
}
}
fun findAllConcatenatedWordsInADict(words: Array<String>): List<String> {
val trie = Trie()
words.forEach { word ->
var t = trie
word.forEach { t = t[it] }
t.isWord = true
}
val res = mutableListOf<String>()
words.forEach { word ->
var tries = ArrayDeque<Pair<Trie,Int>>()
tries.add(trie to 0)
for (c in word) {
repeat(tries.size) {
val (t, wc) = tries.poll()
if (t.exists(c)) {
val curr = t[c]
if (curr.isWord) tries.add(trie to (wc + 1))
tries.add(curr to wc)
}
}
}
if (tries.any { it.second > 1 && it.first === trie } ) res.add(word)
}
return res
}
Telegram
https://t.me/leetcode_daily_unstoppable/99
Intuition
When we scan a word we must know if current suffix is a word. Trie data structure will help.
Approach
- first, scan all the words, and fill the Trie
- next, scan again, and for each suffix begin a new scan from the root of the trie
- preserve a word count for each of the possible suffix concatenation
Complexity
- Time complexity: \(O(nS)\), S - is a max suffix count in one word
- Space complexity: \(O(n)\)
26.01.2023
787. Cheapest Flights Within K Stops medium
https://t.me/leetcode_daily_unstoppable/98
fun findCheapestPrice(n: Int, flights: Array<IntArray>, src: Int, dst: Int, k: Int): Int {
var dist = IntArray(n) { Int.MAX_VALUE }
dist[src] = 0
repeat(k + 1) {
val nextDist = dist.clone()
flights.forEach { (from, to, price) ->
if (dist[from] != Int.MAX_VALUE && dist[from] + price < nextDist[to])
nextDist[to] = dist[from] + price
}
dist = nextDist
}
return if (dist[dst] == Int.MAX_VALUE) -1 else dist[dst]
}
Intuition
DFS and Dijkstra gives TLE.
As we need to find not just shortest path price, but only for k steps, naive Bellman-Ford didn’t work.
Let’s define dist, where dist[i] - the shortest distance from src node to i-th node.
We initialize it with MAX_VALUE, and dist[src] is 0 by definition.
Next, we walk exactly k steps, on each of them, trying to minimize price.
If we have known distance to node a, dist[a] != MAX.
And if there is a link to node b with price(a,b), then we can optimize like this dist[b] = min(dist[b], dist[a] + price(a,b)).
Because we’re starting from a single node dist[0], we will increase distance only once per iteration.
So, making k iterations made our path exactly k steps long.
Approach
- by the problem definition, path length is
k+1, not justk - we can’t optimize a path twice in a single iteration, because then it will overreach to the next step before the current is finished.
- That’s why we only compare distance from the previous step.
Space: O(kE), Time: O(k)
25.01.2023
2359. Find Closest Node to Given Two Nodes medium
https://t.me/leetcode_daily_unstoppable/97
fun closestMeetingNode(edges: IntArray, node1: Int, node2: Int): Int {
val distances = mutableMapOf<Int, Int>()
var n = node1
var dist = 0
while (n != -1) {
if (distances.contains(n)) break
distances[n] = dist
n = edges[n]
dist++
}
n = node2
dist = 0
var min = Int.MAX_VALUE
var res = -1
while (n != -1) {
if (distances.contains(n)) {
val one = distances[n]!!
val max = maxOf(one, dist)
if (max < min || max == min && n < res) {
min = max
res = n
}
}
val tmp = edges[n]
edges[n] = -1
n = tmp
dist++
}
return res
}

We can walk with DFS and remember all distances, then compare them and choose those with minimum of maximums.
- we can use
visitedset, or modify an input - corner case: don’t forget to also store starting nodes
Space: O(n), Time: O(n)
24.01.2023
909. Snakes and Ladders medium
https://t.me/leetcode_daily_unstoppable/96
fun snakesAndLadders(board: Array<IntArray>): Int {
fun col(pos: Int): Int {
return if (((pos/board.size) % 2) == 0)
(pos % board.size)
else
(board.lastIndex - (pos % board.size))
}
val last = board.size * board.size
var steps = 0
val visited = mutableSetOf<Int>()
with(ArrayDeque<Int>().apply { add(1) }) {
while (isNotEmpty() && steps <= last) {
repeat(size) {
var curr = poll()
val jump = board[board.lastIndex - (curr-1)/board.size][col(curr-1)]
if (jump != -1) curr = jump
if (curr == last) return steps
for (i in 1..6)
if (visited.add(curr + i) && curr + i <= last) add(curr + i)
}
steps++
}
}
return -1
}
In each step, we can choose the best outcome, so we need to travel all of them in the parallel and calculate steps number. This is a BFS.
We can avoid that strange order by iterating it and store into the linear array. Or just invent a formula for row and column by given index.
Space: O(n^2), Time: O(n^2), n is a grid size
23.01.2023
https://t.me/leetcode_daily_unstoppable/95
fun findJudge(n: Int, trust: Array<IntArray>): Int {
val judges = mutableMapOf<Int, MutableSet<Int>>()
for (i in 1..n) judges[i] = mutableSetOf()
val notJudges = mutableSetOf<Int>()
trust.forEach { (from, judge) ->
judges[judge]!! += from
notJudges += from
}
judges.forEach { (judge, people) ->
if (people.size == n - 1
&& !people.contains(judge)
&& !notJudges.contains(judge))
return judge
}
return -1
}
We need to count how much trust have each judge and also exclude all judges that have trust in someone.
- use map and set
- there is a better solution with just counting of trust, but it is not that clear to understand and prove
Space: O(max(N, T)), Time: O(max(N, T))
22.01.2023
131. Palindrome Partitioning medium
https://t.me/leetcode_daily_unstoppable/93
fun partition(s: String): List<List<String>> {
val dp = Array(s.length) { BooleanArray(s.length) { false } }
for (from in s.lastIndex downTo 0)
for (to in from..s.lastIndex)
dp[from][to] = s[from] == s[to] && (from == to || from == to - 1 || dp[from+1][to-1])
val res = mutableListOf<List<String>>()
fun dfs(pos: Int, partition: MutableList<String>) {
if (pos == s.length) res += partition.toList()
for (i in pos..s.lastIndex)
if (dp[pos][i]) {
partition += s.substring(pos, i+1)
dfs(i+1, partition)
partition.removeAt(partition.lastIndex)
}
}
dfs(0, mutableListOf())
return res
}
First, we need to be able to quickly tell if some range a..b is a palindrome.
Let’s dp[a][b] indicate that range a..b is a palindrome.
Then the following is true: dp[a][b] = s[a] == s[b] && dp[a+1][b-1], also two corner cases, when a == b and a == b-1.
For example, “a” and “aa”.
- Use
dpfor precomputing palindrome range answers. - Try all valid partitions with backtracking.
Space: O(2^N), Time: O(2^N)
21.01.2023
93. Restore IP Addresses medium
https://t.me/leetcode_daily_unstoppable/92
fun restoreIpAddresses(s: String): List<String> {
val res = mutableSetOf<String>()
fun dfs(pos: Int, nums: MutableList<Int>) {
if (pos == s.length || nums.size > 4) {
if (nums.size == 4) res += nums.joinToString(".")
return
}
var n = 0
for (i in pos..s.lastIndex) {
n = n*10 + s[i].toInt() - '0'.toInt()
if (n > 255) break
nums += n
dfs(i + 1, nums)
nums.removeAt(nums.lastIndex)
if (n == 0) break
}
}
dfs(0, mutableListOf())
return res.toList()
}
So, the size of the problem is small. We can do full DFS. At every step, choose either take a number or split. Add to the solution if the result is good.
- use set for results
- use backtracking to save some space
Some optimizations:
- exit early when nums.size > 5,
- use math to build a number instead of parsing substring
Space: O(2^N), Time: O(2^N)
20.01.2023
491. Non-decreasing Subsequences medium
https://t.me/leetcode_daily_unstoppable/91
fun findSubsequences(nums: IntArray): List<List<Int>> {
val res = mutableSetOf<List<Int>>()
fun dfs(pos: Int, currList: MutableList<Int>) {
if (currList.size > 1) res += currList.toList()
if (pos == nums.size) return
val currNum = nums[pos]
//not add
dfs(pos + 1, currList)
//to add
if (currList.isEmpty() || currList.last()!! <= currNum) {
currList += currNum
dfs(pos + 1, currList)
currList.removeAt(currList.lastIndex)
}
}
dfs(0, mutableListOf())
return res.toList()
}
Notice the size of the problem, we can do a brute force search for all solutions. Also, we only need to store the unique results, so we can store them in a set.
- we can reuse pre-filled list and do backtracking on the return from the DFS.
Space: O(2^N) to store the result, Time: O(2^N) for each value we have two choices, and we can build a binary tree of choices with the 2^n number of elements.
19.01.2023
974. Subarray Sums Divisible by K medium
https://t.me/leetcode_daily_unstoppable/90
fun subarraysDivByK(nums: IntArray, k: Int): Int {
// 4 5 0 -2 -3 1 k=5 count
// 4 4:1 0
// 9 4:2 +1
// 9 4:3 +2
// 7 2:1
// 4 4:4 +3
// 5 0:2 +1
// 2 -2 2 -4 k=6
// 2 2:1
// 0 0:2 +1
// 2 2:2 +1
// -2 2:3 +2
// 1 2 13 -2 3 k=7
// 1
// 3
// 16
// 14
// 17 (17-1*7= 10, 17-2*7=3, 17-3*7=-4, 17-4*7 = -11)
val freq = mutableMapOf<Int, Int>()
freq[0] = 1
var sum = 0
var res = 0
nums.forEach {
sum += it
var ind = (sum % k)
if (ind < 0) ind += k
val currFreq = freq[ind] ?: 0
res += currFreq
freq[ind] = 1 + currFreq
}
return res
}
We need to calculate a running sum.
For every current sum, we need to find any subsumes that are divisible by k, so sum[i]: (sum[i] - sum[any prev]) % k == 0.
Or, sum[i] % k == sum[any prev] % k.
Now, we need to store all sum[i] % k values, count them and add to result.
We can save frequency in a map, or in an array [0..k], because all the values are from that range.
Space: O(N), Time: O(N)
18.01.2023
918. Maximum Sum Circular Subarray medium
https://t.me/leetcode_daily_unstoppable/89
fun maxSubarraySumCircular(nums: IntArray): Int {
var maxEndingHere = 0
var maxEndingHereNegative = 0
var maxSoFar = Int.MIN_VALUE
var total = nums.sum()
nums.forEach {
maxEndingHere += it
maxEndingHereNegative += -it
maxSoFar = maxOf(maxSoFar, maxEndingHere, if (total == -maxEndingHereNegative) Int.MIN_VALUE else total+maxEndingHereNegative)
if (maxEndingHere < 0) {
maxEndingHere = 0
}
if (maxEndingHereNegative < 0) {
maxEndingHereNegative = 0
}
}
return maxSoFar
}
Simple Kadane’s Algorithm didn’t work when we need to keep a window of particular size. One idea is to invert the problem and find the minimum sum and subtract it from the total.
One corner case:
- we can’t subtract all the elements when checking the negative sum.
Space: O(1), Time: O(N)
17.01.2023
926. Flip String to Monotone Increasing medium
https://t.me/leetcode_daily_unstoppable/88
fun minFlipsMonoIncr(s: String): Int {
// 010110 dp0 dp1 min
// 0 0 0 0
// 1 1 0 1
// 0 1 1 1
// 1 2 1 1
// 1 3 1 1
// 0 3 2 2
var dp0 = 0
var dp1 = 0
for (i in 0..s.lastIndex) {
dp0 = if (s[i] == '0') dp0 else 1 + dp0
dp1 = if (s[i] == '1') dp1 else 1 + dp1
if (dp0 <= dp1) dp1 = dp0
}
return minOf(dp0, dp1)
}
We can propose the following rule: let’s define dp0[i] is a min count of flips from 1 to 0 in the 0..i interval.
Let’s also define dp1[i] is a min count of flips from 0 to 1 in the 0..i interval.
We observe that dp0[i] = dp0[i-1] + (flip one to zero? 1 : 0) and dp1[i] = dp1[i-1] + (flip zero to one? 1 : 0).
One special case: if on the interval 0..i one-to-zero flips count is less than zero-to-one then we prefer to flip everything to zeros, and dp1[i] in that case becomes dp0[i].
Just write down what is described above.
- dp arrays can be simplified to single variables.
Space: O(1), Time: O(N)
16.01.2023
57. Insert Interval medium
https://t.me/leetcode_daily_unstoppable/87
fun insert(intervals: Array<IntArray>, newInterval: IntArray): Array<IntArray> {
val res = mutableListOf<IntArray>()
var added = false
fun add() {
if (!added) {
added = true
if (res.isNotEmpty() && res.last()[1] >= newInterval[0]) {
res.last()[1] = maxOf(res.last()[1], newInterval[1])
} else res += newInterval
}
}
intervals.forEach { interval ->
if (newInterval[0] <= interval[0]) add()
if (res.isNotEmpty() && res.last()[1] >= interval[0]) {
res.last()[1] = maxOf(res.last()[1], interval[1])
} else res += interval
}
add()
return res.toTypedArray()
}
There is no magic, just be careful with corner cases.
Make another list, and iterate interval, merging them and adding at the same time.
- don’t forget to add
newIntervalif it is not added after iteration.
Space: O(N), Time: O(N)
15.01.2023
2421. Number of Good Paths hard
https://t.me/leetcode_daily_unstoppable/86
fun numberOfGoodPaths(vals: IntArray, edges: Array<IntArray>): Int {
if (edges.size == 0) return vals.size
edges.sortWith(compareBy( { maxOf( vals[it[0]], vals[it[1]] ) } ))
val uf = IntArray(vals.size) { it }
val freq = Array(vals.size) { mutableMapOf(vals[it] to 1) }
fun find(x: Int): Int {
var p = x
while (uf[p] != p) p = uf[p]
uf[x] = p
return p
}
fun union(a: Int, b: Int): Int {
val rootA = find(a)
val rootB = find(b)
if (rootA == rootB) return 0
uf[rootA] = rootB
val vMax = maxOf(vals[a], vals[b]) // if we connect tree [1-3] to tree [2-1], only `3` matters
val countA = freq[rootA][vMax] ?:0
val countB = freq[rootB][vMax] ?:0
freq[rootB][vMax] = countA + countB
return countA * countB
}
return edges.map { union(it[0], it[1])}.sum()!! + vals.size
}
The naive solution with single DFS and merging frequency maps gives TLE. Now, use hint, and they tell you to sort edges and use Union-Find :) The idea is to connect subtrees, but walk them from smallest to the largest of value. When we connect two subtrees, we look at the maximum of each subtree. The minimum values don’t matter because the path will break at the maximums by definition of the problem.
Use IntArray for Union-Find, and also keep frequencies maps for each root.
Space: O(NlogN), Time: O(N)
14.01.2023
1061. Lexicographically Smallest Equivalent String medium
https://t.me/leetcode_daily_unstoppable/85
fun smallestEquivalentString(s1: String, s2: String, baseStr: String): String {
val uf = IntArray(27) { it }
fun find(ca: Char): Int {
val a = ca.toInt() - 'a'.toInt()
var x = a
while (uf[x] != x) x = uf[x]
uf[a] = x
return x
}
fun union(a: Char, b: Char) {
val rootA = find(a)
val rootB = find(b)
if (rootA != rootB) {
val max = maxOf(rootA, rootB)
val min = minOf(rootA, rootB)
uf[max] = min
}
}
for (i in 0..s1.lastIndex) union(s1[i], s2[i])
return baseStr.map { (find(it) + 'a'.toInt()).toChar() }.joinToString("")
}
We need to find connected groups, the best way is to use the Union-Find.
Iterate over strings and connect each of their chars.
- to find a minimum, we can select the minimum of the current root.
Space: O(N) for storing a result, Time: O(N)
13.01.2023
2246. Longest Path With Different Adjacent Characters hard
https://t.me/leetcode_daily_unstoppable/84
fun longestPath(parent: IntArray, s: String): Int {
val graph = mutableMapOf<Int, MutableList<Int>>()
for (i in 1..parent.lastIndex)
if (s[i] != s[parent[i]]) graph.getOrPut(parent[i], { mutableListOf() }) += i
var maxLen = 0
fun dfs(curr: Int): Int {
parent[curr] = curr
var max1 = 0
var max2 = 0
graph[curr]?.forEach {
val childLen = dfs(it)
if (childLen > max1) {
max2 = max1
max1 = childLen
} else if (childLen > max2) max2 = childLen
}
val childChainLen = 1 + (max1 + max2)
val childMax = 1 + max1
maxLen = maxOf(maxLen, childMax, childChainLen)
return childMax
}
for (i in 0..parent.lastIndex) if (parent[i] != i) dfs(i)
return maxLen
}
Longest path is a maximum sum of the two longest paths of the current node.
Let’s build a graph and then recursively iterate it by DFS. We need to find two largest results from the children DFS calls.
- make
parent[i] == ito store avisitedstate
Space: O(N), Time: O(N), in DFS we visit each node only once.
12.01.2023
1519. Number of Nodes in the Sub-Tree With the Same Label medium
https://t.me/leetcode_daily_unstoppable/83
fun countSubTrees(n: Int, edges: Array<IntArray>, labels: String): IntArray {
val graph = mutableMapOf<Int, MutableList<Int>>()
edges.forEach { (from, to) ->
graph.getOrPut(from, { mutableListOf() }) += to
graph.getOrPut(to, { mutableListOf() }) += from
}
val answer = IntArray(n) { 0 }
fun dfs(node: Int, parent: Int, counts: IntArray) {
val index = labels[node].toInt() - 'a'.toInt()
val countParents = counts[index]
counts[index]++
graph[node]?.forEach {
if (it != parent) {
dfs(it, node, counts)
}
}
answer[node] = counts[index] - countParents
}
dfs(0, 0, IntArray(27) { 0 })
return answer
}
First, we need to build a graph. Next, just do DFS and count all 'a'..'z' frequencies in the current subtree.
For building a graph let’s use a map, and for DFS let’s use a recursion.
- use
parentnode instead of the visited set - use in-place counting and subtract
count before
Space: O(N), Time: O(N)
11.01.2023
1443. Minimum Time to Collect All Apples in a Tree medium
https://t.me/leetcode_daily_unstoppable/82
fun minTime(n: Int, edges: Array<IntArray>, hasApple: List<Boolean>): Int {
val graph = mutableMapOf<Int, MutableList<Int>>()
edges.forEach { (from, to) ->
graph.getOrPut(to, { mutableListOf() }) += from
graph.getOrPut(from, { mutableListOf() }) += to
}
val queue = ArrayDeque<Int>()
queue.add(0)
val parents = IntArray(n+1) { it }
while (queue.isNotEmpty()) {
val node = queue.poll()
graph[node]?.forEach {
if (parents[it] == it && it != 0) {
parents[it] = node
queue.add(it)
}
}
}
var time = 0
hasApple.forEachIndexed { i, has ->
if (has) {
var node = i
while (node != parents[node]) {
val parent = parents[node]
parents[node] = node
node = parent
time++
}
}
}
return time * 2
}
We need to count all paths from apples to 0-node and don’t count already walked path.
- notice, that problem definition doesn’t state the order of the edges in
edgesarray. We need to build the tree first.
First, build the tree, let it be a parents array, where parent[i] is a parent of the i.
Walk graph with DFS and write the parents.
Next, walk hasApple list and for each apple count parents until reach node 0 or already visited node.
To mark a node as visited, make it the parent of itself.
Space: O(N), Time: O(N)
10.01.2023
100. Same Tree easy
https://t.me/leetcode_daily_unstoppable/81
fun isSameTree(p: TreeNode?, q: TreeNode?): Boolean = p == null && q == null ||
p?.`val` == q?.`val` && isSameTree(p?.left, q?.left) && isSameTree(p?.right, q?.right)
Check for the current node and repeat for the children. Let’s write one-liner
Space: O(logN) for stack, Time: O(n)
9.01.2023
144. Binary Tree Preorder Traversal easy
https://t.me/leetcode_daily_unstoppable/80
class Solution {
fun preorderTraversal(root: TreeNode?): List<Int> {
val res = mutableListOf<Int>()
var node = root
while(node != null) {
res.add(node.`val`)
if (node.left != null) {
if (node.right != null) {
var rightmost = node.left!!
while (rightmost.right != null) rightmost = rightmost.right
rightmost.right = node.right
}
node = node.left
} else if (node.right != null) node = node.right
else node = null
}
return res
}
fun preorderTraversalStack(root: TreeNode?): List<Int> {
val res = mutableListOf<Int>()
var node = root
val rightStack = ArrayDeque<TreeNode>()
while(node != null) {
res.add(node.`val`)
if (node.left != null) {
if (node.right != null) {
rightStack.addLast(node.right!!) // <-- this step can be replaced with Morris
// traversal.
}
node = node.left
} else if (node.right != null) node = node.right
else if (rightStack.isNotEmpty()) node = rightStack.removeLast()
else node = null
}
return res
}
fun preorderTraversalRec(root: TreeNode?): List<Int> = mutableListOf<Int>().apply {
root?.let {
add(it.`val`)
addAll(preorderTraversal(it.left))
addAll(preorderTraversal(it.right))
}
}
}
Recursive solution is a trivial. For stack solution, we need to remember each right node. Morris’ solution use the tree modification to save each right node in the rightmost end of the left subtree.
Let’s implement them all.
Space: O(logN) for stack, O(1) for Morris’, Time: O(n)
8.01.2023
149. Max Points on a Line hard
https://t.me/leetcode_daily_unstoppable/79
fun maxPoints(points: Array<IntArray>): Int {
if (points.size == 1) return 1
val pointsByTan = mutableMapOf<Pair<Double, Double>, HashSet<Int>>()
fun gcd(a: Int, b: Int): Int {
return if (b == 0) a else gcd(b, a%b)
}
for (p1Ind in points.indices) {
val p1 = points[p1Ind]
for (p2Ind in (p1Ind+1)..points.lastIndex) {
val p2 = points[p2Ind]
val x1 = p1[0]
val x2 = p2[0]
val y1 = p1[1]
val y2 = p2[1]
var dy = y2 - y1
var dx = x2 - x1
val greatestCommonDivider = gcd(dx, dy)
dy /= greatestCommonDivider
dx /= greatestCommonDivider
val tan = dy/dx.toDouble()
val b = if (dx == 0) x1.toDouble() else (x2*y1 - x1*y2 )/(x2-x1).toDouble()
val line = pointsByTan.getOrPut(tan to b, { HashSet() })
line.add(p1Ind)
line.add(p2Ind)
}
}
return pointsByTan.values.maxBy { it.size }?.size?:0
}
Just do the linear algebra to find all the lines through each pair of points.
Store slope and b coeff in the hashmap. Also, compute gcd to find precise slope. In this case it works for double precision slope, but for bigger numbers we need to store dy and dx separately in Int precision.
Space: O(n^2), Time: O(n^2)
7.01.2023
134. Gas Station medium
https://t.me/leetcode_daily_unstoppable/78
fun canCompleteCircuit(gas: IntArray, cost: IntArray): Int {
var sum = 0
var minSum = gas[0]
var ind = -1
for (i in 0..gas.lastIndex) {
sum += gas[i] - cost[i]
if (sum < minSum) {
minSum = sum
ind = (i+1) % gas.size
}
}
return if (sum < 0) -1 else ind
}
We can start after the station with the minimum decrease in gasoline.
 Calculate running gasoline volume and find the minimum of it. If the total net gasoline is negative, there is no answer.
Space: O(1), Time: O(N)
6.01.2023
1833. Maximum Ice Cream Bars medium
https://t.me/leetcode_daily_unstoppable/77
fun maxIceCream(costs: IntArray, coins: Int): Int {
costs.sort()
var coinsRemain = coins
var iceCreamCount = 0
for (i in 0..costs.lastIndex) {
coinsRemain -= costs[i]
if (coinsRemain < 0) break
iceCreamCount++
}
return iceCreamCount
}
The maximum ice creams would be if we take as many minimum costs as possible
Sort the costs array, then greedily iterate it and buy ice creams until all the coins are spent.
Space: O(1), Time: O(NlogN) (there is also O(N) solution based on count sort)
5.01.2023
452. Minimum Number of Arrows to Burst Balloons medium
https://t.me/leetcode_daily_unstoppable/75
fun findMinArrowShots(points: Array<IntArray>): Int {
if (points.isEmpty()) return 0
if (points.size == 1) return 1
Arrays.sort(points, Comparator<IntArray> { a, b ->
if (a[0] == b[0]) a[1].compareTo(b[1]) else a[0].compareTo(b[0]) })
var arrows = 1
var arrX = points[0][0]
var minEnd = points[0][1]
for (i in 1..points.lastIndex) {
val (start, end) = points[i]
if (minEnd < start) {
arrows++
minEnd = end
}
if (end < minEnd) minEnd = end
arrX = start
}
return arrows
}
The optimal strategy to achieve the minimum number of arrows is to find the maximum overlapping intervals. For this task, we can sort the points by their start and end coordinates and use line sweep technique. Overlapping intervals are separate if their minEnd is less than start of the next interval. minEnd - the minimum of the end’s of the overlapping intervals.
Let’s move the arrow to each start interval and fire a new arrow if this start is greater than minEnd.
- for sorting without Int overflowing, use
compareToinstead of subtraction - initial conditions are better to initialize with the first interval and iterate starting from the second
Space: O(1), Time: O(NlogN)
4.01.2023
2244. Minimum Rounds to Complete All Tasks medium
https://t.me/leetcode_daily_unstoppable/74
fun minimumRounds(tasks: IntArray): Int {
val counts = mutableMapOf<Int, Int>()
tasks.forEach { counts[it] = 1 + counts.getOrDefault(it, 0)}
var round = 0
val cache = mutableMapOf<Int, Int>()
fun fromCount(count: Int): Int {
if (count == 0) return 0
if (count < 0 || count == 1) return -1
return if (count % 3 == 0) {
count/3
} else {
cache.getOrPut(count, {
var v = fromCount(count - 3)
if (v == -1) v = fromCount(count - 2)
if (v == -1) -1 else 1 + v
})
}
}
counts.values.forEach {
val rounds = fromCount(it)
if (rounds == -1) return -1
round += rounds
}
return round
}
For the optimal solution, we must take as many 3’s of tasks as possible, then take 2’s in any order.
First, we need to count how many tasks of each type there are. Next, we need to calculate the optimal rounds for the current tasks type count. There is a math solution, but ultimately we just can do DFS
Space: O(N), Time: O(N), counts range is always less than N
3.01.2023
944. Delete Columns to Make Sorted easy
https://t.me/leetcode_daily_unstoppable/73
fun minDeletionSize(strs: Array<String>): Int =
(0..strs[0].lastIndex).asSequence().count { col ->
(1..strs.lastIndex).asSequence().any { strs[it][col] < strs[it-1][col] }
}
Just do what is asked.
We can use Kotlin’s sequence api.
Space: O(1), Time: O(wN)
2.01.2023
520. Detect Capital easy
https://t.me/leetcode_daily_unstoppable/72
fun detectCapitalUse(word: String): Boolean =
word.all { Character.isUpperCase(it) } ||
word.all { Character.isLowerCase(it) } ||
Character.isUpperCase(word[0]) && word.drop(1).all { Character.isLowerCase(it) }
We can do this optimally by checking the first character and then checking all the other characters in a single pass. Or we can write a more understandable code that directly translates from the problem description. Let’s write one-liner.
Space: O(1), Time: O(N)
1.01.2023
290. Word Pattern easy
https://t.me/leetcode_daily_unstoppable/71
fun wordPattern(pattern: String, s: String): Boolean {
val charToWord = Array<String>(27) { "" }
val words = s.split(" ")
if (words.size != pattern.length) return false
words.forEachIndexed { i, w ->
val cInd = pattern[i].toInt() - 'a'.toInt()
if (charToWord[cInd] == "") {
charToWord[cInd] = w
} else if (charToWord[cInd] != w) return false
}
charToWord.sort()
for (i in 1..26)
if (charToWord[i] != "" && charToWord[i] == charToWord[i-1])
return false
return true
}
Each word must be in 1 to 1 relation with each character in the pattern. We can check this rule.
Use string[27] array for char -> word relation and also check each char have a unique word assigned.
- don’t forget to check lengths
Space: O(N), Time: O(N)
31.12.2022
https://t.me/leetcode_daily_unstoppable/69
fun uniquePathsIII(grid: Array<IntArray>): Int {
var countEmpty = 1
var startY = 0
var startX = 0
for (y in 0..grid.lastIndex) {
for (x in 0..grid[0].lastIndex) {
when(grid[y][x]) {
0 -> countEmpty++
1 -> { startY = y; startX = x}
else -> Unit
}
}
}
fun dfs(y: Int, x: Int): Int {
if (y < 0 || x < 0 || y >= grid.size || x >= grid[0].size) return 0
val curr = grid[y][x]
if (curr == 2) return if (countEmpty == 0) 1 else 0
if (curr == -1) return 0
grid[y][x] = -1
countEmpty--
val res = dfs(y-1, x) + dfs(y, x-1) + dfs(y+1, x) + dfs(y, x+1)
countEmpty++
grid[y][x] = curr
return res
}
return dfs(startY, startX)
}
There is only 20x20 cells, we can brute-force the solution.
We can use DFS, and count how many empty cells passed. To avoid visiting cells twice, modify grid cell and then modify it back, like backtracking.
Space: O(1), Time: O(4^N)
30.12.2022
797. All Paths From Source to Target medium
https://t.me/leetcode_daily_unstoppable/68
fun allPathsSourceTarget(graph: Array<IntArray>): List<List<Int>> {
val res = mutableListOf<List<Int>>()
val currPath = mutableListOf<Int>()
fun dfs(curr: Int) {
currPath += curr
if (curr == graph.lastIndex) res += currPath.toList()
graph[curr].forEach { dfs(it) }
currPath.removeAt(currPath.lastIndex)
}
dfs(0)
return res
}
We must find all the paths, so there is no shortcuts to the visiting all of them. One technique is backtracking - reuse existing visited list of nodes.
Space: O(VE), Time: O(VE)
29.12.2022
1834. Single-Threaded CPU medium
https://t.me/leetcode_daily_unstoppable/67
fun getOrder(tasks: Array<IntArray>): IntArray {
val pqSource = PriorityQueue<Int>(compareBy(
{ tasks[it][0] },
{ tasks[it][1] },
{ it }
))
(0..tasks.lastIndex).forEach { pqSource.add(it) }
val pq = PriorityQueue<Int>(compareBy(
{ tasks[it][1] },
{ it }
))
val res = IntArray(tasks.size) { 0 }
var time = 1
for(resPos in 0..tasks.lastIndex) {
while (pqSource.isNotEmpty() && tasks[pqSource.peek()][0] <= time) {
pq.add(pqSource.poll())
}
if (pq.isEmpty()) {
//idle
pq.add(pqSource.poll())
time = tasks[pq.peek()][0]
}
//take task
val taskInd = pq.poll()
val task = tasks[taskInd]
time += task[1]
res[resPos] = taskInd
}
return res
}
First we need to sort tasks by their availability (and other rules), then take tasks one by one and add them to another sorted set/heap where their start time doesn’t matter, but running time and order does. When we take the task from the heap, we increase the time and fill in the heap.
- use two heaps, one for the source of tasks, another for the current available tasks.
- don’t forget to increase time to the nearest task if all of them unavailable
Space: O(n), Time: O(nlogn)
28.12.2022
1962. Remove Stones to Minimize the Total medium
https://t.me/leetcode_daily_unstoppable/66
fun minStoneSum(piles: IntArray, k: Int): Int {
val pq = PriorityQueue<Int>()
var sum = 0
piles.forEach {
sum += it
pq.add(-it)
}
for (i in 1..k) {
if (pq.isEmpty()) break
val max = -pq.poll()
if (max == 0) break
val newVal = Math.round(max/2.0).toInt()
sum -= max - newVal
pq.add(-newVal)
}
return sum
}
By the problem definition, intuitively the best strategy is to reduce the maximum each time.
Use PriorityQueue to keep track of the maximum value and update it dynamically.
- one can use variable
sumand update it each time.
Space: O(n), Time: O(nlogn)
27.12.2022
2279. Maximum Bags With Full Capacity of Rocks medium
https://t.me/leetcode_daily_unstoppable/65
fun maximumBags(capacity: IntArray, rocks: IntArray, additionalRocks: Int): Int {
val inds = Array<Int>(capacity.size) { it }
inds.sortWith(Comparator { a,b -> capacity[a]-rocks[a] - capacity[b] + rocks[b] })
var rocksRemain = additionalRocks
var countFull = 0
for (i in 0..inds.lastIndex) {
val toAdd = capacity[inds[i]] - rocks[inds[i]]
if (toAdd > rocksRemain) break
rocksRemain -= toAdd
countFull++
}
return countFull
}
We can logically deduce that the optimal solution is to take first bags with the smallest empty space.
Make an array of indexes and sort it by difference between capacity and rocks. Then just simulate rocks addition to each bug from the smallest empty space to the largest.
Space: O(n), Time: O(nlogn)
26.12.2022
55. Jump Game medium
https://t.me/leetcode_daily_unstoppable/64
fun canJump(nums: IntArray): Boolean {
var minInd = nums.lastIndex
for (i in nums.lastIndex - 1 downTo 0) {
if (nums[i] + i >= minInd) minInd = i
}
return minInd == 0
}
For any position i we can reach the end if there is a minInd such that nums[i] + i >= minInd and minInd is a known to be reaching the end.
We can run from the end and update minInd - minimum index reaching the end.
Space: O(1), Time: O(N)
25.12.2022
2389. Longest Subsequence With Limited Sum easy
https://t.me/leetcode_daily_unstoppable/63
fun answerQueries(nums: IntArray, queries: IntArray): IntArray {
nums.sort()
for (i in 1..nums.lastIndex) nums[i] += nums[i-1]
return IntArray(queries.size) {
val ind = nums.binarySearch(queries[it])
if (ind < 0) -ind-1 else ind+1
}
}
We can logically deduce that for the maximum number of arguments we need to take as much as possible items from the smallest to the largest.
We can sort items. Then pre-compute sums[i] = sum from [0..i]. Then use binary search target sum in sums. Also, can modify nums but that’s may be not necessary.
Space: O(N), Time: O(NlogN)
24.12.2022
790. Domino and Tromino Tiling medium
https://t.me/leetcode_daily_unstoppable/62
fun numTilings(n: Int): Int {
val cache = Array<Array<Array<Long>>>(n) { Array(2) { Array(2) { -1L }}}
fun dfs(pos: Int, topFree: Int, bottomFree: Int): Long {
return when {
pos > n -> 0L
pos == n -> if (topFree==1 && bottomFree==1) 1L else 0L
else -> {
var count = cache[pos][topFree][bottomFree]
if (count == -1L) {
count = 0L
when {
topFree==1 && bottomFree==1 -> {
count += dfs(pos+1, 1, 1) // vertical
count += dfs(pos+1, 0, 0) // horizontal
count += dfs(pos+1, 1, 0) // tromino top
count += dfs(pos+1, 0, 1) // tromino bottom
}
topFree==1 -> {
count += dfs(pos+1, 0, 0) // tromino
count += dfs(pos+1, 1, 0) // horizontal
}
bottomFree==1 -> {
count += dfs(pos+1, 0, 0) // tromino
count += dfs(pos+1, 0, 1) // horizontal
}
else -> {
count += dfs(pos+1, 1, 1) // skip
}
}
count = count % 1_000_000_007L
}
cache[pos][topFree][bottomFree] = count
count
}
}
}
return dfs(0, 1, 1).toInt()
}
We can walk the board horizontally and monitor free cells. On each step, we can choose what figure to place. When end reached and there are no free cells, consider that a successful combination. Result depends only on the current position and on the top-bottom cell combination.* just do dfs+memo
- use array for a faster cache
Space: O(N), Time: O(N) - we only visit each column 3 times
23.12.2022
309. Best Time to Buy and Sell Stock with Cooldown medium
https://t.me/leetcode_daily_unstoppable/61
data class K(val a:Int, val b: Boolean, val c:Boolean)
fun maxProfit(prices: IntArray): Int {
val cache = mutableMapOf<K, Int>()
fun dfs(pos: Int, canSell: Boolean, canBuy: Boolean): Int {
return if (pos == prices.size) 0
else cache.getOrPut(K(pos, canSell, canBuy), {
val profitSkip = dfs(pos+1, canSell, !canSell)
val profitSell = if (canSell) {prices[pos] + dfs(pos+1, false, false)} else 0
val profitBuy = if (canBuy) {-prices[pos] + dfs(pos+1, true, false)} else 0
maxOf(profitSkip, profitBuy, profitSell)
})
}
return dfs(0, false, true)
}
Progress from dfs solution to memo. DFS solution - just choose what to do in this step, go next, then compare results and peek max.
Space: O(N), Time: O(N)
22.12.2022
834. Sum of Distances in Tree hard
https://t.me/leetcode_daily_unstoppable/60
fun sumOfDistancesInTree(n: Int, edges: Array<IntArray>): IntArray {
val graph = mutableMapOf<Int, MutableList<Int>>()
edges.forEach { (from, to) ->
graph.getOrPut(from, { mutableListOf() }) += to
graph.getOrPut(to, { mutableListOf() }) += from
}
val counts = IntArray(n) { 1 }
val sums = IntArray(n) { 0 }
fun distSum(pos: Int, visited: Int) {
graph[pos]?.forEach {
if (it != visited) {
distSum(it, pos)
counts[pos] += counts[it]
sums[pos] += counts[it] + sums[it]
}
}
}
fun dfs(pos: Int, visited: Int) {
graph[pos]?.forEach {
if (it != visited) {
sums[it] = sums[pos] - counts[it] + (n - counts[it])
dfs(it, pos)
}
}
}
distSum(0, -1)
dfs(0, -1)
return sums
}
We can do the job for item #0, then we need to invent a formula to reuse some data when we change the node.
How to mathematically prove formula for a new sum:

 Store count of children in a
 counts array, and sum of the distances to children in a dist array. In a first DFS traverse from a node 0 and fill the arrays. In a second DFS only modify dist based on previous computed dist value, using formula: sum[curr] = sum[prev] - count[curr] + (N - count[curr])
Space: O(N), Time: O(N)
21.12.2022
886. Possible Bipartition medium
https://t.me/leetcode_daily_unstoppable/59
fun possibleBipartition(n: Int, dislikes: Array<IntArray>): Boolean {
val love = IntArray(n+1) { it }
fun leader(x: Int): Int {
var i = x
while (love[i] != i) i = love[i]
love[x] = i
return i
}
val hate = IntArray(n+1) { -1 }
dislikes.forEach { (one, two) ->
val leaderOne = leader(one)
val leaderTwo = leader(two)
val enemyOfOne = hate[leaderOne]
val enemyOfTwo = hate[leaderTwo]
if (enemyOfOne != -1 && enemyOfOne == enemyOfTwo) return false
if (enemyOfOne != -1) {
love[leader(enemyOfOne)] = leaderTwo
}
if (enemyOfTwo != -1) {
love[leader(enemyOfTwo)] = leaderOne
}
hate[leaderOne] = leaderTwo
hate[leaderTwo] = leaderOne
}
return true
}
We need somehow to union people that hate the same people. We can do it making someone a leader of a group and make just leaders to hate each other.
Keep track of the leaders hating each other in the hate array, and people loving their leader in love array. (love array is basically a Union-Find).
- also use path compression for
leadermethod
Space: O(N), Time: O(N) - adding to Union-Find is O(1) amortised
20.12.2022
841. Keys and Rooms medium
https://t.me/leetcode_daily_unstoppable/58
fun canVisitAllRooms(rooms: List<List<Int>>): Boolean {
val visited = hashSetOf(0)
with(ArrayDeque<Int>()) {
add(0)
while(isNotEmpty()) {
rooms[poll()].forEach {
if (visited.add(it)) add(it)
}
}
}
return visited.size == rooms.size
}
We need to visit each room, and we have positions of the other rooms and a start position. This is a DFS problem. Keep all visited rooms numbers in a hash set and check the final size. Other solution is to use boolean array and a counter of the visited rooms.
Space: O(N) - for queue and visited set, Time: O(N) - visit all the rooms once
19.12.2022
1971. Find if Path Exists in Graph easy
https://t.me/leetcode_daily_unstoppable/57
fun validPath(n: Int, edges: Array<IntArray>, source: Int, destination: Int): Boolean {
if (source == destination) return true
val graph = mutableMapOf<Int, MutableList<Int>>()
edges.forEach { (from, to) ->
graph.getOrPut(from, { mutableListOf() }).add(to)
graph.getOrPut(to, { mutableListOf() }).add(from)
}
val visited = mutableSetOf<Int>()
with(ArrayDeque<Int>()) {
add(source)
var depth = 0
while(isNotEmpty() && ++depth < n) {
repeat(size) {
graph[poll()]?.forEach {
if (it == destination) return true
if (visited.add(it)) add(it)
}
}
}
}
return false
}
BFS will do the job. Make node to nodes map, keep visited set and use queue for BFS.
- also path can’t be longer than n elements
Space: O(N), Time: O(N)
18.12.2022
739. Daily Temperatures medium
https://t.me/leetcode_daily_unstoppable/55
fun dailyTemperatures(temperatures: IntArray): IntArray {
val stack = Stack<Int>()
val res = IntArray(temperatures.size) { 0 }
for (i in temperatures.lastIndex downTo 0) {
while(stack.isNotEmpty() && temperatures[stack.peek()] <= temperatures[i]) stack.pop()
if (stack.isNotEmpty()) {
res[i] = stack.peek() - i
}
stack.push(i)
}
return res
}
Intuitively, we want to go from the end of the array to the start and keep the maximum value. But, that doesn’t work, because we must also store smaller numbers, as they are closer in distance.
For example, 4 3 5 6, when we observe 4 we must compare it to 5, not to 6. So, we store not just max, but increasing max: 3 5 6, and throw away all numbers smaller than current, 3 < 4 - pop().
We will iterate in reverse order, storing indexes in increasing by temperatures stack.
Space: O(N), Time: O(N)
17.12.2022
150. Evaluate Reverse Polish Notation medium
https://t.me/leetcode_daily_unstoppable/54
fun evalRPN(tokens: Array<String>): Int = with(Stack<Int>()) {
tokens.forEach {
when(it) {
"+" -> push(pop() + pop())
"-" -> push(-pop() + pop())
"*" -> push(pop() * pop())
"/" -> with(pop()) { push(pop()/this) }
else -> push(it.toInt())
}
}
pop()
}
Reverse polish notations made explicitly for calculation using stack. Just execute every operation immediately using last two numbers in the stack and push the result.
- be aware of the order of the operands
Space: O(N), Time: O(N)
16.12.2022
232. Implement Queue using Stacks easy
https://t.me/leetcode_daily_unstoppable/53
class MyQueue() {
val head = Stack<Int>()
val tail = Stack<Int>()
// [] []
// 1 2 3 4 -> 4 3 2 - 1
// 5 4 3 2
// 4 3 2 5
fun push(x: Int) {
head.push(x)
}
fun pop(): Int {
peek()
return tail.pop()
}
fun peek(): Int {
if (tail.isEmpty()) while(head.isNotEmpty()) tail.push(head.pop())
return tail.peek()
}
fun empty(): Boolean = head.isEmpty() && tail.isEmpty()
}
One stack for the head of the queue and other for the tail.
When we need to do pop we first drain from one stack to another, so items order will be restored.
- we can skip rotation on push if we fill tail only when its empty
Space: O(1), Time: O(1)
15.12.2022
1143. Longest Common Subsequence medium
https://t.me/leetcode_daily_unstoppable/52
fun longestCommonSubsequence(text1: String, text2: String): Int {
val cache = Array(text1.length + 1) { IntArray(text2.length + 1) { -1 } }
fun dfs(pos1: Int, pos2: Int): Int {
if (pos1 == text1.length) return 0
if (pos2 == text2.length) return 0
val c1 = text1[pos1]
val c2 = text2[pos2]
if (cache[pos1][pos2] != -1) return cache[pos1][pos2]
val res = if (c1 == c2) {
1 + dfs(pos1 + 1, pos2 + 1)
} else {
maxOf(dfs(pos1, pos2+1), dfs(pos1+1, pos2))
}
cache[pos1][pos2] = res
return res
}
return dfs(0, 0)
}
We can walk the two strings simultaneously and compare their chars. If they are the same, the optimal way will be to use those chars and continue exploring next. If they are not, we have two choices: use the first char and skip the second or skip the first but use the second. Also, observing our algorithm we see, the result so far is only dependent of the positions from which we begin to search (and all the remaining characters). And also see that the calls are repetitive. That mean we can cache the result. (meaning this is a dynamic programming solution). Use depth first search by starting positions and memoize results in a two dimension array. Another approach will be bottom up iteration and filling the same array.
Space: O(N^2), Time: O(N^2)
14.12.2022
198. House Robber medium
https://t.me/leetcode_daily_unstoppable/51
fun rob(nums: IntArray): Int {
val cache = mutableMapOf<Int, Int>()
fun dfs(pos: Int): Int {
if (pos > nums.lastIndex) return 0
return cache.getOrPut(pos) {
maxOf(nums[pos] + dfs(pos+2), dfs(pos+1))
}
}
return dfs(0)
}
Exploring each house one by one we can make a decision to rob or not to rob. The result is only depends on our current position (and all houses that are remaining to rob) and decision, so we can memoize it based on position.
We can use memoization or walk houses bottom up.
Space: O(N), Time: O(N)
13.12.2022
931. Minimum Falling Path Sum medium
https://t.me/leetcode_daily_unstoppable/50
fun minFallingPathSum(matrix: Array<IntArray>): Int {
for (y in matrix.lastIndex-1 downTo 0) {
val currRow = matrix[y]
val nextRow = matrix[y+1]
for (x in 0..matrix[0].lastIndex) {
val left = if (x > 0) nextRow[x-1] else Int.MAX_VALUE
val bottom = nextRow[x]
val right = if (x < matrix[0].lastIndex) nextRow[x+1] else Int.MAX_VALUE
val minSum = currRow[x] + minOf(left, bottom, right)
currRow[x] = minSum
}
}
return matrix[0].min()!!
}
There is only three ways from any cell to it’s siblings. We can compute all three paths sums for all cells in a row so far. And then choose the smallest. Iterate over rows and compute prefix sums of current + minOf(left min sum, bottom min sum, right min sum)
Space: O(N), Time: O(N^2)
12.12.2022
70. Climbing Stairs easy
https://t.me/leetcode_daily_unstoppable/49
val cache = mutableMapOf<Int, Int>()
fun climbStairs(n: Int): Int = when {
n < 1 -> 0
n == 1 -> 1
n == 2 -> 2
else -> cache.getOrPut(n) {
climbStairs(n-1) + climbStairs(n-2)
}
}
You can observe that result is only depend on input n. And also that result(n) = result(n-1) + result(n-2). Just use memoization for storing already solved inputs.
Space: O(N), Time: O(N)
11.12.2022
124. Binary Tree Maximum Path Sum hard
https://t.me/leetcode_daily_unstoppable/48
fun maxPathSum(root: TreeNode?): Int {
fun dfs(root: TreeNode): Pair<Int, Int> {
val lt = root.left
val rt = root.right
if (lt == null && rt == null) return root.`val` to root.`val`
if (lt == null || rt == null) {
val sub = dfs(if (lt == null) rt else lt)
val currRes = root.`val` + sub.second
val maxRes = maxOf(sub.first, currRes, root.`val`)
val maxPath = maxOf(root.`val`, root.`val` + sub.second)
return maxRes to maxPath
} else {
val left = dfs(root.left)
val right = dfs(root.right)
val currRes1 = root.`val` + left.second + right.second
val currRes2 = root.`val`
val currRes3 = root.`val` + left.second
val currRes4 = root.`val` + right.second
val max1 = maxOf(currRes1, currRes2)
val max2 = maxOf(currRes3, currRes4)
val maxRes = maxOf(left.first, right.first, maxOf(max1, max2))
val maxPath = maxOf(root.`val`, root.`val` + maxOf(left.second, right.second))
return maxRes to maxPath
}
}
return if (root == null) 0 else dfs(root).first
}
Space: O(logN), Time: O(N)
10.12.2022
1339. Maximum Product of Splitted Binary Tree medium
https://t.me/leetcode_daily_unstoppable/47
fun maxProduct(root: TreeNode?): Int {
fun sumDfs(root: TreeNode?): Long {
return if (root == null) 0L
else with(root) { `val`.toLong() + sumDfs(left) + sumDfs(right) }
}
val total = sumDfs(root)
fun dfs(root: TreeNode?) : Pair<Long, Long> {
if (root == null) return Pair(0,0)
val left = dfs(root.left)
val right = dfs(root.right)
val sum = left.first + root.`val`.toLong() + right.first
val productLeft = left.first * (total - left.first)
val productRight = right.first * (total - right.first)
val prevProductMax = maxOf(right.second, left.second)
return sum to maxOf(productLeft, productRight, prevProductMax)
}
return (dfs(root).second % 1_000_000_007L).toInt()
}
Just iterate over all items and compute all products. We need to compute total sum before making the main traversal.
Space: O(logN), Time: O(N)
9.12.2022
1026. Maximum Difference Between Node and Ancestor medium
https://t.me/leetcode_daily_unstoppable/46
fun maxAncestorDiff(root: TreeNode?): Int {
root?: return 0
fun dfs(root: TreeNode, min: Int = root.`val`, max: Int = root.`val`): Int {
val v = root.`val`
val currDiff = maxOf(Math.abs(v - min), Math.abs(v - max))
val currMin = minOf(min, v)
val currMax = maxOf(max, v)
val leftDiff = root.left?.let { dfs(it, currMin, currMax) } ?: 0
val rightDiff = root.right?.let { dfs(it, currMin, currMax) } ?: 0
return maxOf(currDiff, leftDiff, rightDiff)
}
return dfs(root)
}
Based on math we can assume, that max difference is one of the two: (curr - max so far) or (curr - min so far).
Like, for example, let our curr value be 3, and from all visited we have min 0 and max 7.
0--3---7
- we can write helper recoursive method and compute max and min so far
Space: O(logN), Time: O(N)
8.12.2022
https://t.me/leetcode_daily_unstoppable/45
fun leafSimilar(root1: TreeNode?, root2: TreeNode?): Boolean {
fun dfs(root: TreeNode?): List<Int> {
return when {
root == null -> listOf()
root.left == null && root.right == null -> listOf(root.`val`)
else -> dfs(root.left) + dfs(root.right)
}
}
return dfs(root1) == dfs(root2)
}
There is only 200 items, so we can concatenate lists. One optimization would be to collect only first tree and just compare it to the second tree while doing the inorder traverse.
Space: O(N), Time: O(N)
7.12.2022
https://t.me/leetcode_daily_unstoppable/44
fun rangeSumBST(root: TreeNode?, low: Int, high: Int): Int =
if (root == null) 0 else
with(root) {
(if (`val` in low..high) `val` else 0) +
(if (`val` < low) 0 else rangeSumBST(left, low, high)) +
(if (`val` > high) 0 else rangeSumBST(right, low, high))
}
- be careful with ternary operations, better wrap them in a brackets
Space: O(log N), Time: O(R), r - is a range [low, high]
6.12.2022
328. Odd Even Linked List medium
https://t.me/leetcode_daily_unstoppable/43
// 1 2
fun oddEvenList(head: ListNode?): ListNode? {
var odd = head //1
val evenHead = head?.next
var even = head?.next //2
while(even!=null) { //2
val oddNext = odd?.next?.next //null
val evenNext = even?.next?.next //null
odd?.next = oddNext // 1->null
even?.next = evenNext //2->null
if (oddNext != null) odd = oddNext //
even = evenNext // null
}
odd?.next = evenHead // 1->2
return head //1->2->null
}
- be careful and store evenHead in a separate variable
Space: O(1), Time: O(n)
5.12.2022
876. Middle of the Linked List easy
https://t.me/leetcode_daily_unstoppable/42
fun middleNode(head: ListNode?, fast: ListNode? = head): ListNode? =
if (fast?.next == null) head else middleNode(head?.next, fast?.next?.next)
- one-liner, but in the interview (or production) I would prefer to write a loop
Space: O(n), Time: O(n)
4.12.2022
2256. Minimum Average Difference medium
https://t.me/leetcode_daily_unstoppable/41
fun minimumAverageDifference(nums: IntArray): Int {
var sum = 0L
nums.forEach { sum += it.toLong() }
var leftSum = 0L
var min = Long.MAX_VALUE
var minInd = 0
for (i in 0..nums.lastIndex) {
val leftCount = (i+1).toLong()
leftSum += nums[i].toLong()
val front = leftSum/leftCount
val rightCount = nums.size.toLong() - leftCount
val rightSum = sum - leftSum
val back = if (rightCount == 0L) 0L else rightSum/rightCount
val diff = Math.abs(front - back)
if (diff < min) {
min = diff
minInd = i
}
}
return minInd
}
Intuition
Two pointers, one for even, one for odd indexes.
Approach
To avoid mistakes you need to be verbose, and don’t skip operations:
- store evenHead in a separate variable
- don’t switch links before both pointers jumped
- don’t make odd pointer null
- try to run for simple input
1->2->nullby yourself
Space: O(1), Time: O(n)
3.12.2022
451. Sort Characters By Frequency medium
https://t.me/leetcode_daily_unstoppable/40
fun frequencySort(s: String): String =
s.groupBy { it }
.values
.map { it to it.size }
.sortedBy { -it.second }
.map { it.first }
.flatten()
.joinToString("")
Very simple task, can be written in a functional style. Space: O(n), Time: O(n)
2.12.2022
https://leetcode.com/problems/determine-if-two-strings-are-close/ medium
https://t.me/leetcode_daily_unstoppable/39
// cabbba -> c aa bbb -> 1 2 3
// a bb ccc -> 1 2 3
// uau
// ssx
fun closeStrings(word1: String, word2: String,
f: (String) -> List<Int> = { it.groupBy { it }.values.map { it.size }.sorted() }
): Boolean = f(word1) == f(word2) && word1.toSet() == word2.toSet()
That is a simple task, you just need to know what exactly you asked for. Space: O(n), Time: O(n)
1.12.2022
1704. Determine if String Halves Are Alike easy
https://t.me/leetcode_daily_unstoppable/38
fun halvesAreAlike(s: String): Boolean {
val vowels = setOf('a', 'e', 'i', 'o', 'u', 'A', 'E', 'I', 'O', 'U')
var c1 = 0
var c2 = 0
s.forEachIndexed { i, c ->
if (c in vowels) {
if (i < s.length / 2) c1++ else c2++
}
}
return c1 == c2
}
Just do what is asked.
O(N) time, O(1) space
30.11.2022
1207. Unique Number of Occurrences easy
https://t.me/leetcode_daily_unstoppable/36
fun uniqueOccurrences(arr: IntArray): Boolean {
val counter = mutableMapOf<Int, Int>()
arr.forEach { n -> counter[n] = 1 + (counter[n] ?: 0) }
val freq = mutableSetOf<Int>()
return !counter.values.any { count -> !freq.add(count) }
}
Nothing interesting, just count and filter.
O(N) time, O(N) space
29.11.2022
380. Insert Delete GetRandom O(1) medium
https://t.me/leetcode_daily_unstoppable/35
class RandomizedSet() {
val rnd = Random(0)
val list = mutableListOf<Int>()
val vToInd = mutableMapOf<Int, Int?>()
fun insert(v: Int): Boolean {
if (!vToInd.contains(v)) {
vToInd[v] = list.size
list.add(v)
return true
}
return false
}
fun remove(v: Int): Boolean {
val ind = vToInd[v] ?: return false
val prevLast = list[list.lastIndex]
list[ind] = prevLast
vToInd[prevLast] = ind
list.removeAt(list.lastIndex)
vToInd.remove(v)
return true
}
fun getRandom(): Int = list[rnd.nextInt(list.size)]
}
The task is simple, one trick is to remove elements from the end of the list, and replacing item with the last one. Some thoughts:
- don’t optimize lines of code, that can backfire. You can use syntax sugar, clever operations inlining, but also can shoot in the foot.
O(1) time, O(N) space
28.11.2022
2225. Find Players With Zero or One Losses medium
https://t.me/leetcode_daily_unstoppable/34
fun findWinners(matches: Array<IntArray>): List<List<Int>> {
val winners = mutableMapOf<Int, Int>()
val losers = mutableMapOf<Int, Int>()
matches.forEach { (w, l) ->
winners[w] = 1 + (winners[w]?:0)
losers[l] = 1 + (losers[l]?:0)
}
return listOf(
winners.keys
.filter { !losers.contains(it) }
.sorted(),
losers
.filter { (k, v) -> v == 1 }
.map { (k, v) -> k}
.sorted()
)
}
Just do what is asked.
O(NlogN) time, O(N) space
27.11.2022
446. Arithmetic Slices II - Subsequence hard
https://t.me/leetcode_daily_unstoppable/33
fun numberOfArithmeticSlices(nums: IntArray): Int {
// 0 1 2 3 4 5
// 1 2 3 1 2 3 diff = 1
// ^ ^ * dp[5][diff] =
// | | \__ curr 1 + dp[1][diff] +
// prev | 1 + dp[4][diff]
// prev
//
val dp = Array(nums.size) { mutableMapOf<Long, Long> () }
for (curr in 0..nums.lastIndex) {
for (prev in 0 until curr) {
val diff = nums[curr].toLong() - nums[prev].toLong()
dp[curr][diff] = 1 + (dp[curr][diff]?:0L) + (dp[prev][diff]?:0L)
}
}
return dp.map { it.values.sum()!! }.sum().toInt() - (nums.size)*(nums.size-1)/2
}
dp[i][d] is the number of subsequences in range [0..i] with difference = d
array: "1 2 3 1 2 3"
For items 1 2 curr = 2:
diff = 1, dp = 1
For items 1 2 3 curr = 3:
diff = 2, dp = 1
diff = 1, dp = 2
For items 1 2 3 1 curr = 1:
diff = 0, dp = 1
diff = -1, dp = 1
diff = -2, dp = 1
For items 1 2 3 1 2 curr = 2:
diff = 1, dp = 2
diff = 0, dp = 1
diff = -1, dp = 1
For items 1 2 3 1 2 3 curr = 3:
diff = 2, dp = 2
diff = 1, dp = 5
diff = 0, dp = 1
and finally, we need to subtract all the sequences of length 2 and 1, count of them is (n)*(n-1)/2
O(N^2) time, O(N^2) space
26.11.2022
1235. Maximum Profit in Job Scheduling hard
https://t.me/leetcode_daily_unstoppable/32
fun jobScheduling(startTime: IntArray, endTime: IntArray, profit: IntArray): Int {
val n = startTime.size
val inds = Array<Int>(n) { it }
inds.sortWith (Comparator<Int> { a, b ->
if (startTime[a] == startTime[b])
endTime[a] - endTime[b]
else
startTime[a] - startTime[b]
})
val maxProfit = IntArray(n) { 0 }
maxProfit[n-1] = profit[inds[n-1]]
for (i in n-2 downTo 0) {
val ind = inds[i]
val end = endTime[ind]
val prof = profit[ind]
var lo = l + 1
var hi = n - 1
var nonOverlapProfit = 0
while (lo <= hi) {
val mid = lo + (hi - lo) / 2
if (end <= startTime[inds[mid]]) {
nonOverlapProfit = maxOf(nonOverlapProfit, maxProfit[mid])
hi = mid - 1
} else lo = mid + 1
}
maxProfit[i] = maxOf(prof + nonOverlapProfit, maxProfit[i+1])
}
return maxProfit[0]
}
Use the hints from the description. THis cannot be solved greedily, because you need to find next non-overlapping job. Dynamic programming equation: from last job to the current, result is max of next result and current + next non-overlapping result.
f(i) = max(f(i+1), profit[i] + f(j)), where j is the first non-overlapping job after i.
Also, instead of linear search for non overlapping job, use binary search.
O(NlogN) time, O(N) space
25.11.2022
907. Sum of Subarray Minimums medium
data class V(val v: Int, val count: Int)
fun sumSubarrayMins(arr: IntArray): Int {
val M = 1_000_000_007
// 1 2 3 4 2 2 3 4
// 1 2 3 2 2 2 3
// 1 2 2 2 2 2
// 1 2 2 2 2
// 1 2 2 2
// 1 2 2
// 1 2
// 1
// f(1) = 1
// f(2) = 2>1 ? f(1) + [1, 2]
// f(3) = 3>2 ? f(2) + [1, 2, 3]
// f(4) = 4>3 ? f(3) + [1, 2, 3, 4]
// f(2) = 2<4 ? f(4) + [1, 2, 2, 2, 2] (1, 2, 3, 4 -> 3-2, 4-2, +2)
// f(2) = 2=2 ? f(2) + [1, 2, 2, 2, 2, 2]
// f(3) = 3>2 ? f(2) + [1, 2, 2, 2, 2, 2, 3]
// f(4) = 4>3 ? f(3) + [1, 2, 2, 2, 2, 2, 3, 4]
// 3 1 2 4 f(3) = 3 sum = 3 stack: [3]
// 1 1 2 f(1): 3 > 1 , remove V(3,1), sum = sum - 3 + 1*2= 2, f=3+2=5, [(1,2)]
// 1 1 f(2): 2>1, sum += 2 = 4, f+=4=9
// 1 f(4): 4>2, sum+=4=8, f+=8=17
val stack = Stack<V>()
var f = 0
var sum = 0
arr.forEach { n ->
var countRemoved = 0
while (stack.isNotEmpty() && stack.peek().v > n) {
val v = stack.pop()
countRemoved += v.count
var removedSum = (v.v*v.count) % M
if (removedSum < 0) removedSum = M + removedSum
sum = (sum - removedSum) % M
if (sum < 0) sum = sum + M
}
val count = countRemoved + 1
stack.add(V(n, count))
sum = (sum + (n * count) % M) % M
f = (f + sum) % M
}
return f
}
First attempt is to build an N^2 tree of minimums, comparing adjacent elements row by row and finding a minimum. That will take O(N^2) time and gives TLE. Next observe that there is a repetition of the results if we computing result for each new element: result = previous result + some new elements. That new elements are also have a law of repetition: sum = current element + if (current element < previous element) count of previous elements * current element else previous sum We can use a stack to keep lowest previous elements, all values in stack must be less than current element.
O(N) time, O(N) space
24.11.2022
79. Word Search medium
fun exist(board: Array<CharArray>, word: String): Boolean {
fun dfs(y: Int, x: Int, pos: Int): Boolean {
if (pos == word.length) return true
if (y < 0 || x < 0 || y == board.size || x == board[0].size) return false
val c = board[y][x]
if (c != word[pos]) return false
board[y][x] = '.'
val res = dfs(y-1, x, pos+1)
|| dfs(y+1, x, pos+1)
|| dfs(y, x-1, pos+1)
|| dfs(y, x+1, pos+1)
board[y][x] = c
return res
}
for (y in 0..board.lastIndex) {
for (x in 0..board[0].lastIndex) {
if (dfs(y, x, 0)) return true
}
}
return false
}
We can brute force this problem. Backtracking help to preserve memory.
Complexity: O(MNW) Memory: O(W)
23.11.2022
https://leetcode.com/problems/valid-sudoku/ medium
fun isValidSudoku(board: Array<CharArray>): Boolean {
val cell9 = arrayOf(0 to 0, 0 to 1, 0 to 2,
1 to 0, 1 to 1, 1 to 2,
2 to 0, 2 to 1, 2 to 2)
val starts = arrayOf(0 to 0, 0 to 3, 0 to 6,
3 to 0, 3 to 3, 3 to 6,
6 to 0, 6 to 3, 6 to 6)
return !starts.any { (sy, sx) ->
val visited = HashSet<Char>()
cell9.any { (dy, dx) ->
val c = board[sy+dy][sx+dx]
c != '.' && !visited.add(c)
}
} && !board.any { row ->
val visited = HashSet<Char>()
row.any { it != '.' && !visited.add(it) }
} && !(0..8).any { x ->
val visited = HashSet<Char>()
(0..8).any { board[it][x] != '.' && !visited.add(board[it][x]) }
}
}
This is an easy problem, just do what is asked.
Complexity: O(N) Memory: O(N), N = 81, so it O(1)
22.11.2022
https://leetcode.com/problems/perfect-squares/ medium
val cache = mutableMapOf<Int, Int>()
fun numSquares(n: Int): Int {
if (n < 0) return -1
if (n == 0) return 0
if (cache[n] != null) return cache[n]!!
var min = Int.MAX_VALUE
for (x in Math.sqrt(n.toDouble()).toInt() downTo 1) {
val res = numSquares(n - x*x)
if (res != -1) {
min = minOf(min, 1 + res)
}
}
if (min == Int.MAX_VALUE) min = -1
cache[n] = min
return min
}
The problem gives stable answers for any argument n. So, we can use memoization technique and search from the biggest square to the smallest one.
Complexity: O(Nsqrt(N)) Memory: O(N)
21.11.2022
https://leetcode.com/problems/nearest-exit-from-entrance-in-maze/ medium
fun nearestExit(maze: Array<CharArray>, entrance: IntArray): Int {
val queue = ArrayDeque<Pair<Int, Int>>()
queue.add(entrance[1] to entrance[0])
maze[entrance[0]][entrance[1]] = 'x'
var steps = 1
val directions = intArrayOf(-1, 0, 1, 0, -1)
while(queue.isNotEmpty()) {
repeat(queue.size){
val (x, y) = queue.poll()
for (i in 1..directions.lastIndex) {
val nx = x + directions[i-1]
val ny = y + directions[i]
if (nx in 0..maze[0].lastIndex &&
ny in 0..maze.lastIndex &&
maze[ny][nx] == '.') {
if (nx == 0 ||
ny == 0 ||
nx == maze[0].lastIndex ||
ny == maze.lastIndex) return steps
maze[ny][nx] = 'x'
queue.add(nx to ny)
}
}
}
steps++
}
return -1
}
Just do BFS.
- we can modify input matrix, so we can use it as visited array
Complexity: O(N), N - number of cells in maze Memory: O(N)
20.11.2022
https://leetcode.com/problems/basic-calculator/ hard
fun calculate(s: String): Int {
var i = 0
var sign = 1
var eval = 0
while (i <= s.lastIndex) {
val chr = s[i]
if (chr == '(') {
//find the end
var countOpen = 0
for (j in i..s.lastIndex) {
if (s[j] == '(') countOpen++
if (s[j] == ')') countOpen--
if (countOpen == 0) {
//evaluate substring
eval += sign * calculate(s.substring(i+1, j)) // [a b)
sign = 1
i = j
break
}
}
} else if (chr == '+') {
sign = 1
} else if (chr == '-') {
sign = -1
} else if (chr == ' ') {
//nothing
} else {
var num = (s[i] - '0').toInt()
for (j in (i+1)..s.lastIndex) {
if (s[j].isDigit()) {
num = num * 10 + (s[j] - '0').toInt()
i = j
} else break
}
eval += sign * num
sign = 1
}
i++
}
return eval
}
This is a classic calculator problem, nothing special.
- be careful with the indexes
Complexity: O(N) Memory: O(N), because of the recursion, worst case is all the input is brackets
19.11.2022
https://leetcode.com/problems/erect-the-fence/ hard
fun outerTrees(trees: Array<IntArray>): Array<IntArray> {
if (trees.size <= 3) return trees
trees.sortWith(Comparator { a, b -> if (a[0]==b[0]) a[1]-b[1] else a[0] - b[0]} )
fun cmp(a: IntArray, b: IntArray, c: IntArray): Int {
val xab = b[0] - a[0]
val yab = b[1] - a[1]
val xbc = c[0] - b[0]
val ybc = c[1] - b[1]
return xab*ybc - yab*xbc
}
val up = mutableListOf<IntArray>()
val lo = mutableListOf<IntArray>()
trees.forEach { curr ->
while(up.size >= 2 && cmp(up[up.size-2], up[up.size-1], curr) < 0) up.removeAt(up.lastIndex)
while(lo.size >= 2 && cmp(lo[lo.size-2], lo[lo.size-1], curr) > 0) lo.removeAt(lo.lastIndex)
up.add(curr)
lo.add(curr)
}
return (up+lo).distinct().toTypedArray()
}
This is an implementation of the Andrew’s monotonic chain algorithm.
- need to remember vector algebra equation for ccw (counter clockwise) check (see here)
- don’t forget to sort by x and then by y
Complexity: O(Nlog(N)) Memory: O(N)
18.11.2022
https://leetcode.com/problems/ugly-number/ easy
fun isUgly(n: Int): Boolean {
if (n <= 0) return false
var x = n
while(x%2==0) x = x/2
while(x%3==0) x = x/3
while(x%5==0) x = x/5
return x == 1
}
There is also a clever math solution, but I don’t understand it yet.
Complexity: O(log(n)) Memory: O(1)
17.11.2022
https://leetcode.com/problems/rectangle-area/ middle
class Solution {
class P(val x: Int, val y: Int)
class Rect(val l: Int, val t: Int, val r: Int, val b: Int) {
val corners = arrayOf(P(l, t), P(l, b), P(r, t), P(r, b))
val s = (r - l) * (t - b)
fun contains(p: P) = p.x in l..r && p.y in b..t
fun intersect(o: Rect): Rect {
val allX = intArrayOf(l, r, o.l, o.r).apply { sort() }
val allY = intArrayOf(b, t, o.b, o.t).apply { sort() }
val r = Rect(allX[1], allY[2], allX[2], allY[1])
return if (r.corners.all { contains(it) && o.contains(it)})
r else Rect(0,0,0,0)
}
}
fun computeArea(ax1: Int, ay1: Int, ax2: Int, ay2: Int, bx1: Int, by1: Int, bx2: Int, by2: Int): Int {
val r1 = Rect(ax1, ay2, ax2, ay1)
val r2 = Rect(bx1, by2, bx2, by1)
return r1.s + r2.s - r1.intersect(r2).s
}
}
This is an OOP problem. One trick to write intersection function is to notice that all corners of intersection rectangle must be inside both rectangles. Also, intersection rectangle formed from middle coordinates of all corners sorted by x and y.
Complexity: O(1) Memory: O(1)
16.11.2022
https://leetcode.com/problems/guess-number-higher-or-lower/ easy
override fun guessNumber(n:Int):Int {
var lo = 1
var hi = n
while(lo <= hi) {
val pick = lo + (hi - lo)/2
val answer = guess(pick)
if (answer == 0) return pick
if (answer == -1) hi = pick - 1
else lo = pick + 1
}
return lo
}
This is a classic binary search algorithm. The best way of writing it is:
- use safe mid calculation (lo + (hi - lo)/2)
- use lo <= hi instead of lo < hi and mid+1/mid-1 instead of mid
Complexity: O(log(N)) Memory: O(1)
15.11.2022
https://leetcode.com/problems/count-complete-tree-nodes/ medium
x
* x
* * x
* x * x
* x x x x * x x
\
on each node we can check it's left and right depths
this only takes us O(logN) time on each step
there are logN steps in total (height of the tree)
so the total time complexity is O(log^2(N))
fun countNodes(root: TreeNode?): Int {
var hl = 0
var node = root
while (node != null) {
node = node.left
hl++
}
var hr = 0
node = root
while (node != null) {
node = node.right
hr++
}
return when {
hl == 0 -> 0
hl == hr -> (1 shl hl) - 1
else -> 1 +
(root!!.left?.let {countNodes(it)}?:0) +
(root!!.right?.let {countNodes(it)}?:0)
}
}
Complexity: O(log^2(N)) Memory: O(logN)
14.11.2022
https://leetcode.com/problems/most-stones-removed-with-same-row-or-column/ medium
From observing the problem, we can see, that the task is in fact is to find an isolated islands:
// * 3 * * 3 * * * *
// 1 2 * -> * * * or 1 * *
// * * 4 * * 4 * * 4
// * 3 * * * *
// 1 2 5 -> * * *
// * * 4 * * 4
fun removeStones(stones: Array<IntArray>): Int {
val uf = IntArray(stones.size) { it }
var rootsCount = uf.size
fun root(a: Int): Int {
var x = a
while (uf[x] != x) x = uf[x]
return x
}
fun union(a: Int, b: Int) {
val rootA = root(a)
val rootB = root(b)
if (rootA != rootB) {
uf[rootA] = rootB
rootsCount--
}
}
val byY = mutableMapOf<Int, MutableList<Int>>()
val byX = mutableMapOf<Int, MutableList<Int>>()
stones.forEachIndexed { i, st ->
byY.getOrPut(st[0], { mutableListOf() }).add(i)
byX.getOrPut(st[1], { mutableListOf() }).add(i)
}
byY.values.forEach { list ->
if (list.size > 1)
for (i in 1..list.lastIndex) union(list[0], list[i])
}
byX.values.forEach { list ->
if (list.size > 1)
for (i in 1..list.lastIndex) union(list[0], list[i])
}
return stones.size - rootsCount
}
Complexity: O(N) Memory: O(N)
13.11.2022
https://leetcode.com/problems/reverse-words-in-a-string/ medium
A simple trick: reverse all the string, then reverse each word.
fun reverseWords(s: String): String {
val res = StringBuilder()
val curr = Stack<Char>()
(s.lastIndex downTo 0).forEach { i ->
val c = s[i]
if (c in '0'..'z') curr.push(c)
else if (curr.isNotEmpty()) {
if (res.length > 0) res.append(' ')
while (curr.isNotEmpty()) res.append(curr.pop())
}
}
if (curr.isNotEmpty() && res.length > 0) res.append(' ')
while (curr.isNotEmpty()) res.append(curr.pop())
return res.toString()
}
Complexity: O(N) Memory: O(N) - there is no O(1) solution for string in JVM
12.11.2022
https://leetcode.com/problems/find-median-from-data-stream/ hard
To find the median we can maintain two heaps: smaller and larger. One decreasing and one increasing. Peeking the top from those heaps will give us the median.
// [5 2 0] [6 7 10]
// dec inc
// ^ peek ^ peek
class MedianFinder() {
val queDec = PriorityQueue<Int>(reverseOrder())
val queInc = PriorityQueue<Int>()
fun addNum(num: Int) {
if (queDec.size == queInc.size) {
queInc.add(num)
queDec.add(queInc.poll())
} else {
queDec.add(num)
queInc.add(queDec.poll())
}
}
fun findMedian(): Double = if (queInc.size == queDec.size)
(queInc.peek() + queDec.peek()) / 2.0
else
queDec.peek().toDouble()
}
Complexity: O(NlogN) Memory: O(N)
11.11.2022
https://leetcode.com/problems/remove-duplicates-from-sorted-array/ easy
Just do what is asked. Keep track of the pointer to the end of the “good” part.
fun removeDuplicates(nums: IntArray): Int {
var k = 0
for (i in 1..nums.lastIndex) {
if (nums[k] != nums[i]) nums[++k] = nums[i]
}
return k + 1
}
Complexity: O(N) Memory: O(1)
10.11.2022
https://leetcode.com/problems/remove-all-adjacent-duplicates-in-string/ easy
Solution:
fun removeDuplicates(s: String): String {
val stack = Stack<Char>()
s.forEach { c ->
if (stack.isNotEmpty() && stack.peek() == c) {
stack.pop()
} else {
stack.push(c)
}
}
return stack.joinToString("")
}
Explanation: Just scan symbols one by one and remove duplicates from the end. Complexity: O(N) Memory: O(N)
9.11.2022
https://leetcode.com/problems/online-stock-span/ medium
So, we need to keep increasing sequence of numbers, increasing/decreasing stack will help. Consider example, this is how decreasing stack will work
// 100 [100-1] 1
// 80 [100-1, 80-1] 1
// 60 [100-1, 80-1, 60-1] 1
// 70 [100-1, 80-1, 70-2] + 60 2
// 60 [100-1, 80-1, 70-2, 60-1] 1
// 75 [100-1, 80-1, 75-4] + 70-2+60-1 4
// 85 [100-1, 85-6] 80-1+75-4 6
Solution:
class StockSpanner() {
val stack = Stack<Pair<Int,Int>>()
fun next(price: Int): Int {
// 100 [100-1] 1
// 80 [100-1, 80-1] 1
// 60 [100-1, 80-1, 60-1] 1
// 70 [100-1, 80-1, 70-2] + 60 2
// 60 [100-1, 80-1, 70-2, 60-1] 1
// 75 [100-1, 80-1, 75-4] + 70-2+60-1 4
// 85 [100-1, 85-6] 80-1+75-4 6
var span = 1
while(stack.isNotEmpty() && stack.peek().first <= price) {
span += stack.pop().second
}
stack.push(price to span)
return span
}
}
Complexity: O(N) Memory: O(N)
8.11.2022
https://leetcode.com/problems/make-the-string-great/ easy
fun makeGood(s: String): String {
var ss = s.toCharArray()
var finished = false
while(!finished) {
finished = true
for (i in 0 until s.lastIndex) {
if (ss[i] == '.') continue
var j = i+1
while(j <= s.lastIndex && ss[j] == '.') {
j++
continue
}
if (j == s.length) break
var a = ss[i]
var b = ss[j]
if (a != b && Character.toLowerCase(a) ==
Character.toLowerCase(b)) {
ss[i] = '.'
ss[j] = '.'
finished = false
}
}
}
return ss.filter { it != '.' }.joinToString("")
}
Explanation: The simplest solution is just to simulate all the process, as input string is just 100 symbols.
Speed: O(n^2) Memory: O(n)
7.11.2022
https://leetcode.com/problems/maximum-69-number/ easy
fun maximum69Number (num: Int): Int {
var n = num
if (6666 <= n && n <= 6999) return num + 3000
if (n > 9000) n -= 9000
if (666 <= n && n <= 699) return num + 300
if (n > 900) n -= 900
if (66 <= n && n <= 69) return num + 30
if (n > 90) n -= 90
if (6 == n) return num + 3
return num
}
Explanation: The simplest implementations would be converting to array of digits, replacing the first and converting back. However we can observe that numbers are in range 6-9999, so we can hardcode some logic.
Speed: O(1), Memory: O(1)
6.11.2022
https://leetcode.com/problems/orderly-queue/ hard
fun orderlyQueue(s: String, k: Int): String {
val chrs = s.toCharArray()
if (k == 1) {
var smallest = s
for (i in 0..s.lastIndex) {
val prefix = s.substring(0, i)
val suffix = s.substring(i)
val ss = suffix + prefix
if (ss.compareTo(smallest) < 0) smallest = ss
}
return smallest
} else {
chrs.sort()
return String(chrs)
}
}
O(n^2)
Explanation: One idea that come to my mind is: if k >= 2 then you basically can swap any adjacent elements. That means you can actually sort all the characters.
Speed: O(n^2), Memory: O(n)
6.11.2022
https://leetcode.com/problems/word-search-ii/ hard
Solution [kotlin]
class Node {
val next = Array<Node?>(26) { null }
var word: String? = null
operator fun invoke(c: Char): Node {
val ind = c.toInt() - 'a'.toInt()
if (next[ind] == null) next[ind] = Node()
return next[ind]!!
}
operator fun get(c: Char) = next[c.toInt() - 'a'.toInt()]
}
fun findWords(board: Array<CharArray>, words: Array<String>): List<String> {
val trie = Node()
words.forEach { w ->
var t = trie
w.forEach { t = t(it) }
t.word = w
}
val result = mutableSetOf<String>()
fun dfs(y: Int, x: Int, t: Node?, visited: MutableSet<Int>) {
if (t == null || y < 0 || x < 0
|| y >= board.size || x >= board[0].size
|| !visited.add(100 * y + x)) return
t[board[y][x]]?.let {
it.word?.let { result.add(it) }
dfs(y-1, x, it, visited)
dfs(y+1, x, it, visited)
dfs(y, x-1, it, visited)
dfs(y, x+1, it, visited)
}
visited.remove(100 * y + x)
}
board.forEachIndexed { y, row ->
row.forEachIndexed { x, c ->
dfs(y, x, trie, mutableSetOf<Int>())
}
}
return result.toList()
}
Explanation: Use trie + dfs
- Collect all the words into the Trie
- Search deeply starting from all the cells and advancing trie nodes
- Collect if node is the word
- Use set to avoid duplicates
Speed: O(wN + M), w=10, N=10^4, M=12^2 , Memory O(26w + N)
4.11.2022
https://leetcode.com/problems/reverse-vowels-of-a-string/ easy
Solution [kotlin]
fun reverseVowels(s: String): String {
val vowels = setOf('a', 'e', 'i', 'o', 'u', 'A', 'E', 'I', 'O', 'U')
var chrs = s.toCharArray()
var l = 0
var r = chrs.lastIndex
while(l < r) {
while(l<r && chrs[l] !in vowels) l++
while(l<r && chrs[r] !in vowels) r--
if (l < r) chrs[l] = chrs[r].also { chrs[r] = chrs[l] }
r--
l++
}
return String(chrs)
}
Explanation: Straightforward solution : use two pointers method and scan from the both sides.
Speed: O(N), Memory O(N)
3.11.2022
https://leetcode.com/problems/longest-palindrome-by-concatenating-two-letter-words/ medium
Solution [kotlin]
fun longestPalindrome(words: Array<String>): Int {
var singles = 0
var mirrored = 0
var uneven = 0
var unevenSum = 0
val visited = mutableMapOf<String, Int>()
words.forEach { w -> visited[w] = 1 + visited.getOrDefault(w, 0) }
visited.forEach { w, wCount ->
if (w[0] == w[1]) {
if (wCount %2 == 0) {
singles += wCount*2
} else {
// a b -> a
// a b a -> aba 2a + 1b = 2 + 1
// a b a b -> abba 2a + 2b = 2+2
// a b a b a -> baaab 3a + 2b = 3+2
// a b a b a b -> baaab 3a + 3b = 3+2 (-1)
// a b a b a b a -> aabbbaa 4a+3b=4+3
// a b a b a b a b -> aabbbbaa 4a+4b=4+4
// 5a+4b = 2+5+2
// 5a+5b = 2+5+2 (-1)
// 1c + 2b + 2a = b a c a b
// 1c + 3b + 2a =
// 1c + 3b + 4a = 2a + 3b + 2a
// 5d + 3a + 3b + 3c = a b c 5d c b a = 11
uneven++
unevenSum += wCount
}
} else {
val matchingCount = visited[w.reversed()] ?:0
mirrored += minOf(wCount, matchingCount)*2
}
}
val unevenCount = if (uneven == 0) 0 else 2*(unevenSum - uneven + 1)
return singles + mirrored + unevenCount
}
Explanation: This is a counting task, can be solved linearly. There are 3 cases:
- First count mirrored elements, “ab” <-> “ba”, they all can be included to the result
- Second count doubled letters “aa”, “bb”. Notice, that if count is even, they also can be splitted by half and all included.
- The only edge case is uneven part. The law can be derived by looking at the examples
Speed: O(N), Memory O(N)
2.11.2022
https://leetcode.com/problems/minimum-genetic-mutation/ medium
Solution [kotlin]
fun minMutation(start: String, end: String, bank: Array<String>): Int {
val wToW = mutableMapOf<Int, MutableList<Int>>()
fun searchInBank(i1: Int, w1: String) {
bank.forEachIndexed { i2, w2 ->
if (w1 != w2) {
var diffCount = 0
for (i in 0..7) {
if (w1[i] != w2[i]) diffCount++
}
if (diffCount == 1) {
wToW.getOrPut(i1, { mutableListOf() }).add(i2)
wToW.getOrPut(i2, { mutableListOf() }).add(i1)
}
}
}
}
bank.forEachIndexed { i1, w1 -> searchInBank(i1, w1) }
searchInBank(-1, start)
val queue = ArrayDeque<Int>()
queue.add(-1)
var steps = 0
while(queue.isNotEmpty()) {
repeat(queue.size) {
val ind = queue.poll()
val word = if (ind == -1) start else bank[ind]
if (word == end) return steps
wToW[ind]?.let { siblings ->
siblings.forEach { queue.add(it) }
}
}
steps++
if (steps > bank.size + 1) return -1
}
return -1
}
Explanation:
- make graph
- BFS in it
- stop search if count > bank, or we can use visited map
Speed: O(wN^2), Memory O(N)
1.11.2022
https://leetcode.com/problems/where-will-the-ball-fall/ medium
Solution [kotlin]
fun findBall(grid: Array<IntArray>): IntArray {
var indToBall = IntArray(grid[0].size) { it }
var ballToInd = IntArray(grid[0].size) { it }
grid.forEach { row ->
var nextIndToBall = IntArray(grid[0].size) { -1 }
var nextBallToInd = IntArray(grid[0].size) { -1 }
for (i in 0..row.lastIndex) {
val currBall = indToBall[i]
if (currBall != -1) {
val isCorner = row[i] == 1
&& i<row.lastIndex
&& row[i+1] == -1
|| row[i] == -1
&& i > 0
&& row[i-1] == 1
val newInd = i + row[i]
if (!isCorner && newInd >= 0 && newInd <= row.lastIndex) {
nextIndToBall[newInd] = currBall
nextBallToInd[currBall] = newInd
}
}
}
indToBall = nextIndToBall
ballToInd = nextBallToInd
}
return ballToInd
}
Explanation: This is a geometry problem, but seeing the pattern might help. We can spot that each row is an action sequence: -1 -1 -1 shifts balls left, and 1 1 1 shifts balls to the right. Corners can be formed only with -1 1 sequence.
31.10.2022
https://leetcode.com/problems/toeplitz-matrix/ easy
Solution [kotlin]
fun isToeplitzMatrix(matrix: Array<IntArray>): Boolean =
matrix
.asSequence()
.windowed(2)
.all { (prev, curr) -> prev.dropLast(1) == curr.drop(1) }
Explanation: just compare adjacent rows, they must have an equal elements except first and last
]]>

 Thinking about what to do with it.


 Heap size for View - 1.5M vs Compose - 2.7M
This is the basic difference with just one view. Twice as much, but not critical for modern devices.
Heap size for View - 1.5M vs Compose - 2.7M
This is the basic difference with just one view. Twice as much, but not critical for modern devices. View 723M vs Compose 26778M
You can see how memory usage significantly increases depending on the number of elements in compose.
View 723M vs Compose 26778M
You can see how memory usage significantly increases depending on the number of elements in compose.
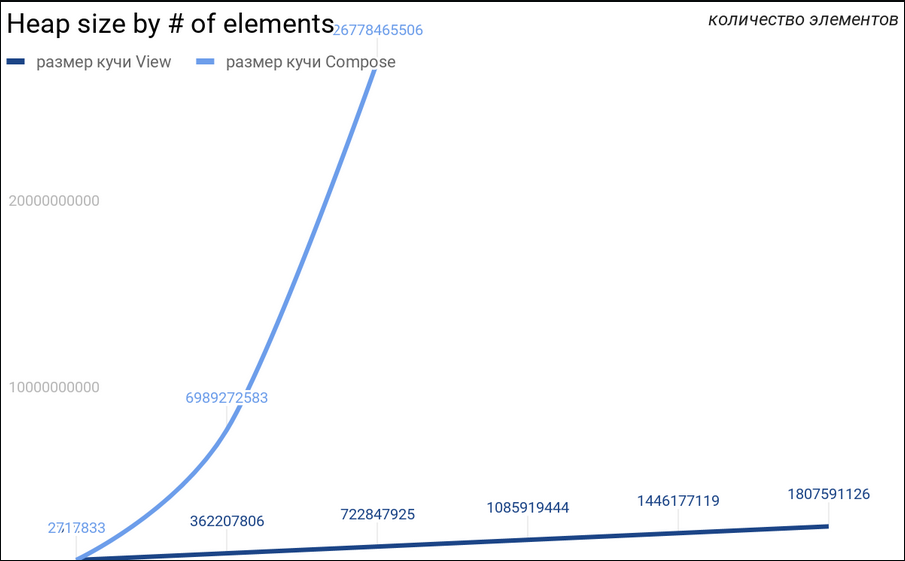 Memory usage for View grows linearly, which is not the case for Compose.